Kylin源码分析系列一—任务调度
Kylin源码分析系列一—任务调度
注:Kylin源码分析系列基于Kylin的2.5.0版本的源码,其他版本可以类比。
一. 相关介绍
Kylin在Web上触发Cube的相关操作后并不是马上执行相关的操作,而是将构建的任务提交到任务调度服务,任务调度服务每隔一段时间会将提交了未执行的job进行调度执行,默认是30s调度一次,可根据配置项kylin.job.scheduler.poll-interval-second来配置调度时间间隔。
任务调度服务的服务类为JobService,包路径:org.apache.kylin.rest.service.JobService。JobService是通过实现InitializingBean接口,继而实现afterPropertiesSet的方法 ,然后通过配置spring加载bean的方式被初始化的;具体是通过配置文件来装配bean的,涉及到的配置文件有:在./tomcat/webapps/kylin/WEB-INF/web.xml中引入了./tomcat/webapps/kylin/WEB-INF/classes/applicationContext.xml,然后在applicationContext.xml中配置有:
然后spring去扫描目录org.apache.kylin.rest下的标有@Component的类,并注册成bean。由于JobService是通过实现InitializingBean接口,继而实现afterPropertiesSet的方法来初始化bean的,所以在JobService这个bean被初始化的时候,afterPropertiesSet会被调用执行,继而实现JobService的初始化,kylin中的其他服务也是这要被初始化的。
二. 源码分析
下面看下源码:
任务调度服务初始化:
public void afterPropertiesSet() throws Exception {
    String timeZone = getConfig().getTimeZone();
    TimeZone tzone = TimeZone.getTimeZone(timeZone);
    TimeZone.setDefault(tzone);
    final KylinConfig kylinConfig = KylinConfig.getInstanceFromEnv();

    //获取配置的任务调度器,默认为org.apache.kylin.job.impl.threadpool.DefaultScheduler

    final Scheduler scheduler = (Scheduler) SchedulerFactory
            .scheduler(kylinConfig.getSchedulerType());
    new Thread(new Runnable() {
        @Override
        public void run() {
            try {
                //调度服务初始化
                scheduler.init(new JobEngineConfig(kylinConfig), new ZookeeperJobLock());
                if (!scheduler.hasStarted()) {
                    logger.info("scheduler has not been started");
                }
            } catch (Exception e) {
                throw new RuntimeException(e);
            }
        }
    }).start();

    Runtime.getRuntime().addShutdownHook(new Thread(new Runnable() {
        @Override
        public void run() {
            try {
                scheduler.shutdown();
            } catch (SchedulerException e) {
                logger.error("error occurred to shutdown scheduler", e);
            }
        }
    }));
}
Kylin的任务调度器有三种:
public Map getSchedulers() {

    Map r = Maps.newLinkedHashMap();

    r.put(0, "org.apache.kylin.job.impl.threadpool.DefaultScheduler");

    r.put(2, "org.apache.kylin.job.impl.threadpool.DistributedScheduler");

    r.put(77, "org.apache.kylin.job.impl.threadpool.NoopScheduler");

    r.putAll(convertKeyToInteger(getPropertiesByPrefix("kylin.job.scheduler.provider.")));

    return r;

} 通过配置项kylin.job.scheduler.default来配置,默认配置为0,即为DefaultScheduler,下面回到任务调度服务的初始化,调用DefaultScheduler的init方法:
public synchronized void init(JobEngineConfig jobEngineConfig, JobLock lock) throws SchedulerException {

    jobLock = lock;
    String serverMode = jobEngineConfig.getConfig().getServerMode();
    //只有服务模式为job和all的需要运行任务调度服务,query不需要
    if (!("job".equals(serverMode.toLowerCase()) || "all".equals(serverMode.toLowerCase()))) {
        logger.info("server mode: " + serverMode + ", no need to run job scheduler");
        return;

    }
    logger.info("Initializing Job Engine ....");

    if (!initialized) {
        initialized = true;
    } else {
        return;
    }

    this.jobEngineConfig = jobEngineConfig;

    if (jobLock.lockJobEngine() == false) {
        throw new IllegalStateException("Cannot start job scheduler due to lack of job lock");
    }
    executableManager = ExecutableManager.getInstance(jobEngineConfig.getConfig());

    //load all executable, set them to a consistent status
    fetcherPool = Executors.newScheduledThreadPool(1);
    int corePoolSize = jobEngineConfig.getMaxConcurrentJobLimit();
    jobPool = new ThreadPoolExecutor(corePoolSize, corePoolSize, Long.MAX_VALUE, TimeUnit.DAYS,
            new SynchronousQueue());
    context = new DefaultContext(Maps. newConcurrentMap(), jobEngineConfig.getConfig());
    logger.info("Staring resume all running jobs.");
    executableManager.resumeAllRunningJobs();
    logger.info("Finishing resume all running jobs.");

    //获取调度时间间隔,
    int pollSecond = jobEngineConfig.getPollIntervalSecond();
    logger.info("Fetching jobs every {} seconds", pollSecond);
    JobExecutor jobExecutor = new JobExecutor() {

        @Override
        public void execute(AbstractExecutable executable) {

            jobPool.execute(new JobRunner(executable));
        }

    };
    //判断任务调度是否考虑优先级,默认不考虑,即使用DefaultFetcherRunner
    fetcher = jobEngineConfig.getJobPriorityConsidered()
            ? new PriorityFetcherRunner(jobEngineConfig, context, executableManager, jobExecutor)
            : new DefaultFetcherRunner(jobEngineConfig, context, executableManager, jobExecutor);
    logger.info("Creating fetcher pool instance:" + System.identityHashCode(fetcher));

    //每隔pollSecond去获取一次任务
    fetcherPool.scheduleAtFixedRate(fetcher, pollSecond / 10, pollSecond, TimeUnit.SECONDS);
    hasStarted = true;

} 下面间隔性的执行DefaultFetcherRunner的run方法:
synchronized public void run() {

    try (SetThreadName ignored = new SetThreadName(//
            "FetcherRunner %s", System.identityHashCode(this))) {//
        // logger.debug("Job Fetcher is running...");
        Map runningJobs = context.getRunningJobs();
        // 任务调度池是否满了,默认只能同时执行10个job
        if (isJobPoolFull()) {
            return;
        }
        ......
        //获取索引的job
        for (final String id : executableManager.getAllJobIds()) {
            ......
            //根据任务id获取具体的任务
            final AbstractExecutable executable = executableManager.getJob(id);
            ......
            //添加任务到任务调度池
            addToJobPool(executable, executable.getDefaultPriority());
        }
      ......
    }
} 主要看下是从哪获取到的所有的job,上面是调用executableManager.getAllJobIds()来获取所有的任务id的,下面看下这个函数:
public List getJobIds() throws PersistentException {

    try {
        NavigableSet resources = store.listResources(ResourceStore.EXECUTE_RESOURCE_ROOT);
        if (resources == null) {
            return Collections.emptyList();
        }

        ArrayList result = Lists.newArrayListWithExpectedSize(resources.size());
        for (String path : resources) {
            result.add(path.substring(path.lastIndexOf("/") + 1));
        }
        return result;
    } catch (IOException e) {
        logger.error("error get all Jobs:", e);
        throw new PersistentException(e);
    }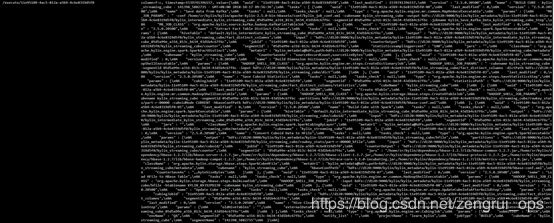
} store.listResources 到存储kylin元数据的数据库获取以“/execute”开始的元数据条目,然后截取出任务的id,接着调用executableManager.getJob(id)来获取具体的任务信息,依然是到存储kylin元数据的数据库中获取,数据库中的任务的元数据条目如下所示(使用的hbase存储的元数据):
最后调用addToJobPool将任务添加到任务调度池:
protected void addToJobPool(AbstractExecutable executable, int priority) {

    String jobDesc = executable.toString();
    logger.info(jobDesc + " prepare to schedule and its priority is " + priority);
    try {
        context.addRunningJob(executable);
        //提交任务到调度池中执行
        jobExecutor.execute(executable);
        logger.info(jobDesc + " scheduled");
    } catch (Exception ex) {
        context.removeRunningJob(executable);
        logger.warn(jobDesc + " fail to schedule", ex);
    }
}回到DefaultScheduler中的init函数中的jobExecutor,最终调用JobRunner的run方法来执行任务,主要是调用executable.execute(context),kylin中的具体任务都是继承类AbstractExecutable,如果重写了execute方法,就调用具体任务的execute方法来执行相应的任务,如果未重写execute方法,则调用AbstractExecutable中的execute方法,然后调用doWork来执行任务,spark的相关任务的任务类型是SparkExecutable,该类继承自AbstractExecutable,自己实现了doWork方法来提交spark任务,spark任务提交运行的主类为SparkEntry,调用main方法,然后调用AbstractApplication的execute方法,最后调用具体任务类的execute方法运行。上面就是kylin中任务调度的相关代码,下面看下任务是怎么提交到任务调度服务的。
任务提交最终要调用到JobService中submitJobInternal方法,这个方法中最终调用getExecutableManager().addJob(job)来提交任务(这里的job是一个DefaultChainedExecutable的实例,里面包含各种Executable类型的task),这里的getExecutableManager获取了ExecutableManager的单例,然后调用addJob来提交任务,然后调用executableDao.addJob(parse(executable)),接着调用writeJobResource(pathOfJob(job), job)将job信息序列化后存入元数据数据库表中。