SpringBoot 入门(七)——JavaMail 发送邮件
发送邮件,不论是给开发人员发送日志,还是给用户发送一些信息都有可能有这种需求,Sun 公司提供的 JavaMail 可以很方便的使用 Java 代码通过 SMTP 服务器来发送邮件。
一 添加依赖
            com.sun.mail
            javax.mail
            1.6.2
注意如果是 Java EE 的工程的话 groupId 可以是 javax.mail,但如果是 SpringBoot 工程则 groupId 需要是 com.sun.mail。
二 邮件实体类
定义这个实体类只是为了简单封装一下,使用起来更方便。
package com.qinshou.springbootdemo.bean;

import java.io.Serializable;
import java.util.List;

/**
 * Description:邮件实体类
 * Author: QinHao
 * Date: 2019/8/6 17:40
 */
public class EMailBean implements Serializable {
    /**
     * 标题
     */
    private String title;
    /**
     * 内容
     */
    private String content;
    /**
     * 内容
     */
    private ContentType contentType;
    /**
     * 内容
     */
    private List toAddressList;

    public EMailBean(String title, String content, ContentType contentType, List toAddressList) {
        this.title = title;
        this.content = content;
        this.contentType = contentType;
        this.toAddressList = toAddressList;
    }

    public enum ContentType {
        HTML("text/html;charset=utf-8"),
        TEXT("text");
        private String value;

        ContentType(String value) {
            this.value = value;
        }

        public String getValue() {
            return value;
        }
    }

    @Override
    public String toString() {
        return "EMailBean{" +
                "title='" + title + '\'' +
                ", content='" + content + '\'' +
                ", contentType=" + contentType +
                ", toAddressList=" + toAddressList +
                '}';
    }

    public String getTitle() {
        return title;
    }

    public void setTitle(String title) {
        this.title = title;
    }

    public String getContent() {
        return content;
    }

    public void setContent(String content) {
        this.content = content;
    }

    public ContentType getContentType() {
        return contentType;
    }

    public void setContentType(ContentType contentType) {
        this.contentType = contentType;
    }

    public List getToAddressList() {
        return toAddressList;
    }

    public void setToAddressList(List toAddressList) {
        this.toAddressList = toAddressList;
    }
}
三 邮件工具类
package com.qinshou.springbootdemo.util;

import com.qinshou.springbootdemo.bean.EMailBean;

import java.io.UnsupportedEncodingException;
import java.util.Locale;
import java.util.Properties;
import java.util.ResourceBundle;

import javax.mail.Authenticator;
import javax.mail.Message;
import javax.mail.MessagingException;
import javax.mail.PasswordAuthentication;
import javax.mail.Session;
import javax.mail.Transport;
import javax.mail.internet.InternetAddress;
import javax.mail.internet.MimeMessage;
import javax.mail.internet.MimeUtility;

/**
 * Description:邮件工具类
 * Author: QinHao
 * Date: 2019/8/13 13:58
 */
public class EmailUtil {
    public static void send(EMailBean eMailBean) throws UnsupportedEncodingException, MessagingException {
        ResourceBundle resourceBundle = ResourceBundle.getBundle("email", new Locale("zh", "CN"));

        Properties properties = new Properties();
        // 设置需要验证
        properties.put("mail.smtp.auth", "true");
        // 设置 SMTP 主机
        properties.put("mail.smtp.host", resourceBundle.getString("mail.smtp.host"));
        // 设置 SMTP 端口
        properties.put("mail.smtp.port", resourceBundle.getString("mail.smtp.port"));
        // 设置发信人用户名
        properties.put("mail.user", resourceBundle.getString("mail.user"));
        // 设置发信人密码
        properties.put("mail.password", resourceBundle.getString("mail.password"));
        // 用户名和密码验证
        Authenticator authenticator = new Authenticator() {
            @Override
            protected PasswordAuthentication getPasswordAuthentication() {
                String username = properties.getProperty("mail.user");
                String password = properties.getProperty("mail.password");
                return new PasswordAuthentication(username, password);
            }
        };
        // 创建一个邮件会话
        Session session = Session.getInstance(properties, authenticator);
//        session.setDebug(true);
        MimeMessage mimeMessage = new MimeMessage(session);
        // 设置发信人昵称
        String nickname = MimeUtility.encodeText(resourceBundle.getString("mail.from.nickname"));
        InternetAddress from = new InternetAddress(nickname + "<" + properties.getProperty("mail.user") + ">");
        mimeMessage.setFrom(from);
        mimeMessage.setSubject(eMailBean.getTitle());
        // 设置内容类型
        if (eMailBean.getContentType() == EMailBean.ContentType.HTML) {
            mimeMessage.setContent(eMailBean.getContent(), eMailBean.getContentType().getValue());
        } else {
            mimeMessage.setText(eMailBean.getContent());
        }
        // 遍历列表,依次发送
        for (String toAddress : eMailBean.getToAddressList()) {
            InternetAddress to = new InternetAddress(toAddress);
            mimeMessage.setRecipient(Message.RecipientType.TO, to);
            Transport.send(mimeMessage);
        }
    }
}
这个类中主要做的就是读取配置文件,然后设置 SMTP 服务器的地址和发信人的信息等,代码中有些注释,可以结合着看。
四 配置文件
# SMTP 服务
mail.smtp.host=smtp.126.com
# SMTP 服务端口
mail.smtp.port=25
# 发信人邮箱账号
[email protected]
# 发信人邮箱授权密码,注意不是登录密码
mail.password=xxxx
# 发信人昵称
mail.from.nickname=禽兽先生
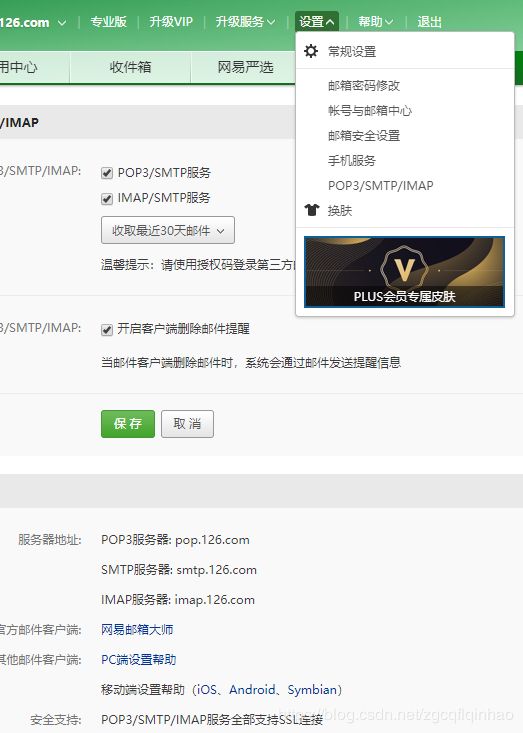
我是使用 126 的网易邮箱进行的测试,不同邮箱的 SMTP 服务器不一样,端口也不一样,而且 126 更坑的是都没有说明这个服务端口是多少,QQ 邮箱好歹还能查到一点帮助信息,QQ 邮箱的 SMTP 发送服务器为 smtp.qq.com,端口为 465或587。
如何去开通这个 IMAP/SMTP 服务,都可以在设置中找到,以 126 为例:
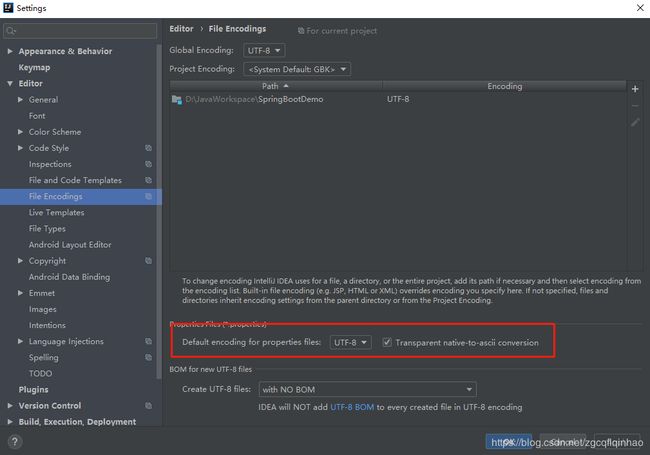
当这些基本信息配置好后,通过上面的工具类就可以发送测试邮件了。但是一般情况下,收到测试邮件都会看到收信人昵称和主题那里都是乱码,这个需要在 IDEA 中设置一下。
五 解决乱码
IDEA 中 File-->Settings-->Editor-->File encodings,找到下面的地方,改成 UTF-8,并勾上后面的选项:

