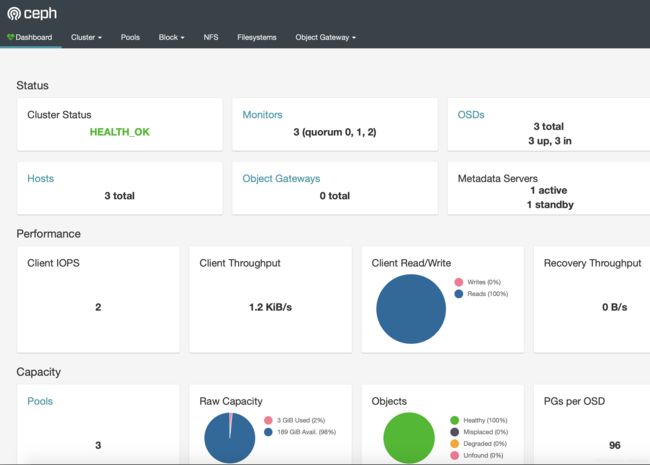
Kubernetes使用Rook部署Ceph存储集群
简单说明:
- 本实验内容参考于官方文档:https://rook.io/docs/rook/v1.2/
- 依据《CentOS7使用KubeSpray搭建多节点K8S集群》部署一个3个节点的K8S集群
- 每个节点增加一块存储设备/dev/sdb
- K8S版本为v1.16.7,Rook版本为v1.2
适应性变更:
-
以下变更在所有节点上均实施
-
更改原时间同步方案
crontab -l>/tmp/crontab.tmp
sed -i 's/.*ntpdate/# &/g' /tmp/crontab.tmp
cat /tmp/crontab.tmp |crontab
rm -rf /tmp/crontab.tmp
yum -y install chrony
systemctl enable chronyd && systemctl start chronyd
timedatectl status
timedatectl set-local-rtc 0
systemctl restart rsyslog && systemctl restart crond
- 确保安装了lvm2
yum -y install lvm2
- 启用rbd模块
modprobe rbd
cat > /etc/rc.sysinit << EOF
#!/bin/bash
for file in /etc/sysconfig/modules/*.modules
do
  [ -x \$file ] && \$file
done
EOF
cat > /etc/sysconfig/modules/rbd.modules << EOF
modprobe rbd
EOF
chmod 755 /etc/sysconfig/modules/rbd.modules
lsmod |grep rbd
- 内核升级
# CephFS需要内核版本在4.17以上
# 使用ml版本来代替原来的lt版本,ml版本是稳定版,lt版本是长期支持版
# 目前ml版本已经到5.5.9
rpm -Uvh https://www.elrepo.org/elrepo-release-7.0-4.el7.elrepo.noarch.rpm
yum --enablerepo=elrepo-kernel install -y kernel-ml
grub2-set-default 0
reboot
uname -r
使用Rook部署Ceph集群
- 提前拉取镜像
# 各个节点均拉取镜像
docker pull registry.cn-hangzhou.aliyuncs.com/vinc-auto/ceph:v1.2.6
docker pull registry.cn-hangzhou.aliyuncs.com/vinc-auto/ceph:v14.2.8
docker pull registry.cn-hangzhou.aliyuncs.com/vinc-auto/csi-node-driver-registrar:v1.2.0
docker pull registry.cn-hangzhou.aliyuncs.com/vinc-auto/csi-provisioner:v1.4.0
docker pull registry.cn-hangzhou.aliyuncs.com/vinc-auto/csi-attacher:v1.2.0
docker pull registry.cn-hangzhou.aliyuncs.com/vinc-auto/csi-snapshotter:v1.2.2
docker pull registry.cn-hangzhou.aliyuncs.com/vinc-auto/cephcsi:v1.2.2
# 需要手动将镜像做tag,否则依然会去远端下载
docker tag registry.cn-hangzhou.aliyuncs.com/vinc-auto/csi-node-driver-registrar:v1.2.0 quay.io/k8scsi/csi-node-driver-registrar:v1.2.0
docker tag registry.cn-hangzhou.aliyuncs.com/vinc-auto/csi-provisioner:v1.4.0 quay.io/k8scsi/csi-provisioner:v1.4.0
docker tag registry.cn-hangzhou.aliyuncs.com/vinc-auto/csi-attacher:v1.2.0 quay.io/k8scsi/csi-attacher:v1.2.0
docker tag registry.cn-hangzhou.aliyuncs.com/vinc-auto/csi-snapshotter:v1.2.2 quay.io/k8scsi/csi-snapshotter:v1.2.2
docker tag registry.cn-hangzhou.aliyuncs.com/vinc-auto/cephcsi:v1.2.2 quay.io/cephcsi/cephcsi:v1.2.2
- 修改master节点,使其能够创建pod
# Ceph集群需要3个节点,当前的K8S集群为3节点集群,因此需要在master节点上创建pod
# 如果K8S有至少3个worker节点,master节点不作为Ceph集群节点,则该操作不需要
kubectl get no -o yaml | grep taint -A 5
kubectl taint nodes --all node-role.kubernetes.io/master-
- 集群部署
# 在master节点上下载Rook部署Ceph集群
cd /tmp
git clone --single-branch --branch release-1.2 https://github.com/rook/rook.git
cd /tmp/rook/cluster/examples/kubernetes/ceph
kubectl create -f common.yaml
sed -i 's|rook/ceph:v1.2.6|registry.cn-hangzhou.aliyuncs.com/vinc-auto/ceph:v1.2.6|g' operator.yaml
kubectl create -f operator.yaml
kubectl -n rook-ceph get pod -o wide

# 默认的集群配置文件简单梳理:
# cluster.yaml 是生产存储集群配置,需要至少三个节点
# cluster-test.yaml 是测试集群配置,只需要一个节点
# cluster-minimal.yaml 仅仅会配置一个ceph-mon和一个ceph-mgr
# 修改集群配置文件,替换镜像,关闭所有节点和所有设备选择,手动指定节点和设备
sed -i 's|ceph/ceph:v14.2.8|registry.cn-hangzhou.aliyuncs.com/vinc-auto/ceph:v14.2.8|g' cluster.yaml
sed -i 's|useAllNodes: true|useAllNodes: false|g' cluster.yaml
sed -i 's|useAllDevices: true|useAllDevices: false|g' cluster.yaml
# 在storage标签的config:下添加配置
      metadataDevice:
      databaseSizeMB: "1024"
      journalSizeMB:  "1024"
    nodes:
    - name: "master01"
      devices:
      - name: "sdb"
      config:
        storeType: bluestore
    - name: "worker01"
      devices:
      - name: "sdb"
      config:
        storeType: bluestore
    - name: "worker02"
      devices:
      - name: "sdb"
      config:
        storeType: bluestore
# 注意,name不能够配置为IP,而应该是标签 kubernetes.io/hostname 的内容
kubectl get node
kubectl describe node master01|grep kubernetes.io/hostname
# 添加后的配置文件参见下图
# 集群创建
kubectl apply -f cluster.yaml
kubectl -n rook-ceph get pod -o wide

# 集群配置清除
kubectl -n rook-ceph delete cephcluster rook-ceph
kubectl -n rook-ceph get cephcluster
# 环境清除
# Ceph集群的所有节点均要清空相应的配置目录和抹除相应的存储设备数据并重启
# 否则再次部署集群时会出现各种问题导致集群部署失败
yum -y install gdisk
sgdisk --zap-all /dev/sdb
rm -rvf /var/lib/rook/*
reboot
部署Ceph工具
- Ceph集群部署后就可以使用相应的工具对集群进行查看和操纵,这些工具可以使用yum安装,也可以托管于k8s之上
# 部署托管于K8S的Ceph工具
cd /tmp/rook/cluster/examples/kubernetes/ceph
kubectl apply -f toolbox.yaml

# 简单检测Ceph集群状态
kubectl -n rook-ceph get pod -l "app=rook-ceph-tools"
NAME=$(kubectl -n rook-ceph get pod -l "app=rook-ceph-tools" -o jsonpath='{.items[0].metadata.name}')
kubectl -n rook-ceph exec -it ${NAME} sh
ceph status
ceph osd status
ceph osd df
ceph osd utilization
ceph osd pool stats
ceph osd tree
ceph pg stat
ceph df
rados df
exit

# 删除工具
kubectl -n rook-ceph delete deployment rook-ceph-tools
登陆 Ceph Dashboard
- 在Ceph集群配置文件中配置开启了dashboard,但是需要配置后才能进行登陆
# Dashboard默认是ClusterIP类型的,无法在k8s节点之外的主机访问,修改ClusterIP为NodePort
kubectl edit service rook-ceph-mgr-dashboard -n rook-ceph
# 查询对应的NodePort端口
kubectl -n rook-ceph get service rook-ceph-mgr-dashboard -o wide
# 获取登陆密码
Ciphertext=$(kubectl -n rook-ceph get secret rook-ceph-dashboard-password -o jsonpath="{['data']['password']}")
Pass=$(echo ${Ciphertext}|base64 --decode)
echo ${Pass}
# 浏览器以https协议访问集群节点相应的端口,登陆用户名为admin
块设备创建和测试
- Ceph能够为pod提供裸的块设备卷,定义在Ceph数据冗余级别的一个池中
# storageclass.yaml:
#   该配置文件为生产场景提供了3个副本,至少需要3个节点
#   数据会间歇性的在3个不同的k8s节点上复制,单节点故障不会造成数据的丢失或不可用
# storageclass-ec.yaml:
#   以纠错码来替代镜像达到数据持久性的功能,需要至少3个节点
#   Ceph的纠错码比镜像的效率更高,所以能够提供高可用性而无需3份镜像的代价
#   但会造成节点较高的编码解码计算,也就是会提高节点的cpu资源消耗
# storageclass-test.yaml:
#   测试场景,只需要单个节点,只有一份镜像,有数据丢失的风险
# 使用 csi/rbd 目录下的配置文间,csi是推荐的驱动,flex驱动不推荐使用
cd /tmp/rook/cluster/examples/kubernetes/ceph/csi/rbd
sed -i 's/failureDomain: host/failureDomain: osd/g' storageclass.yaml
kubectl apply -f storageclass.yaml
kubectl get sc -n rook-ceph

# 简单查看
kubectl -n rook-ceph get pod -l "app=rook-ceph-tools"
NAME=$(kubectl -n rook-ceph get pod -l "app=rook-ceph-tools" -o jsonpath='{.items[0].metadata.name}')
kubectl -n rook-ceph exec -it ${NAME} ceph status
kubectl -n rook-ceph exec -it ${NAME} ceph osd status
kubectl -n rook-ceph exec -it ${NAME} ceph osd df
- 测试
# 创建 Wordpress 进行测试
cd /tmp/rook/cluster/examples/kubernetes
sed -i 's|mysql:5.6|registry.cn-hangzhou.aliyuncs.com/vinc-auto/mysql:5.6|g' mysql.yaml
sed -i 's|wordpress:4.6.1-apache|registry.cn-hangzhou.aliyuncs.com/vinc-auto/wordpress:4.6.1-apache|g' wordpress.yaml
sed -i 's/LoadBalancer/NodePort/g' wordpress.yaml
kubectl create -f mysql.yaml
kubectl create -f wordpress.yaml

kubectl get pvc -o wide
kubectl get deploy -o wide
kubectl get pod -o wide
kubectl get service -o wide
kubectl get svc wordpress -o wide
# 浏览器访问 wordpress 进行部署

# 查看Ceph集群中的相关数据
kubectl -n rook-ceph get pod -l "app=rook-ceph-tools"
NAME=$(kubectl -n rook-ceph get pod -l "app=rook-ceph-tools" -o jsonpath='{.items[0].metadata.name}')
kubectl -n rook-ceph exec -it ${NAME} sh
ceph osd pool stats
rbd ls -p replicapool
rbd info replicapool/'csi-vol-a15dc75d-69a0-11ea-a3b7-2ef116ca54b6'
rbd info replicapool/'csi-vol-a18385ed-69a0-11ea-a3b7-2ef116ca54b6'
exit

# 删除测试环境
cd /tmp/rook/cluster/examples/kubernetes
kubectl delete -f wordpress.yaml
kubectl delete -f mysql.yaml
kubectl delete -n rook-ceph cephblockpools.ceph.rook.io replicapool
kubectl delete storageclass rook-ceph-block
CephFS创建和测试
- CephFS 允许用户挂载一个兼容posix的共享目录到多个主机,该存储和NFS共享存储以及CIFS共享目录相似
# filesystem.yaml: 3份副本的生产环境配置,需要至少3个节点
# filesystem-ec.yaml: 纠错码的生产环境配置,需要至少3个节点
# filesystem-test.yaml: 1份副本的测试环境,只需要一个节点
cd /tmp/rook/cluster/examples/kubernetes/ceph
sed -i 's/failureDomain: host/failureDomain: osd/g' filesystem.yaml
kubectl apply -f filesystem.yaml
kubectl -n rook-ceph get pod -l app=rook-ceph-mds

# 简单查看
kubectl -n rook-ceph get pod -l "app=rook-ceph-tools"
NAME=$(kubectl -n rook-ceph get pod -l "app=rook-ceph-tools" -o jsonpath='{.items[0].metadata.name}')
kubectl -n rook-ceph exec -it ${NAME} sh
ceph status
ceph osd lspools
ceph mds stat
ceph fs ls
exit
- 如果要使用CephFS,则必须先创建对应的storageclass
cd /tmp/rook/cluster/examples/kubernetes/ceph/csi/cephfs/
kubectl apply -f storageclass.yaml
- 测试
# 部署多个私有仓库共享同一个数据目录进行测试
docker pull registry:2
kubectl create -f kube-registry.yaml
# 在kube-system下创建了一个deployment作为私有仓库
# 将目录/var/lib/registry挂接到CephFS,并且是3个副本共享挂载的
kubectl get pod -n kube-system -l k8s-app=kube-registry -o wide
kubectl -n kube-system exec -it kube-registry-65df7d789d-9bwzn sh
df -hP|grep '/var/lib/registry'
cd /var/lib/registry
touch abc
exit
kubectl -n kube-system exec -it kube-registry-65df7d789d-sf55j ls /var/lib/registry

# 删除环境
cd /tmp/rook/cluster/examples/kubernetes/ceph/csi/cephfs/
kubectl delete -f kube-registry.yaml
kubectl delete -f storageclass.yaml
cd /tmp/rook/cluster/examples/kubernetes/ceph
kubectl delete -f filesystem.yaml
对象存储
- Ceph提供基于http的get、put、post和delete方式的blob数据存储,类似AWS的S3存储
- 这是一种类似于存储云的服务,本地环境用不上,不研究
使用Prometheus进行监控
- 依据《Kubernetes部署Prometheus+Grafana监控简录》部署Prometheus监控组件
cd /tmp/rook/cluster/examples/kubernetes/ceph/monitoring
# 在各个节点上下载镜像并tag,没有找到使用该镜像的配置文件
docker pull registry.cn-hangzhou.aliyuncs.com/vinc-auto/prometheus:v2.16.0
docker tag registry.cn-hangzhou.aliyuncs.com/vinc-auto/prometheus:v2.16.0 \
  quay.io/prometheus/prometheus:v2.16.0
kubectl create -f service-monitor.yaml
kubectl create -f prometheus.yaml
kubectl create -f prometheus-service.yaml
kubectl create -f rbac.yaml
kubectl create -f csi-metrics-service-monitor.yaml

# 查看运行状态
kubectl -n rook-ceph get pod prometheus-rook-prometheus-0

# 浏览器访问相应URL
echo "http://$(kubectl -n rook-ceph -o jsonpath={.status.hostIP} get pod prometheus-rook-prometheus-0):30900"

# 确保 metadata 标签中 name 为 rook-ceph,namespace 为 rook-ceph
# 确保 monitoring 标签中 enabled 为 true,rulesNamespace 为 rook-ceph
kubectl edit CephCluster rook-ceph -n rook-ceph

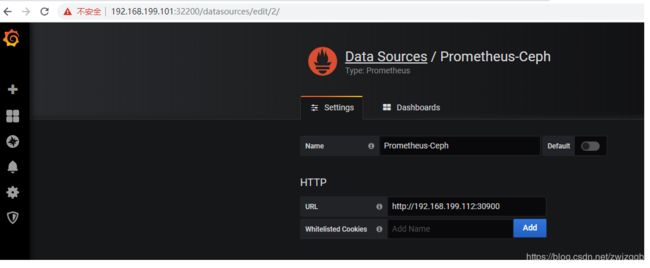
# 创建一个数据源 Prometheus-Ceph,相应的url为 http://192.168.199.112:30900

# 浏览器下载相应的模板json文件
# https://grafana.com/grafana/dashboards/2842
# https://grafana.com/grafana/dashboards/5336
# https://grafana.com/grafana/dashboards/5342
# 或者在grafana中搜索相应的ceph模板文件
# https://grafana.com/grafana/dashboards?search=ceph
# 以上模板文件都比较陈旧,很多监控项目已经不支持了,需要手动修正替换
# 将数据源指向 Prometheus-Ceph
[TOC]


