SpringSecurity OAuth2 授权码模式介绍
授权码模式简介:
- 用户访问第三方应用
- 第三方应用请求用户授权,将用户转至认证服务器,认证服务器认证之后,请求携带授权码 跳回到第三方应用(url中设置的redirect_uri)
- 第三方应用携带授权码,去向认证服务器申请令牌
- 认证服务器检查授权码无误后,发放令牌
- 第三方应用以后的请求,携带令牌访问即可
获取授权码的过程
客户端根据下面的参数来构造请求uri
-
response_type 必填,值是固定的,为"code"
-
client_id 必填 客户端id,与资源服务器上配置的客户端id中的一个吻合即可
-
redirect_uri 可选,跳转路径。即第三方往认证服务器请求授权,认证服务器响应后 回跳回来的地址
-
scope 范围 即拿到的授权码或token 可访问资源的范围
授权和令牌端点允许客户端指定 使用“范围”请求参数的访问请求的范围。然后,授权服务器使用“作用域”响应参数来 通知客户端已发出的访问令牌的范围。
如果颁发的访问令牌作用域 与客户要求的不同,授权服务器务在响应参数以通知 客户授予的实际范围
-
state 推荐
客户端用来维护 表示 请求和回调之间的状态的不透明值 。授权 服务器将用户代理重定向回时包括此值 给客户端。这个主要用来防止跨站点伪造请求
结合代码分析
<project xmlns="http://maven.apache.org/POM/4.0.0" xmlns:xsi="http://www.w3.org/2001/XMLSchema-instance"
         xsi:schemaLocation="http://maven.apache.org/POM/4.0.0 https://maven.apache.org/xsd/maven-4.0.0.xsd">
    <modelVersion>4.0.0modelVersion>
    <parent>
        <groupId>org.springframework.bootgroupId>
        <artifactId>spring-boot-starter-parentartifactId>
        <version>2.2.0.RELEASEversion>
        <relativePath/>
    parent>
    <groupId>com.wojiushiwogroupId>
    <artifactId>securityartifactId>
    <version>0.0.1-SNAPSHOTversion>
    <name>securityname>
    <description>Demo project for Spring Bootdescription>

    <properties>
        <java.version>1.8java.version>
    properties>

    <dependencies>
        <dependency>
            <groupId>org.springframework.bootgroupId>
            <artifactId>spring-boot-starter-securityartifactId>
        dependency>


        <dependency>
            <groupId>org.springframework.security.oauthgroupId>
            <artifactId>spring-security-oauth2artifactId>
            <version>2.0.14.RELEASEversion>
        dependency>
        <dependency>
            <groupId>org.springframework.bootgroupId>
            <artifactId>spring-boot-starter-webartifactId>
        dependency>
        <dependency>
            <groupId>org.projectlombokgroupId>
            <artifactId>lombokartifactId>
            <version>1.18.2version>
        dependency>
        <dependency>
            <groupId>org.springframework.bootgroupId>
            <artifactId>spring-boot-starter-jdbcartifactId>
        dependency>
        <dependency>
            <groupId>mysqlgroupId>
            <artifactId>mysql-connector-javaartifactId>
        dependency>
        <dependency>
            <groupId>org.apache.commonsgroupId>
            <artifactId>commons-lang3artifactId>
        dependency>
    dependencies>


project>
对于获取授权码、获取token、刷新token等操作,在Spring Security OAuth2中已经定义,对应的类在TokenEndPoint和AuthorizationEndpoint("/oauth/authorize"在该类)
首先需要访问/oauth/authorize获取授权码
@RequestMapping(value = "/oauth/authorize")
public ModelAndView authorize(Map<String, Object> model, @RequestParam Map<String, String> parameters,
			SessionStatus sessionStatus, Principal principal) {}
从该url方法的参数签名可以分析,parameters应该就是我们在前面说的需要构造的参数。principal,如果还有印象的话,表示认证过后的用户信息。
所以 从这里我们得出一个结论:第三方请求授权的用户必须登录完成,才能在认证服务器上换取授权码
在做demo时,通过断点发现,url即使直接请求的/oauth/authorize,也不是直接跳转到这个方法里。而是经过一系列的过滤器(比如这里用户需要登录完成,需要UserNamePasswordAuthenticationFilter等过滤器链)。过滤器链上某一环节出问题,都到不了请求授权码的接口方法。
所以 我们需要构造一个用户,可以在内存中也可以是JDBC的。并且我们需要对/oauth/authorize、/oauth/token等url放行,所以 SpringSecurity中这么配置:
@Configuration
@EnableWebSecurity
public class WebMvcSecurityConfig extends WebSecurityConfigurerAdapter {ß

    @Override
    protected void configure(HttpSecurity http) throws Exception {
        http.httpBasic().and()
           .requestMatchers()
          .anyRequest()
          .and().
          authorizeRequests().antMatchers("/oauth/*")
          .permitAll();

    }
}
因为前面提到了 前提条件是需要用户认证通过,所以我选择SpringSecurity默认的登录方式:httpBasic(不知道为什么formLogin()方式好像不起作用)
接下来 自定义一个UserDetailsService Bean 用户登录时会用到
@Component
public class MyUserDetailsService implements UserDetailsService {

    private Logger logger = LoggerFactory.getLogger(getClass());

    @Autowired
    private PasswordEncoder passwordEncoder;


    /**
     * 处理用户获取逻辑 UserDetailService
     * 可以将获取用户信息的逻辑写到loadUserByUserName中
     * 处理用户校验逻辑 UserDetails
     * User是UserDetails的实现 在这里可以为授权 即赋予当前用户 xx角色
     * 处理密码加密解密 PasswordEncoder
     *
     * @param username
     * @return
     * @throws UsernameNotFoundException
     */
    @Override
    public UserDetails loadUserByUsername(String username) throws UsernameNotFoundException {
        List<GrantedAuthority> authorityList = new ArrayList<>();
        authorityList.add(new SimpleGrantedAuthority("admin"));
//        authorityList.add(new SimpleGrantedAuthority("ROLE_USER"));
        //若填写明文密码,则默认的DaoAuthenticationProvider会进行校验 会使用passwordEncoder进行匹配密码,所以要指定一个passwordEncoder的Bean
        //AuthorityUtils.commaSeparatedStringToAuthorityList("admin,ROLE_USER")
        return new User(username, passwordEncoder.encode("123456"), authorityList);
    }

}
OAuth2 认证怎么少的了认证服务器和资源服务器呢?接下来 我们配置认证服务器和资源服务器
@Configuration
public class OAuth2ServiceConfig {
    @EnableResourceServer
    protected static class ResourceServerConfiguration {
 		//采用Spring Security OAuth2 默认配置
    }

    @EnableAuthorizationServer
    protected static class AuthorizationServerConfiguration extends AuthorizationServerConfigurerAdapter {


        @Override
        public void configure(ClientDetailsServiceConfigurer clients) throws Exception {
            BCryptPasswordEncoder bCryptPasswordEncoder = new BCryptPasswordEncoder();
            String finalPassword = bCryptPasswordEncoder.encode("123456");

						//1 表示client_id 第三方应用id
           //authorizedGrantTypes 表示支持的认证类型,分别对应TokenGranter的几种实现 在源码分析那里 我们在讨论
            clients.inMemory().withClient("1")
                    .authorizedGrantTypes("client_credentials", "refresh_token", "authorization_code")
                    .scopes("all")
                    .authorities("client")
                    .secret(finalPassword);
        }
    }
}
以上贴出来的代码即是授权码方式的主要代码了
贴图演示
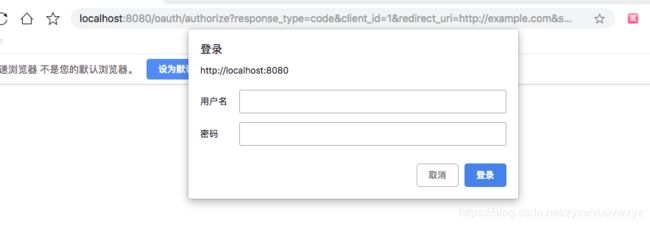
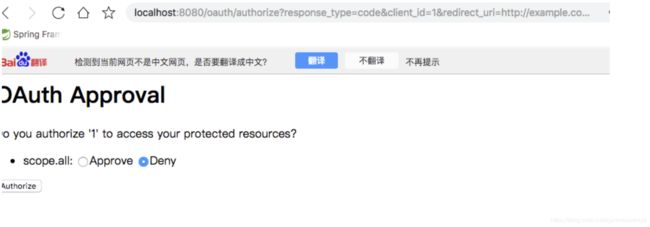
1、获取授权码:
http://localhost:8080/oauth/authorize?response_type=code&client_id=1&redirect_uri=http://example.com&scope=all
输入我们在代码中预设的账户信息,这里输入: wojiushiwo/123456
图中标注的就是获取到的授权码
下面根据授权码获取token
OAuth2官网关于授权码获取token
获取token的uri是/oauth/token
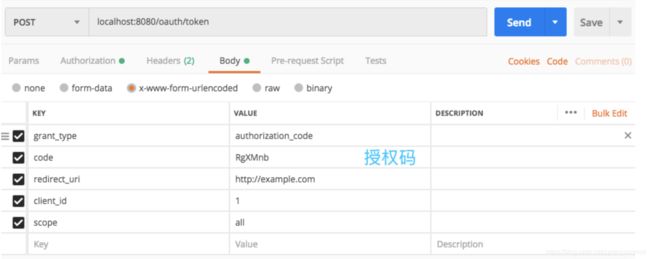
需要构造的参数:
- grant_type 必填 值为"authorization_code"
- code 必填 就是上面获取的授权码
- redirect_uri 必填,如果redirect_uri的值被包含在请求授权码的参数里,那么这里的值与那里的一致
- client_id 客户端id
		POST /token HTTP/1.1
     Host: server.example.com
     Authorization: Basic czZCaGRSa3F0MzpnWDFmQmF0M2JW
     Content-Type: application/x-www-form-urlencoded

     grant_type=authorization_code&code=SplxlOBeZQQYbYS6WxSbIA
     &redirect_uri=https%3A%2F%2Fclient%2Eexample%2Ecom%2Fcb
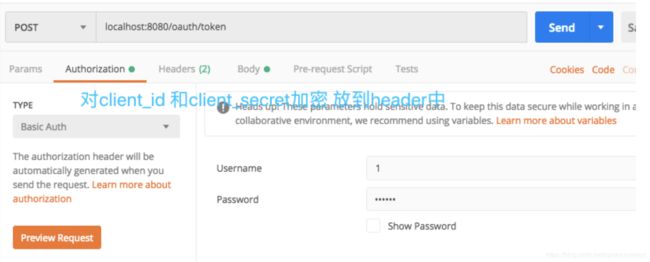
上面的是OAuth2 协议构造的请求,所以我们也要保住Conten-Type与之一致。另外Authentication这个是放到Header中的,是基于Http Basic认证的,是基于Base64加密的,待加密信息是client_id:client_secret
Authorization 是上面生成的。
响应结果如下:
{
    "access_token": "cf29d052-9e9a-407b-bb99-13d565111fa7",
    "token_type": "bearer",
    "refresh_token": "8ce92e4e-fc07-49d0-95f6-4fec91e4e770",
    "expires_in": 43199,
    "scope": "all"
}
后续 便可以拿着access_token来访问了。
比如我们访问一个/test 请求,从前面的配置可以发现 它是需要被验证的
curl http://localhost:8080/test\?access_token\=4b5b89fc-e3b0-4336-93be-c06e06e48033
输出:haha

不带着access_token:

curl http://localhost:8080/test
{"error":"unauthorized","error_description":"Full authentication is required to access this resource"}

Access is denied (user is anonymous); redirecting to authentication entry point
至此 基于授权码的OAuth2基础配置已经完毕。


