Android逆向实例笔记—同步家教王及其升级版的破解
一朋友让我来破解下一软件,我拿来一看是这玩意。我以为很难,结果发现没壳。兴趣就来了,弄了一天,就弄出来了。这里把过程和思路分享一下。其实很简单,大神一看就知道。因为这个没加壳,只是加了混淆的。
这算是我第一次破解玩玩整整的apk了。
然后我们就开始吧。
一、工具
这次我用的是AndroidKiller,感觉很不错的样子
然后就是我每次都要用的蓝叠
二、同步家教王
1.看情况
老规矩,还是先拖蓝叠看看情况
随便输了123,出现了激活码错误。我们记下来
2.反编译
这个就不多说了,前面说的够多了。直接拖进去,反编译就OK。
3.修改
我们先去string.xml中没有信息,然后转码搜索激活码错误
我们跳过去,看看源码。右键,查看-查看源码
package com.school.app.activity.login;

import android.os.Handler;
import android.os.Message;
import android.widget.Button;
import android.widget.EditText;
import android.widget.TextView;
import com.school.app.utils.SharedPreHandler;

class LoginActivity$3
  extends Handler
{
  LoginActivity$3(LoginActivity paramLoginActivity, String paramString) {}

  public void handleMessage(Message paramMessage)
  {
    try
    {
      if (paramMessage.obj != null)
      {
        paramMessage = ((String)paramMessage.obj).split("&");
        if (paramMessage[0].equals("yes"))
        {
          SharedPreHandler.getShared().setSharedPreKey("activation_code", this.val$text);
          SharedPreHandler.getShared().setSharedPreKey("activation_deviceId", LoginActivity.access$1(this.this$0));
          SharedPreHandler.getShared().setSharedPreKey("activation_model", LoginActivity.access$2(this.this$0));
          if (paramMessage[1].equals("-1")) {}
          for (paramMessage = "激活成功";; paramMessage = String.format(LoginActivity.access$3(this.this$0), new Object[] { paramMessage[1], paramMessage[2] }))
          {
            SharedPreHandler.getShared().setSharedPreKey("activation_msg", paramMessage);
            LoginActivity.access$4(this.this$0);
            this.this$0.finish();
            return;
          }
        }
      }
      return;
    }
    catch (Exception paramMessage)
    {
      paramMessage.printStackTrace();
      this.this$0.title.setText("激活码错误");
      this.this$0.back.setVisibility(0);
      this.this$0.exit.setVisibility(0);
      this.this$0.yes.setVisibility(8);
      this.this$0.clear.setVisibility(8);
      this.this$0.edit.setVisibility(8);
    }
  }
}
我们可以很容易的看到激活码出错的字样。再来分析一下java代码。
我们发现激活码错误并没有跳转到这里,但是之前的代码却有个 :cond_1跳转这里来。所以我们明显知道是加了混淆的。
那我们只有从激活成功去看看下手了。
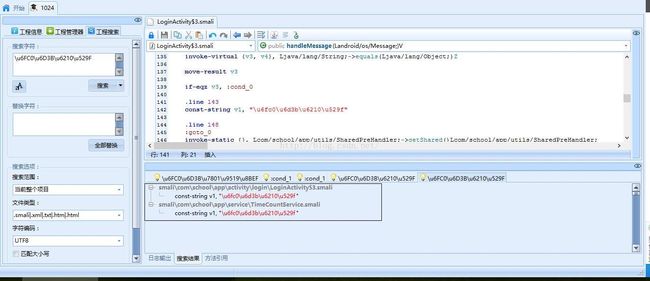
再次搜索
发现有两处
刚刚这出看过了,我们去看看另一处的源码
package com.school.app.service;

import android.app.Service;
import android.content.BroadcastReceiver;
import android.content.Context;
import android.content.Intent;
import android.os.Handler;
import android.os.IBinder;
import android.os.Message;
import android.widget.Toast;
import com.school.app.activity.login.LoginActivity;
import com.school.app.utils.CommTool;
import com.school.app.utils.SharedPreHandler;

public class TimeCountService
  extends Service
{
  private static final long sMinute = 1L;
  private Handler mHandler = new Handler()
  {
    public void handleMessage(Message paramAnonymousMessage)
    {
      try
      {
        if ((paramAnonymousMessage.obj != null) && (((String)paramAnonymousMessage.obj).contains("stop")))
        {
          SharedPreHandler.getShared().setSharedPreKey("activation_code", "");
          SharedPreHandler.getShared().setSharedPreKey("activation_msg", "");
          paramAnonymousMessage = new Intent();
          paramAnonymousMessage.setFlags(268435456);
          paramAnonymousMessage.setClass(TimeCountService.this, LoginActivity.class);
          TimeCountService.this.startActivity(paramAnonymousMessage);
        }
        return;
      }
      catch (Exception paramAnonymousMessage)
      {
        paramAnonymousMessage.printStackTrace();
      }
    }
  };
  private MyReceiver myReceiver;
  private long time;

  private void requestLoginInfo()
  {
    if (CommTool.isNetworkAvailable(this))
    {
      String str = SharedPreHandler.getShared().getSharedStrPreKey("activation_code", "");
      CommTool.getActivationCode(SharedPreHandler.getShared().getSharedStrPreKey("activation_deviceId", ""), SharedPreHandler.getShared().getSharedStrPreKey("activation_model", ""), str, this.mHandler);
    }
  }

  private void stopTimeCountService()
  {
    Intent localIntent = new Intent();
    localIntent.setClass(this, TimeCountService.class);
    stopService(localIntent);
  }

  public IBinder onBind(Intent paramIntent)
  {
    return null;
  }

  public void onCreate()
  {
    super.onCreate();
  }

  public void onDestroy()
  {
    super.onDestroy();
    if (this.myReceiver != null) {
      unregisterReceiver(this.myReceiver);
    }
  }

  public int onStartCommand(Intent paramIntent, int paramInt1, int paramInt2)
  {
    String str = SharedPreHandler.getShared().getSharedStrPreKey("activation_msg", "");
    if ((!str.equals("")) && (!str.equals("激活成功"))) {
      Toast.makeText(this, str, 1).show();
    }
    requestLoginInfo();
    return super.onStartCommand(paramIntent, paramInt1, paramInt2);
  }

  class MyReceiver
    extends BroadcastReceiver
  {
    MyReceiver() {}

    public void onReceive(Context paramContext, Intent paramIntent) {}
  }
}
在研究一下之前的源码,发现很混乱。但是明确知道,有个地方会跳转来验证。
的确很混乱,我研究了半天,才在这个地方破解出来。这个不写出出来这个方法,因为我自己也不是太清楚。我是自己不清楚,就绝不误人子弟的,这里大家可以自行尝试。
这里给大家就说另一个简单点的。我想起来wnagzihxain大神写的移动恶意APP分析的心得分享
于是想到了这个思路。
从入口去看看
其实这个工具挺好的,直接把入口写这了,都不用我们去AndroidManifest.xml里面找了
好吧,直接点过。看看源码
package com.school.app.activity;

import android.content.Intent;
import android.os.Bundle;
import android.support.v4.app.FragmentActivity;
import com.school.app.activity.login.LoginActivity;
import com.school.app.service.TimeCountService;
import com.school.app.utils.SharedPreHandler;

public class MainActivity
  extends FragmentActivity
{
  private void startCountTimeService()
  {
    Intent localIntent = new Intent();
    localIntent.setClass(this, TimeCountService.class);
    startService(localIntent);
  }

  public boolean isActivationCode()
  {
    if (SharedPreHandler.getShared().getSharedStrPreKey("activation_code", "").equals(""))
    {
      Intent localIntent = new Intent();
      localIntent.setClass(this, LoginActivity.class);
      startActivityForResult(localIntent, 10085);
      return false;
    }
    startCountTimeService();
    return true;
  }

  protected void onActivityResult(int paramInt1, int paramInt2, Intent paramIntent)
  {
    if ((paramInt1 == 10085) && (paramInt2 == 10086)) {
      finish();
    }
    super.onActivityResult(paramInt1, paramInt2, paramIntent);
  }

  protected void onCreate(Bundle paramBundle)
  {
    super.onCreate(paramBundle);
    setContentView(2130903040);
    isActivationCode();
  }

  protected void onRestart()
  {
    super.onRestart();
  }
}
有了思路,就直接上手,找到地方。
就是这里了,别问我是怎么找到的,多看两遍源码。不废话,改为nez试试再说。
4.验证
这里就不多说了,修改完了保存。打开就直接没有验证了。
三、学习平台(综合版)
这个怎么说呢,算我是投机取巧吧。因为就上上面那个的升级版。更复杂。我估计要是没有前面那个,后面这个我也许还不能弄出来呢。
同样找到跳转验证的地方,给修改掉。
还是改为nez就OK了
此处,没有太多的技术含量。写这个的主要目的一是记记自己第一次破解完整的apk,然后就是写点换个思路的方式。
最后给出两个apk的下载地址:
https://yunpan.cn/cMeIDvXGmzBjP 访问密码 1603
https://yunpan.cn/cMeIpjDyebQPw 访问密码 2eae
最后需要这两个破解的app的话,就去吾爱搜索吧,我把破解好的在吾爱发过帖子。


