华为防火墙NAT策略原理+实验验证!
文章目录
- 前言
- 一:华为防火墙的NAT分类
- 1.1:NAT NO-PAT
- 1.2:NAPT
- 1.3:出接口地址( Easy-IP)
- 1.4:NAT Server
- 1.5:Smart NAT
- 1.6:三元组NAT
- 二:黑洞路由
- 2.1:黑洞路由的产生
- 2.2:通过配置黑洞路由解决环路和ARP的问题
- 2.3:配置黑洞路由的命令
- 三:Sever-map表
- 3.1:Sever-map和会话表的区别
- 3.2:server-map表的生成
- 3.3:FTP传输方式
- 3.3.1:主动模式
- 3.3.2:被动模式
- 3.3.3:两个模式穿越防火墙
- 3.3.4:NAT对报文的处理流程
- 四:华为防火墙NAT实验
- 4.1:环境
- 4.2:实验目的
- 4.3:实验拓扑图
- 4.4:实验过程
- 4.4.1:先配置所有的IP地址
- 4.4.2:server服务器和client配置
- 4.4.3:配置技术部的防火墙NAT
- 4.4.4:配置行政部的防火墙NAT
- 4.4.5:配置财务部的防火墙NAT
- 4.4.6:配置DMZ区域中的两台服务器
- 4.5:实验成功结束
前言
一:华为防火墙的NAT分类
- 主要分为NAT NO-PAT ,NAPT,出接口地址( Easy-IP),Smart NAT,三元组NAT。
1.1:NAT NO-PAT
- 【NAT no-PAT】类似于思科的动态转化,多对多,不转化端口,它不能解约公网IP地址
实际应用场景使用较少,主要适用于需要上网的用户比较少,而公网IP地址又足够多的场景
1.2:NAPT
- 【NAPT】(Network Address and Port Translation,网络地址和端口转换):
类似于Cisco的PAT转换,NAPT即转换报文的源地址,又转换源端口。转换后的地址不能是外网接口IP地址,
属于多对多或多对一转换,可以节约公网IP地址,使用场景较多。
1.3:出接口地址( Easy-IP)
- 【出接口地址(Easy-IP)】:因其转换方式非常简单,所以也被称为Easy-IP、
和NAPT一样,即转换源IP地址,又转换源端口。区别是出接口地址方式转换后的地址只能是
NAT设备外网接口所配置的IP地址,属于多对一转换,可以节约IP地址。
1.4:NAT Server
- 【NAT Server】:静态一对一发布,主要用于内部服务器需要对Internet提供服务时使用,。
1.5:Smart NAT
- 【Smart NAT(智能转换)】:通过预留一个公网地址进行NAPT转换,而其他的公网地址
用来进行NAT No-PAT转换,该方式不太常用。
1.6:三元组NAT
- 【三元组NAT】:与源IP地址、源端口和协议类型有关的一种转换,将源IP地址和源端口
转换为固定公网IP地址和端口,能解决一些特殊应用在普遍NAT中无法实现的问题。
主要应用于外部用户访问局域网的一些P2P应用。
二:黑洞路由
2.1:黑洞路由的产生
-
在特定的NAT转换时,可能会产生环路及无效ARP,关于其如何产生,大概就是,
在有些NAT的转换方式中,是为了解决内网连接Internet,而映射出了一个公有IP -
那么,若此时有人通过internet来访问这个映射出来的公有IP,就会产生这两种情况。
2.2:通过配置黑洞路由解决环路和ARP的问题
-
根据情况选择是否配置黑洞路由
-
NAT类型 描述 是否配置黑洞路由 NAT NO-PAT 当公网用户访向转换后地址时产生环路或产生ARP报文 是 NAPT 当公网用户访问转换后地址时产生环路或产生ARP报文 是 出接口地址( Easy-IP) 转换后的地址就是外网接口地址,公网用户访问该地址被防火墙接收(策略允许)或丢弃(策略不允不产生环路 否 NAT Server(粗泛) 当公网用户访问映射后地址时直接转发给内部服务器 否 NAT Server(精细) 当公网用户访问映射后地址时产生环路或产生ARP报文 是
-
2.3:配置黑洞路由的命令
-
解决这两个问题很简单,就是配置黑洞路由
-
(将internet主动访问映射出来的地址的流量指定到空接口null0)
-
[USG6000V1]ip route-static 100.2.2.10 32 NULL 0
三:Sever-map表
- 状态化防火墙中会有一张表叫做会话表,用来记录的是内网访问外网时的一个连接信息,
当外网返回的数据匹配到会话表的记录时,直接放行相关返回流量。 - server-map表不用手动配置,是自动生成的
3.1:Sever-map和会话表的区别
- 会话表记录的是连接信息,包括连接状态。
- ●server-map表记录的不是当前的连接信息,而是通过分析当前连接的报文后得到的信息,
该信息用来解决接下来的数据流通过防火墙的问题。可以将server-map表的作用理解为通过未雨绸缪解决将来的问题, - 如像FTP这种的多端口协议,在从一开始的三次握手,到最后完成数据的传输,其过程中,可能端口会发生改变等问题,
server-map正好可以解决这种问题。 - 然而在NAT中也需要这个server-map表,就是在有数据流量通过NAT的方式穿越防火墙时,
server-map表会记录其源地址和转换后地址的对应关系,从而使后续流量可以不用查看NAT策略,
直接匹配到server-map表,从而实现高效的NAT转换。若用户通过互联网访问转换后的地址时,
也可以匹配到server-map表,从而高效的将数据转发到内网真实主机(必须保证安全策略允许通过)。
3.2:server-map表的生成
-
server-map表不用手动配置,是自动生成的,在NAT中,不是所有的表都可以生成server-map表的,我简单总结了一下,如下:
-
NAT类型 描述 NAT no-PAT 动态生成server-map表,也就是说只有流量通过才会
自动生成server-map表,并且不是长期存在的NAT Server 静态生成server-map表,意味表中的内容长期存在 NAPT及出口地址方式 不会生成Server-map表
-
-
当防火墙上配置某些内类的NAT后,在防火墙上会生成Server-map,默认生成两个server-map条目,
分别是正向条目和反向条目(Reverse) -
此时Server-map表的作用是:
- 正向条目 :携带端口信息,用来使Internet用户访问内网中的服务器时直接通过server-map表来进行目标地址转换。
- 反向条目(Reverse):不携带端口信息,且目标地址是任意的,用来使服务器可以访问Internet。
3.3:FTP传输方式
3.3.1:主动模式
- 服务器主动发起数据连接。首先客户端向服务器的21端口建立FTP管理连接
控制连接源端口是1万以上的端口目标端口:21
客户端以PORT命令告诉服务器“我打开了某个端口”你来连我。
这个时候服务器以源端口20目标端口“我打开了某个端口”向客户机请求并建立连接。 
3.3.2:被动模式
- 场景:客户端有防火墙。
客户机主动发起数据连接。首先客户端想服务器的21端口建立FTP管理连接
客户端有防火墙,这个时候服务器连接客户机是连不起来的,因为客户端有防火墙,需要被动模式
服务端以PASV命令告诉客户端“我打开了某个端口”你来连我。
于是客户端向服务端“我打开了某个端口″进行建立数据连接 
3.3.3:两个模式穿越防火墙
3.3.4:NAT对报文的处理流程
四:华为防火墙NAT实验
4.1:环境
- eNSP软件
- 一台USG6000V防火墙
- 一台路由器
- 一台三层交换机
- 三台PC机
- 两台server服务器,分别提供FTP服务和WEB服务
- 一台client客户端
4.2:实验目的
- 1、ISP为公司分配的公网地址为100.2.2.8/29。
- 2、技术部属于trust区域,通过Easy-ip访问Internet。
- 3、行政部属于trust区域,通过NAPT访问internet(使用100.2.2.12/29)。
- 4、财务部属于trust区域,通过no-pat访问internet(使用100.2.2.10/29-100.2.2.11/29)
- 5、DMZ区域中的两台服务器配置NAT-Server发布,分别提供FTP服务及web服务(使用100.2.2.9/29)
- 6、防护墙的GE1/0/0属于UNtrust区域。
4.3:实验拓扑图
4.4:实验过程
4.4.1:先配置所有的IP地址
-
PC机和server服务器与client客户端配置方法相同,双击打开–填写地址–应用/保存
-
R1配置IP地址
sys '//进入系统视图' Enter system view, return user view with Ctrl+Z. [Huawei]sysn R1 '//修改设备名称' [R1]int g0/0/0 '//进入接口' [R1-GigabitEthernet0/0/0]ip add 100.1.1.1 30 '//添加IP地址' [R1-GigabitEthernet0/0/0]un sh '//保存' [R1-GigabitEthernet0/0/0]int g0/0/1 [R1-GigabitEthernet0/0/1]ip add 200.1.1.1 24 [R1-GigabitEthernet0/0/1]un sh [R1]ip route-static 100.2.2.8 29 100.1.1.2 '//100.2.2.8/29为汇总后的地址' -
登陆防火墙,配置IP地址
Username:admin Password: '//输入Admin@123' The password needs to be changed. Change now? [Y/N]: y Please enter old password: '//输入Admin@123' Please enter new password: '//输入自定义新密码,如abcd@123' Please confirm new password: '//重复输入自定义新密码'sys [USG6000V1]in g1/0/0 [USG6000V1-GigabitEthernet1/0/0]ip add 100.1.1.2 30 [USG6000V1-GigabitEthernet1/0/0]in g1/0/4 [USG6000V1-GigabitEthernet1/0/4]ip add 192.168.3.1 24 [USG6000V1-GigabitEthernet1/0/4]in g1/0/3 [USG6000V1-GigabitEthernet1/0/3]ip add 192.168.2.1 24 [USG6000V1-GigabitEthernet1/0/3]in g1/0/2 [USG6000V1-GigabitEthernet1/0/2]ip add 192.168.1.1 24 [USG6000V1-GigabitEthernet0/0/0]in g1/0/1 [USG6000V1-GigabitEthernet1/0/1]ip add 192.168.0.1 24 [USG6000V1-GigabitEthernet1/0/1]quit [USG6000V1]ip route-static 0.0.0.0 0.0.0.0 100.1.1.1
4.4.2:server服务器和client配置
4.4.3:配置技术部的防火墙NAT
-
先将接口添加到对应区域
-
[USG6000V1]firewall zone trust '//进入trust区域' [USG6000V1-zone-trust]add in g1/0/4 '//添加接口' [USG6000V1-zone-trust]add in g1/0/3 [USG6000V1-zone-trust]add in g1/0/2 [USG6000V1-zone-trust]quit [USG6000V1]firewall zone dmz '//进入dmz区域' [USG6000V1-zone-dmz]add in g1/0/1 [USG6000V1-zone-dmz]quit [USG6000V1]firewall zone untrust '//进入untrust区域' [USG6000V1-zone-untrust]add in g1/0/0 -
配置安全策略
-
[USG6000V1]security-policy [USG6000V1-policy-security]rule name easy '//定义安全策略名字' [USG6000V1-policy-security-rule-easy]source-zone trust '//源区域为trust' [USG6000V1-policy-security-rule-easy]destination-zone untrust '//目标区域为untrust' [USG6000V1-policy-security-rule-easy]action permit '//动作为允许' [USG6000V1-policy-security-rule-easy]quit [USG6000V1-policy-security]quit -
配置NAT策略
-
[USG6000V1]nat-policy [USG6000V1-policy-nat]rule name easypolicy '//定义NAT策略名字' [USG6000V1-policy-nat-rule-easypolicy]source-address 192.168.3.0 24 '//定义源地址' [USG6000V1-policy-nat-rule-easypolicy]source-zone trust '//定义源区域' [USG6000V1-policy-nat-rule-easypolicy]destination-zone untrust '//定义目标区域' [USG6000V1-policy-nat-rule-easypolicy]action source-nat easy-ip '//配置出接口方式' [USG6000V1-policy-nat-rule-easypolicy]quit [USG6000V1-policy-nat]quit -
技术部主机PC1访问Internet的client
-
'//查看会话表,地址已经成功转换'
[USG6000V1]dis firewall session table
2020-02-11 12:34:58.660
 Current Total Sessions : 5
 icmp  VPN: public --> public  192.168.3.2:24735[100.1.1.2:2065] --> 200.1.1.2:2
048
 icmp  VPN: public --> public  192.168.3.2:24479[100.1.1.2:2064] --> 200.1.1.2:2
048
 icmp  VPN: public --> public  192.168.3.2:24991[100.1.1.2:2066] --> 200.1.1.2:2
048
 icmp  VPN: public --> public  192.168.3.2:24223[100.1.1.2:2063] --> 200.1.1.2:2
048
 icmp  VPN: public --> public  192.168.3.2:25247[100.1.1.2:2067] --> 200.1.1.2:2
048
4.4.4:配置行政部的防火墙NAT
-
配置NAT地址组
-
[USG6000V1]nat address-group napt '//定义nat地址组名' [USG6000V1-address-group-napt]section 0 100.2.2.12 '//定义组中的地址' [USG6000V1-address-group-napt]mode pat '//配置为NAPT方式' [USG6000V1-address-group-napt]quit -
配置NAT策略
-
[USG6000V1]nat-policy [USG6000V1-policy-nat]rule name napt '//自定义nat策略的组名' [USG6000V1-policy-nat-rule-napt]source-address 192.168.2.0 24 '//定义需要转换的源地址' [USG6000V1-policy-nat-rule-napt]source-zone trust '//定义源区域' [USG6000V1-policy-nat-rule-napt]destination-zone untrust '//定义目标区域' [USG6000V1-policy-nat-rule-napt]action source-nat address-group napt '//关联地址组' -
配置黑洞路由
-
NAPT的NAT类型要配置黑洞路由,所以要针对转换后的全局地址100.2.2.12/32配置黑洞路由。 [USG6000V1] ip route-static 100.2.2.12 32 NULL 0 -
行政部主机PC2访问Internet的client
-
[USG6000V1]dis firewall session table 	'//查看会话表,地址已经成功转换'
2020-02-11 12:29:05.470
 Current Total Sessions : 5
 icmp  VPN: public --> public  192.168.2.2:63389[100.2.2.12:2048] --> 200.1.1.2:
2048
 icmp  VPN: public --> public  192.168.2.2:64413[100.2.2.12:2051] --> 200.1.1.2:
2048
 icmp  VPN: public --> public  192.168.2.2:64669[100.2.2.12:2052] --> 200.1.1.2:
2048
 icmp  VPN: public --> public  192.168.2.2:64157[100.2.2.12:2050] --> 200.1.1.2:
2048
 icmp  VPN: public --> public  192.168.2.2:63645[100.2.2.12:2049] --> 200.1.1.2:
2048
4.4.5:配置财务部的防火墙NAT
-
配置NAT地址组
-
[USG6000V1]nat address-group natnopat '//定义nat地址组名' [USG6000V1-address-group-natnopat]section 0 100.2.2.10 100.2.2.11 '//定义组中的地址' [USG6000V1-address-group-natnopat]mode no-pat local '//配置为NAT No-PAT方式' [USG6000V1-address-group-natnopat]quit -
配置NAT策略
-
[USG6000V1]nat-policy [USG6000V1-policy-nat]rule name nopat '//自定义nat策略的组名' [USG6000V1-policy-nat-rule-nopat]source-address 192.168.1.0 24 '//定义需要转换的源地址' [USG6000V1-policy-nat-rule-nopat]source-zone trust '//定义源区域' [USG6000V1-policy-nat-rule-nopat]destination-zone untrust '//定义目标区域' [USG6000V1-policy-nat-rule-nopat]action source-nat address-group natnopat '//关联地址组' [USG6000V1-policy-nat-rule-nopat]quit [USG6000V1-policy-nat]quit -
配置黑洞路由
-
'//针对转换后的全局地址(NAT地址组中的地址)配置黑洞路由:' [USG6000V1]ip route-static 100.2.2.10 32 NULL 0 [USG6000V1]ip route-static 100.2.2.11 32 NULL 0 -
财务部PC3访问Internet的client
-
[USG6000V1]dis firewall session table
2020-02-11 12:39:25.340
 Current Total Sessions : 5
 icmp  VPN: public --> public  192.168.1.2:25760[100.2.2.10:25760] --> 200.1.1.2
:2048
 icmp  VPN: public --> public  192.168.1.2:24992[100.2.2.10:24992] --> 200.1.1.2
:2048
 icmp  VPN: public --> public  192.168.1.2:25248[100.2.2.10:25248] --> 200.1.1.2
:2048
 icmp  VPN: public --> public  192.168.1.2:26016[100.2.2.10:26016] --> 200.1.1.2
:2048
 icmp  VPN: public --> public  192.168.1.2:25504[100.2.2.10:25504] --> 200.1.1.2
:2048
[USG6000V1]dis firewall server-map
2020-02-11 12:39:41.740
 Current Total Server-map : 2
 Type: No-Pat Reverse, ANY -> 100.2.2.10[192.168.1.2],  Zone: untrust
 Protocol: ANY, TTL:---, Left-Time:---,  Pool: 1, Section: 0
 Vpn: public

 Type: No-Pat,  192.168.1.2[100.2.2.10] -> ANY,  Zone: untrust
 Protocol: ANY, TTL:360, Left-Time:357,  Pool: 1, Section: 0
 Vpn: public
4.4.6:配置DMZ区域中的两台服务器
-
配置安全策略
-
[USG6000V1]security-policy [USG6000V1-policy-security]rule name todmz [USG6000V1-policy-security-rule-todmz]source-zone untrust [USG6000V1-policy-security-rule-todmz]destination-zone dmz [USG6000V1-policy-security-rule-todmz]destination-address 192.168.0.0 24 [USG6000V1-policy-security-rule-todmz]service ftp [USG6000V1-policy-security-rule-todmz]service http [USG6000V1-policy-security-rule-todmz]action permit -
配置NATserver
-
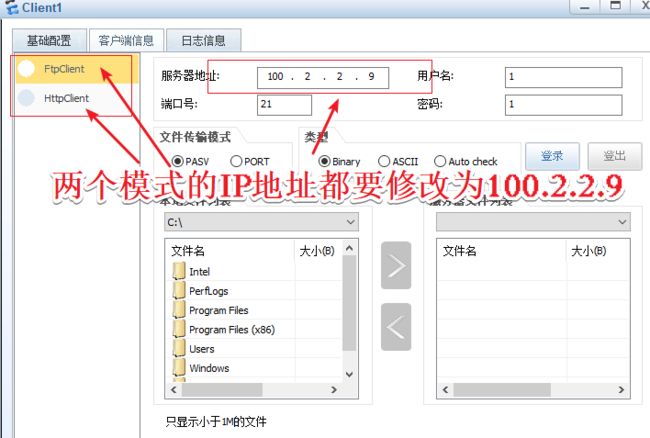
[USG6000V1]nat server ftp protocol tcp global 100.2.2.9 21 inside 192.168.0.2 21 [USG6000V1]nat server http protocol tcp global 100.2.2.9 80 inside 192.168.0.3 80 -
使用外网客户端client1进行访问验证
-
查看会话表和server-map表
-
[USG6000V1]dis firewall session table 2020-02-11 13:04:09.130 Current Total Sessions : 1 ftp VPN: public --> public 200.1.1.2:2058 +-> 100.2.2.9:21[192.168.0.2:21] [USG6000V1]dis firewall server-map 2020-02-11 13:04:52.430 Current Total Server-map : 4 Type: Nat Server, ANY -> 100.2.2.9:80[192.168.0.3:80], Zone:---, protocol:tc p Vpn: public -> public Type: Nat Server, ANY -> 100.2.2.9:21[192.168.0.2:21], Zone:---, protocol:tc p Vpn: public -> public Type: Nat Server Reverse, 192.168.0.2[100.2.2.9] -> ANY, Zone:---, protocol: tcp Vpn: public -> public, counter: 1 Type: Nat Server Reverse, 192.168.0.3[100.2.2.9] -> ANY, Zone:---, protocol: tcp Vpn: public -> public, counter: 1 -
访问验证HTTP
-
再次相同方法查看会话表和server-map表


