【前端面试vue】vue响应式(双向数据绑定)原理及实现简例
Vue如何追踪变化
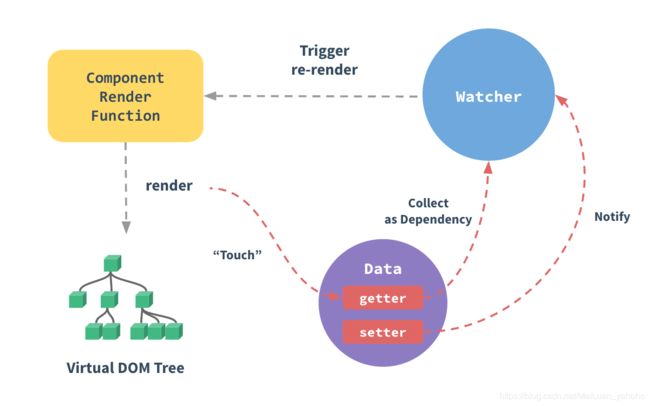
vue.js采用的是数据劫持结合发布和-订阅者模式的方式,通过Object.defineProperty()来劫持各个属性的setter,getter,在数据变动时发布消息给订阅者,触发相应的监听回调。

当你把一个普通的 JavaScript 对象传给 Vue 实例的 data 选项,Vue 将遍历此对象所有的属性,并使用 Object.defineProperty (ES5 中一个无法 shim 的特性)把这些属性全部转为 getter/setter。
这些 getter/setter 对用户来说是不可见的,但是在内部它们让 Vue 追踪依赖,在属性被访问和修改时通知变化。
每个组件实例都有相应的 watcher 实例对象,它会在组件渲染的过程中把属性记录为依赖,之后当依赖项的 setter 被调用时,会通知 watcher 重新计算,从而致使它关联的组件得以更新。

实现
页面结构很简单,如下
最后会通过类似于vue的方式来使用我们的双向数据绑定,结合我们的数据结构添加注释
模仿vue写法创建一个vue实例
var app = new myVue({
      el:'#app',
      data: {
        number: 0
      },
      methods: {
        increment: function() {
          this.number ++;
        },
      }
    })
首先我们需要定义一个myVue构造函数:为了初始化这个构造函数,给它添加一 个_init属性
function myVue(options) {
  this._init(options);
}
myVue.prototype._init = function (options) {
    this.$options = options;  // options 为上面使用时传入的结构体,包括el,data,methods
    this.$el = document.querySelector(options.el); // el是 #app, this.$el是id为app的Element元素
    this.$data = options.data; // this.$data = {number: 0}
    this.$methods = options.methods;  // this.$methods = {increment: function(){}}
  }
接下来实现_obverse函数,对data进行处理,重写data的set和get函数,并改造_init函数
首先了解一下es5的Object.defineProperty的api,
configurable:true | false,  //这个就两个意思能不能改属性和能不能删除属性
enumerable:true | false,    //属性是否可以被枚举
value:任意类型的值,          //这个是属性的值,你就理解键值对吧
writable:true | false       //这个看单词应该能知道和write类似,可以理解为能不能写,就是能不能更改属  性的意思(重写)
提示:一旦使用Object.defineProperty给对象添加属性,那么如果不设置属性的特性,那么configurable、enumerable、writable这些值都为默认的false;
实现object.defineProperty的重写
 myVue.prototype._obverse = function (obj) { // obj = {number: 0}
    var value;
    for (key in obj) {  //遍历obj对象
      if (obj.hasOwnProperty(key)) {
        value = obj[key];
        if (typeof value === 'object') {  //如果值还是对象,则遍历处理
          this._obverse(value);
        }
        Object.defineProperty(this.$data, key, {  //关键
          enumerable: true,
          configurable: true,
          get: function () {
            console.log(`获取${value}`);
            return value;
          },
          set: function (newVal) {
            console.log(`更新${newVal}`);
            if (value !== newVal) {
              value = newVal;
            }
          }
        })
      }
    }
  }

 myVue.prototype._init = function (options) {
    this.$options = options;
    this.$el = document.querySelector(options.el);
    this.$data = options.data;
    this.$methods = options.methods;

    this._obverse(this.$data);
  }
接下来我们写一个指令类Watcher,用来绑定更新函数,实现对DOM元素的更新
function Watcher(name, el, vm, exp, attr) {
    this.name = name;         //指令名称,例如文本节点,该值设为"text"
    this.el = el;             //指令对应的DOM元素
    this.vm = vm;             //指令所属myVue实例
    this.exp = exp;           //指令对应的值,本例如"number"
    this.attr = attr;         //绑定的属性值,本例为"innerHTML"

    this.update();
  }

  Watcher.prototype.update = function () {
    this.el[this.attr] = this.vm.$data[this.exp];
  //比如 H3.innerHTML = this.data.number; 当number改变时,会触发这个update函数,保证对应的DOM内容进行了更新。

}
更新_init函数以及_obverse函数
myVue.prototype._init = function (options) {
    //...
    this._binding = {};   //_binding保存着model与view的映射关系,也就是我们前面定义的Watcher的实例。当model改变时,我们会触发其中的指令类更新,保证view也能实时更新
    //...
  }

  myVue.prototype._obverse = function (obj) {
    //...
      if (obj.hasOwnProperty(key)) {
        this._binding[key] = {    // 按照前面的数据,_binding = {number: _directives: []}
          _directives: []
        };
        //...
        var binding = this._binding[key];
        Object.defineProperty(this.$data, key, {
          //...
          set: function (newVal) {
            console.log(`更新${newVal}`);
            if (value !== newVal) {
              value = newVal;
              binding._directives.forEach(function (item) {  // 当number改变时,触发_binding[number]._directives 中的绑定的Watcher类的更新
                item.update();
              })
            }
          }
        })
      }
    }
  }
那么如何将view与model进行绑定呢?接下来我们定义一个_compile函数,用来解析我们的指令(v-bind,v-model,v-clickde)等,并在这个过程中对view与model进行绑定。
 myVue.prototype._init = function (options) {
   //...
    this._complie(this.$el);
  }


myVue.prototype._complie = function (root) { root 为 id为app的Element元素,也就是我们的根元素
    var _this = this;
    var nodes = root.children;
    for (var i = 0; i < nodes.length; i++) {
      var node = nodes[i];
      if (node.children.length) {  // 对所有元素进行遍历,并进行处理
        this._complie(node);
      }

  if (node.hasAttribute('v-click')) {  // 如果有v-click属性,我们监听它的onclick事件,触发increment事件,即number++
    node.onclick = (function () {
      var attrVal = nodes[i].getAttribute('v-click');
      return _this.$methods[attrVal].bind(_this.$data);  //bind是使data的作用域与method函数的作用域保持一致
    })();
  }

  if (node.hasAttribute('v-model') && (node.tagName == 'INPUT' || node.tagName == 'TEXTAREA')) { // 如果有v-model属性,并且元素是INPUT或者TEXTAREA,我们监听它的input事件
    node.addEventListener('input', (function(key) {
      var attrVal = node.getAttribute('v-model');
       //_this._binding['number']._directives = [一个Watcher实例]
       // 其中Watcher.prototype.update = function () {
       //    node['vaule'] = _this.$data['number'];  这就将node的值保持与number一致
       // }
      _this._binding[attrVal]._directives.push(new Watcher(
        'input',
        node,
        _this,
        attrVal,
        'value'
      ))

      return function() {
        _this.$data[attrVal] =  nodes[key].value; // 使number 的值与 node的value保持一致,已经实现了双向绑定
      }
    })(i));
  }

  if (node.hasAttribute('v-bind')) { // 如果有v-bind属性,我们只要使node的值及时更新为data中number的值即可
    var attrVal = node.getAttribute('v-bind');
    _this._binding[attrVal]._directives.push(new Watcher(
      'text',
      node,
      _this,
      attrVal,
      'innerHTML'
    ))
  }
}
  }
至此,我们已经实现了一个简单vue的双向绑定功能,包括v-bind, v-model, v-click三个指令。效果如下图
附上全部代码,不到150行
myVue这个实现的例子来源:https://segmentfault.com/a/1190000014274840
检测变化的注意事项
受现代 JavaScript 的限制 (而且 Object.observe 也已经被废弃),Vue 不能检测到对象属性的添加或删除。由于 Vue 会在初始化实例时对属性执行 getter/setter 转化过程,所以属性必须在 data 对象上存在才能让 Vue 转换它,这样才能让它是响应的。例如:
var vm = new Vue({
  data:{
    a:1
  }
})

// `vm.a` 是响应的

vm.b = 2
// `vm.b` 是非响应的
Vue 不允许在已经创建的实例上动态添加新的根级响应式属性 (root-level reactive property)。然而它可以使用 Vue.set(object, key, value) 方法将响应属性添加到嵌套的对象上
Vue.set(vm.someObject, 'b', 2)
您还可以使用 vm.$set 实例方法,这也是全局 Vue.set 方法的别名:
this.$set(this.someObject,'b',2)
声明响应式属性
由于 Vue 不允许动态添加根级响应式属性,所以你必须在初始化实例前声明根级响应式属性,哪怕只是一个空值:
var vm = new Vue({
  data: {
    // 声明 message 为一个空值字符串
    message: ''
  },
  template: '{{ message }}'
})
// 之后设置 `message`
vm.message = 'Hello!'
如果你未在 data 选项中声明 message,Vue 将警告你渲染函数正在试图访问的属性不存在。
异步更新队列
可能你还没有注意到,Vue 异步执行 DOM 更新。只要观察到数据变化,Vue 将开启一个队列,并缓冲在同一事件循环中发生的所有数据改变。
如果同一个 watcher 被多次触发,只会被推入到队列中一次。这种在缓冲时去除重复数据对于避免不必要的计算和 DOM 操作上非常重要。
然后,在下一个的事件循环“tick”中,Vue 刷新队列并执行实际 (已去重的) 工作。Vue 在内部尝试对异步队列使用原生的 Promise.then 和 MessageChannel,如果执行环境不支持,会采用 setTimeout(fn, 0) 代替。
例如,当你设置 vm.someData = ‘new value’ ,该组件不会立即重新渲染。当刷新队列时,组件会在事件循环队列清空时的下一个“tick”更新。多数情况我们不需要关心这个过程,但是如果你想在 DOM 状态更新后做点什么,这就可能会有些棘手。虽然 Vue.js 通常鼓励开发人员沿着“数据驱动”的方式思考,避免直接接触 DOM,但是有时我们确实要这么做。为了在数据变化之后等待 Vue 完成更新 DOM ,可以在数据变化之后立即使用 Vue.nextTick(callback) 。这样回调函数在 DOM 更新完成后就会调用。
{{message}}
var vm = new Vue({
  el: '#example',
  data: {
    message: '123'
  }
})
vm.message = 'new message' // 更改数据
vm.$el.textContent === 'new message' // false
Vue.nextTick(function () {
  vm.$el.textContent === 'new message' // true
})
在组件内使用 vm.$nextTick() 实例方法特别方便,因为它不需要全局 Vue ,并且回调函数中的 this 将自动绑定到当前的
Vue 实例上:
Vue.component('example', {
  template: '{{ message }}',
  data: function () {
    return {
      message: '没有更新'
    }
  },
  methods: {
    updateMessage: function () {
      this.message = '更新完成'
      console.log(this.$el.textContent) // => '没有更新'
      this.$nextTick(function () {
        console.log(this.$el.textContent) // => '更新完成'
      })
    }
  }
})
因为 $nextTick() 返回一个 Promise 对象,所以你可以使用新的 ES2016 async/await 语法完成相同的事情:
methods: {
  updateMessage: async function () {
    this.message = 'updated'
    console.log(this.$el.textContent) // => '未更新'
    await this.$nextTick()
    console.log(this.$el.textContent) // => '已更新'
  }
}
参考:https://segmentfault.com/a/1190000014274840
及vue官方教程 https://cn.vuejs.org/v2/guide/reactivity.html