大概说说Handler机制
1、Handler简介
Handler是Android的一种消息机制,用于同一进程的线程间通信,在这里引用一些任老师书里的描述。 Handler的主要作用是将一个任务切换到某个指定的线程中去执行。那么Android为什么要提供这个功能呢?那是因为Android规定访问UI只 能在主线程中进行,如果再子线程中访问UI,那么程序就会抛出异常(这个验证是否是主线程的工作在ViewRootImpl的checkThread方 法里完成)。这里说的主线程比较特殊,它是由Zygote fork创建的进程,程序入口是ActivityThread类的main方法,然而AcitvityThread不是一个Thread,只是一个final类,后面会有进一步说明。
void checkThread(){
    if(mThread != Thread.currentThread){
        throw new CalledFromWrongThreadException("Only the original thread that created a view hierarchy can touch its views");
  }
}2、Handler机制梳理
平常我们说的Handler,指的是由Handler、Message、MessageQueue和Looper构成的一个整体运行机制。我们可以从下图,大概了解它们的运行流程。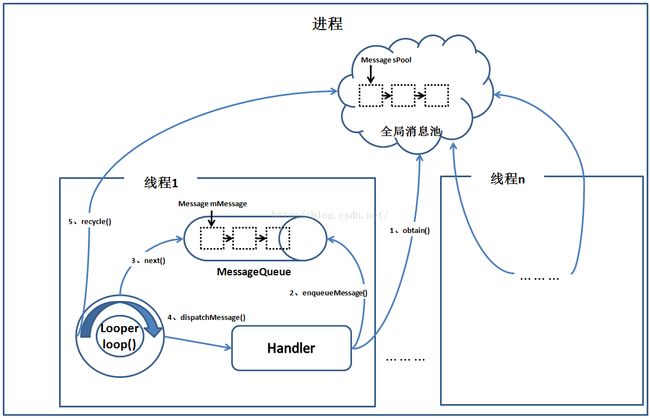
首先就是Handler调用sendXXX系列或者postXXX系列的方法发送Message,不管是哪种方法都是需要从全局消息池里面拿出一个Message对象,即obtain(虽然Message有个全局消息池,其实它的内部实现只是一个对链头进行插入和删除的单链表,毕竟单链表在插入和删除上比较有优势),接着对该Message对象进行各种成员变量的赋值后,把它发送到相应线程的消息队列中,即enqueueMessage(虽然MessageQueue叫消息队列,但它的内部实现并不是队列,和全局消息池一样,也是一个对链头进行插入和删除的单链表),之后的工作交给相应线程的Looper对象,它通过调用loop()方法,无限循环地往消息队列里取消息,即next(),如果队列里无消息,它便被阻塞了(nativePollOnce和nativeWake,本地方法使用Linux的epoll模型)。如果有消息便把消息取出来,同时消息队列伴随着删除该消息的操作,然后调用Message对象的target成员变量的dispatchMessage方法进行消息分发处理,target实际上就是Handler的实例。Handler把消息处理完后,Looper便要把这条消息进行回收再利用,即recycle(),对消息进行“净身”,即置空消息的所有成员变量,之后保证消息无污染地插入全局消息池中,避免OOM。
3、Handler机制分析
大家读到这里有没有产生这样的疑问,上面提到相应线程的消息队列和相应线程的Looper对象,Handler发送消息它是怎么识别发送到哪个线程中的消息队列呢?下面我写了个小例子,我们跟着代码分析。public class TestHandler extends Handler {
public static final String TAG = "TestHanlder";
private String mName = null;
public TestHandler(String n) {
// TODO Auto-generated constructor stub
mName = n;
}
public TestHandler(String n, Looper lp){
super(lp);
mName = n;
}
@Override
public void handleMessage(Message msg) {
// TODO Auto-generated method stub
switch(msg.what){
case 1:
Log.d(TAG, mName);
break;
default:
break;
}
}
} public void button1(View v){
TestHandler th = new TestHandler("button1");
Log.d(TAG,th.getLooper().getThread().toString());
th.sendEmptyMessage(1);
}09-17 17:17:09.879: D/MainActivity(21186): Thread[main,5,main]
09-17 17:17:09.879: D/TestHanlder(21186): button1
    /**
     * Default constructor associates this handler with the {@link Looper} for the
     * current thread.
     *
     * If this thread does not have a looper, this handler won't be able to receive messages
     * so an exception is thrown.
     */
    public Handler() {
        this(null, false);
    }


    public Handler(Callback callback, boolean async) {
        if (FIND_POTENTIAL_LEAKS) {
            final Class klass = getClass();
            if ((klass.isAnonymousClass() || klass.isMemberClass() || klass.isLocalClass()) &&
                    (klass.getModifiers() & Modifier.STATIC) == 0) {
                Log.w(TAG, "The following Handler class should be static or leaks might occur: " +
                    klass.getCanonicalName());
            }
        }

        mLooper = Looper.myLooper();
        if (mLooper == null) {
            throw new RuntimeException(
                "Can't create handler inside thread that has not called Looper.prepare()");
        }
        mQueue = mLooper.mQueue;
        mCallback = callback;
        mAsynchronous = async;
}static final ThreadLocal sThreadLocal = new ThreadLocal();
final MessageQueue mQueue;
... ... ...
/**
* Return the Looper object associated with the current thread. Returns
* null if the calling thread is not associated with a Looper.
*/
public static Looper myLooper() {
return sThreadLocal.get();
} 从上面我可以知道,Looper不断循环取消息并处理,其中处理操作其实就是调用了Handler的dispatchMessage方法,由Handler进行消息分发处理,我们看看Handler分发消息的实现:
    /**
     * Handle system messages here.
     */
    public void dispatchMessage(Message msg) {
        if (msg.callback != null) {
            handleCallback(msg);
        } else {
            if (mCallback != null) {
                if (mCallback.handleMessage(msg)) {
                    return;
                }
            }
            handleMessage(msg);
        }
} public final boolean post(Runnable r)
{
return sendMessageDelayed(getPostMessage(r), 0);
}
public final boolean postAtTime(Runnable r, long uptimeMillis)
{
return sendMessageAtTime(getPostMessage(r), uptimeMillis);
}
... ... ...
private static Message getPostMessage(Runnable r) {
Message m = Message.obtain();
m.callback = r;
return m;
}
private static Message getPostMessage(Runnable r, Object token) {
Message m = Message.obtain();
m.obj = token;
m.callback = r;
return m;
}
private static void handleCallback(Message message) {
message.callback.run();
}
     /**
     * Callback interface you can use when instantiating a Handler to avoid
     * having to implement your own subclass of Handler.
     *
     * @param msg A {@link android.os.Message Message} object
     * @return True if no further handling is desired
     */
    public interface Callback {
        public boolean handleMessage(Message msg);
    }

... ... ...
   public Handler(Callback callback) {
        this(callback, false);
    }

 /**
     * Use the provided {@link Looper} instead of the default one and take a callback
     * interface in which to handle messages.
     *
     * @param looper The looper, must not be null.
     * @param callback The callback interface in which to handle messages, or null.
     */
    public Handler(Looper looper, Callback callback) {
        this(looper, callback, false);
    }

... ... ...

    final Callback mCallback;
接下来我们可以看看非主线程是如何具有Handler机制,还是例子分析,和上面工程一样,只是添加了个button2按钮和一个TestHandlerThreadHelp类,首先我们看button2的调用代码,如下:
@Override
	protected void onCreate(Bundle savedInstanceState) {
		super.onCreate(savedInstanceState);
		setContentView(R.layout.activity_main);
		TestHanlderThreadHelp.getInstance().starTest("MyTestHandler");
	}


        public void button2(View v){
		 TestHandler th = TestHanlderThreadHelp.getInstance().getHandlerInMyThread("button2");
		Log.d(TAG,th.getLooper().getThread().toString());
		 th.sendEmptyMessage(1);
	}


	@Override
	protected void onDestroy() {
		 // TODO Auto-generated method stub
		super.onDestroy();
		TestHanlderThreadHelp.getInstance().stopTest();
}public class TestHanlderThreadHelp {
public static final String TAG = "TestHanlderThreadHelp";
private TestHanlderThread mtht = null;
private TestHandler th = null;
private TestHanlderThreadHelp() {
}
private static class TestHanlderThreadHelpHolder {
private static final TestHanlderThreadHelp mInstance = new TestHanlderThreadHelp();
}
public static TestHanlderThreadHelp getInstance(){
return TestHanlderThreadHelpHolder.mInstance;
}
public TestHandler getHandlerInMyThread(String n){
if(th == null)
th = new TestHandler(n,mtht.getLooper());
return th;
}
public void starTest(String threadName){
if(mtht == null)
mtht = new TestHanlderThread(threadName);
mtht.start();
}
public void stopTest(){
if(mtht != null)mtht.quit();
mtht = null;
th = null;
}
private class TestHanlderThread extends Thread{
Looper mLooper;
public TestHanlderThread(String threadName) {
// TODO Auto-generated constructor stub
super(threadName);
}
@Override
public void run() {
// TODO Auto-generated method stub
//super.run();
Looper.prepare();
mLooper = Looper.myLooper();
Looper.loop();
}
public Looper getLooper(){
if(!isAlive())
return null;
return mLooper;
}
public boolean quit(){
Looper lp = getLooper();
if(lp != null){
lp.quit();
return true;
}
return false;
}
}
}09-18 10:34:37.689: D/MainActivity(21695): Thread[MyTestHandler,5,main]
09-18 10:34:37.699: D/TestHanlder(21838): button2
     /** Initialize the current thread as a looper.
      * This gives you a chance to create handlers that then reference
      * this looper, before actually starting the loop. Be sure to call
      * {@link #loop()} after calling this method, and end it by calling
      * {@link #quit()}.
      */
    public static void prepare() {
        prepare(true);
    }

    private static void prepare(boolean quitAllowed) {
        if (sThreadLocal.get() != null) {
            throw new RuntimeException("Only one Looper may be created per thread");
        }
        sThreadLocal.set(new Looper(quitAllowed));
    }

... ... ...

    private Looper(boolean quitAllowed) {
        mQueue = new MessageQueue(quitAllowed);
        mThread = Thread.currentThread();
    }
然而这里还是有问题的,问题是我们怎么把消息发到MyTestHandler线程的消息队列里呢?也就是说,我们在new一个Handler实例时怎么绑定MyTestHandler线程对应的Looper对象呢?于是TestHandlerThread类里就有了一个mLooper成员变量及其getter方法,用于存储和获取TestHandlerThread线程对应的Looper对象。在new一个Handler实例时,Hanlder有一个构造方法Handler(Looper),作用就是把Handler实例就与传入的Looper对象绑定在一起了,此后它的发送消息就会发到与这个Looper对象对应的线程里。因此在程序里,我写了个包装了TestHandlerThread类的TestHandlerThreadHelp类,它的getHandlerInMyThread方法里就返回了绑定了TestHandlerThread线程的Handler实例。至此,其他线程只要拿到这个实例,就能往TestHandlerThread线程发送消息了。因此,我们在mainActivity的button2方法里,调用TestHandlerThreadHelp类的getHandlerInMyThread方法获取Handler实例并发送消息,效果等于在主线程里往MyTestHandler线程发送消息,最后在MyTestHandler线程里处理消息。这里写的TestHandlerThread类仅仅为了测试验证所写,实际使用中,还是推荐使用android系统现成提供的HandlerThread类,使用方式如下:
	@Override
	protected void onCreate(Bundle savedInstanceState) {
		super.onCreate(savedInstanceState);
		setContentView(R.layout.activity_main);
		h = new HandlerThread("MyTestHandler3");
		h.start();
	}

	@Override
	protected void onDestroy() {
		// TODO Auto-generated method stub
		super.onDestroy();
		h.quit();
	}


	public void button3(View v){
		TestHandler th = new TestHandler("button3", h.getLooper());
		Log.d(TAG,th.getLooper().getThread().toString());
		th.sendEmptyMessage(1);
} @Override
public void run() {
mTid = Process.myTid();
Looper.prepare();
synchronized (this) {
mLooper = Looper.myLooper();
notifyAll();
}
Process.setThreadPriority(mPriority);
onLooperPrepared();
Looper.loop();
mTid = -1;
}09-18 14:43:59.279: D/MainActivity(21695): Thread[MyTestHandler3,5,main]
09-18 14:43:59.279: D/TestHanlder(21839): button3
1    21695    Native    72    52    main
*2    21697    VmWait    144    7    GC
*3    21700    VmWait    0    0    Signal Catcher
*4    21701    Runnable    2267    6275    JDWP
*5    21702    VmWait    4    2    Compiler
*6    21703    Wait    0    0    ReferenceQueueDaemon
*7    21704    Wait    1    0    FinalizerDaemon
*8    21705    Wait    0    0    FinalizerWatchdogDaemon
9    21706    Native    0    1    Binder_1
10    21707    Native    0    0    Binder_2
11    21838    Native    0    0    MyTestHandler
12    21839    Native    0    0    MyTestHandler3
13    21841    Native    0    0    Binder_3
最后,在前面叙述中,留下了一个疑问,那就是主线程是什么时候拥有Looper对象的?当启动一个应用程序的时候,系统为应用程序创建进程时会传入一个java类(ActivityThread类),把该类的静态成员函数main作为程序运行入口点。而主线程是在应用程序进程开启后第一个被启动的线程,用来执行ActivityThread的main方法。在开始的时候提过,主线程比较特殊,它不像其他线程一样new出来了之后再start开启,它是由底层zygota fork出来并把AcitvityThread类main方法作为入口而跑起来的线程,ThreadActivity类也不是一个Thread,它只是一个final类,下面我们看看ActivityThread的main方法实现:
    public static void main(String[] args) {
        SamplingProfilerIntegration.start();

        // CloseGuard defaults to true and can be quite spammy.  We
        // disable it here, but selectively enable it later (via
        // StrictMode) on debug builds, but using DropBox, not logs.
        CloseGuard.setEnabled(false);

        Environment.initForCurrentUser();

        // Set the reporter for event logging in libcore
        EventLogger.setReporter(new EventLoggingReporter());

        Process.setArgV0("");

        Looper.prepareMainLooper();


        ActivityThread thread = new ActivityThread();
        thread.attach(false);

        if (sMainThreadHandler == null) {
            sMainThreadHandler = thread.getHandler();
        }

        AsyncTask.init();

        if (false) {
            Looper.myLooper().setMessageLogging(new
                    LogPrinter(Log.DEBUG, "ActivityThread"));
        }

        Looper.loop();

        throw new RuntimeException("Main thread loop unexpectedly exited");
    }
} /** Returns the application's main looper, which lives in the main thread of the application.
*/
public static Looper getMainLooper() {
synchronized (Looper.class) {
return sMainLooper;
}
}
... ... ...
/** Initialize the current thread as a looper.
* This gives you a chance to create handlers that then reference
* this looper, before actually starting the loop. Be sure to call
* {@link #loop()} after calling this method, and end it by calling
* {@link #quit()}.
*/
public static void prepare() {
prepare(true);
}
private static void prepare(boolean quitAllowed) {
if (sThreadLocal.get() != null) {
throw new RuntimeException("Only one Looper may be created per thread");
}
sThreadLocal.set(new Looper(quitAllowed));
}
/**
* Initialize the current thread as a looper, marking it as an
* application's main looper. The main looper for your application
* is created by the Android environment, so you should never need
* to call this function yourself. See also: {@link #prepare()}
*/
public static void prepareMainLooper() {
prepare(false);
synchronized (Looper.class) {
if (sMainLooper != null) {
throw new IllegalStateException("The main Looper has already been prepared.");
}
sMainLooper = myLooper();
}
}
... ...
final H mH = new H();
... ...
final Handler getHandler() {
        return mH;
}
... ...
private class H extends Handler {
public static final int LAUNCH_ACTIVITY         = 100;
public static final int PAUSE_ACTIVITY          = 101;
public static final int PAUSE_ACTIVITY_FINISHING= 102;
public static final int STOP_ACTIVITY_SHOW      = 103;
        public static final int STOP_ACTIVITY_HIDE      = 104;
public static final int SHOW_WINDOW             = 105;
public static final int HIDE_WINDOW             = 106;
public static final int RESUME_ACTIVITY         = 107;
public static final int SEND_RESULT             = 108;
public static final int DESTROY_ACTIVITY        = 109;
... ...
public void handleMessage(Message msg) {
            if (DEBUG_MESSAGES) Slog.v(TAG, ">>> handling: " + codeToString(msg.what));
            switch (msg.what) {
                case LAUNCH_ACTIVITY: {
                    Trace.traceBegin(Trace.TRACE_TAG_ACTIVITY_MANAGER, "activityStart");
                    final ActivityClientRecord r = (ActivityClientRecord) msg.obj;

                    r.packageInfo = getPackageInfoNoCheck(
                            r.activityInfo.applicationInfo, r.compatInfo);
                    handleLaunchActivity(r, null);
                    Trace.traceEnd(Trace.TRACE_TAG_ACTIVITY_MANAGER);
                } break;
                case RELAUNCH_ACTIVITY: {
                    Trace.traceBegin(Trace.TRACE_TAG_ACTIVITY_MANAGER, "activityRestart");
                    ActivityClientRecord r = (ActivityClientRecord)msg.obj;
                    handleRelaunchActivity(r);
                    Trace.traceEnd(Trace.TRACE_TAG_ACTIVITY_MANAGER);
                } break;
                case PAUSE_ACTIVITY:
                    Trace.traceBegin(Trace.TRACE_TAG_ACTIVITY_MANAGER, "activityPause");
                    handlePauseActivity((IBinder)msg.obj, false, (msg.arg1&1) != 0, msg.arg2,
                            (msg.arg1&2) != 0);
                    maybeSnapshot();
                    Trace.traceEnd(Trace.TRACE_TAG_ACTIVITY_MANAGER); break;
... ...
 system_server进程是系统进程,java framework框架的核心载体,里面运行了大量的系统服务,比如这里提供ApplicationThreadProxy(简称ATP),ActivityManagerService(简称AMS),这个两个服务都运行在system_server进程的不同线程中,由于ATP和AMS都是基于IBinder接口,都是binder线程,binder线程的创建与销毁都是由binder驱动来决定的。
App进程则是我们常说的应用程序,主线程主要负责Activity/Service等组件的生命周期以及UI相关操作都运行在这个线程; 另外,每个App进程中至少会有两个binder线程 ApplicationThread(简称AT)和ActivityManagerProxy(简称AMP),除了图中画的线程,其中还有很多线程,比如signal catcher线程等,这里就不一一列举。Binder用于不同进程之间通信,由一个进程的Binder客户端向另一个进程的服务端发送事务,比如图中线程2向线程4发送事务;而handler用于同一个进程中不同线程的通信,比如图中线程4向主线程发送消息。
结合图说说Activity生命周期,比如暂停Activity,流程如下:
system_server进程是系统进程,java framework框架的核心载体,里面运行了大量的系统服务,比如这里提供ApplicationThreadProxy(简称ATP),ActivityManagerService(简称AMS),这个两个服务都运行在system_server进程的不同线程中,由于ATP和AMS都是基于IBinder接口,都是binder线程,binder线程的创建与销毁都是由binder驱动来决定的。
App进程则是我们常说的应用程序,主线程主要负责Activity/Service等组件的生命周期以及UI相关操作都运行在这个线程; 另外,每个App进程中至少会有两个binder线程 ApplicationThread(简称AT)和ActivityManagerProxy(简称AMP),除了图中画的线程,其中还有很多线程,比如signal catcher线程等,这里就不一一列举。Binder用于不同进程之间通信,由一个进程的Binder客户端向另一个进程的服务端发送事务,比如图中线程2向线程4发送事务;而handler用于同一个进程中不同线程的通信,比如图中线程4向主线程发送消息。
结合图说说Activity生命周期,比如暂停Activity,流程如下:
- 线程1的AMS中调用线程2的ATP;(由于同一个进程的线程间资源共享,可以相互直接调用,但需要注意多线程并发问题)
- 线程2通过binder传输到App进程的线程4;
- 线程4通过handler消息机制,将暂停Activity的消息发送给主线程;
- 主线程在looper.loop()中循环遍历消息,当收到暂停Activity的消息时,便将消息分发给ActivityThread.H.handleMessage()方法,再经过方法的调用,最后便会调用到Activity.onPause(),当onPause()处理完后,继续循环loop下去。
------------------------- 2016/11/29--------------------------在研究android内存泄漏时,发现有一种handler的使用方法会导致内存泄漏,这里简单记一下,具体如下例子:
1、Handler的消息队列是按照时间排序的(msg.when时间参数,以system boot为基准),时间最短的排的越靠近接口。
2、removeMessage只能移除消息队列里的消息,已经被next出去并进行处理的是无法取消的。
public class HandlerActivity extends Activity {

    private final Handler mHandler = new Handler() {
        @Override
        public void handleMessage(Message msg) {
            // ...
        }
    };

    @Override
    public void onCreate(Bundle savedInstanceState) {
        super.onCreate(savedInstanceState);
        setContentView(R.layout.activity_main);
        mHandler.sendMessageDelayed(Message.obtain(), 60000);

        //just finish this activity
        finish();
    }

} public class HandlerActivity2 extends Activity {
private static final int MESSAGE_1 = 1;
private static final int MESSAGE_2 = 2;
private static final int MESSAGE_3 = 3;
private final Handler mHandler = new MyHandler(this);
@Override
public void onCreate(Bundle savedInstanceState) {
super.onCreate(savedInstanceState);
setContentView(R.layout.activity_main);
mHandler.sendMessageDelayed(Message.obtain(), 60000);
// just finish this activity
finish();
}
@Override
public void onDestroy() {
// If null, all callbacks and messages will be removed.
mHandler.removeCallbacksAndMessages(null);
}
public void todo() {
};
private static class MyHandler extends Handler {
private final WeakReference mActivity;
public MyHandler(HandlerActivity2 activity) {
mActivity = new WeakReference(activity);
}
@Override
public void handleMessage(Message msg) {
System.out.println(msg);
if (mActivity.get() == null) {
return;
}
mActivity.get().todo();
}
} 1、Handler的消息队列是按照时间排序的(msg.when时间参数,以system boot为基准),时间最短的排的越靠近接口。
2、removeMessage只能移除消息队列里的消息,已经被next出去并进行处理的是无法取消的。
3、msg.what尽量不使用0,因为postDelayed(runnable, time)默认创建的msg的what就是0,一旦removeMessage,就会把所有msg.what等于0的消息移除,这样runnable也会被移除。
4、SyncBarrier消息就是一个target为null的message,一旦发送syncbarrier消息,那么这个消息后续的说有同步消息都不会被执行,只有异步消息才能通过被执行,提供了一个简单的优先级机制。MessageQueue的next方法如下:
4、SyncBarrier消息就是一个target为null的message,一旦发送syncbarrier消息,那么这个消息后续的说有同步消息都不会被执行,只有异步消息才能通过被执行,提供了一个简单的优先级机制。MessageQueue的next方法如下:
 // Try to retrieve the next message.  Return if found.
                final long now = SystemClock.uptimeMillis();
                Message prevMsg = null;
                Message msg = mMessages;
                if (msg != null && msg.target == null) {
                    // Stalled by a barrier.  Find the next asynchronous message in the queue.
                    do {
                        prevMsg = msg;
                        msg = msg.next;
                    } while (msg != null && !msg.isAsynchronous());
                }
                if (msg != null) {
                     if (now < msg.when)
                        ... ... ...
5、MessageQueue的IdleHandler接口用于在looper处理完所有消息并空闲时被调用,接口返回true表示下次空闲时可被再此调用,返回false就执行一次就完。