C# + OpenXML 生成 Word 文档(VS2015)
本文是 Open XML SDK 的入门文章,将逐步讲解如何生成一个下面这样的 Word 文档:
 有关 Open XML SDK 的详细内容,请参阅这个链接:欢迎使用 Open XML SDK 2.5 for Office
创建示例程序
启动 Visual Studio 2015,新建一个 Windows 窗体应用程序。在窗体上放一个按钮,用于生成 Word 文档。

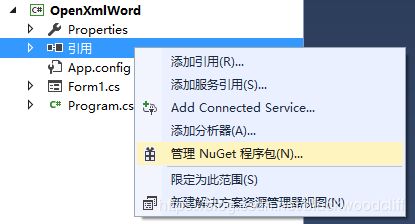
添加 Open XML SDK 引用
在解决方案资源管理器里,在项目名称下面的引用节点上单击右键,在弹出菜单上选择管理 NuGet 程序包,打开NuGet 包管理器。
NuGet 包管理器有浏览、已安装、更新三个页面,点击浏览切换到浏览页面。在浏览下面的搜索框里输入 openxml,搜索结果列表的第一项 DocumentFormat.OpenXml 就是我们要找的 Open XML SDK。

版本信息显示当前版本是 2.9.1,点击右侧的安装按钮,安装 Open XML SDK。
安装完毕后,切换到已安装页面,会发现已安装列表里出现了 DocumentFormat.OpenXml。
创建 Word 文档
创建 Word 文档,使用 WordprocessingDocument.Create(fileName, WordprocessingDocumentType.Document) 方法,该方法创建一个空白的文档。
MainDocumentPart 与 Body
使用 Create() 方法创建一个新文档,并得到 WordprocessingDocument 对象,该对象表示 Word 文档包。我们要为文档添加文字和表格,但文字和表格并不能直接添加到 WordprocessingDocument 对象里,还要做以下三步:
- 为
WordprocessingDocument对象增加主文档部件 - 创建主文档部件的
Document对象 - 为
Document对象添加Body对象
然后,再把文字和表格等添加到 Body 对象里。
using (WordprocessingDocument wordDocument = WordprocessingDocument.Create(fileName, WordprocessingDocumentType.Document))
{
    MainDocumentPart mainPart = wordDocument.AddMainDocumentPart();
    mainPart.Document = new Document();
    Body docBody = mainPart.Document.AppendChild(new Body());
}
设置纸张大小和方向
新建的文档,默认是纵向的,在我们这个示例中,需要设置为横向,并且设置纸张尺寸为 A4 大小。
要设置整个文档的打印方向,需要给 Body 添加一个 SectionProperties 对象,再给 SectionProperties 添加一个 PageSize 对象,并设置 PageSize 的 Orient 为 PageOrientationValues.Landscape。
仅设置 Orient 为 Landscape,并不能使打印方向变为横向,还需要同时设置 PageSize 的 Width 和 Height。
设置宽度和高度
A4 纸的大小是 21cm x 29.7cm,是不是把 PageSize 的 Width 设为 29.7,Height 设为 21 就可以了呢?仔细看一下,Width 和 Height 的类型是 UInt32Value,也就是说必须是整数。实际上这还不是重点,真正的重点是,PageSize 的 Width 和 Height 的单位并不是厘米,而是 二十分之一磅。我们来换算一下,1 厘米≈28.35磅,那么 29.7×28.35×20≈16839,21×28.35×20≈11907。所以,要把纸张设为 A4 横向大小,需要设置 Width 为 16839,Height 为 11907。
docBody.AppendChild(
    new SectionProperties(
        new PageSize() { Width = 16839U, Height = 11907U, Orient = PageOrientationValues.Landscape }
    ));
输出文字
这个文档的内容,包括两行文字、一个表格和一张图片。下面先来输出文字。
对于文字,Open XML 是以 段落(Paragraph)、连续文本(Run)、文本(Text) 三级结构来表示的。一个 Paragraph 包含一个或多个 Run,一个 Run 包含一个或多个 Text。
下面就来输出这两行文字:
Paragraph titlePara = docBody.AppendChild(new Paragraph());
Run titleRun = titlePara.AppendChild(new Run());
titleRun.AppendChild(new Text("陈桑桑的日常家务杂事"));

Paragraph datePara = docBody.AppendChild(new Paragraph());
Run dateRun = datePara.AppendChild(new Run());
dateRun.AppendChild(new Text("5 月 27 日至 6 月 1 日"));
输出结果如下:

设置文字字体、大小、颜色
上面的代码虽然输出了文字,但并不美观。我们还要为文字设置字体、大小、颜色。
要设置文字的字体、大小、颜色,需要给 Run 添加 RunProperties。
RunProperties titleRunProp = titleRun.AppendChild(new RunProperties());

RunFonts titleFonts = new RunFonts() { Ascii = "宋体", HighAnsi = "宋体", EastAsia = "宋体" };
FontSize titleSize = new FontSize() { Val = "36" }; //设置字体大小为18磅,以半磅为单位
DocumentFormat.OpenXml.Wordprocessing.Color titleColor = new DocumentFormat.OpenXml.Wordprocessing.Color() { Val = "365F91" };

titleRunProp.AppendChild(titleFonts);
titleRunProp.AppendChild(titleSize);
titleRunProp.AppendChild(titleColor);
RunProperties dateRunProp = dateRun.AppendChild(new RunProperties());
RunFonts dateFonts = new RunFonts() { Ascii = "宋体", HighAnsi = "宋体", EastAsia = "宋体" };
FontSize dateSize = new FontSize() { Val = "24" }; //设置字体大小为12磅,以半磅为单位
DocumentFormat.OpenXml.Wordprocessing.Color dateColor = new DocumentFormat.OpenXml.Wordprocessing.Color() { Val = "365F91" };
dateRunProp.AppendChild(dateFonts);
dateRunProp.AppendChild(dateSize);
dateRunProp.AppendChild(dateColor);需要注意:
RunProperties必须是 Run 的第一个子元素,也就是说需要先添加 RunProperties,后添加 TextFontSize是以半磅为单位的,若要设置文字为 12 磅大小,需要设置 FontSize 为 24

设置段落属性
为这两行字设置段落属性,设置每行字的段前、段后各增加 4 磅间距。
段落属性由 ParagraphProperties 表示,用于控制对齐方式、缩进、行距等。
titlePara.AppendChild(new ParagraphProperties(new SpacingBetweenLines { Before = "80", After = "80" }));
datePara.AppendChild(new ParagraphProperties(new SpacingBetweenLines { Before = "80", After = "80" }));需要注意:
ParagraphProperties必须是 Paragraph 的第一个子元素,也就是说需要先添加 ParagraphProperties,后添加 RunSpacingBetweenLines是以二十分之一磅为单位的,4 磅大小的值是 4 x 20 = 80

输出表格
表格由 Table、TableRow、TableCell 三级结构构成。那么,向文档中添加一个 9 行 x 6 列的表格:
Table weekTable = docBody.AppendChild(new Table());
for (int row = 0; row < 9; row++)
{
    TableRow tabRow = weekTable.AppendChild(new TableRow());
    for (int col = 0; col < 6; col++)
    {
        TableCell tabCell = tabRow.AppendChild(new TableCell());
    }
}
上面的代码看着好像很对,但实际用 Word 打开生成的文档会报错。
如果要 Word 能够正常打开文档,每个 TableCell 至少需包含一个空段落才行。
Paragraph tabCellPara = tabCell.AppendChild(new Paragraph());表格边框
上面的代码虽然输出了表格,但如果 Word 选项里设置了不显示段落标记的话,实际上这时候打开文档,表格处是一片空白,什么也看不到。
要想看到表格,还要设置表格边框。表格边框通过 TableProperties 设置。
TableProperties tabProps = new TableProperties(
    new TableBorders(
    new TopBorder
    {
        Val = new EnumValue<BorderValues>(BorderValues.Single),
        Size = 4,
        Color = "4F81BD"
    },
    new BottomBorder
    {
        Val = new EnumValue<BorderValues>(BorderValues.Single),
        Size = 4,
        Color = "4F81BD"
    },
    new LeftBorder
    {
        Val = new EnumValue<BorderValues>(BorderValues.Single),
        Size = 4,
        Color = "4F81BD"
    },
    new RightBorder
    {
        Val = new EnumValue<BorderValues>(BorderValues.Single),
        Size = 4,
        Color = "4F81BD"
    },
    new InsideHorizontalBorder
    {
        Val = new EnumValue<BorderValues>(BorderValues.Single),
        Size = 4,
        Color = "4F81BD"
    },
    new InsideVerticalBorder
    {
        Val = new EnumValue<BorderValues>(BorderValues.Single),
        Size = 4,
        Color = "4F81BD"
    }
    ));
weekTable.AppendChild(tabProps);需要注意:
TableProperties必须是 Table 的第一个子元素,也就是说需要先添加 TableProperties,后添加 TableRowBorderType.Size是以八分之一磅为单位的,Size = 4表示边框宽度是 4/8 = 0.5 磅
表格宽度
上面的代码设置了表格边框,可以看到表格了,但所有边框紧挨在一起,看起来并不美观,还需要设置表格宽度。
表格宽度由 TableWidth 表示,将 TableWidth 添加到 TableProperties 可设置表格宽度。
我们希望表格宽度充满整个文档,所以将以百分比设置表格宽度,并设为 100%。
var tabWidth = new TableWidth { Width = "5000", Type = TableWidthUnitValues.Pct };
tabProps.AppendChild(tabWidth);需要注意:
Type是TableWidthUnitValues枚举类型,Pct表示宽度值为百分比,参考 TableWidthUnitValues Enum- 当
Type为Pct时,Width是以 百分之一的五十分之一 为单位的,所以要表示 100%,Width值应该为 100x50=5000 - 另外,
Width值是字符型的(为什么要用字符型?后面会看到另一种用法)
行高
行高由 TableRowHeight 表示,通过将 TableRowHeight 添加到 TableRowProperties 来设置行高。
TableRowProperties tabRowProps = tabRow.AppendChild(new TableRowProperties(new TableRowHeight { Val = 600, HeightType = HeightRuleValues.Exact }));需要注意:
TableRowHeight是以二十分之一磅为单位的,600 表示行高是 600/20 = 30 磅
列宽
列宽可以通过设置单元格的宽度实现。
单元格宽度由 TableCellWidth 表示,通过将 TableCellWidth 添加到 TableCellProperties 来设置单元格宽度。
由于表格宽度已经使用百分比设置了,所以列宽也同样使用百分比设置。
TableCellProperties tabCellProps;
if (col == 0)
{
    tabCellProps = tabCell.AppendChild(new TableCellProperties(new TableCellWidth { Width = "40%", Type = TableWidthUnitValues.Pct }));
}
else
{
    tabCellProps = tabCell.AppendChild(new TableCellProperties(new TableCellWidth { Width = "12%", Type = TableWidthUnitValues.Pct }));
}需要注意:
- 上面设置表格宽度时,使用 5000 表示的 100%,这里直接使用了百分数,是不是更简单
单元格垂直对齐方式
单元格垂直对齐方式由 TableCellVerticalAlignment 表示,通过将 TableCellVerticalAlignment 添加到 TableCellProperties 来设置垂直对齐方式。
下面设置所有单元格内容垂直居中对齐:
tabCellProps.Append(new TableCellVerticalAlignment { Val = TableVerticalAlignmentValues.Center });单元格水平对齐方式
单元格的垂直对齐是通过单元格属性设置的,但单元格属性里却找不到设置水平对齐的方法。
实际上,单元格水平对齐方式是通过单元格内文字的段落属性设置的。
段落对齐方式由 Justification 表示,通过将 Justification 添加到 ParagraphProperties 来设置段落水平对齐方式。
ParagraphProperties tabCellParaProps = tabCellPara.AppendChild(new ParagraphProperties());
if (row == 0)
{
    tabCellParaProps.AppendChild(new Justification { Val = JustificationValues.Center });
}
单元格背景色
Shading 用于设置底纹和背景色,将 Shading 添加到 TableCellProperties 即可设置单元格背景色。
tabCellProps.Append(new Shading { Fill = "DBE5F1" });单元格边距
单元格边距由 TableCellMargin 表示,通过将 TableCellMargin 添加到 TableCellProperties 来设置单元格边距。
tabCellProps.AppendChild(new TableCellMargin(
    new LeftMargin { Width = "100", Type = TableWidthUnitValues.Dxa },
    new RightMargin { Width = "100", Type = TableWidthUnitValues.Dxa },
    new TopMargin { Width = "0", Type = TableWidthUnitValues.Dxa },
    new BottomMargin { Width = "0", Type = TableWidthUnitValues.Dxa }
));需要注意:
TableWidthUnitValues.Dxa表示以二十分之一磅为单位,所以这里设置的单元格左右边距是 100/20 = 5 磅
表格内容
每个单元格已经添加了空段落,再往空段落里加入 Run\Text 就能显示文字了。
空单元格的文字字体、大小
对于空单元格,要设置文字字体和大小,正常思路是,向每个单元格的空段落添加一个 Run,并设置 RunProperties 的字体、大小。但经过实践会发现,这样做并不好用。
要想设置空单元格的文字字体和大小,需要把 RunProperties 添加到 ParagraphProperties 才好用。但是奇怪的是,当向空段落添加 Run\Text,加入文字后,ParagraphProperties 里的 RunProperties 对添加的文字并不起作用,需要另外给 Run 添加 RunProperties 才能对文字进行设置。不知道这是不是 Open XML SDK 的 Bug!
RunProperties tabCellParaRunProps = tabCellParaProps.AppendChild(new RunProperties());

RunFonts tabCellFonts = new RunFonts() { Ascii = "宋体", HighAnsi = "宋体", EastAsia = "宋体" };
FontSize tabCellFontSize = new FontSize() { Val = "24" };//设置字体大小,以半磅为单位
tabCellParaRunProps.AppendChild(tabCellFonts);
tabCellParaRunProps.AppendChild(tabCellFontSize);
添加文字并设置字体、大小、颜色
var firstRowCells = weekTable.Descendants<TableRow>().First().Descendants<TableCell>();
for (int idx = 1; idx <= 5; idx++)
{
    Run tabCellRun = firstRowCells.ElementAt(idx).Elements<Paragraph>().First().AppendChild(new Run());
    RunProperties tabCellRunProps = tabCellRun.AppendChild(new RunProperties());
    RunFonts tabCellFonts = new RunFonts() { Ascii = "宋体", HighAnsi = "宋体", EastAsia = "宋体" };
    FontSize tabCellFontSize = new FontSize() { Val = "24" };//设置字体大小,以半磅为单位
    DocumentFormat.OpenXml.Wordprocessing.Color tabCellFontColor = new DocumentFormat.OpenXml.Wordprocessing.Color() { Val = "365F91" };
    tabCellRunProps.AppendChild(tabCellFonts);
    tabCellRunProps.AppendChild(tabCellFontSize);
    tabCellRunProps.AppendChild(tabCellFontColor);

    string weekText = "星期";
    switch (idx)
    {
        case 1:
            weekText += "一";
            break;
        case 2:
            weekText += "二";
            break;
        case 3:
            weekText += "三";
            break;
        case 4:
            weekText += "四";
            break;
        case 5:
            weekText += "五";
            break;
        default:
            break;
    }
    tabCellRun.AppendChild(new Text(weekText));
}
var tabRows = weekTable.Descendants<TableRow>();
for (int idx = 1; idx <= 3; idx++)
{
Run tabCellRun = tabRows.ElementAt(idx).Descendants<TableCell>().First().Elements<Paragraph>().First().AppendChild(new Run());
RunProperties tabCellRunProps = tabCellRun.AppendChild(new RunProperties());
RunFonts tabCellFonts = new RunFonts() { Ascii = "宋体", HighAnsi = "宋体", EastAsia = "宋体" };
FontSize tabCellFontSize = new FontSize() { Val = "24" };//设置字体大小,以半磅为单位
tabCellRunProps.AppendChild(tabCellFonts);
tabCellRunProps.AppendChild(tabCellFontSize);
string itemText = "";
if (idx == 1)
{
itemText = "家庭作业";
}
else if (idx == 2)
{
itemText = "扔掉垃圾和垃圾回收";
}
else if (idx == 3)
{
itemText = "洗碗碟";
}
tabCellRun.AppendChild(new Text(itemText));
}输出空行
要输出一个空行,只要添加一个空段落就行了。
Paragraph emptyPara = docBody.AppendChild(new Paragraph());
emptyPara.AppendChild(new ParagraphProperties(new SpacingBetweenLines { Before = "80", After = "80" }));
输出图片
输出图片比较复杂,具体例子可以参考 如何:在字处理文档中插入图片
using A = DocumentFormat.OpenXml.Drawing;
using DW = DocumentFormat.OpenXml.Drawing.Wordprocessing;
using PIC = DocumentFormat.OpenXml.Drawing.Pictures;
string picFileName = "clear.png";
ImagePart imagePart = mainPart.AddImagePart(ImagePartType.Png);
using (FileStream stream = new FileStream(picFileName, FileMode.Open))
{
imagePart.FeedData(stream);
}
AddImageToBody(wordDocument, mainPart.GetIdOfPart(imagePart));private static void AddImageToBody(WordprocessingDocument wordDoc, string relationshipId)
{
var element = new Drawing(
new DW.Anchor(
new DW.SimplePosition() { X = 0, Y = 0 },
new DW.HorizontalPosition(
new DW.PositionOffset("-9525")
)
{ RelativeFrom = DW.HorizontalRelativePositionValues.Column },
new DW.VerticalPosition() { RelativeFrom = DW.VerticalRelativePositionValues.Paragraph, PositionOffset = new DW.PositionOffset("360000") },
new DW.Extent() { Cx = 8863330, Cy = 1763395 },
new DW.WrapTopBottom(),
new DW.DocProperties()
{
Id = 1U,
Name = "Picture 1"
},
new DW.NonVisualGraphicFrameDrawingProperties(
new A.GraphicFrameLocks() { NoChangeAspect = true }
),
new A.Graphic(
new A.GraphicData(
new PIC.Picture(
new PIC.NonVisualPictureProperties(
new PIC.NonVisualDrawingProperties()
{
Id = 0U,
Name = "New Bitmap Image.jpg"
},
new PIC.NonVisualPictureDrawingProperties()
),
new PIC.BlipFill(
new A.Blip()
{
Embed = relationshipId
},
new A.Stretch(
new A.FillRectangle()
)
),
new PIC.ShapeProperties(
new A.Transform2D(
new A.Extents() { Cx = 8863330, Cy = 1763395 }
),
new A.PresetGeometry() { Preset = A.ShapeTypeValues.Rectangle }
)
)
)
{ Uri = "http://schemas.openxmlformats.org/drawingml/2006/picture" }
)
)
{
SimplePos = false,
RelativeHeight = 251658240U,
BehindDoc = false,
Locked = false,
LayoutInCell = true,
AllowOverlap = true }
);
wordDoc.MainDocumentPart.Document.Body.AppendChild(new Paragraph(new Run(element)));
}需要注意:
- 图片在文档中有两种布局方式:内嵌和浮动。示例 如何:在字处理文档中插入图片 使用的是内嵌布局,而本文使用的是浮动布局。内嵌布局用
Inline表示,浮动布局用Anchor表示。 - 图片显示的大小由
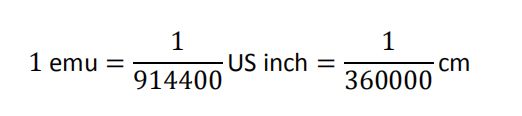
ShapeProperties.Transform2D.Extents设置,Extents.Cx和Extents.Cy分别表示宽和高。Extents.Cx和Extents.Cy的单位是 EMU (English Metric Units,英语公制单位)。EMU 与厘米的换算关系如下:
源码下载
https://download.csdn.net/download/blackwoodcliff/11357951
参考
- 处理段落
- 使用连续文本
- 如何:通过提供文件名创建字处理文档
- 如何:将表格添加到字处理文档中
- 如何:在字处理文档中插入图片
- 向导:将新文档部件添加到包中
- Open XML SDK 2.5 for Microsoft Office
- Open XML SDK生成word
- 利用OpenXml生成Word2007文档