ubuntu10.04网络安装
转载自 http://blog.chinaunix.net/uid-15007890-id-106944.html
PXE
PXE(preboot execute environment)是由Intel公司开发的最新技术,工作于Client/Server的网络模式,支持工作站通过网络从远端服务器下载映像,并由此支持来自网络的操作系统的启动过程,其启动过程中,终端要求服务器分配IP地址,再用TFTP(trivial file transfer protocol)或MTFTP(multicast trivial file transfer protocol)协议下载一个启动软件包到本机内存中并执行,由这个启动软件包完成终端基本软件设置,从而引导预先安装在服务器中的终端操作系统。PXE可以引导多种操作系统,如:Windows 95/98/2000/xp/2003/vista/2008,linux等。
KickStart
KickStart是一种无人职守安装方式。KickStart的工作原理是通过记录典型的安装过程中所需人工干预填写的各种参数,并生成一个名为ks.cfg的文件;在其后的安装过程中(不只局限于生成KickStart安装文件的机器)当出现要求填写参数的情况时,安装程序会首先去查找KickStart生成的文件,当找到合适的参数时,就采用找到的参数,当没有找到合适的参数时,才需要安装者手工干预。
准备工作
1.安装KICKSTART
star@ Ubuntu:~$ sudo apt-get install system-config-kickstart
Reading package lists... Done
Building dependency tree
Reading state information... Done
The following extra packages will be installed:
hwdata isoquery libxml++2.6-2 localechooser-data
The following NEW packages will be installed:
hwdata isoquery libxml++2.6-2 localechooser-data system-config-kickstart
0 upgraded, 5 newly installed, 0 to remove and 277 not upgraded.
Need to get 1,139kB of archives.
After this operation, 5,063kB of additional disk space will be used.
Do you want to continue [Y/n]?
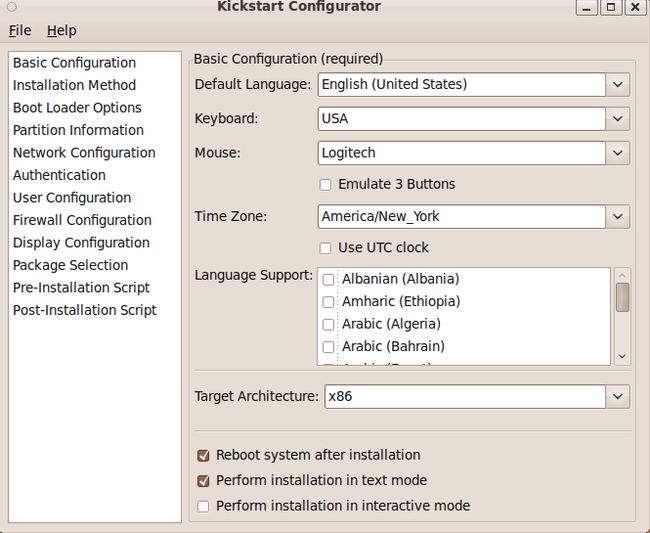
1.1在 “应用程序系统工具”中打开kickstart
设置好以后,保存配置文件为ks.cfg
注意: package selection 选项不能选择,具体原因不详(网上查询有人说是BUG问题),这时可以直接修改ks.cfg文件添加要安装的软件包,在最后行添加%packages
如笔者的配置文件如下
Generated by Kickstart Configurator
#platform=x86
#System language
lang en_US
#Language modules to install
langsupport en_US
#System keyboard
keyboard us
#System mouse
mouse
#System timezone
timezone Asia/Chongqing
#Root password
rootpw --disabled
#Initial user
user star --fullname "star" --iscrypted --password $1$TELmpWrC$yPElivw5xnKjAGqxBi50T/
#Reboot after installation
reboot
#Use text mode install
text
#Install OS instead of upgrade
install
#Use Web installation
url --url http://192.168.10.21/Ubuntu
#System bootloader configuration
bootloader --location=mbr
#Clear the Master Boot Record
zerombr yes
#Partition clearing information
clearpart --all --initlabel
#Disk partitioning information
part /boot --fstype ext4 --size 256
part swap --size 1024
part / --fstype ext4 --size 1 --grow
#System authorization infomation
auth --useshadow --enablemd5
#Network information
network --bootproto=dhcp --device=eth0
#Firewall configuration
firewall --disabled --ssh
#X Window System configuration information
xconfig --depth=24 --resolution=1024x768 --defaultdesktop=GNOME
%packages
@Ubuntu-desktop
红色字体部队为手动添加的
注意: 不添加@Ubuntu-desktop这行,安装成功能没有图形界面的
1.2复制ks.cfg文件/var/www/Ubuntu/目录中,并保证其它机器能通过http://192.168.10.21/Ubuntu/ks.cfg能看到ks.cfg中的内容
2.安装DHCP服务器
star@Ubuntu:~$ sudo apt-get install dhcp3-server
Reading package lists... Done
Building dependency tree
Reading state information... Done
dhcp3-server is already the newest version.
0 upgraded, 0 newly installed, 0 to remove and 277 not upgraded.
star@ Ubuntu:~$ sudo apt-get remove dhcp3-server
Reading package lists... Done
Building dependency tree
Reading state information... Done
The following packages will be REMOVED:
dhcp3-server
0 upgraded, 0 newly installed, 1 to remove and 277 not upgraded.
After this operation, 872kB disk space will be freed.
Do you want to continue [Y/n]?
2.1配置DHCP,配置文件如下
subnet 192.168.10.0 netmask 255.255.255.0 {
range 192.168.10.30 192.168.10.254;
option domain-name "192.168.10.251";
option routers 192.168.10.1;
default-lease-time 600;
max-lease-time 7200;
next-server 192.168.10.21;
filename "pxelinux.0";
增加红色字体部分
3.安装TFTP服务器
注意:必须使用TFTP-HPA这个软件包,使用TFTPD会出现问题导致不能导引导系统
star@ Ubuntu:/$ sudo apt-get install tftpd-hpa tftp-hpa
Reading package lists... Done
Building dependency tree
Reading state information... Done
The following packages will be REMOVED:
atftpd tftp
The following NEW packages will be installed:
tftp-hpa tftpd-hpa
0 upgraded, 2 newly installed, 2 to remove and 277 not upgraded.
Need to get 63.8kB of archives.
After this operation, 57.3kB disk space will be freed.
Do you want to continue [Y/n]?
3.1修改TFTP配置文件,把RUN_DAEMON=”no”改为”yes”
star@ Ubuntu:/tftpboot$ sudo vim /etc/default/tftpd-hpa
#Defaults for tftpd-hpa
RUN_DAEMON="yes"
OPTIONS="-l -s /var/lib/tftpboot"
TFTP安装完成后会建立/var/lib/tftpboot目录
star@ Ubuntu:~$ cd /var/lib/tftpboot/
star@ Ubuntu:/var/lib/tftpboot$
3.2下载 Ubuntu netboot文件(和 RedHat 有区别需要下载引导文件或在Ubuntu DVD光盘中提取)
使用wget –r 命令下载
http://archive.Ubuntu.com/Ubuntu/dists/lucid/main/installer-i386/current/images/netboot/
注意安装不同的版本其netboot文件也不同,请选择正确的下载
此处下载的是10.04的netboot文件
3.3进入/var/lib/tftp/ Ubuntu-installer/i386/boot-screens目录中,编辑text.cfg文件
default install
label install
menu label ^Install
menu default
kernel Ubuntu-installer/i386/linux
append ks=http://192.168.10.21/ Ubuntu/ks.cfg
vga=normal initrd= Ubuntu-installer/i386/initrd.gz -- quiet
label cli
menu label ^Command-line install
kernel Ubuntu-installer/i386/linux
append tasks=standard pkgsel/language-pack-patterns= pkgsel/install-language-support=false vga=normal initrd= Ubuntu-installer/i386/initrd.gz -- quiet
~
4.安装Apache2服务器
star@ Ubuntu::~$ sudo apt-get install apache2
Reading package lists... Done
Building dependency tree
Reading state information... Done
The following NEW packages will be installed:
apache2
0 upgraded, 1 newly installed, 0 to remove and 3 not upgraded.
Need to get 0B/46.8kB of archives.
After this operation, 102kB of additional disk space will be used.
Selecting previously deselected package apache2.
(Reading database ... 135440 files and directories currently installed.)
Unpacking apache2 (from .../apache2_2.2.11-2 Ubuntu2.6_all.deb) ...
Setting up apache2 (2.2.11-2 Ubuntu2.6) ...
安装完成后会建立/var/www/目录
在些目录中新建 Ubuntu 目录
4.1挂载光盘镜像,复制光盘中的所以内容到/var/www/ Ubuntu/目录下
注意: Ubuntu 光盘必须使用Alternative,desktop版本不支持,说起这个问题了,当初因为这个问题我耽误了不少时间,如果使用desktop 版本会在选择镜像地址时出现找不到镜像的提示
保证其它机器能通过http://192.168.10.21/ Ubuntu/能看到/var/www/Ubuntu/目录中的内容
安装系统
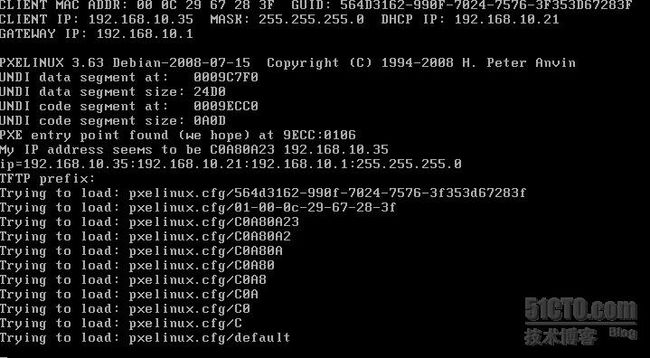
在客户裸机上设为网卡启动系统,启动系统后就会出现如下图所示的界面
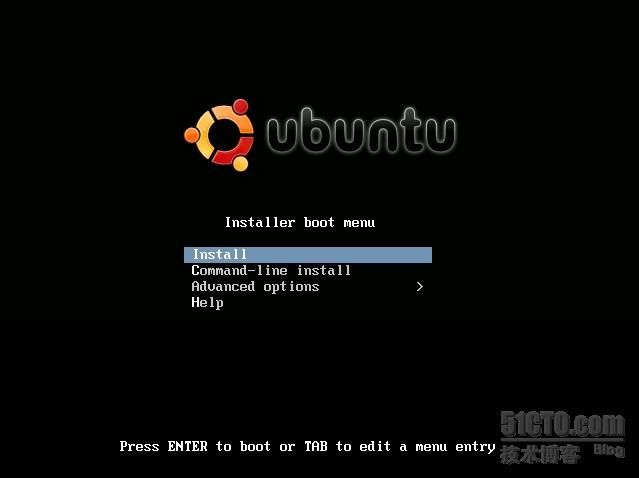
当出现如下界面时选择第一项就开始自动安装Ubuntu了
安装完成后重启系统进入Ubuntu,如下图
至此,Ubuntu 10.04算是顺利安装完成了.


