对称加密算法AES之GCM模式简介及在OpenSSL中使用举例
AES(Advanced Encryption Standard)即高级加密标准,由美国国家标准和技术协会(NIST)于2000年公布,它是一种对称加密算法。关于AES的更多介绍可以参考:https://blog.csdn.net/fengbingchun/article/details/100139524
AES的GCM(Galois/Counter Mode)模式本质上是AES的CTR模式(计数器模式)加上GMAC(Galois Message Authentication Code, 伽罗华消息认证码)进行哈希计算的一种组合模式。GCM可以提供对消息的加密和完整性校验,另外,它还可以提供附加消息的完整性校验。
OpenSSL中的EVP接口支持执行经过身份验证的加密和解密的功能,以及将未加密的关联数据附加到消息的选项。这种带有关联数据的身份验证加密(AEAD, Authenticated-Encryption with Associated-Data)方案通过对数据进行加密来提供机密性,并通过在加密数据上创建MAC标签来提供真实性保证。
Key:对称密钥,它的长度可以为128、192、256bits,用来加密明文的密码。
IV(Initialisation Vector):初始向量,它的选取必须随机。通常以明文的形式和密文一起传送。它的作用和MD5的”加盐”有些类似,目的是防止同样的明文块,始终加密成同样的密文块。
AAD(Additional Authenticated Data):附加身份验证数据。AAD数据不需要加密,通常以明文形式与密文一起传递给接收者。
Mac tag(MAC标签):将确保数据在传输和存储过程中不会被意外更改或恶意篡改。该标签随后在解密操作期间使用,以确保密文和AAD未被篡改。在加密时,Mac tag由明文、密钥Key、IV、AAD共同产生。
以下为测试代码:
namespace {

static const unsigned char gcm_key[] = { // 32 bytes, Key
	0xee, 0xbc, 0x1f, 0x57, 0x48, 0x7f, 0x51, 0x92, 0x1c, 0x04, 0x65, 0x66,
	0x5f, 0x8a, 0xe6, 0xd1, 0x65, 0x8b, 0xb2, 0x6d, 0xe6, 0xf8, 0xa0, 0x69,
	0xa3, 0x52, 0x02, 0x93, 0xa5, 0x72, 0x07, 0x8f
};

static const unsigned char gcm_iv[] = { // 12 bytes, IV(Initialisation Vector)
	0x99, 0xaa, 0x3e, 0x68, 0xed, 0x81, 0x73, 0xa0, 0xee, 0xd0, 0x66, 0x84
};

// Additional Authenticated Data(AAD): it is not encrypted, and is typically passed to the recipient in plaintext along with the ciphertext
static const unsigned char gcm_aad[] = { // 16 bytes
	0x4d, 0x23, 0xc3, 0xce, 0xc3, 0x34, 0xb4, 0x9b, 0xdb, 0x37, 0x0c, 0x43,
	0x7f, 0xec, 0x78, 0xde
};

std::unique_ptr aes_gcm_encrypt(const char* plaintext, int& length, unsigned char* tag)
{
	EVP_CIPHER_CTX* ctx = EVP_CIPHER_CTX_new();
	// Set cipher type and mode
	EVP_EncryptInit_ex(ctx, EVP_aes_256_gcm(), nullptr, nullptr, nullptr);
	// Set IV length if default 96 bits is not appropriate
	EVP_CIPHER_CTX_ctrl(ctx, EVP_CTRL_AEAD_SET_IVLEN, sizeof(gcm_iv), nullptr);
	// Initialise key and IV
	EVP_EncryptInit_ex(ctx, nullptr, nullptr, gcm_key, gcm_iv);
	// Zero or more calls to specify any AAD
	int outlen;
	EVP_EncryptUpdate(ctx, nullptr, &outlen, gcm_aad, sizeof(gcm_aad));
	unsigned char outbuf[1024];
	// Encrypt plaintext
	EVP_EncryptUpdate(ctx, outbuf, &outlen, (const unsigned char*)plaintext, strlen(plaintext));
	length = outlen;
	std::unique_ptr ciphertext(new unsigned char[length]);
	memcpy(ciphertext.get(), outbuf, length);
	// Finalise: note get no output for GCM
	EVP_EncryptFinal_ex(ctx, outbuf, &outlen);
	// Get tag
	EVP_CIPHER_CTX_ctrl(ctx, EVP_CTRL_AEAD_GET_TAG, 16, outbuf);
	memcpy(tag, outbuf, 16);
	// Clean up
	EVP_CIPHER_CTX_free(ctx);
	return ciphertext;
}

std::unique_ptr aes_gcm_decrypt(const unsigned char* ciphertext, int& length, const unsigned char* tag)
{
	EVP_CIPHER_CTX* ctx = EVP_CIPHER_CTX_new();
	// Select cipher
	EVP_DecryptInit_ex(ctx, EVP_aes_256_gcm(), nullptr, nullptr, nullptr);
	// Set IV length, omit for 96 bits
	EVP_CIPHER_CTX_ctrl(ctx, EVP_CTRL_AEAD_SET_IVLEN, sizeof(gcm_iv), nullptr);
	// Specify key and IV
	EVP_DecryptInit_ex(ctx, nullptr, nullptr, gcm_key, gcm_iv);
	int outlen;
	// Zero or more calls to specify any AAD
	EVP_DecryptUpdate(ctx, nullptr, &outlen, gcm_aad, sizeof(gcm_aad));
	unsigned char outbuf[1024];
	// Decrypt plaintext
	EVP_DecryptUpdate(ctx, outbuf, &outlen, ciphertext, length);
	// Output decrypted block
	length = outlen;
	std::unique_ptr plaintext(new unsigned char[length]);
	memcpy(plaintext.get(), outbuf, length);
	// Set expected tag value
	EVP_CIPHER_CTX_ctrl(ctx, EVP_CTRL_AEAD_SET_TAG, 16, (void*)tag);
	// Finalise: note get no output for GCM
	int rv = EVP_DecryptFinal_ex(ctx, outbuf, &outlen);
	// Print out return value. If this is not successful authentication failed and plaintext is not trustworthy.
	fprintf(stdout, "Tag Verify %s\n", rv > 0 ? "Successful!" : "Failed!");
	EVP_CIPHER_CTX_free(ctx);
	return plaintext;
}

} // namespace

int test_openssl_aes_gcm()
{
	/* reference:
		https://github.com/openssl/openssl/blob/master/demos/evp/aesgcm.c
		https://wiki.openssl.org/index.php/EVP_Authenticated_Encryption_and_Decryption
	*/
	fprintf(stdout, "Start AES GCM 256 Encrypt:\n");
	const char* plaintext = "1234567890ABCDEFG!@#$%^&*()_+[]{};':,.<>/?|";
	fprintf(stdout, "src plaintext: %s, length: %d\n", plaintext, strlen(plaintext));
	int length = 0;
	std::unique_ptr tag(new unsigned char[16]);
	std::unique_ptr ciphertext = aes_gcm_encrypt(plaintext, length, tag.get());
	fprintf(stdout, "length: %d, ciphertext: ", length);
	for (int i = 0; i < length; ++i)
		fprintf(stdout, "%02x ", ciphertext.get()[i]);
	fprintf(stdout, "\nTag: ");
	for (int i = 0; i < 16; ++i)
		fprintf(stdout, "%02x ", tag.get()[i]);
	fprintf(stdout, "\n");

	fprintf(stdout, "\nStart AES GCM 256 Decrypt:\n");
	std::unique_ptr result = aes_gcm_decrypt(ciphertext.get(), length, tag.get());
	fprintf(stdout, "length: %d, decrypted plaintext: ", length);
	for (int i = 0; i < length; ++i)
		fprintf(stdout, "%c", result.get()[i]);
	fprintf(stdout, "\n");

	if (strncmp(plaintext, (const char*)result.get(), length) == 0) {
		fprintf(stdout, "decrypt success\n");
		return 0;
	} else {
		fprintf(stderr, "decrypt fail\n");
		return -1;
	}
}
在Windows上执行结果如下:
以上是在OpenSSL较老的版本1.0.1g上执行的,在最新版1.1.1g上以上代码也同样可以执行。
在Windows上编译1.1.1g版本源码执行命令如下:no-asm选项为不开启汇编模式,编译release则将debug-VC-WIN64A改为VC-WIN64即可。
perl Configure debug-VC-WIN64A no-asm --prefix=D:\DownLoad\openssl\win64_debug
nmake
nmake install
在Linux上编译1.1.1g版本源码执行命令如下:
./config --prefix=/home/sensetime/Downloads/openssl/install
make
make insall
在1.1.1g源码的demos/evp目录下给出了gcm的示例aesgcm.c,这里将以上测试代码新加为aesgcm2.cpp,编译脚本如下:
#! /bin/bash

g++ -o test_aesgcm aesgcm.c -L ../../ -lcrypto -lssl -I../../include
g++ -o test_aesgcm2 aesgcm2.cpp -std=c++11 -L ../../ -lcrypto -lssl -I../../include

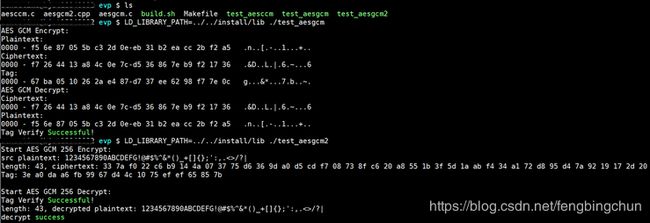
g++ -o test_aesccm aesccm.c -L ../../ -lcrypto -lssl -I../../include执行结果如下:注意如果在Windows上执行aesgcm2.cpp,需要额外的 #include
GitHub:https://github.com//fengbingchun/OpenSSL_Test

