仿QQ视屏动画特效-人脸识别.附项目源码
本文旨在对类似于QQ视屏动画特效的实现原理进行探究。
文章主要涉及到三方面内容:
(1)AVFoundation的图像视频操作框架
(2)CoreImage中的CIDetector人脸识别框架
(3)OpenGLES的绘图操作
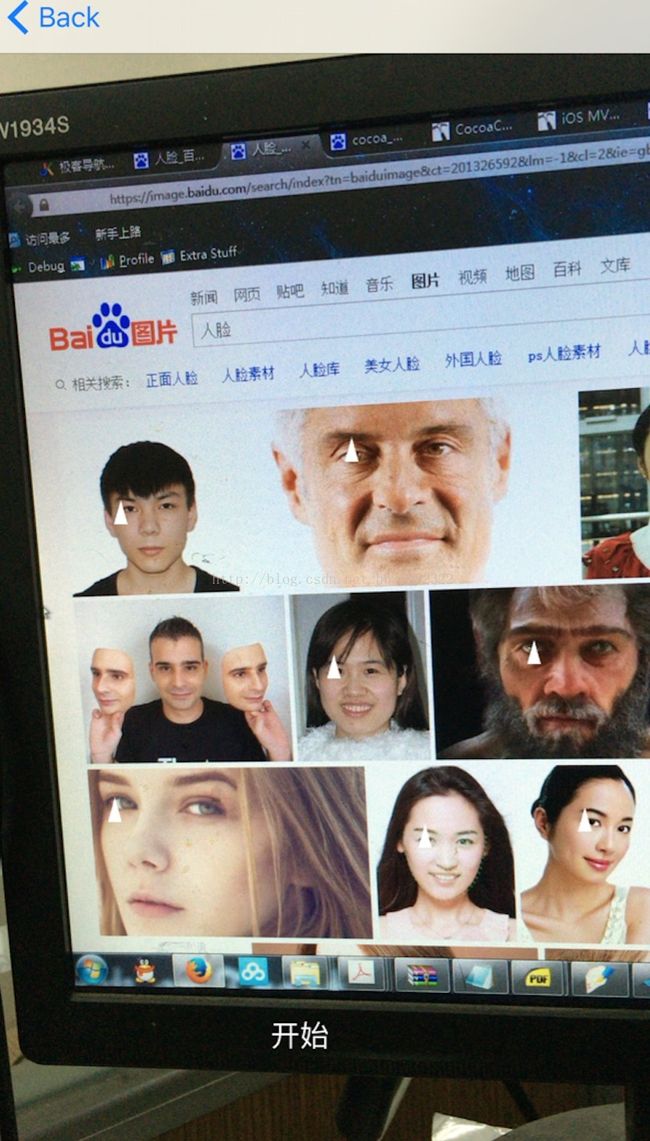
本文模仿QQ视频特效实现了人脸识别操作。最终能够实时的识别出手机摄像头画面中的人脸特征,并初步利用OpenGLES实现实时绘图操作。效果如下图,在每个识别出的左眼上绘制一个小的白色三角形:
第一部分:在手机界面上实时的显示出摄像头捕获的图像
(1)视频流管道铺设
有两种方法可以将摄像头捕捉到的画面实时的显示在手机屏幕上,一种是利用AVFoundation框架中的AVCaptureVideoPreviewLayer来显示,另外一种是利用OpenGLES将摄像头捕获的图像画在屏幕上。我们知道IOS应用中所有的绘图都发生在层之上,但是你若是想在AVCaptureVideoPreviewLayer进行一些自定义的画图操作是很困难的,所以如果使用了AVCaptureVideoPreviewLayer将会难以进行一些深度的个性化定制。为了避免这个问题并最终实现本文开头提到的效果,我门应该使用一个GLKView,并在GLKView的Layer上进行操作,先将摄像头捕获的图像画到Layer上,然后再利用OpenGLES在Layer上画一些你需要的图像,这样就能达到最终的目标。
我先介绍如何调用系统摄像头进行拍摄,ios下实现视频流的开启非常像一个管道的铺设,用一堆单个的管子(类)逐一套接在一起就能使视频流正常工作, 在这里我们应该遵循一个逻辑顺序:
AVCaptureDevice -> AVCaptureDeviceInput -> AVCaptureSession -> AVCaptureVideoDataOutput

在实现了上述的管线之后,我们还需要实现一个delegate方法:
- (void)captureOutput: didOutputSampleBuffer: fromConnection:
这个代理方法会在摄像头每获取一帧图像之后调用一次,在这个方法里面我们就可以对捕获到的图像进行操作。代码如下:
    backDevice = [self getDeviceWithPosition:AVCaptureDevicePositionBack];
    frontDevice = [self getDeviceWithPosition:AVCaptureDevicePositionFront];

    NSError *inputError;
    backDeviceInput = [[AVCaptureDeviceInput alloc]initWithDevice:backDevice error:&inputError];
    frontDeviceInput = [[AVCaptureDeviceInput alloc]initWithDevice:frontDevice error:&inputError];

    session = [[AVCaptureSession alloc]init];
    if ([session canAddInput:backDeviceInput]) {
        [session addInput:backDeviceInput];
        isUsingFrontFacingCamera = NO;
    }

    videoDataOutput = [[AVCaptureVideoDataOutput alloc]init];
    videoDataOutput.alwaysDiscardsLateVideoFrames = YES;
    NSString* key = (NSString*)kCVPixelBufferPixelFormatTypeKey;
    NSNumber* value = [NSNumber numberWithUnsignedInt:kCVPixelFormatType_32BGRA];
    NSDictionary* videoSettings = [NSDictionary dictionaryWithObject:value forKey:key];
    [videoDataOutput setVideoSettings:videoSettings];

    if ([session canAddOutput:videoDataOutput]) {
        [session addOutput:videoDataOutput];
    }
只要再添加一行代码:[session startRunning],摄像头就会开始工作。
(2)实时画面显示
AVCaptureVideoPreviewLayer:
如果是要简单实现将摄像头捕获的图像显示出来,我们可以使用AVCaptureVideoPreviewLayer来实现,只需要:
previewLayer = [[AVCaptureVideoPreviewLayer alloc]initWithSession:session];
   [previewLayer setFrame:CGRectMake(0, 0, [UIScreen mainScreen].bounds.size.width,[UIScreen mainScreen].bounds.size.height)];
   [self.view.layer addSublayer:previewLayer];
即可。
OpenGLES:
如果是要采用OpenGLES来绘制,我们先要搞清楚一件事情,摄像头捕获的图像默认的方向与我们人眼看到的图像是不一样的,摄像头捕获的图像相当于我们人眼看到的图像顺时针旋转90度,通俗点说就是把我们看到图像向右放倒、平躺了。 所以在显示图像之前我们要将其逆时针旋转90度。 首先在代理方法中取出图像:
 CVPixelBufferRef pixelBuffer = CMSampleBufferGetImageBuffer(sampleBuffer);
    CFDictionaryRef attachments = CMCopyDictionaryOfAttachments(kCFAllocatorDefault, sampleBuffer, kCMAttachmentMode_ShouldPropagate);
CIImage *ciImage = [[CIImage alloc] initWithCVPixelBuffer:pixelBuffer options:(__bridge NSDictionary *)attachments];ciImage = [ciImage imageByApplyingTransform:[ciImage imageTransformForOrientation:6]];
将图片转化为指定的方向。
如果不需要再绘制其他的东西,那么我们只要再代理方法中调用:
    [glkView bindDrawable];
    [ciContext drawImage:ciImage inRect:ciImage.extent fromRect:ciImage.extent ];
    [glkView display];
就能实现实时画面的显示。
第二部分:实时人脸识别
(1)调用CIDetector进行人脸识别
IOS的CoreImage框架自带了一个人脸识别类CIDetector,我们将每一帧图像传给CIDetector识别即可。
在识别之前,我们先确定设备的方向:
	CIDetector *faceRecognizer;
	UIDeviceOrientation curDeviceOrientation = [[UIDevice currentDevice] orientation];
    	int exifOrientation;//捕捉到的图像的方向
    	enum {
        	PHOTOS_EXIF_0ROW_TOP_0COL_LEFT			= 1, //   1  =  0th row is at the top, and 0th column is on the 										left (THE DEFAULT).
        	PHOTOS_EXIF_0ROW_TOP_0COL_RIGHT			= 2, //   2  =  0th row is at the top, and 0th column is on the 										right.
       		PHOTOS_EXIF_0ROW_BOTTOM_0COL_RIGHT      = 3, //   3  =  0th row is at the bottom, and 0th column is on the right
        	PHOTOS_EXIF_0ROW_BOTTOM_0COL_LEFT       = 4, //   4  =  0th row is at the bottom, and 0th column is on the left.
        	PHOTOS_EXIF_0ROW_LEFT_0COL_TOP          = 5, //   5  =  0th row is on the left, and 0th column is the top.
        	PHOTOS_EXIF_0ROW_RIGHT_0COL_TOP         = 6, //   6  =  0th row is on the right, and 0th column is the top.
        	PHOTOS_EXIF_0ROW_RIGHT_0COL_BOTTOM      = 7, //   7  =  0th row is on the right, and 0th column is the bottom.
        	PHOTOS_EXIF_0ROW_LEFT_0COL_BOTTOM       = 8  //   8  =  0th row is on the left, and 0th column is the bottom.
    	};

    	switch (curDeviceOrientation) {
        	case UIDeviceOrientationPortraitUpsideDown:  // Device oriented vertically, home button on the top
            		exifOrientation = PHOTOS_EXIF_0ROW_LEFT_0COL_BOTTOM;
            		break;
        	case UIDeviceOrientationLandscapeLeft:       // Device oriented horizontally, home button on the right
            		if (isUsingFrontFacingCamera)
               			exifOrientation = PHOTOS_EXIF_0ROW_BOTTOM_0COL_RIGHT;
            		else
                		exifOrientation = PHOTOS_EXIF_0ROW_TOP_0COL_LEFT;
            		break;
        	case UIDeviceOrientationLandscapeRight:      // Device oriented horizontally, home button on the left
            		if (isUsingFrontFacingCamera)
                		exifOrientation = PHOTOS_EXIF_0ROW_TOP_0COL_LEFT;
           		else
                		exifOrientation = PHOTOS_EXIF_0ROW_BOTTOM_0COL_RIGHT;
            		break;
        	case UIDeviceOrientationPortrait:   // Device oriented vertically, home button on the bottom
        	default:
            		exifOrientation = PHOTOS_EXIF_0ROW_RIGHT_0COL_TOP;
            		break;
   	}
然后将图像传给CIDetector识别,会返回一个检测结果数组,数组中每一个对象就是一个人脸的数据:
	NSDictionary *imageOptions = [NSDictionary dictionaryWithObject:[NSNumber numberWithInt:exifOrientation] forKey:CIDetectorImageOrientation];
    	NSArray *features = [faceRecognizer featuresInImage:ciImage options:imageOptions];
(2)坐标变换(重要)
这里提到的坐标变换包含
两个方面:
图像缩放:
摄像头捕获的图像实际大小不等于手机屏幕大小,通过ciImage.extent.size.width,ciImage.extent.size.height可以查看图像实际大小,在我的机子上(iPhone 6s plus)上输出的结果是 1920x1080,而6s plus的屏幕大小是414x736, 换算一下我们可以知道将原图逆时针旋转90度并乘以一个缩放系数就等于手机屏幕的大小了。 相应的,其实数组features中的人脸数据也应该进行逆时针90度的转换:
for( CIFaceFeature *f in features ){

	CGRect face_Rect = [f bounds];

        // flip preview width and height  变换宽与高、x与y坐标
        CGFloat temp = face_Rect.size.width;
        face_Rect.size.width = face_Rect.size.height;
        face_Rect.size.height = temp;
        temp = face_Rect.origin.x;
        face_Rect.origin.x = face_Rect.origin.y;
        face_Rect.origin.y = temp;
        // scale coordinates so they fit in the preview box, which may be scaled
        CGFloat widthScaleBy = [UIScreen mainScreen].bounds.size.width / clap.size.height;
        CGFloat heightScaleBy = [UIScreen mainScreen].bounds.size.height / clap.size.width;
        face_Rect.size.width *= widthScaleBy;
        face_Rect.size.height *= heightScaleBy;
        face_Rect.origin.x *= widthScaleBy;
        face_Rect.origin.y *= heightScaleBy;

        NSLog(@"clap:%f,%f,%f,%f",clap.origin.x,clap.origin.y,clap.size.width,clap.size.height);
        NSLog(@"face_Rect:%f,%f",face_Rect.size.width,face_Rect.size.height);

        CGFloat leftEyePositionX = f.leftEyePosition.y*([UIScreen mainScreen].bounds.size.width/clap.size.height);
        CGFloat leftEyePositionY = f.leftEyePosition.x*([UIScreen mainScreen].bounds.size.height/clap.size.width);

        NSLog (@"left eye: %g %g",f.leftEyePosition.x, f.leftEyePosition.y);
        NSLog (@"left eye after: %g %g",leftEyePositionX, leftEyePositionY );
}
OpenGLES坐标系与UIKit坐标系转换
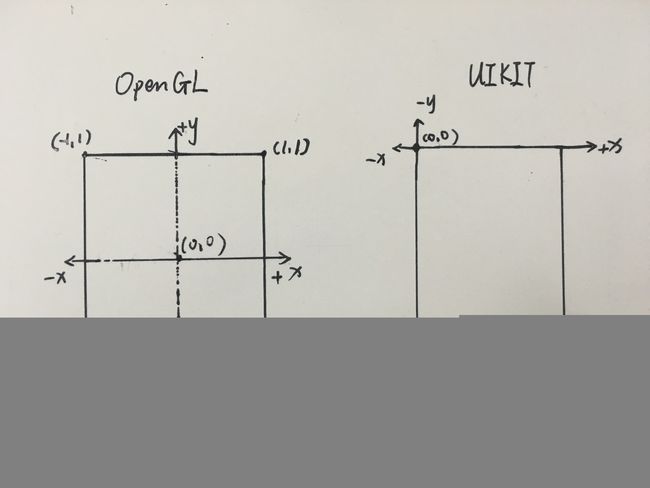
我手绘了这两个坐标系,能直观的看出两者明显的不同,openGLES以屏幕中心点为原点,而UIKit以屏幕的左上角为原点。我们如果要根据UIKit图像中人脸的位置来使用openGLES作图,就必须先统一两者的坐标系。由于这里不涉及z轴的转换,所以我拿起笔手动总结了两者的转换公式:
| openGLES | UIKit | 备注 |
| (x,y) | (width*(x+1)/2, height*(1-y)/2) | width为屏幕宽度,height为屏幕长度 |
| (2*x/width-1, 1-2*y/height) | (x,y) |
也就是说,若已知openGLES下的点的坐标为(x,y),那么其在UIKit下的相应的坐标就为(width*(x+1)/2, height*(1-y)/2);而若已知UIKit下的点的坐标为(x,y),那么其在openGLES下的相应的坐标就为(2*x/width-1, 1-2*y/height)。
所以我们先取出人脸左眼在UIKit下的坐标,然后转换为openGLES下的坐标,并用opengles绘制即可:
//先转换为openGLES坐标(未考虑z)
        CGFloat x = 2*leftEyePositionX/self.view.bounds.size.width-1;
        CGFloat y = 1-2*leftEyePositionY/self.view.bounds.size.height;

        NSLog(@"openGLES  x:%f, y:%f",x,y);

        GLKVector3 top = GLKVector3Make(x, y+0.02, 0);
        GLKVector3 right = GLKVector3Make(x+0.02, y-0.02, 0);
        GLKVector3 left = GLKVector3Make(x-0.02, y-0.02, 0);

        NSLog(@"openGLES top x:%f, y:%f",x,y+0.02);
        NSLog(@"openGLES right x:%f, y:%f",x+0.02,y-0.02);
        NSLog(@"openGLES left x:%f, y:%f",x-0.02,y-0.02);

        SceneVertex Top = {top};
        SceneVertex Right = {right};
        SceneVertex Left = {left};

        vertices[0] = Top;
        vertices[1] = Right;
        vertices[2] = Left;

        [self.baseEffect prepareToDraw];

        glGenBuffers(1,                // STEP 1
                     &vertexBufferID);
        glBindBuffer(GL_ARRAY_BUFFER,  // STEP 2
                     vertexBufferID);
        glBufferData(                  // STEP 3
                     GL_ARRAY_BUFFER,  // Initialize buffer contents
                     sizeof(vertices), // Number of bytes to copy
                     vertices,         // Address of bytes to copy
                     GL_STATIC_DRAW);  // Hint: cache in GPU memory

        // Enable use of positions from bound vertex buffer
        glEnableVertexAttribArray(      // STEP 4
                                  GLKVertexAttribPosition);

        glVertexAttribPointer(          // STEP 5
                              GLKVertexAttribPosition,
                              3,                   // three components per vertex
                              GL_FLOAT,            // data is floating point
                              GL_FALSE,            // no fixed point scaling
                              sizeof(SceneVertex), // no gaps in data
                              NULL);               // NULL tells GPU to start at
        // beginning of bound buffer

        // Draw triangles using the first three vertices in the
        // currently bound vertex buffer
        glDrawArrays(GL_TRIANGLES,      // STEP 6
                     0,  // Start with first vertex in currently bound buffer
                     3); // Use three vertices from currently bound buffer
    }
       [glkView display];
项目源码:
https://github.com/holyHbw/faceRecognize