调用 OpenSSL 1.1.1 计算 SM3 杂凑值的一个简单示例
在前面的博文《Windows上使用VS 2010编译OpenSSL 1.1.1-pre6》中介绍了如何在 Windows 平台上编译 OpenSSL 1.1.1, 在这个版本中增加了对国密 SM2、SM3、SM4 算法的支持,本文介绍一下如何调用它计算 SM3 杂凑值。
在编译好的 OpenSSL 1.1.1 库文件中,并没有对外部提供单独的计算 SM3 杂凑值的函数。计算各种杂凑函数,都需要通过调用 EVP 相关函数来完成。下面对调用 EVP 计算 SM3 杂凑值的过程进行了一下简单封装,分为三个文件给出示例代码:
1) sm3hash.h
/**************************************************
* File name: sm3hash.h
* Author: HAN Wei
* Author's blog: http://blog.csdn.net/henter/
* Date: June 18th, 2018
* Description: declare a sm3 hash calculation function
**************************************************/

#ifndef HEADER_C_FILE_SM3_HASH_H
  #define HEADER_C_FILE_SM3_HASH_H

#ifdef  __cplusplus
  extern "C" {
#endif

int sm3_hash(const unsigned char *message, size_t len, unsigned char *hash, unsigned int *hash_len);

#ifdef  __cplusplus
  }
#endif

#endif  /* end of HEADER_C_FILE_SM3_HASH_H */
2) sm3hash.c
/**************************************************
* File name: sm3hash.c
* Author: HAN Wei
* Author's blog: http://blog.csdn.net/henter/
* Date: June 18th, 2018
* Description: implement a sm3 hash calculation function
**************************************************/

#include "openssl/evp.h"
#include "sm3hash.h"

int sm3_hash(const unsigned char *message, size_t len, unsigned char *hash, unsigned int *hash_len)
{
    EVP_MD_CTX *md_ctx;
    const EVP_MD *md;

    md = EVP_sm3();
    md_ctx = EVP_MD_CTX_new();
    EVP_DigestInit_ex(md_ctx, md, NULL);
    EVP_DigestUpdate(md_ctx, message, len);
    EVP_DigestFinal_ex(md_ctx, hash, hash_len);
    EVP_MD_CTX_free(md_ctx);
    return 0;
}
3) demo.c
/**************************************************
* File name: demo.c
* Author: HAN Wei
* Author's blog: http://blog.csdn.net/henter/
* Date: June 18th, 2018
* Description: This program demonstrates how to calculate SM3 hash
    by invoking OpenSSL v1.1.1. Sample data used here are excerpted
    from GM/T 0004 "SM3 cryptographic hash algorithm".
**************************************************/

#include
#include
#include "sm3hash.h"

int main(void)
{
	const unsigned char sample1[] = {'a', 'b', 'c', 0};
	unsigned int sample1_len = strlen((char *)sample1);
	const unsigned char sample2[] = {0x61, 0x62, 0x63, 0x64, 0x61, 0x62, 0x63, 0x64,
                                         0x61, 0x62, 0x63, 0x64, 0x61, 0x62, 0x63, 0x64,
                                         0x61, 0x62, 0x63, 0x64, 0x61, 0x62, 0x63, 0x64,
                                         0x61, 0x62, 0x63, 0x64, 0x61, 0x62, 0x63, 0x64,
                                         0x61, 0x62, 0x63, 0x64, 0x61, 0x62, 0x63, 0x64,
                                         0x61, 0x62, 0x63, 0x64, 0x61, 0x62, 0x63, 0x64,
                                         0x61, 0x62, 0x63, 0x64, 0x61, 0x62, 0x63, 0x64,
                                         0x61, 0x62, 0x63, 0x64, 0x61, 0x62, 0x63, 0x64};
	unsigned int sample2_len = sizeof(sample2);
	unsigned char hash_value[64];
	unsigned int i, hash_len;

	sm3_hash(sample1, sample1_len, hash_value, &hash_len);
	printf("raw data: %s\n", sample1);
	printf("hash length: %d bytes.\n", hash_len);
	printf("hash value:\n");
	for (i = 0; i < hash_len; i++)
	{
	    printf("0x%x  ", hash_value[i]);
	}
	printf("\n\n");

	sm3_hash(sample2, sample2_len, hash_value, &hash_len);
	printf("raw data:\n");
	for (i = 0; i < sample2_len; i++)
	{
	    printf("0x%x  ", sample2[i]);
	}
	printf("\n");
	printf("hash length: %d bytes.\n", hash_len);
	printf("hash value:\n");
	for (i = 0; i < hash_len; i++)
	{
	    printf("0x%x  ", hash_value[i]);
	}
	printf("\n");

	return 0;
}
如果是在 Windows 平台上使用 Visual Studio 编译以上程序,在项目的“属性页”中,“属性配置”->“C/C++”->“附加包含目录”中要设置 OpenSSL 头文件所在目录,比如对于 32 位的 OpenSSL,目录可能为:C:\Program Files (x86)\OpenSSL\include 。注意在设置后括号相关字符会有变化,有可能会显示成:C:\Program Files %28x86%29\OpenSSL\include ,但不影响使用。
“属性配置”->“链接器”->“常规”->“附加库目录”要设置 OpenSSL 库文件所在的目录,比如对于 32 位的 OpenSSL,目录可能为:C:\Program Files (x86)\OpenSSL\lib 。注意在设置后括号相关字符会有变化,有可能会显示成:C:\Program Files %28x86%29\OpenSSL\lib ,但不影响使用。
“属性配置”->“链接器”->“输入”->“附加依赖项”要设置 OpenSSL 库文件名,比如:libcrypto.lib 。
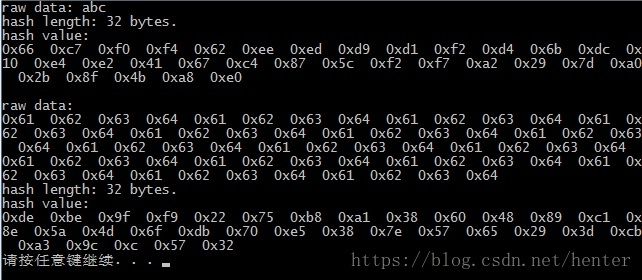
在运行程序时,要将 OpenSSL 的动态库文件 libcrypto-1_1.dll (如果编译出的是32位的exe程序,要用到这个32位库文件)或 libcrypto-1_1-x64.dll(如果编译出的是64位的exe程序,要用到这个64位库文件)拷贝到 Windows 系统目录下,或拷贝到编译出的 exe 文件所在目录下,只有这样程序才能正常运行。运行结果如下图:
