ant design + egg (Node.js + React)开发web前后台
接下来我采用蚂蚁金服开源的前后台框架搭建非Java的微服务。
前台:Ant Design(基于Node.js & React)
后台:egg(基于Node.js & Koa)
搭建前台环境
创建项目(详细过程见在 create-react-app 中使用),执行“安装和初始化”和“引入antd”的步骤
用VS Code打开文件夹。
在package.json中增加 :
"proxy": "http://localhost:7001"重写App.js
import React, { Component } from 'react';
import './App.css';

class App extends Component {
  constructor(props) {
    super(props);
    this.state = {
      echo: '',
    };
  }
  componentDidMount() {
    fetch('/index').then((res)=>{
      if(res.ok){
          res.text().then((data)=>{
              console.log(data);
              this.setState({
                echo:data
              });
            })
        }
    }).catch((res)=>{
        console.log(res.status);
    });
  }

  componentWillUnmount() {
    this.serverRequest.abort();
  }

  render() {
    return (
      "App">
        {this.state.echo}

    );
  }
}

export default App;
搭建后台环境
创建后台项目(详见egg快速入门)
$ npm i egg-init -g
$ egg-init egg-example --type=simple
$ cd egg-example
$ npm i
修改app -> router.js,增加一行路由
router.get('/index', controller.home.index);运行
在VS Code中启动后台和前台:
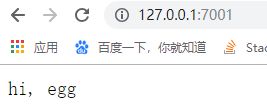
执行“npm dev”或egg-example -> package.json中的dev脚本(或鼠标移到scripts -> dev,左右键都能运行),出来界面:

执行“npm start”或antd-demo -> package.json中的start脚本(鼠标移到scripts -> start,左右键都能运行),出来界面:

说明已经成功访问到后台。
调试
后台调试
用VS Code打开egg-example。
创建.vscode -> launch.json文件,配置如下:
{
    "version": "0.2.0",
    "configurations": [
      {
        "name": "Launch Egg",
        "type": "node",
        "request": "launch",
        "cwd": "${workspaceRoot}",
        "runtimeExecutable": "npm",
        "windows": { "runtimeExecutable": "npm.cmd" },
        "runtimeArgs": [ "run", "debug" ],
        "console": "integratedTerminal",
        "protocol": "auto",
        "restart": true,
        "port": 9999
      }
    ]
}
之后重新用F5打开调试方式运行后台就行了。
调试前台
用VS Code打开antd-demo。
首先安装Debugger for Chrome插件。
创建.vscode -> launch.json文件,配置如下:
{
    "version": "0.2.0",
    "configurations": [{
        "name": "Chrome",
        "type": "chrome",
        "request": "launch",
        "url": "http://localhost:3000",
        "webRoot": "${workspaceRoot}/src",
        "userDataDir": "${workspaceRoot}/.vscode/chrome",
        "sourceMapPathOverrides": {
            "webpack:///src/*": "${webRoot}/*"
        }
    }]
}
npm start启动前台,并F5打开调试(两个都要打开),这样就可以调试前台了。