用mininet来自定义拓扑结构
一、前言:
学习SDN的人,我相信大部分人都用过或者听过mininet,我觉得这是一款集成软件,它给初学者带来了很多的方便,没有真实的openflow交换机,也没有那么多的主机的环境下,mininet的确是一个不错的选择,但是毕竟我们通常在一台PC机上面安装了控制器,来对SDN网络进行控制,而这时我们接着在这台PC机上面安装mininet,什么ovs和主机都在上面进行模拟的话,就缺少了许多真实感,对SDN的架构也会缺少应有的了解,如在我最开始的时候我一直都觉着ovs是必须要通过mininet来进行运行的,在安装时有的mininet就集成了pox控制器,这时不了解sdn架构的初学者就会认为mininet就是实现sdn网络的一切,其实不然,要知道,控制器和它是没有多大的关系。有人会问:在mininet中为什么没有添加流表的时候两台主机会ping通,原因在于控制器中的二层自学习功能,因为这是控制器可以通过下发流表的方式来使交换机产生流表,从而两台机器ping通,这时如果你关闭了控制器,你会发现两台主机就ping不同了。这个例子其实很好地阐释了sdn网络与传统网络的区别。总之,mininet有好有坏,我建议我们做研究的,最好还是可以在真实的环境中搭建下环境,这样才能有更深的体会。
二、mininet的安装及相关的配置:
1、mininet的安装:
这里接着说几句题外话,我觉着学习这些知识,Google是一个不错的选择,各种新技术的了解我觉着自己去国外的官网里查,即使看英文慢点,但是会有更深的了解。mininet的官网就是http://mininet.org/walkthrough/">http://mininet.org里面有具体教你安装的教程。
2、mininet的配置:
http://mininet.org/walkthrough/和http://mininet.org/walkthrough以及http://archive.openflow.org/wk/index.php/
(1)sudo mn 其实就是默认进入mininet自带拓扑结构的网络环境;
(2)其实想要对各个设备进行操作的话,我建议使用xterm name of node进入各自设备进行配置,但我觉着这点有点像传统网络里的管理,通过远程登陆到各自的设备中进行配置,这点我建议大家如果想要对流表进行操作的话还是使用OVS的命令来进行配置,这个我们会在后面的笔记中总结;
(3)如果想要改变拓扑结构和相关的参数,需要在sudo mn 进入的时候在后面添加参数变量,即:
     sudo mn --test pingall --topo single,3 //一台交换机,两台主机
     sudo mn --test pingall --topo linear,4 //linear表示每台交换机链接一台主机
     sudo mn --link tc,bw=10,delay=10ms //带宽设置10M,延迟为10ms
     sudo mn --mac //mac以1、2递增的顺序保存
     sudo mn --switch ovsk --controller ref --topo tree,depth=2,fanout=8 --test pingall //二层八叉树,即九台交换机加上64台主机
sudo mn --topo single,3 --mac --switch ovsk --controller remote //(4)通过Python来自定义拓扑结构:
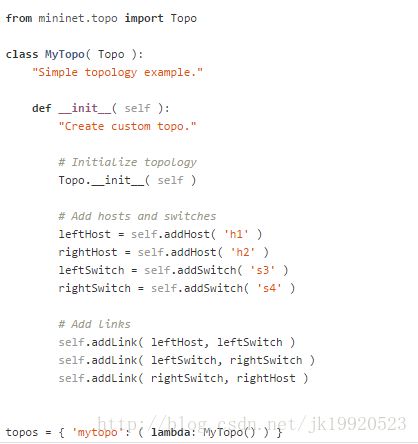
方式一:通过对文件 mininet/custom/topo-2sw-2host.py的修改来自定义拓扑结构:
-
cp ~/mininet/custom/topo-2sw-2host.py mytopo.py //复制文件 -
vim mytopo.py
对里面进行修改:
添加两行:
rightHost1=self.addHost('h3')self.addLink(rightSwitch,rightHost1)最后进入模式下就行:
sudo mn --custom mytopo.py --topo mytopo --mac
方式二:直接自己来创建一个网络拓扑(Python语言)
在官网里mininet中的源代码都是开源的,你可以最好的了解各个部分是怎样实现的,用了哪些函数进行了定义,知道这些函数的作用,这样才能写出好的代码结构:我的代码参考http://www.muzixing.com/pages/2013/12/06/yuan-chuang-mininetda-jian-zi-ding-yi-wang-luo-tuo-bu-by-muzi.html
(1)首先将相关的模块引用进来:
/#!/usr/bin/python

import re
from mininet.cli import CLI
from mininet.log import setLogLevel, info,error
from mininet.net import Mininet
from mininet.link import Intf
from mininet.topolib import TreeTopo
from mininet.util import quietRun
from mininet.node import RemoteController, OVSKernelSwitch
其中re模块提供python正则表达式的支持
if __name__ == "__main__":
    setLogLevel("info")
    OVSKernelSwitch.setup() //开启一个网络
    intfName_1 = "eth1"     //将虚拟机eth1赋值给为变量intfName_1
    intfName_2 = "eth2"
    info("****checking****", intfName_1, '\n')
    checkIntf(intfName_1)    //检查是否可用
    info("****checking****", intfName_2, '\n')
    checkIntf(intfName_2)

    info("****creating network****\n")
    net = Mininet(listenPort = 6634)   //创建一个Mininet的实例,端口为6634

    mycontroller = RemoteController("myController",   ip = "127.0.0.1")//创建远程控制器,ip=127.0.0.1,端口是6634。

    switch_1 = net.addSwitch('s1')   //在net里添加交换机s1,mininet中规则为:如果不填充dpid参数,则dpid参数默认取sn的n.即s1的dpid为1。
    switch_2 = net.addSwitch('s2')


    net.controllers = [mycontroller] //将远程控制器添加到网络中


    net.addLink(switch_1, switch_2, 2, 1)# node1,   node2, port1, port2

    info("*****Adding hardware interface ",     intfName_1, "to switch:" ,switch_1.name, '\n')
    info("*****Adding hardware interface ",     intfName_2, "to switch:" ,switch_2.name, '\n')

    _intf_1 = Intf(intfName_1, node = switch_1, port =  1)//将intfName_1和s1的端口1相连,形成一个接口_intf_1
    _intf_2 = Intf(intfName_2, node = switch_2, port =  2)

    info("Node: you may need to reconfigure the     interfaces for the Mininet hosts:\n",   net.hosts, '\n')

    net.start()  //启动net
    CLI(net)     //等待键入命令
    net.stop()   //关闭net
(3)这个时候就不需要写sudo mn 后面的参数进行进入,只需要调用你的Python文件就可以了,即:
sudo Python topo.py这样也满足了实验要求。
以上mininet的学习也告一段落,接下来开始研究OpenFlow协议。
