第20天(就业班) 自定义连接池、DBCP连接池、C3P0连接池、分页
1. dbutils回顾
package com.xp.connectionpool;

import java.sql.Connection;
import java.util.List;

import org.apache.commons.dbutils.QueryRunner;
import org.apache.commons.dbutils.handlers.BeanListHandler;
import org.junit.Test;

import com.xp.utils.JdbcUtil;
public class DbutilsDemo {
	// 1. 使用DbUtils组件更新
		@Test
		public void testUpdate() throws Exception {
			String sql = "delete from admin where id=10;";
			//1.1 连接
			Connection con = JdbcUtil.getConnection();
			//1.2 创建核心工具类
			QueryRunner qr = new QueryRunner();
			//1.3 更新
			qr.update(con, sql);

			con.close();
		}

		// 2. 使用DbUtils组件查询
		@Test
		public void testQuery() throws Exception {
			String sql = "select * from admin";
			//1.1 连接
			Connection con = JdbcUtil.getConnection();
			//1.2 创建核心工具类
			QueryRunner qr = new QueryRunner();
			//1.3 查询
			List list = qr.query(con, sql, new BeanListHandler(Admin.class));

			System.out.println(list);

			con.close();
		}
}
1. 自定义连接池
连接资源宝贵;需要对连接管理
连接:
a) 操作数据库,创建连接
b) 操作结束, 关闭!
分析:
涉及频繁的连接的打开、关闭,影响程序的运行效率!
连接管理:
预先创建一组连接,有的时候每次取出一个; 用完后,放回;

代理:
如果对某个接口中的某个指定的方法的功能进行扩展,而不想实现接口里所有方法,可以使用(动态)代理模式!
Java中代理模式:静态/动态/Cglib代理(spring)
使用动态代理,可以监测接口中方法的执行!
如何对Connection对象,生成一个代理对象:
|--Proxy
static Object newProxyInstance(
ClassLoader loader, 当前使用的类加载器
Class[] interfaces, 目标对象(Connection)实现的接口类型
InvocationHandler h 事件处理器:当执行上面接口中的方法的时候,就会自动触发事件处理器代码,把当前执行的方法(method)作为参数传入。
)
package com.xp.connectionpool;

import java.lang.reflect.InvocationHandler;
import java.lang.reflect.Method;
import java.lang.reflect.Proxy;
import java.sql.Connection;
import java.sql.DriverManager;
import java.sql.SQLException;
import java.util.LinkedList;
/**
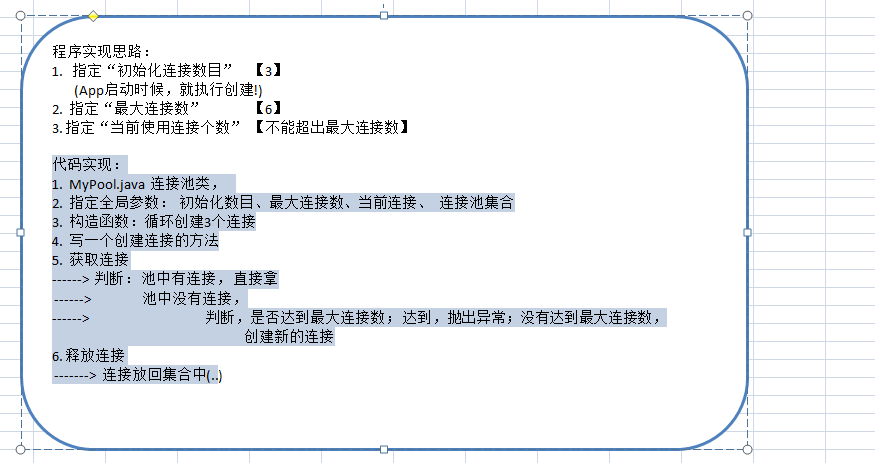
 * 自定义连接池, 管理连接 代码实现: 1. MyPool.java 连接池类, 2. 指定全局参数: 初始化数目、最大连接数、当前连接、 连接池集合 3.
 * 构造函数:循环创建3个连接 4. 写一个创建连接的方法 5. 获取连接 ------> 判断: 池中有连接, 直接拿 ------> 池中没有连接,
 * ------> 判断,是否达到最大连接数; 达到,抛出异常;没有达到最大连接数, 创建新的连接 6. 释放连接 -------> 连接放回集合中(..)
 *
 */
public class MyPool {

	private int init_count = 3; // 初始化连接数目
	private int max_count = 6; // 最大连接数
	private int current_count = 0; // 记录当前使用连接数
	// 连接池 (存放所有的初始化连接)
	private LinkedList pool = new LinkedList();

	// 1. 构造函数中,初始化连接放入连接池
	public MyPool() {
		// 初始化连接
		for (int i = 0; i < init_count; i++) {
			// 记录当前连接数目
			current_count++;
			// 创建原始的连接对象
			Connection con = createConnection();
			// 把连接加入连接池
			pool.addLast(con);
		}
	}

	// 2. 创建一个新的连接的方法
	private Connection createConnection() {
		try {
			Class.forName("com.mysql.jdbc.Driver");
			// 原始的目标对象
			final Connection con = DriverManager.getConnection(
					"jdbc:mysql:///jdbc_demo", "root", "xiongpan");

			/********** 对con对象代理 **************/

			// 对con创建其代理对象
			Connection proxy = (Connection) Proxy.newProxyInstance(

			con.getClass().getClassLoader(), // 类加载器
					// con.getClass().getInterfaces(), // 当目标对象是一个具体的类的时候
					new Class[] { Connection.class }, // 目标对象实现的接口

					new InvocationHandler() { // 当调用con对象方法的时候, 自动触发事务处理器
						@Override
						public Object invoke(Object proxy, Method method,
								Object[] args) throws Throwable {
							// 方法返回值
							Object result = null;
							// 当前执行的方法的方法名
							String methodName = method.getName();

							// 判断当执行了close方法的时候,把连接放入连接池
							if ("close".equals(methodName)) {
								System.out.println("begin:当前执行close方法开始!");
								// 连接放入连接池 (判断..)
								pool.addLast(con);
								System.out.println("end: 当前连接已经放入连接池了!");
							} else {
								// 调用目标对象方法
								result = method.invoke(con, args);
							}
							return result;
						}
					});
			return proxy;
		} catch (Exception e) {
			throw new RuntimeException(e);
		}
	}

	// 3. 获取连接
	public Connection getConnection() {

		// 3.1 判断连接池中是否有连接, 如果有连接,就直接从连接池取出
		if (pool.size() > 0) {
			return pool.removeFirst();
		}

		// 3.2 连接池中没有连接: 判断,如果没有达到最大连接数,创建;
		if (current_count < max_count) {
			// 记录当前使用的连接数
			current_count++;
			// 创建连接
			return createConnection();
		}

		// 3.3 如果当前已经达到最大连接数,抛出异常
		throw new RuntimeException("当前连接已经达到最大连接数目 !");
	}

	// 4. 释放连接
	public void realeaseConnection(Connection con) {
		// 4.1 判断: 池的数目如果小于初始化连接,就放入池中
		if (pool.size() < init_count) {
			pool.addLast(con);
		} else {
			try {
				// 4.2 关闭
				current_count--;
				con.close();
			} catch (SQLException e) {
				throw new RuntimeException(e);
			}
		}
	}

	public static void main(String[] args) throws SQLException {
		MyPool pool = new MyPool();
		System.out.println("当前连接: " + pool.current_count); // 3

		// 使用连接
		pool.getConnection();
		pool.getConnection();
		Connection con4 = pool.getConnection();
		Connection con3 = pool.getConnection();
		Connection con2 = pool.getConnection();
		Connection con1 = pool.getConnection();

		// 释放连接, 连接放回连接池
		// pool.realeaseConnection(con1);
		/*
		 * 希望:当关闭连接的时候,要把连接放入连接池!【当调用Connection接口的close方法时候,希望触发pool.addLast(con)
		 * ;操作】 把连接放入连接池 解决1:实现Connection接口,重写close方法 解决2:动态代理
		 */
		con1.close();

		// 再获取
		pool.getConnection();

		System.out.println("连接池:" + pool.pool.size()); // 0
		System.out.println("当前连接: " + pool.current_count); // 3
	}

} 使用代理,可以在不实现接口的情况,对接口的方法进行扩展,添加额外的用户需要的业务逻辑!
3. DBCP连接池
编写连接池需实现java.sql.DataSource接口。DataSource接口中定义了两个重载的getConnection方法:
Connection getConnection()
Connection getConnection(String username, String password)
实现DataSource接口,并实现连接池功能的步骤:
在DataSource构造函数中批量创建与数据库的连接,并把创建的连接加入LinkedList对象中。
实现getConnection方法,让getConnection方法每次调用时,从LinkedList中取一个Connection返回给用户。
当用户使用完Connection,调用Connection.close()方法时,Collection对象应保证将自己返回到LinkedList中,而不要把conn还给数据库。
Collection保证将自己返回到LinkedList中是此处编程的难点。
开源数据连接池
现在很多WEB服务器(Weblogic, WebSphere, Tomcat)都提供了DataSoruce的实现,即连接池的实现。通常我们把DataSource的实现,按其英文含义称之为数据源,数据源中都包含了数据库连接池的实现。
也有一些开源组织提供了数据源的独立实现:
• DBCP 数据库连接池 (tomcat)
• C3P0 数据库连接池 (hibernate)
实际应用时不需要编写连接数据库代码,直接从数据源获得数据库的连接。程序员编程时也应尽量使用这些数据源的实现,以提升程序的数据库访问性能。
DBCP数据源
DBCP 是 Apache 软件基金组织下的开源连接池实现,使用DBCP数据源,应用程序应在系统中增加如下两个 jar 文件:
• Commons-dbcp.jar:连接池的实现
• Commons-pool.jar:连接池实现的依赖库
Tomcat 的连接池正是采用该连接池来实现的。该数据库连接池既可以与应用服务器整合使用,也可由应用程序独立使用。
核心类: BasicDataSource
使用步骤:
• 进入jar文件
Common-dbcp-1.4jar
Commons-pool-1.5.6.jar
public class DBCPDemo {
// 1. 硬编码方式实现连接池
@Test
public void testDbcp() throws Exception {
// DBCP连接池核心类
BasicDataSource dataSouce = new BasicDataSource();
// 连接池参数配置:初始化连接数、最大连接数 / 连接字符串、驱动、用户、密码
dataSouce.setUrl("jdbc:mysql:///jdbc_demo");//数据库连接字符串
dataSouce.setDriverClassName("com.mysql.jdbc.Driver"); //数据库驱动
dataSouce.setUsername("root");//数据库连接用户
dataSouce.setPassword("xiongpan");//数据库连接密码
dataSouce.setInitialSize(3); // 初始化连接
dataSouce.setMaxActive(6); // 最大连接
dataSouce.setMaxIdle(3000); // 最大空闲时间
// 获取连接
Connection con = dataSouce.getConnection();
con.prepareStatement("delete from admin where id=3").executeUpdate();
// 关闭
con.close();
}
@Test
// 2. 【推荐】配置方式实现连接池 , 便于维护
public void testProp() throws Exception {
// 加载prop配置文件
Properties prop = new Properties();
// 获取文件流
InputStream inStream = DBCPDemo.class.getResourceAsStream("db.properties");
// 加载属性配置文件
prop.load(inStream);
// 根据prop配置,直接创建数据源对象
DataSource dataSouce = BasicDataSourceFactory.createDataSource(prop);
// 获取连接
Connection con = dataSouce.getConnection();
con.prepareStatement("delete from admin where id=4").executeUpdate();
// 关闭
con.close();
}
}
配置方式实现DBCP连接池, 配置文件中的key与BaseDataSouce中的属性一样:
url=jdbc:mysql:///jdbc_demo
driverClassName=com.mysql.jdbc.Driver
username=root
password=xiongpan
initialSize=3
maxActive=6
maxIdle=3000
1.
2.
5. username 传递给JDBC驱动的用于建立连接的用户名
password 传递给JDBC驱动的用于建立连接的密码
url 传递给JDBC驱动的用于建立连接的URL
driverClassName 使用的JDBC驱动的完整有效的java 类名
connectionProperties 当建立新连接时被发送给JDBC驱动的连接参数,
格式必须是 [propertyName=property;]*
注意 :参数user/password将被明确传递,所以不需要包括在这里。
参数 默认值 描述
defaultAutoCommit true 连接池创建的连接的默认的auto-commit状态
defaultReadOnly driver default 连接池创建的连接的默认的read-only状态.
如果没有设置则setReadOnly方法将不会被调用. (某些驱动不支持只读模式,比如:Informix)
defaultTransactionIsolation driver default 连接池创建的连接的默认的TransactionIsolation状态.
下面列表当中的某一个: (参考javadoc)
* NONE
* READ_COMMITTED
* READ_UNCOMMITTED
* REPEATABLE_READ
* SERIALIZABLE
defaultCatalog 连接池创建的连接的默认的catalog
参数 默认值 描述
initialSize 0 初始化连接:连接池启动时创建的初始化连接数量,1.2版本后支持
maxActive 8 最大活动连接:连接池在同一时间能够分配的最大活动连接的数量,
如果设置为非正数则表示不限制
maxIdle 8 最大空闲连接:连接池中容许保持空闲状态的最大连接数量,超过的空闲连接将被释放,
如果设置为负数表示不限制
minIdle 0 最小空闲连接:连接池中容许保持空闲状态的最小连接数量,低于这个数量将创建新的连接,
如果设置为0则不创建
maxWait 无限 最大等待时间:当没有可用连接时,连接池等待连接被归还的最大时间(以毫秒计数),
超过时间则抛出异常,如果设置为-1表示无限等待
参数 默认值 描述
validationQuery SQL查询,用来验证从连接池取出的连接,在将连接返回给调用者之前.如果指定,
则查询必须是一个SQL SELECT并且必须返回至少一行记录
testOnBorrow true 指明是否在从池中取出连接前进行检验,如果检验失败,
则从池中去除连接并尝试取出另一个.
注意: 设置为true后如果要生效,validationQuery参数必须设置为非空字符串
testOnReturn false 指明是否在归还到池中前进行检验
注意: 设置为true后如果要生效,validationQuery参数必须设置为非空字符串
testWhileIdle false 指明连接是否被空闲连接回收器(如果有)进行检验.如果检测失败,
则连接将被从池中去除.
注意: 设置为true后如果要生效,validationQuery参数必须设置为非空字符串
timeBetweenEvictionRunsMillis -1 在空闲连接回收器线程运行期间休眠的时间值,以毫秒为单位.
如果设置为非正数,则不运行空闲连接回收器线程
numTestsPerEvictionRun 3 在每次空闲连接回收器线程(如果有)运行时检查的连接数量
minEvictableIdleTimeMillis 1000 * 60 * 30 连接在池中保持空闲而不被空闲连接回收器线程
(如果有)回收的最小时间值,单位毫秒
参数 默认值 描述
poolPreparedStatements false 开启池的prepared statement 池功能
maxOpenPreparedStatements 不限制 statement池能够同时分配的打开的statements的最大数量,
如果设置为0表示不限制
这里可以开启PreparedStatements池. 当开启时, 将为每个连接创建一个statement池,
并且被下面方法创建的PreparedStatements将被缓存起来:
* public PreparedStatement prepareStatement(String sql)
* public PreparedStatement prepareStatement(String sql, int resultSetType, int resultSetConcurrency)
注意: 确认连接还有剩余资源可以留给其他statement
参数 默认值 描述
accessToUnderlyingConnectionAllowed false 控制PoolGuard是否容许获取底层连接
如果容许则可以使用下面的方式来获取底层连接:
Connection conn = ds.getConnection();
Connection dconn = ((DelegatingConnection) conn).getInnermostDelegate();
...
conn.close();
默认false不开启, 这是一个有潜在危险的功能, 不适当的编码会造成伤害.
(关闭底层连接或者在守护连接已经关闭的情况下继续使用它).请谨慎使用,
并且仅当需要直接访问驱动的特定功能时使用.
注意: 不要关闭底层连接, 只能关闭前面的那个.
参数 默认值 描述
removeAbandoned false 标记是否删除泄露的连接,如果他们超过了removeAbandonedTimout的限制.
如果设置为true, 连接被认为是被泄露并且可以被删除,如果空闲时间超过removeAbandonedTimeout.
设置为true可以为写法糟糕的没有关闭连接的程序修复数据库连接.
removeAbandonedTimeout 300 泄露的连接可以被删除的超时值, 单位秒
logAbandoned false 标记当Statement或连接被泄露时是否打印程序的stack traces日志。
被泄露的Statements和连接的日志添加在每个连接打开或者生成新的Statement,
因为需要生成stack trace。
如果开启"removeAbandoned",那么连接在被认为泄露时可能被池回收. 这个机制在(getNumIdle() < 2)
and (getNumActive() > getMaxActive() - 3)时被触发.
举例当maxActive=20, 活动连接为18,空闲连接为1时可以触发"removeAbandoned".
但是活动连接只有在没有被使用的时间超过"removeAbandonedTimeout"时才被删除,默认300秒.
在resultset中游历不被计算为被使用.
4. C3P0连接池
C3P0连接池:
最常用的连接池技术!Spring框架,默认支持C3P0连接池技术!
C3P0连接池,核心类:
CombopooledDataSource ds;
使用:
1. 下载,引入jar文件: c3p0-0.9.1.2.jar
2. 使用连接池,创建连接
a) 硬编码方式
b) 配置方式(xml)
package com.xp.connectionpool;
import java.sql.Connection;

import org.junit.Test;

import com.mchange.v2.c3p0.ComboPooledDataSource;
public class C3p0PoolDemo {
	@Test
	//1. 硬编码方式,使用C3P0连接池管理连接
	public void testCode() throws Exception {
		// 创建连接池核心工具类
		ComboPooledDataSource dataSource = new ComboPooledDataSource();
		// 设置连接参数:url、驱动、用户密码、初始连接数、最大连接数
		dataSource.setJdbcUrl("jdbc:mysql://localhost:3306/jdbc_demo");
		dataSource.setDriverClass("com.mysql.jdbc.Driver");
		dataSource.setUser("root");
		dataSource.setPassword("xiongpan");
		dataSource.setInitialPoolSize(3);
		dataSource.setMaxPoolSize(6);
		dataSource.setMaxIdleTime(1000);

		// ---> 从连接池对象中,获取连接对象
		Connection con = dataSource.getConnection();
		// 执行更新
		con.prepareStatement("delete from admin where id=5").executeUpdate();
		// 关闭
		con.close();
	}

	@Test
	//2. XML配置方式,使用C3P0连接池管理连接
	public void testXML() throws Exception {
		// 创建c3p0连接池核心工具类
		// 自动加载src下c3p0的配置文件【c3p0-config.xml】
		ComboPooledDataSource dataSource = new ComboPooledDataSource();// 使用默认的配置
		// 获取连接
		Connection con = dataSource.getConnection();
		// 执行更新
		con.prepareStatement("delete from admin where id=5").executeUpdate();
		// 关闭
		con.close();
	}
}
优化
项目,连接的管理,交给连接池!
package com.xp.utils;
import java.sql.Connection;
import java.sql.DriverManager;
import java.sql.ResultSet;
import java.sql.SQLException;
import java.sql.Statement;

import javax.management.RuntimeErrorException;
import javax.sql.DataSource;

import com.mchange.v2.c3p0.ComboPooledDataSource;
public class JdbcUtilC3p0 {
		//初始化连接池
		private static DataSource dataSource;
		//静态代码块初始化连接池资源,只加载一次
		static{
			dataSource=new ComboPooledDataSource();
		}
		/**
		 * 返回连接对象
		 */
		public static Connection getConnection() {
			try {
				return dataSource.getConnection();
			} catch (SQLException e) {
				throw new RuntimeException(e);
			}
		}
		public static void closeAll(Connection con, Statement stmt, ResultSet rs) {
			try {
				if (rs != null) {
					rs.close();  // 快速异常捕获 Alt + shift + z
					rs = null;   // 建议垃圾回收期回收资源
				}
				if (stmt != null) {
					stmt.close();
					stmt = null;
				}
				if (con != null && !con.isClosed()) {
					con.close();
					con = null;
				}
			} catch (SQLException e) {
				throw new RuntimeException(e);
			}
		}
	}
配置tomcat数据源
Context initCtx = new InitialContext();
Context envCtx = (Context) initCtx.lookup("java:comp/env");
dataSource = (DataSource)envCtx.lookup("jdbc/datasource");
特别提醒:此种配置下,驱动jar文件需放置在tomcat的lib下5.分页分析过程
分页技术:
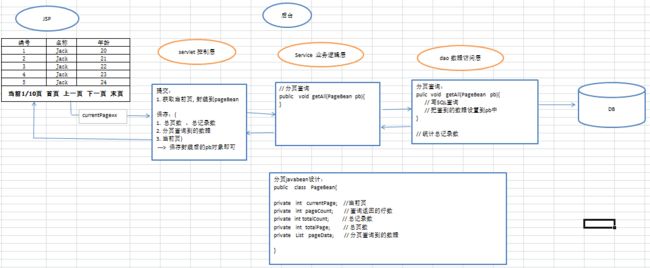
JSP页面,用来显示数据! 如果数据有1000条,分页显示,每页显示10条,共100页; 好处: 利于页面布局,且显示的效率高!
分页关键点:
1. 分页SQL语句;
-- 分页查询
-- limit第一个参数,查询的起始行(从0开始)
-- limit第二个参数,返回的行数
-- 每页显示4条
-- 第一页
SELECT * FROM employee LIMIT0,4;-- (当前页-1)*每页显示的行数
-- 第二页
SELECT * FROM employee LIMIT4,4;
-- 第一页
SELECT * FROM employee LIMIT8,4;
SELECT * FROM LIMIT (当前页-1)*每页显示的行数,每页显示的行数

1. 后台处理:dao/service/servlet/JSP
6.分页实现(1)
实现步骤:
0. 环境准备
a) 引入jar文件及引入配置文件
i. 数据库驱动包
ii. C3P0连接池jar文件 及 配置文件
iii. DbUtis组件: QueryRunner qr = newQueryRuner(dataSouce);
qr.update(sql);
b) 公用类: JdbcUtils.java
1. 先设计:PageBean.java
2. Dao接口设计/实现: 2个方法
3. Service/servlet
4. JSP
引入c3po配置文件
		jdbc:mysql://localhost:3306/jdbc_demo

		com.mysql.jdbc.Driver
		root
		xiongpan
		3
		6
		1000


		jdbc:mysql://localhost:3306/jdbc_demo
		com.mysql.jdbc.Driver
		root
		xiongpan
		3
		6
		1000


第二步创建连接池工具类
package com.xp.utils;
import javax.sql.DataSource;
import org.apache.commons.dbutils.QueryRunner;
import com.mchange.v2.c3p0.ComboPooledDataSource;
/**
 * 工具类
 * 1. 初始化C3P0连接池
 * 2. 创建DbUtils核心工具类对象
 */
public class JdbcUtils {
	/**
	 *  1. 初始化C3P0连接池
	 */
	private static  DataSource dataSource;
	static {
		dataSource = new ComboPooledDataSource();
	}
	/**
	 * 2. 创建DbUtils核心工具类对象
	 */
	public static QueryRunner getQueryRuner(){
		// 创建QueryRunner对象,传入连接池对象
		// 在创建QueryRunner对象的时候,如果传入了数据源对象;
		// 那么在使用QueryRunner对象方法的时候,就不需要传入连接对象;
		// 会自动从数据源中获取连接(不用关闭连接)
		return new QueryRunner(dataSource);
	}
}
第三步:封装分页的参数
package com.xp.utils;
import java.util.List;
/**
* 封装分页的参数
*/
public class PageBean {
	private int currentPage = 1; // 当前页, 默认显示第一页
	private int pageCount = 4;   // 每页显示的行数(查询返回的行数), 默认每页显示4行
	private int totalCount;      // 总记录数
	private int totalPage;       // 总页数 = 总记录数 / 每页显示的行数  (+ 1)
	private List pageData;       // 分页查询到的数据
	// 返回总页数
	public int getTotalPage() {
		if (totalCount % pageCount == 0) {
			totalPage = totalCount / pageCount;
		} else {
			totalPage = totalCount / pageCount + 1;
		}
		return totalPage;
	}
	public void setTotalPage(int totalPage) {
		this.totalPage = totalPage;
	}

	public int getCurrentPage() {
		return currentPage;
	}
	public void setCurrentPage(int currentPage) {
		this.currentPage = currentPage;
	}
	public int getPageCount() {
		return pageCount;
	}
	public void setPageCount(int pageCount) {
		this.pageCount = pageCount;
	}
	public int getTotalCount() {
		return totalCount;
	}
	public void setTotalCount(int totalCount) {
		this.totalCount = totalCount;
	}

	public List getPageData() {
		return pageData;
	}
	public void setPageData(List pageData) {
		this.pageData = pageData;
	}
}
第三步:编写实体类
package com.xp.entity;
/**
 * 1. 实体类设计 (因为用了DbUtils组件,属性要与数据库中字段一致)
 */
public class Employee {
	private int empId;			// 员工id
	private String empName;		// 员工名称
	private int dept_id;		// 部门id

	public int getEmpId() {
		return empId;
	}
	public void setEmpId(int empId) {
		this.empId = empId;
	}
	public String getEmpName() {
		return empName;
	}
	public void setEmpName(String empName) {
		this.empName = empName;
	}
	public int getDept_id() {
		return dept_id;
	}
	public void setDept_id(int deptId) {
		dept_id = deptId;
	}
}
第四步:编写数据访问层:接口设计
package com.xp.dao;

import com.xp.entity.Employee;
import com.xp.utils.PageBean;

public interface IEmployeeDao {
	/**
	 * 分页查询数据
	 */
	public void getAll(PageBean pb);

	/**
	 * 查询总记录数
	 */
	public int getTotalCount();
}

第五步;编写数据访问层实现类
package com.xp.dao.impl;

import java.util.List;

import org.apache.commons.dbutils.QueryRunner;
import org.apache.commons.dbutils.handlers.BeanListHandler;
import org.apache.commons.dbutils.handlers.ScalarHandler;

import com.xp.dao.IEmployeeDao;
import com.xp.entity.Employee;
import com.xp.utils.JdbcUtils;
import com.xp.utils.PageBean;
public class EmployeeDao implements IEmployeeDao {
	@Override
	public void getAll(PageBean pb) {
		//2. 查询总记录数;  设置到pb对象中
		int totalCount = this.getTotalCount();
		pb.setTotalCount(totalCount);
		/*
		 * 问题: jsp页面,如果当前页为首页,再点击上一页报错!
		 *              如果当前页为末页,再点下一页显示有问题!
		 * 解决:
		 * 	   1. 如果当前页 <= 0;       当前页设置当前页为1;
		 * 	   2. 如果当前页 > 最大页数;  当前页设置为最大页数
		 */
		// 判断
		if (pb.getCurrentPage() <=0) {
			pb.setCurrentPage(1);					    // 把当前页设置为1
		} else if (pb.getCurrentPage() > pb.getTotalPage()){
			pb.setCurrentPage(pb.getTotalPage());		// 把当前页设置为最大页数
		}
		//1. 获取当前页: 计算查询的起始行、返回的行数
		int currentPage = pb.getCurrentPage();
		int index = (currentPage -1 ) * pb.getPageCount();		// 查询的起始行
		int count = pb.getPageCount();							// 查询返回的行数


		//3. 分页查询数据;  把查询到的数据设置到pb对象中
		String sql = "select * from employee limit ?,?";

		try {
			// 得到Queryrunner对象
			QueryRunner qr = JdbcUtils.getQueryRuner();
			// 根据当前页,查询当前页数据(一页数据)
			List pageData = qr.query(sql, new BeanListHandler(Employee.class), index, count);
			// 设置到pb对象中
			pb.setPageData(pageData);

		} catch (Exception e) {
			throw new RuntimeException(e);
		}

	}
	@Override
	public int getTotalCount() {
		String sql = "select count(*) from employee";
		try {
			// 创建QueryRunner对象
			QueryRunner qr = JdbcUtils.getQueryRuner();
			// 执行查询, 返回结果的第一行的第一列
			Long count = qr.query(sql, new ScalarHandler());
			return count.intValue();
		} catch (Exception e) {
			throw new RuntimeException(e);
		}
	}

}
第六步:编写业务逻辑层接口
package com.xp.service;
import com.xp.entity.Employee;
import com.xp.utils.PageBean;
public interface IEmployeeService {
	/**
	 * 分页查询数据
	 */
	public void getAll(PageBean pb);
}
第七步:编写业务逻辑层实现
package com.xp.service.impl;

import com.xp.dao.IEmployeeDao;
import com.xp.dao.impl.EmployeeDao;
import com.xp.entity.Employee;
import com.xp.service.IEmployeeService;
import com.xp.utils.PageBean;
/**
 * 3. 业务逻辑层,实现
 */
public class EmployeeService implements IEmployeeService {
	// 创建Dao实例
	private IEmployeeDao employeeDao = new EmployeeDao();
	@Override
	public void getAll(PageBean pb) {
		try {
			employeeDao.getAll(pb);
		} catch (Exception e) {
			throw new RuntimeException(e);
		}
	}
}
第八步:控制层开发
package com.xp.servlet;
import java.io.IOException;

import javax.servlet.ServletException;
import javax.servlet.http.HttpServlet;
import javax.servlet.http.HttpServletRequest;
import javax.servlet.http.HttpServletResponse;

import com.xp.entity.Employee;
import com.xp.service.IEmployeeService;
import com.xp.service.impl.EmployeeService;
import com.xp.utils.PageBean;
/**
 * 4. 控制层开发
 */
public class IndexServlet extends HttpServlet {
	// 创建Service实例
	private IEmployeeService employeeService = new EmployeeService();
	// 跳转资源
	private String uri;

	public void doGet(HttpServletRequest request, HttpServletResponse response)
			throws ServletException, IOException {

		try {
			//1. 获取“当前页”参数;  (第一次访问当前页为null)
			String currPage = request.getParameter("currentPage");
			// 判断
			if (currPage == null || "".equals(currPage.trim())){
				currPage = "1";  	// 第一次访问,设置当前页为1;
			}
			// 转换
			int currentPage = Integer.parseInt(currPage);

			//2. 创建PageBean对象,设置当前页参数; 传入service方法参数
			PageBean pageBean = new PageBean();
			pageBean.setCurrentPage(currentPage);

			//3. 调用service
			employeeService.getAll(pageBean);    // 【pageBean已经被dao填充了数据】

			//4. 保存pageBean对象,到request域中
			request.setAttribute("pageBean", pageBean);

			//5. 跳转
			uri = "/WEB-INF/list.jsp";
		} catch (Exception e) {
			e.printStackTrace();  // 测试使用
			// 出现错误,跳转到错误页面;给用户友好提示
			uri = "/error/error.jsp";
		}
		request.getRequestDispatcher(uri).forward(request, response);

	}
	public void doPost(HttpServletRequest request, HttpServletResponse response)
			throws ServletException, IOException {
		this.doGet(request, response);
	}
}
<%@ page language="java" import="java.util.*" pageEncoding="UTF-8"%>

<%@taglib uri="http://java.sun.com/jsp/jstl/core" prefix="c" %>


    分页查询数据


  			序号
  			员工编号
  			员工姓名


  						${vs.count }
  						${emp.empId }
  						${emp.empName }


  					对不起,没有你要找的数据


  				当前${requestScope.pageBean.currentPage }/${requestScope.pageBean.totalPage }页

  				首页
  				上一页
  				下一页
  				末页
