Nvidia jetson nano Caffe Mobilnet-SSD 训练自己的数据
参考自:
https://blog.csdn.net/weixin_39750664/article/details/82502302
目录
1.下载Mobilnet ssd
2.制作VOC数据集
修改create_list.sh
修改create_data.sh
修改好后,生成lmdb数据库
训练前准备
1.把labelmap_voc.prototxt复制到工程文件下
2.把上面两个lmdb数据库复制到工程下
3.将labelmap_voc .prototxt改名为labelmap.prototxt
4.将VOC2007_test_lmdb改名为test_lmdb
5.将VOC2007_trainval_lmdb改名为trainval_lmdb
6.如下图
7.运行gen_model.sh脚本
8.进入examples文件夹,打开编辑MobilNetSSD_train.prototxt(MobileNetSSD_test.prototxt文件类似地方也改下)
9.回到上一层目录,编辑train.sh文件
10.修改solver_train.prototxt文件
训练
训练完成后,运行检测
测试报错解决
1.下载Mobilnet ssd
git下载:
git clone https://github.com/chuanqi305/MobileNet-SSD.git网站下载:https://github.com/chuanqi305/MobileNet-SSD
2.制作VOC数据集
目录结构是这样的
|--VOCseahorse
|--VOC2007
|--Annotations
|--ImageSets
|--Layout
|--Main
|--Segmentation
|--JPEGImages
·这里解释下Annotations是放xml的,就是放置标注(物体位置 类别)好了的文件,用的labelImg软件标注的。
·ImageSets下面的Main放的是文本,里面有4个文件 test.txt val,txt train.txt trainval.txt,分别为测试图片,验证图片,训练图片,训练验证图片的文件名。其他Layout和Segmentation占时用不到,可以放Main中一样的文件进去。
·JPEGImages是放置图片的
这个目录结构的文件我会提供,里面也包含了标注好的图片。下面说说如何制作。
我修改过的工程文件:https://download.csdn.net/download/ourkix/12076480
标注软件下载:https://github.com/tzutalin/labelImg
我用的编译好的,上面的是源码,你们也可以去下载编译好的。
想知道如何标注,可以自己查查 研究研究,比较简单,看看应该会(就选好图片文件夹路径,右键选择方框,左键拉框,标上label值,保存xml文件即可)
这里默认标定好了数据 xml放入到annotations文件夹里面了。
按照上面的目录结构建立好文件夹,去到caffe的根目录,切换到data/VOC0712/,将里面的create_data.sh create_list.sh labelmap_voc.prototxt文件复制到你建立的目录的VOC2007下面
接下来进入imagesets文件夹的main
修改 test.txt 和 trainval.txt文件
trainval是要训练的图片,test是测试图片,这里直接填上图片的名字就行了。图片多的话可以用脚本来生成。
修改create_list.sh
#!/bin/bash
#你数据的路径
root_dir=$HOME/caffe/caffe-ssd/data/VOCseahorse
sub_dir=ImageSets/Main
bash_dir="$(cd "$(dirname "${BASH_SOURCE[0]}")" && pwd)"
for dataset in trainval test
do
  dst_file=$bash_dir/$dataset.txt
  if [ -f $dst_file ]
  then
    rm -f $dst_file
  fi
  for name in VOC2007
  do
    if [[ $dataset == "test" && $name == "VOC2012" ]]
    then
      continue
    fi
    echo "Create list for $name $dataset..."
    dataset_file=$root_dir/$name/$sub_dir/$dataset.txt

    img_file=$bash_dir/$dataset"_img.txt"
    cp $dataset_file $img_file
    sed -i "s/^/$name\/JPEGImages\//g" $img_file
    sed -i "s/$/.jpg/g" $img_file

    label_file=$bash_dir/$dataset"_label.txt"
    cp $dataset_file $label_file
    sed -i "s/^/$name\/Annotations\//g" $label_file
    sed -i "s/$/.xml/g" $label_file

    paste -d' ' $img_file $label_file >> $dst_file

    rm -f $label_file
    rm -f $img_file
  done

  # Generate image name and size infomation.
  if [ $dataset == "test" ]
  then
    $HOME/caffe/caffe-ssd/build/tools/get_image_size $root_dir $dst_file $bash_dir/$dataset"_name_size.txt"
  fi

  # Shuffle trainval file.
  if [ $dataset == "trainval" ]
  then
    rand_file=$dst_file.random
    cat $dst_file | perl -MList::Util=shuffle -e 'print shuffle();' > $rand_file
    mv $rand_file $dst_file
  fi
done
修改create_data.sh
cur_dir=$(cd $( dirname ${BASH_SOURCE[0]} ) && pwd )
#咖啡根目录路径
root_dir=$HOME/caffe/caffe-ssd

cd $root_dir

redo=1
#你的数据的路径
data_root_dir="$HOME/caffe/caffe-ssd/data/VOCseahorse"
dataset_name="VOC2007"
#labelmap路径
mapfile="$root_dir/data/VOCdevkits/$dataset_name/labelmap_voc.prototxt"
anno_type="detection"
db="lmdb"
min_dim=0
max_dim=0
width=300 #0
height=300 #0

extra_cmd="--encode-type=jpg --encoded"
if [ $redo ]
then
  extra_cmd="$extra_cmd --redo"
fi
for subset in test trainval
do
  python $root_dir/scripts/create_annoset.py --anno-type=$anno_type --label-map-file=$mapfile --min-dim=$min_dim --max-dim=$max_dim --resize-width=$width --resize-height=$height --check-label $extra_cmd $data_root_dir $root_dir/data/VOCseahorse/$dataset_name/$subset.txt $data_root_dir/$dataset_name/$db/$dataset_name"_"$subset"_"$db examples/$dataset_name
done
#如果你路基不同的话 上面这里面的路径也要改
修改labelmap_voc.prototxt文件(背景层为0,有几个类就写几个item)
item {
  name: "none_of_the_above"
  label: 0
  display_name: "background"
}
item {
  name: "seahorse"
  label: 1
  display_name: "seahorse"
}
修改好后,生成lmdb数据库
chmod +x creat_list.sh creat_data.sh
./creat_list.sh
./creat_data.sh
执行完成后会创建出lmdb文件夹进入此文件夹
训练前准备
1.把labelmap_voc.prototxt复制到工程文件下
2.把上面两个lmdb数据库复制到工程下
3.将labelmap_voc .prototxt改名为labelmap.prototxt
4.将VOC2007_test_lmdb改名为test_lmdb
5.将VOC2007_trainval_lmdb改名为trainval_lmdb
6.如下图
7.运行gen_model.sh脚本
执行命令:./gen_model.sh 2
数字为类别数,注意,实际类别+1,有个默认的背景类
之后,生成examples文件夹,里面的3个prototxt就是从模板生成的正式网络定义,根据作者设置,其中的deploy文件是已经合并过bn层的,需要后面配套使用。
8.进入examples文件夹,打开编辑MobilNetSSD_train.prototxt(MobileNetSSD_test.prototxt文件类似地方也改下)
#找到这个,改成你自己的数据库路径
#batch_size 为批量大小,根据自己的平台内存大小来 4 和 8 都可以
data_param {
    source: "trainval_lmdb/"
    batch_size: 4
    backend: LMDB
  }

#找到这个,改成你自己的labelmap路径
 label_map_file: "/home/ubuntuq/mobilenet/MobileNet-SSD/labelmap.prototxt"
9.回到上一层目录,编辑train.sh文件
/home/ubuntuq/caffe/caffe-ssd/build/tools/caffe 是你的caffe的路径
solver="solver_train.prototxt" 这个是训练参数文件
weights="mobilenet_iter_73000.caffemodel" 这个是预训练模型
#!/bin/sh
if ! test -f example/MobileNetSSD_train.prototxt ;then
	echo "error: example/MobileNetSSD_train.prototxt does not exist."
	echo "please use the gen_model.sh to generate your own model."
        exit 1
fi
mkdir -p snapshot
/home/ubuntuq/caffe/caffe-ssd/build/tools/caffe train -solver="solver_train.prototxt" \
-weights="mobilenet_iter_73000.caffemodel" \
-gpu 0
10.修改solver_train.prototxt文件
#训练网络的文件路径
train_net: "example/MobileNetSSD_train.prototxt"
#基础学习率
base_lr: 0.0005
display: 10
#最大训练迭代次数
max_iter: 5000
lr_policy: "multistep"
gamma: 0.5
weight_decay: 0.00005
#训练多少次一次快照
snapshot: 2500
#快照模型保存路径
snapshot_prefix: "snapshot/mobilenet"
#训练方式 GPU 还是 CPU
solver_mode: GPU
debug_info: false
snapshot_after_train: true
test_initialization: false
average_loss: 10
stepvalue: 20000
stepvalue: 40000
iter_size: 1
type: "RMSProp"
eval_type: "detection"
ap_version: "11point"
训练
./train.sh训练完成后,运行检测
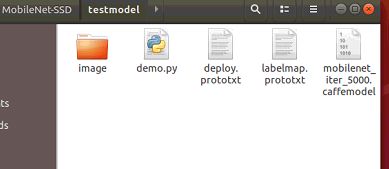
如果下载我的上传的文件,进入testmodel文件夹,里面是我之前训练好的,你把里面的文件换成你自己的
deploy.prototxt文件是example文件夹里面的MobileNetSSD_deploy.prototxt,复制过来改名即可
labelmap.prototxt就是我们之前改的那个,复制进来
mobilenet_iter_5000.caffemodel是训练完的模型文件,在snapshot文件夹里面复制过来
image里面是测试图片
里面的demo.py也修改下。
import numpy as np
import sys,os
import cv2
#caffe路径 根目录
caffe_root = '/home/ubuntuq/caffe/caffe-ssd/'
sys.path.insert(0, caffe_root + 'python')
import caffe

#部署文件路径
net_file= 'deploy.prototxt'
#模型文件路径
caffe_model='mobilenet_iter_5000.caffemodel'
#测试图片路径
test_dir = "image"

if not os.path.exists(caffe_model):
    print(caffe_model + " does not exist")
    exit()
if not os.path.exists(net_file):
    print(net_file + " does not exist")
    exit()
net = caffe.Net(net_file,caffe_model,caffe.TEST)

#分类显示名字修改
CLASSES = ('background',
           'seahorse')


def preprocess(src):
    img = cv2.resize(src, (300,300))
    img = img - 127.5
    img = img * 0.007843
    return img

def postprocess(img, out):
    h = img.shape[0]
    w = img.shape[1]
    box = out['detection_out'][0,0,:,3:7] * np.array([w, h, w, h])

    cls = out['detection_out'][0,0,:,1]
    conf = out['detection_out'][0,0,:,2]
    return (box.astype(np.int32), conf, cls)

def detect(imgfile):
    origimg = cv2.imread(imgfile)
    img = preprocess(origimg)

    img = img.astype(np.float32)
    img = img.transpose((2, 0, 1))

    net.blobs['data'].data[...] = img
    out = net.forward()
    box, conf, cls = postprocess(origimg, out)

    #print("box is ",box)

    for i in range(len(box)):
       p1 = (box[i][0], box[i][1])
       p2 = (box[i][2], box[i][3])
       cv2.rectangle(origimg, p1, p2, (0,255,0))
       p3 = (max(p1[0], 15), max(p1[1], 15))
       #print("---",i)
       title = "%s:%.2f" % (CLASSES[int(cls[i])], conf[i])
       cv2.putText(origimg, title, p3, cv2.FONT_ITALIC, 0.6, (0, 255, 0), 1)


    cv2.imshow("SSD", origimg)

    k = cv2.waitKey(0) & 0xff
        #Exit if ESC pressed
    if k == 27 : return False
    return True

for f in os.listdir(test_dir):
    if detect(test_dir + "/" + f) == False:
       break
测试(回车下一张,esc退出)
python demo.py测试报错解决
原因是caffe-ssd缺少了relu6层,要修改caffe源码重新编辑就行了。
下载这两个文件
下载地址:https://github.com/chuanqi305/MobileNetv2-SSDLite/tree/master/src
去到你的caffe根目录,进入src/caffe/layers将这两个文件复制进去覆盖掉原来的文件。
然后去到你的caffe构建目录,我的是build目录
make -j4
make pycaffe
make install
完成后重新打开终端,运行demo.py


