Android基础教程13 room存储数据至本地数据库
Room 在 SQLite 上提供了一个抽象层,以便在充分利用 SQLite 的强大功能的同时,能够流畅地访问数据库。
处理大量结构化数据的应用可极大地受益于在本地保留这些数据。最常见的用例是缓存相关数据。这样,当设备无法访问网络时,用户仍可在离线状态下浏览相应内容。设备之后重新连接到网络后,用户发起的所有内容更改都会同步到服务器。
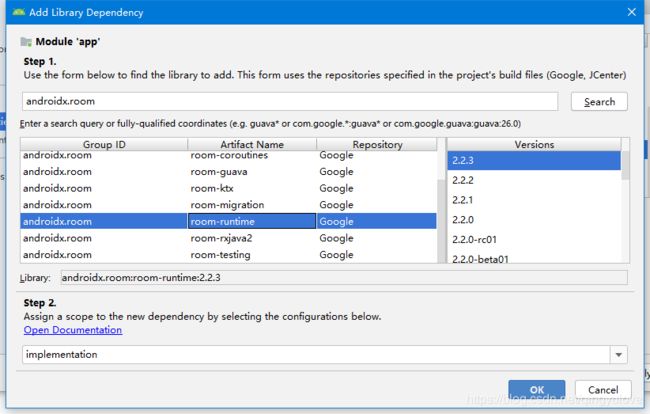
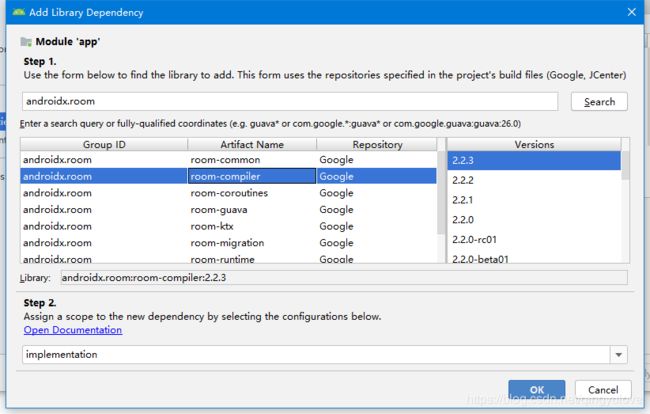
项目同步后,我们试着运行会得到下面的错误:

此时我们只需要将下图中的依赖项修改为:
annotationProcessor ‘androidx.room:room-compiler:2.2.3’
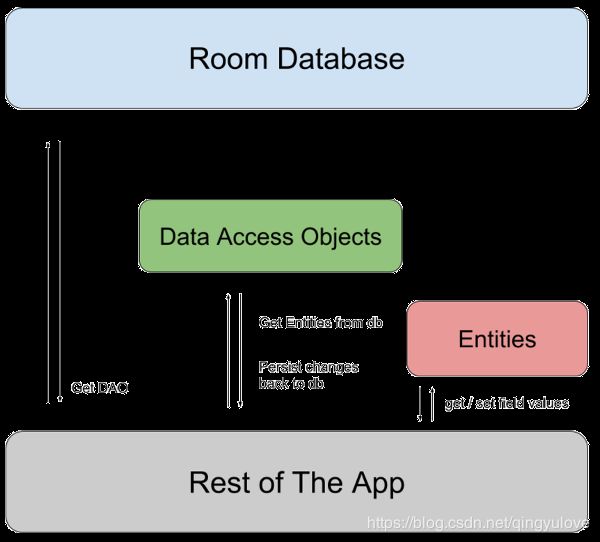
Room 包含 3 个主要组件:数据库、Entity(数据库表)、DAO(访问数据库的方法)。
接下来结合我们的项目来创建Entity。
在项目中创建database对应的package,其下有entity和dao:
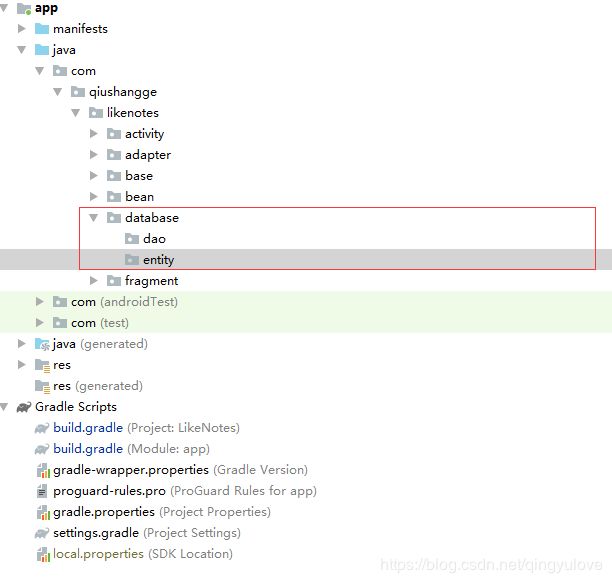
接下来我们创建日记记录的entity:
package com.qiushangge.likenotes.database.entity;

import androidx.room.Entity;
import androidx.room.PrimaryKey;

import java.util.Date;
import java.util.UUID;

@Entity
public class Note {
    //日记唯一标识
    @PrimaryKey
    public UUID uid;
    //日记标题
    public String noteTitle;
    //日记内容
    public String noteContent;
    //日记创建时间
    public Date dateCreate;
    //日记修改时间
    public Date dateUpdate;
}
Room 必须拥有该字段的访问权限。您可以将某个字段设为公开字段,也可以为其提供 getter 和 setter。
也就是说可以使用下面的定义方式:
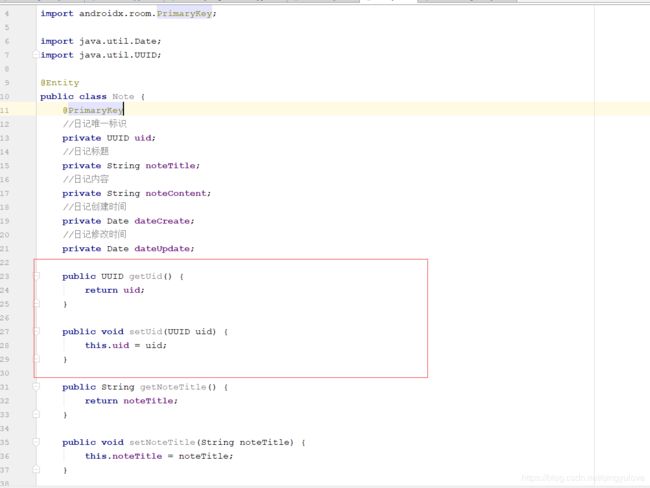
我们可以将变量定义为私有变量然后提供对应的getter和setter方法,这里我们使用第一种方式。
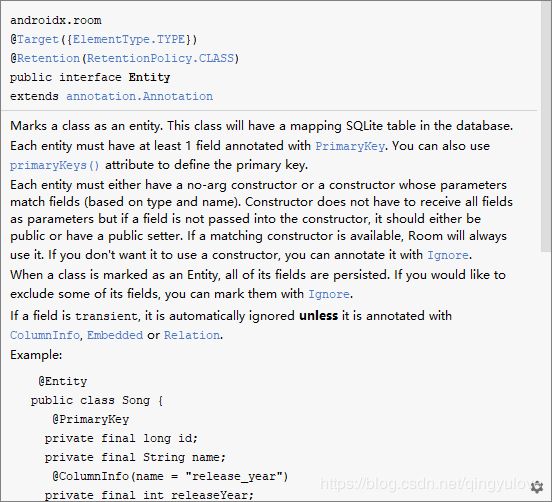
一个类意味着使用@Entity注解,那么它将和SQLite数据库中的一张表建立起映射。默认情况下类名就是表名。同样的约束有在该类中必须至少有一个使用@PrimaryKey注解的变量。这一点不难理解,主键的概念如果我们接触过数据库都应该很容易明白。
如果要修改我们的表名,那么可以使用 tableName属性:

如果我们需要定义复合主键,那么可以使用@Entity注释的 primaryKeys属性:
![]()
在实际的使用中,我们可能会使用一个默认的自增的列作为表的主键,此时我们需要使用@PrimaryKey的autoGenerate 属性:
与 tableName 属性类似,Room 将字段名称用作数据库中的列名称。如果你希望列具有不同的名称,那么可以使用@ColumnInfo 注释添加到字段,如以下代码段所示:

另外一个就是在Entity中使用@Ignore忽略指定的字段,默认情况下我们Entity中所有的变量都将作为数据表中的列:

如果实体继承了父实体的字段,则使用 @Entity 属性的 ignoredColumns 属性通常会更容易:

需要通过全文搜索 (FTS) 快速访问数据库信息,我们可使用@Fts4 注释添加到给定实体:

如果我们启用 FTS 的表始终使用 INTEGER 类型的主键且列名称为“rowid”。如果是由 FTS 表支持的实体定义主键,则必须使用相应的类型和列名称。
最后我们在说一下@AutoValue注释, J如果这两个实例的列包含相同的值,那么两个实例被视为相等。具体的使用我们不再赘述,等需要的时候再详细学习吧。
创建嵌套对象
在很多情况下我们的表结构可能十分复杂,在一个表中往往会嵌套其他的数据对象。此时我们需要使用@Embedded注释将该对象包含在当前Entity中。
我们修改下我们日记记录的数据结构,将日记的创建时间和修改时间单独提取出来作为一个新的Entity,然后在Note的Entity中嵌套使用:
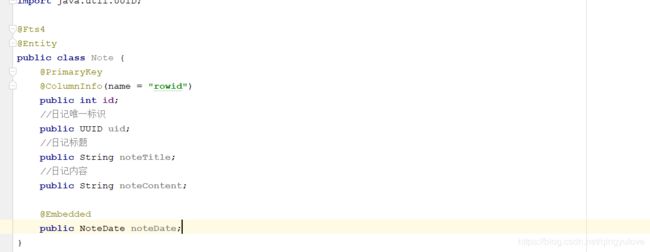
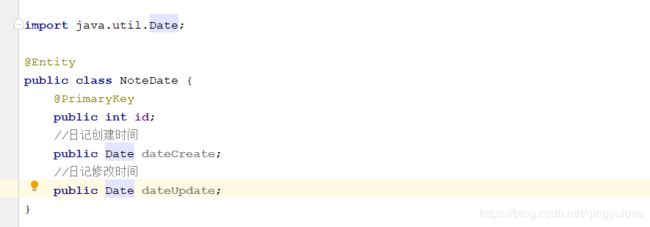
定义一对多关系
另外一种常见的场景就是数据表一对多的关系,比如我们有一个User类,同时还有一个Book类,此时我们可通过@ForeignKey 注释定义外键关系,示例代码如下:
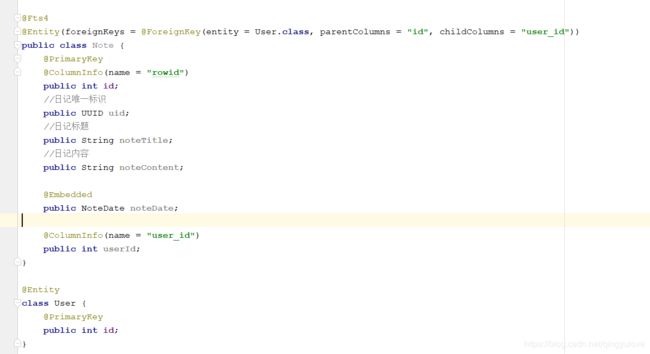
代码很简单,十分容易理解,其中entity指定需要和那个Entity建立外键关系,parentColumns指定的是目标Entity中的列,childColumns指定当前Entity中和目标Entity对应的列。
另外多对多的关系这里我们暂不做介绍。
接下来我们使用Dao来操作数据库,数据库的操作无非是增删改查,这里我们根据项目做一个简单的演示。首先创建NoteDao,并添加增删改查的方法。
@Dao
public interface NoteDao {

    @Insert
    public void insert(Note note);

    @Delete
    public void delete(Note note);

    @Update
    public void update(Note note);

   @Query("SELECT * FROM note WHERE uid = :uid")
    public Note getNote(int uid);

    @Query("SELECT * FROM note")
    public List<Note> getAllNotes();
}
LiveData
当数据更改时,通常需要执行一些操作,例如在UI中显示更新的数据。这意味着我们必须观察数据,以便在数据发生更改时做出反应。
LiveData是一个用于数据观察的生命周期库类,在方法描述中使用LiveData类型的返回值,Room在更新数据库时生成更新LiveData所需的所有代码。
在我们上面的代码中将返回的数据使用LiveData进行包裹:
    @Query("SELECT * FROM note WHERE uid = :uid")
    public LiveData<Note> getNote(int uid);

    @Query("SELECT * FROM note")
    public LiveData<List<Note>> getAllNotes();
ok,暂时我们就先说一下它的概念,后面我们在学习怎么使用。
接下里我们就该创建数据了,这里我们创建的room 数据库必须是abstract而且必须继承自RoomDatabase:
@Database(entities = {Note.class}, version = 1, exportSchema = false)
public abstract class DataBase extends RoomDatabase {
}
使用数据库那么首先我们的拿到数据库的实例,接下来才能进行我们的操作。如果我们的应用在单个进程中运行,则在实例化 AppDatabase 对象时应遵循单例设计模式。每个 RoomDatabase 实例的成本相当高,而大多时候我们几乎不需要在单个进程中访问多个实例。
具体代码如下:
@Database(entities = {Note.class}, version = 1, exportSchema = false)
public abstract class NoteRoomDatabase extends RoomDatabase {

    public abstract NoteDao getNoteDao();

    private static volatile NoteRoomDatabase INSTANCE;
    private static final int NUMBER_OF_THREAD = 5;
    private static final String DATABASE_NAME = "noteDatabase";

    static final ExecutorService databaseWriteExcutor =
            Executors.newFixedThreadPool(NUMBER_OF_THREAD);

    static NoteRoomDatabase getDataBase(final Context context) {
        if (INSTANCE == null) {
            synchronized (NoteRoomDatabase.class) {
                if (INSTANCE == null) {
                    INSTANCE = Room.databaseBuilder(context.getApplicationContext(),
                            NoteRoomDatabase.class, DATABASE_NAME).build();
                }
            }
        }
        return INSTANCE;
    }

}
注意这里我们必须为每个定义的Entity提供对应的getter方法。
同时我们创建了一个带有固定线程池的ExecutorService,可以使用它在后台线程上异步运行数据库操作。
其实到这里我们就可以使用了额,不过呢作为学习我还是跟着官方推荐接着往下走。
Repository
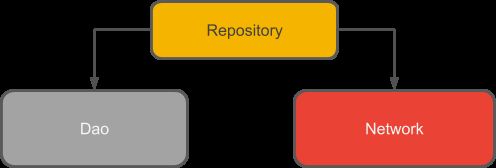
Repository是android对于代码分离和体系结构建议的最佳实践,简单来说Repository是抽象了对多个数据源的访问。比如我们可同时通过本地数据库和网络进行数据请求,Repository就可以决定我们从哪里获取数据。
接下来我们创建一个实际的例子来看看:
public class NoteRepository {
    private NoteDao mNoteDao;

    public NoteRepository(Application application) {
        NoteRoomDatabase db = NoteRoomDatabase.getDatabase(application);
        mNoteDao = db.getNoteDao();
    }

    public void insert(Note note) {
        NoteRoomDatabase.databaseWriteExecutor.execute(() -> {
            mNoteDao.insert(note);
        });
    }

    public void delete(Note note) {
        NoteRoomDatabase.databaseWriteExecutor.execute(() -> {
            mNoteDao.delete(note);
        });
    }

    public void update(Note note) {
        NoteRoomDatabase.databaseWriteExecutor.execute(() -> {
            mNoteDao.update(note);
        });
    }

    public LiveData<List<Note>> getAllNotes() {
        return mNoteDao.getAllNotes();
    }

    public LiveData<Note> getNote(int uid) {
        return mNoteDao.getNote(uid);
    }
}
这里使用databaseWriteExecutor执行那些可以在后台线程运行的操作。
ViewModel
ViewModel 类旨在以注重生命周期的方式存储和管理界面相关的数据。ViewModel 类让数据可在发生屏幕旋转等配置更改后继续存在。
架构组件为界面控制器提供了 ViewModel 辅助程序类,该类负责为界面准备数据。 在配置更改期间会自动保留 ViewModel 对象,以便它们存储的数据立即可供下一个 Activity 或 Fragment 实例使用。
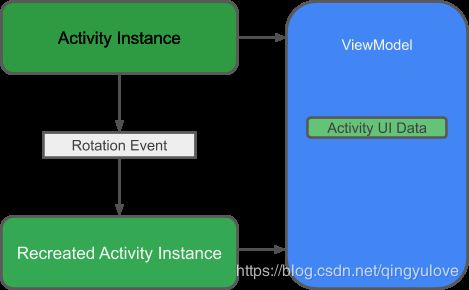
简单来说就是Repository和ui的中间层,控制器。将应用程序的UI数据与Activity和Fragment类分离可以让我们更好地遵循单一责任原则:Activity和Fragment负责将数据绘制到屏幕上,而ViewModel则负责保存和处理UI所需的所有数据。
代码示例:
public class NoteViewModel extends AndroidViewModel {

    private NoteRepository mRepository;

    private LiveData<List<Note>> mAllNotes;


    public NoteViewModel(@NonNull Application application) {
        super(application);
        mRepository = new NoteRepository(application);
        mAllNotes = mRepository.getAllNotes();
    }

    public void insert(Note note) {
        mRepository.insert(note);
    }

    public void delete(Note note) {
        mRepository.delete(note);
    }

    public void update(Note note) {
        mRepository.update(note);
    }

    public LiveData<Note> getNote(int uid) {
        return mRepository.getNote(uid);
    }

    public LiveData<List<Note>> getAllNotes() {
        return mAllNotes;
    }

}
这里AndroidViewModel继承ViewModel。
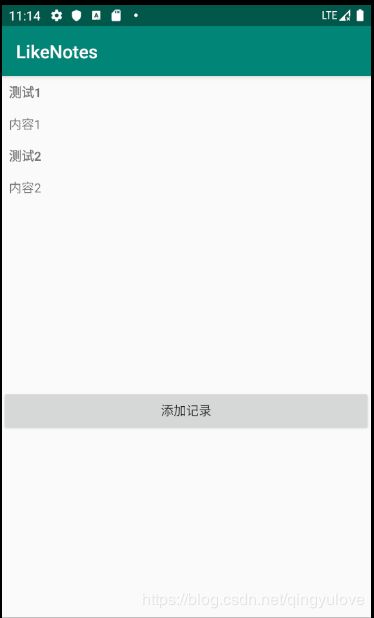
接下来我们修改我们的项目,使用database来存储和操作数据。删除原来无用代码,重新创建类NoteActivity :
public class NoteActivity extends BaseActivity {

    private NoteViewModel mViewModel;

    private RecyclerView recyclerView;

    private NoteListAdapter mAdapter;

    private Button btn;

    /**
     * 初始化组件配置数据
     */
    @Override
    protected void initViewOptions() {

    }

    /**
     * 完成必要的数据初始化
     */
    @Override
    protected void initActivityData() {

        mViewModel = new ViewModelProvider(this, new ViewModelProvider.AndroidViewModelFactory(getApplication())).get(NoteViewModel.class);
        mViewModel.getAllNotes().observe(this, new Observer<List<Note>>() {
            @Override
            public void onChanged(List<Note> notes) {
                mAdapter.setData(notes);
            }
        });
    }

    /**
     * 实现事件监听
     */
    @Override
    protected void initActivityListener() {
        btn.setOnClickListener(v -> {
            Note note = new Note();
            note.noteTitle = "测试1";
            note.noteContent = "内容1";
            note.uid = UUID.randomUUID().toString();
            mViewModel.insert(note);
        });
    }

    /**
     * 初始化组件
     */
    @Override
    protected void initActivityView() {
        recyclerView = findViewById(R.id.note_recycle_view);
        mAdapter = new NoteListAdapter();
        mAdapter.setNoteListItemClickListener(position -> {

        });
        recyclerView.setAdapter(mAdapter);
        recyclerView.setLayoutManager(new LinearLayoutManager(this));

        btn = findViewById(R.id.btn);
    }

    /**
     * @return 返回布局文件资源id
     */
    @Override
    protected int getActivityLayout() {
        return R.layout.fragment_note_list;
    }
}
修改adapter:
ublic class NoteListAdapter extends RecyclerView.Adapter<NoteListAdapter.ViewHolder> {

    private List<Note> noteItemList;

    private NoteListItemClickListener noteListItemClickListener;

    public interface NoteListItemClickListener {
        /**
         * @param position 数据项索引
         */
        public void onNoteListItemClicked(int position);
    }

    public void setData(List<Note> noteItemList) {
        this.noteItemList = noteItemList;
        notifyDataSetChanged();
    }


    public NoteListAdapter() {
    }


    public void setNoteListItemClickListener(NoteListItemClickListener noteListItemClickListener) {
        this.noteListItemClickListener = noteListItemClickListener;
    }

    /**
     * 创建ViewHolder实例
     *
     * @param parent
     * @param viewType
     * @return
     */
    @NonNull
    @Override
    public ViewHolder onCreateViewHolder(@NonNull ViewGroup parent, int viewType) {
        View view = LayoutInflater.from(parent.getContext())
                .inflate(R.layout.note_list_item, parent, false);
        ViewHolder holder = new ViewHolder(view);
        return holder;
    }

    /**
     * 对RecyclerView子项进行赋值
     *
     * @param holder
     * @param position 当前数据项索引
     */
    @Override
    public void onBindViewHolder(@NonNull ViewHolder holder, int position) {
        Note noteItem = noteItemList.get(position);
        holder.noteTitle.setText(noteItem.noteTitle);
        holder.noteContent.setText(noteItem.noteContent);
    }


    /**
     * 获取数据项大小
     *
     * @return
     */
    @Override
    public int getItemCount() {
        return noteItemList == null ? 0 : noteItemList.size();
    }


    /**
     * 构造函数需要传入view参数,通常为RecyclerView子项的最外层布局,这里就是note_list_item
     */
    public class ViewHolder extends RecyclerView.ViewHolder implements View.OnClickListener {

        TextView noteTitle;
        TextView noteContent;

        public ViewHolder(@NonNull View itemView) {
            super(itemView);
            noteTitle = itemView.findViewById(R.id.tv_note_title);
            noteContent = itemView.findViewById(R.id.tv_note_content);
            itemView.setOnClickListener(this);
        }

        @Override
        public void onClick(View v) {
            if (noteListItemClickListener != null) {
                noteListItemClickListener.onNoteListItemClicked(getAdapterPosition());
            }
        }
    }
}
