原文来自卡米尔大神(Kamil Myśliwiec):Nest FINAL release is here! Node.js framework built on top of TypeScript
Nest 是 Node.js圈子中又一强大的 Web 框架, 使用 Nest 可以轻松构建高效可拓展应用。 Nest 使用现代 JavaScript 技术构建,编码使用TypeScript,同时汲取了 OOP (面向对象编程) 以及 FP(函数式编程) 的精华所在。
Nest 不仅仅是一个 Web 框架,使用 Nest 时,无需担心有没有丰富的社区支持, 因为Nest 本身就基于闻名遐迩的老牌框架而建 – Express 和socket.io! 因此,学习 Nest 能够让你轻松上手,而不用学习一整套新的工具全家桶。
核心概念
Nest 的核心内容是提供一个服务框架 (architecture), 帮助开发者实现多层分离,业务抽象。
安装
$ npm install --save nest.js
配置应用
Nest 支持 ES6 和 ES7 (decorators, async / await) 新特性。 所以最简单方式就是使用 Babel 或者 TypeScript。
本文中会使用 TypeScript (当然不是唯一方式),我也推荐大家使用这种方式,下边是一个简单的 tsconfig.json 文件
{
    "compilerOptions": {
        "module": "commonjs",
        "declaration": false,
        "noImplicitAny": false,
        "noLib": false,
        "emitDecoratorMetadata": true,
        "experimentalDecorators": true,
        "target": "es6"
    },
    "exclude": [ "node_modules" ]
}
注意 emitDecoratorMetadata 以及 experimentalDecorators 需要设置为 true, 来支持项目中使用 Decorator 新特性。
现在可以写一个小服务了。首先,创建一个应用的入口模块(entry module) (app.module.ts):
import { Module } from 'nest.js';
@Module({})
export class ApplicationModule {}
此时尚未为模块添加修饰 metadata 是空对象 ({}), 我们现在只想让服务跑起来 (现在也没有控制器和组件能够让我们添加的).
第二步,编写主文件:index.ts (这个文件名随意,约定俗成,喜欢使用 Index) ,调用 Nest 提供的工厂函数创建 Nest应用实例,并将这个实例挂载在刚创建的入口模块上。
import { NestFactory } from 'nest.js';
import { ApplicationModule } from './app.module';
const app = NestFactory.create(ApplicationModule);
app.listen(3000, () => console.log('Application is listening on port 3000'));
完工,齐活。跑一下,看看。
Express 实例
如果你需要控制 express 实例的生命周期,可以将创建的实例传递给工厂函数 NestFactory.create(),就成了下边这样
import express from 'express';
import { NestFactory } from 'nest.js';
import { ApplicationModule } from './modules/app.module';
const instance = express();
const app = NestFactory.create(ApplicationModule, instance);
app.listen(3000, () => console.log('Application is listening on port 3000'));
换句话说,你可以向工厂函数添加配置项,来生成想要的服务实例。(例如,添加常用的插件 morgan 或者 body-parser).
第一个控制器
控制器层用来处理 HTTP 请求. Nest 中,控制器是用 @Controller() 修饰的类。
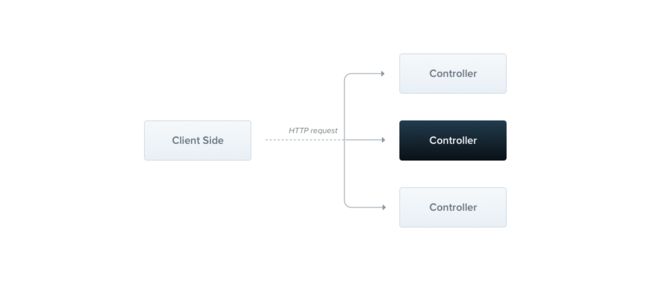
上一节中,我们已经写好了程序入口,基于此,我们来构建一个应用端口 /users
import { Controller, Get, Post } from 'nest.js';

@Controller()
export class UsersController {
    @Get('users')
    getAllUsers() {}

    @Get('users/:id')
    getUser() {}

    @Post('users')
    addUser() {}
}
正如所见,我们快速创建了同一个端口的3个应用路径:
GET: users
GET: users/:id
POST: users
看看刚创建的这个类,有木有可优化的地方呢? users 这个词貌似有点重复,能优化么?当然!只需要向 @Controller()添加元数据配置即可,这里添加一个路径,重写一下这个类。
@Controller('users')
export class UsersController {
    @Get()
    getAllUsers(req, res, next) {}

    @Get('/:id')
    getUser(req, res, next) {}

    @Post()
    addUser(req, res, next) {}
}
世界忽然清净了。这里多写了一点,那就是所有的 Nest 控制器默认包含 Express 自带参数列表和参数方法。如果你想学习更多 req (request), res (response) 以及 next 的使用 你需要读一下 Express 路由相关的文档。在 Nest 中,这些参数能力依旧,不仅如此,Nest 还对其进行了拓展。 Nest提供了一整套网络请求装饰器,你可以用这些装饰器来增强请求参数处理。
| Nest | Express |
|---|---|
| @Request() | req |
| @Response() | res |
| @Next() | next |
| @Session() | req.session |
| @Param(param?: string) | req.params[param] |
| @Body(param?: string) | req.body[param] |
| @Query(param?: string) | req.query[param] |
| @Headers(param?: string) | req.headers[param] |
简单 demo 这些装饰器的用法
@Get('/:id')
public async getUser(@Response() res, @Param('id') id) {
    const user = await this.usersService.getUser(id);
    res.status(HttpStatus.OK).json(user);
}
使用这些装饰器的时候,记得从 Nest 引入 Param 模块
import { Response, Param } from 'nest.js';
现在 UsersController 已经可以投放使用了,但模块并不知道有这个控制器的存在,所以进入 ApplicationModule 给装饰器添加些元数据。
import { Module } from 'nest.js';
import { UsersController } from "./users.controller";
@Module({
    controllers: [ UsersController ]
})
export class ApplicationModule {}
正如所见,引入控制器,并将其添加到元数据的 controllers 数组,就完成了注册。
组件
Nest 中所有内容都可以视为组件 Service, Repository, Provider 等都是组件。同时组件可以相互嵌套,也可以作为服务从构造函数里注入控制器。
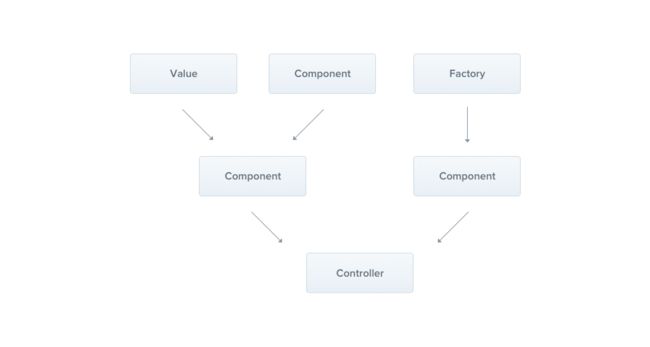
上一节,我们创建了一个简单的控制器,UsersController。这个控制器负责响应网络请求并将请求映射到数据(当然现在还是假数据,但并不影响)上。实际上,这并不是好的实践,数据和请求分离才更便于分离依赖,抽象业务。所以应该将控制器的职责单一化,只负责响应网络请求,而将更复杂的任务交付给 服务 来实现。我们称这个抽离出来的依赖叫 UsersService 组件。实际开发中,UsersService应从持久层调用方法实现数据整合,比如从 UsersRepository组件,为了说明简单,我们暂时跳过这个阶段,依然使用假数据来说明组件的概念。
import { Component, HttpException } from 'nest.js';
@Component()
export class UsersService {
    private users = [
        { id: 1, name: "John Doe" },
        { id: 2, name: "Alice Caeiro" },
        { id: 3, name: "Who Knows" },
    ];

    getAllUsers() {
        return Promise.resolve(this.users);
    }

    getUser(id: number) {
        const user = this.users.find((user) => user.id === id);
        if (!user) {
            throw new HttpException("User not found", 404);
        }
        return Promise.resolve(user);
    }

    addUser(user) {
        this.users.push(user);
        return Promise.resolve();
    }
}
Nest 组件也是个类,他使用 @Component() 装饰器来修饰。 正如所见,getUser() 方法中调用了 HttpException 模块,这是 Nest 内置的 Http 请求异常处理模块,传入两个参数,错误信息和返给客户端的状态码。 优先处理异常是一种优良习惯,更多情况可以拓展 HttpException 来实现 (更多细节查看错误处理小结)。如此,我们的用户服务已经就绪,那就在用户控制器中使用起来吧。
@Controller('users')
export class UsersController {
    constructor(private usersService: UsersService) {}

    @Get()
    getAllUsers(@Response res) {
        this.usersService.getAllUsers()
          .then((users) => res.status(HttpStatus.OK).json(users));
    }

    @Get('/:id')
    getUser(@Response() res, @Param('id') id) {
        this.usersService.getUser(+id)
          .then((user) => res.status(HttpStatus.OK).json(user));
    }
    @Post()
    addUser(@Response() res, @Body('user') user) {
        this.usersService.addUser(req.body.user)
          .then((msg) => res.status(HttpStatus.CREATED).json(msg));
    }
}
注意,这里没有写 next参数,因为这个场景中并未用到。
正如所见,UsersService 会自动注入控制器,这是 TypeScript 提供的语法糖,让你轻而易举的实现依赖注入,Nest 能够从这种方式中识别出对应的依赖。
constructor(private usersService: UsersService)
如上,即可。再次声明,如果你在自己 demo 时如果报错,请查看 tsconfig.json 文件中是否将 emitDecoratorMetadata 置为 true, 当然,你从头就没用 ts,无可厚非,就像你非得满足 IE6用户需求一样,Nest 也提供了相应的写法。
import { Dependencies, Controller, Post, Get, HttpStatus, Response, Param, Body } from 'nest.js';

@Controller('users')
@Dependencies(UsersService)
export class UsersController {
    constructor(usersService) {
        this.usersService = usersService;
    }

    @Get()
    getAllUsers(@Response() res) {
        this.usersService.getAllUsers()
          .then((users) => res.status(HttpStatus.OK).json(users));
        }

    @Get('/:id')
    getUser(@Response() res, @Param('id') id) {
        this.usersService.getUser(+id)
          .then((user) => res.status(HttpStatus.OK).json(user));
    }

    @Post()
    addUser(@Response() res, @Body('user') user) {
        this.usersService.addUser(user)
          .then((msg) => res.status(HttpStatus.CREATED).json(msg));
    }
}
也不难是吧,眼熟不?当然,没有 ts 之前,我项目里绝大多数依赖注入都是如此实现的。不过,当你运行项目的时候,又要报错了,因为 Nest 和 ApplicationModule 并不知道 UserService 是什么东西,需要像添加控制器一样,将组件(服务,提供商,持久层)也添加到模块里,统一叫做组件。
import { Module } from 'nest.js';
import { UsersController } from './users.controller';
import { UsersService } from './users.service';

@Module({
    controllers: [ UsersController ],
    components: [ UsersService ]
})
export class ApplicationModule {}
齐活!现在应用能够正常跑了,不过路由 addUser 貌似不太管用, 为啥呢?因为我们并不能正确读取 req.body.user 啊,这时候咋整呢?这一步的思考至关重要,是自己造轮子解决这个问题,还是用别人的轮子?首先告诉你有 body-parser这个express中间件 解决这个问题,你可以在 express 实例中使用这些插件。当然,你可以自己写一个组件来处理这个问题(从用轮子到造轮子)。
让我们来装上这个神奇的插件
$ npm install --save body-parser
在 express实例中使用起来。
import express from 'express';
import * as bodyParser from 'body-parser';
import { NestFactory } from 'nest.js';
import { ApplicationModule } from './modules/app.module';

const instance = express();
instance.use(bodyParser.json());
const app = NestFactory.create(ApplicationModule, instance);
app.listen(3000, () => console.log('Application is listening on port 3000'));
异步回调方案 Async/await (ES7)
Nest 支持使用 ES7的 async / await 解决异步回调问题, 所以,我们可以顺利的重构 userController
@Controller('users')
export class UsersController {
    constructor(private usersService: UsersService) {}

    @Get()
    async getAllUsers(@Response() res) {
        const users = await this.usersService.getAllUsers();
        res.status(HttpStatus.OK).json(users);
    }

    @Get('/:id')
    async getUser(@Response() res, @Param('id') id) {
        const user = await this.usersService.getUser(+id);
        res.status(HttpStatus.OK).json(user);
    }

    @Post()
    async addUser(@Response() res, @Body('user') user) {
        const msg = await this.usersService.getUser(user);
        res.status(HttpStatus.CREATED).json(msg);
    }
}
这样能看起来舒服一点是吧,至少 async/await 要比 promise/then 方案更酷炫一些。更多可以去看 async / await.
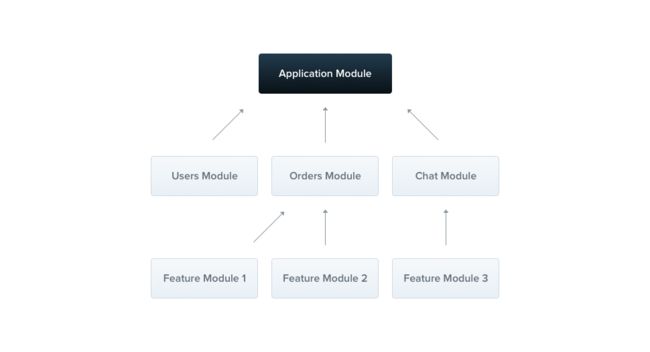
模块
模块是用 @Module({}) 装饰器修饰的类。Nest 会使用这些元数据来组织模块的结构。
截止到现在,我们的 ApplicationModule 看上去是这样的。
import { Module } from 'nest.js';
import { UsersController } from './users.controller';
import { UsersService } from './users.service';
@Module({
    controllers: [ UsersController ],
    components: [ UsersService ]
})
export class ApplicationModule {}
默认情况下,模块封装了所有的依赖,换句话说,控制器和组件对于模块外部是透明的。模块之间可以相互引用,实际上,Nest 本身也是一个模块树。基于最佳实践,我们将 UsersController 和 UsersService 转移到 UsersModule,新建一个 users.module.ts来存储这个模块。
import { Module } from 'nest.js';
import { UsersController } from './users.controller';
import { UsersService } from './users.service';

@Module({
    controllers: [ UsersController ],
    components: [ UsersService ]
})
export class UsersModule {}
然后在主模块 ApplicationModule 引入 UsersModule,并在元数据中使用 modules 声明。
import { Module } from 'nest.js';
import { UsersModule } from './users/users.module';
@Module({
    modules: [ UsersModule ]
})
export class ApplicationModule {}
齐活!正如所见,你可以根据业务需求,将部分模块抽离出来做成可重用的模块。
依赖注入
模块可以轻松的注入她自己的组件,在元数据里说明一下就行了。
@Module({
    controllers: [ UsersController ],
    components: [ UsersService, ChatGateway ]
})
export class UsersModule implements NestModule {
    constructor(private usersService: UsersService) {}
}
与此同时,组件也可以注入模块
export class UsersController { constructor(private module: UsersModule) {}}
中间件
中间件本质是一个函数,这个函数在路由处理器之前调用。中间件能够查看请求和回复对象,同时也能修改这些内容。你可以把他们理解为 围栏。如果中间件不放行,请求是不会抵达路由处理控制器的。
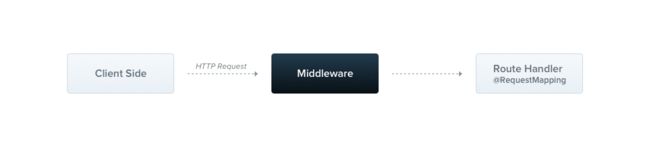
我们来构建一个虚拟的授权中间件(简单起见,只验证 username)。我们使用 HTTP 的头部信息 X-Access-Token 来提供 username(这种实现很奇怪,不过例子嘛,不要太认真)
import { UsersService } from './users.service';
import { HttpException, Middleware, NestMiddleware } from 'nest.js';

@Middleware()
export class AuthMiddleware implements NestMiddleware {
    constructor(private usersService: UsersService) {}

    resolve() {
        return (req, res, next) => {
            const userName = req.headers["x-access-token"];
            const users = this.usersService.getUsers();
            const user = users.find((user) => user.name === userName);
            if (!user) {
                throw new HttpException('User not found.', 401);
            }
            req.user = user;
            next();
        }
    }
}
关于中间件,你需要知道的只有四条
- 你使用 @Middleware() 装饰器告诉 Nest,下边这个类是个中间件
- 你可以使用 NestMiddleware 模块提供的接口,这样你就可以将注意力集中在输入输出上了,换句话说,你只需要实现 resolve()函数
- 像组件一样,中间件可以通过构造函数注入其他组件作为依赖,这里的组件应该是模块内部的。
- 中间件必须包含一个 resolve()函数, 同时return 一个新的函数(高阶函数)为啥这么设计呢?因为大量的 express 第三方插件都是这么搞,Nest 也支持的话,就能够让大家轻松平移过来了。
注意: 上边代码中子在
UsersService添加了一个getUsers方法,用以封装获取所有用户。
现在我们有这个中间件了,尝试用起来吧。
import { Module, MiddlewaresConsumer } from 'nest.js';

@Module({
    controllers: [ UsersController ],
    components: [ UsersService ],
    exports: [ UsersService ]
})
export class UsersModule {
    configure(consumer: MiddlewaresConsumer) {
        consumer.apply(AuthMiddleware)
          .forRoutes(UsersController);
    }
}
如上所见,在类 UsersModule 内部调用 configure() 方法。方法有一个参数,通过参数配置中间件消费者 MiddlewaresConsumer, 这是一个用于配置中间件的对象。这个对象有 apply() 方法,可以接收逗号分隔的多个中间件,apply() 方法返回一个对象,有两个内置方法
- forRoutes() – 将中间件配置给哪个控制器使用,可以用逗号分隔多个
- with – 向中间件反向传递参数
原理是啥呢?
当把 UsersController作为参数传递给 forRoutes方法时,Nest 会自动为控制器配置中间件。
GET: users
GET: users/:id
POST: users
也可通过配置的方式进行逐个操作,告知中间件作用在哪个路由上。一般用于指明某一个认证作用于全部控制器的场景。
consumer.apply(AuthMiddleware)
  .forRoutes({ path: '*', method: RequestMethod.ALL });
链式操作
Nest 支持链式操作,你可以轻松实现以下代码
consumer.apply(AuthMiddleware, PassportMidleware)
    .forRoutes(UsersController, OrdersController, ClientController)
    .apply(...)
    .forRoutes(...);
调用顺序
中间件按照其出现在数组中的顺序依次调用,子模块的中间件会在父模块中间件调用之后调用。
基于网关的实时应用
Nest 中有一种独特的组件叫做网关。网关可以帮助开发者构造实时应用。Nest 在实现过程中封装了 socket.io中的部分特性。
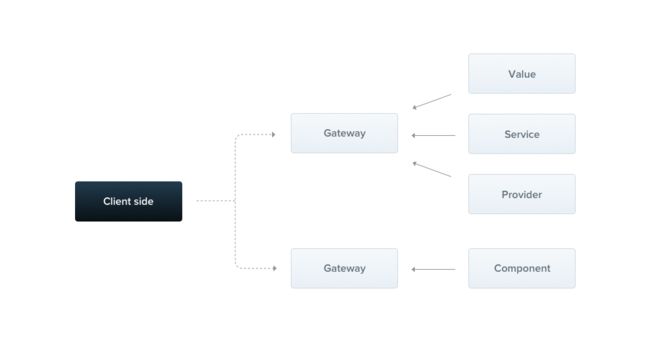
网关也是组件,一样可以通过构造函数注入依赖,当然也可作为其他组件的依赖。
import { WebSocketGateway, OnGatewayInit } from 'nest.js/websockets';

@WebSocketGateway()
export class UsersGateway implements OnGatewayInit {
    afterInit(server) {}
    handleConnection(client) {}
    handleDisconnect(client) {}
}
默认情况下,Websocket 会开通80端口,并使用默认命名空间,可以通过向装饰器传递元数据的方式进行配置。
@WebSocketGateway({ port: 81, namespace: 'users' })
当然,想要网关生效,还需要将其加入主模块,跟其他服务组件并列。
@Module({
    controllers: [ UsersController ],
    components: [ UsersService, UsersGateway ],
    exports: [ UsersService ]
})
另外,网关有三个重要的生命周期钩子:
- afterInit 有个本地服务器 socket.io 对象可以操作,一般写为 server
- handleConnection/handleDisconnect 有个本地客户端 socket.io 对象可以操作,一般写为 client
- OnGatewayInit/OnGatewayConnection/OnGatewayDisconnect 网关状态管理接口
如何传递数据
在网关中可以轻松订阅广播信息,使用 SubscribeMessage 装饰器实现。
import { WebSocketGateway, OnGatewayInit, SubscribeMessage } from 'nest.js/websockets';

@WebSocketGateway({ port: 81, namespace: 'users' })
export class UsersGateway implements OnGatewayInit {
    afterInit(server) {}
    handleConnection(client) {}
    handleDisconnect(client) {}

    @SubscribeMessage('drop')
    handleDropMessage(sender, data) { // sender 是本地客户端 socket.io 对象}
}
客户端可以轻松实现
import * as io from 'socket.io-client';
const socket = io('http://URL:PORT/');
socket.emit('drop', { msg: 'test' });
@WebSocketServer()
如果你想准确的指明使用哪个 socket.io 本地服务实例,可以将这个实例通过 @WebSocketServer() 装饰器进行包裹。
import { WebSocketGateway, WebSocketServer, OnGatewayInit } from 'nest.js/websockets';

@WebSocketGateway({ port: 81, namespace: 'users' })
export class UsersGateway implements OnGatewayInit {
    @WebSocketServer() server;
    afterInit(server) {}

    @SubscribeMessage('drop')
    handleDropMessage(sender, data) { // sender是本地客户端 socket.io 对象}
}
服务端初始化以后便完成指定。
网关中间件
网关中间件与路由中间件相似。中间件是一个函数,在订阅事件触发之前调用。网关可以操作本地 socket 对象。你可以把他们理解为 围栏。如果中间件不放行,信息是不会被广播的。
@Middleware()
export class AuthMiddleware implements GatewayMiddleware {
    public resolve(): (socket, next) => void {
        return (socket, next) => {
            console.log('Authorization...'); next();
        }
    }
}
网关中间件须知须会:(跟中间件一节一毛一样,我是拖戏的,骗稿费的)
- 你需要通过
@Middeware告知 Nest 这是一个中间件 - 你可以继承自
GatewayMiddleware然后集中处理 resolve 中的内容 - 像组件一样,中间件可以通过构造函数注入其他组件作为依赖,这里的组件应该是模块内部的。
- 中间件必须包含一个 resolve()函数, 同时return 一个新的函数(高阶函数)
中间件搞好了,就用起来。
@WebSocketGateway({
    port: 2000,
    middlewares: [ ChatMiddleware ]
})
export class ChatGateway {}
如上所见,网关@WebSocketGateway()接收元数据来配置使用的中间件,这里可以配置一组中间件,他们有个名,叫做“事前诸葛亮”
交互流
如上所见,Nest 中的网关也是组价,可以作为依赖注入其他组件,这就能让我们针对不同的信息作出不同的操作。比如做信息过滤(fuck=>fu*k),当然也可将组件注入网关,将网关的功能再次封装拆分。有个话题专门解决这个方向,网关交互流,你可以去这里查看详情
微服务
将 Nest 应用服务转为微服务异常简单。创建服务应用的时候这么写:
const app = NestFactory.create(ApplicationModule);
app.listen(3000, () => console.log('Application is listening on port 3000'));
转成微服务,只需要改一个方法即可,Java 工程师,PHP?看一看!
const app = NestFactory.createMicroservice(ApplicationModule, { port: 3000 });
app.listen() => console.log('Microservice is listening on port 3000'));
使用 TCP 进行通信
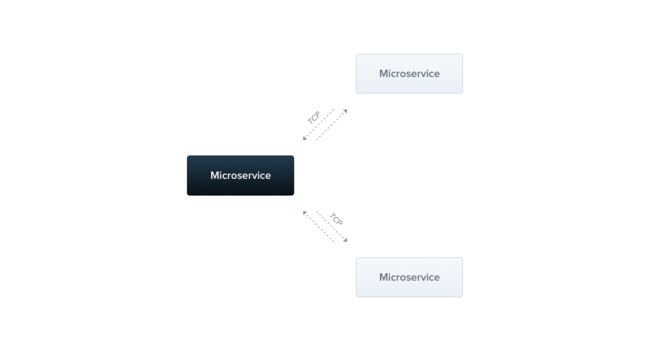
默认情况下,Nest 的微服务监听 TCP 协议信息,于是微服务中 @RequestMapping() (以及 @Post(), @Get()) 这些装饰器就用不到了,因为他们基于 HTTP协议。微服务中如何识别信息呢?Nest 提供了 patterns,这可能是对象,字符串,甚至数字(当然,数字不太好)
import { MessagePattern } from 'nest.js/microservices';

@Controller()
export class MathController {
    @MessagePattern({ cmd: 'add' })
    add(data, respond) {
        const numbers = data || [];
        respond(null, numbers.reduce((a, b) => a + b));
    }
}
如上所见,如果你想处理信息,那么只需使用 @MessagePattern(pattern)装饰器,装饰器中的元数据cmd指明了处理数据的方式,默认传递两个参数
- data, 其他微服务传递过来的数据,或者网络数据
- respond 响应方法,默认传递两个参数(错误,响应)
客户端
能够接收数据还没完事,你得知道怎么发送数据。在发送之前,你需要告诉 Nest 你给谁发数据。实际上也很简单,首先你脑子里需要构建一个 server-client 链接,你数据的接收方就是你的 Client,你可以使用 @Client来装饰
import { Controller } from 'nest.js';
import { Client, ClientProxy, Transport } from 'nest.js/microservices';

@Controller()
export class ClientController {
    @Client({
        transport: Transport.TCP,
        port: 5667
    })
    client: ClientProxy;
}
@Client() 装饰器接收三个元数据配置项
- transport – 传递数据的通道和协议,可以是
Transport.TCP或者Transport.REDIS,默认为 TCP - url – 只有传递通道为 Redis 的时候用到(默认 – redis://localhost:6379),
- port - 端口号(默认 3000).
创建客户端
创建一个端口服务来验证一下刚刚创建的 Server-Client 微服务通道
import { Controller, Get } from 'nest.js';
import { Client, ClientProxy, Transport } from 'nest.js/microservices';

@Controller()
export class ClientController {

    @Client({
        transport: Transport.TCP,
        port: 5667
    })
    client: ClientProxy;

    @Get('client')
    sendMessage(req, res) {
        const pattern = { command: 'add' };
        const data = [ 1, 2, 3, 4, 5 ];
        this.client.send(pattern, data)
          .catch((err) => Observable.empty())
          .subscribe((result) => res.status(200).json({ result }));
    }
}
如上所见,如果你想发送信息,你需要调用 send 方法,发送数据被封装为参数,一个 pattern一个 data.这个方法返回了 Rxjs 式的观察者对象。这可是不得了的一个特性,因为交互式观察者对象提供了一整套炫酷的方法。比如 combine, zip, retryWhen, timeout 等等,当然你还是喜欢用 Promises-then 那套,你可以使用 toPromise() 方法。由此,当请求发送到此控制器时,就会得到下边的结果(前提是微服务和 Web应用都启动起来)
{ "result": 15}
Redis
上文书 Nest 微服务还能链接 Redis,与 TCP 通信不同,与 Redis链接就能使用其自带的各种特性,最赞的当属 – 发布/订阅模式.

当然,你得先安装 Redis.
创建 Redis 微服务
创建一个 Redis 微服务也很简单,在创建微服务时,传递 Redis 服务配置即可。
const app = NestFactory.createMicroservice(
    MicroserviceModule, {
        transport: Transport.REDIS,
        url: 'redis://localhost:6379'
    });
app.listen(() => console.log('Microservice listen on port:', 5667 ));
如此便链接了 Redis,其服务中心分发的信息就能够被此微服务捕获到。剩下的工作跟 TCP 微服务一样。
Redis 客户端
现在仿照微服务创建一个客户端,在 TCP 微服务中,你的客户端配置像下边这样
@Client({
    transport: Transport.TCP,
    port: 5667
})
client: ClientProxy;
Redis 微服务的客户端修改一下即可,添加一个 url 配置项
@Client({
    transport: Transport.REDIS,
    url: 'redis://localhost:6379'
})
client: ClientProxy;
是不是很简单,数据操作和管道跟 TCP的微服务一致。
模块共享
Nest 可以指明向外暴漏哪些组件,换句话说,我们能够轻松地在模块之间共享组件实例。更好的方式当然是使用 Nest 内置的 Shared 模块.

以共享 ChatGateway 组件为例,添加一个 exports 关键字来指明导出的组件服务。
@Module({
    components: [ ChatGateway ],
    exports: [ ChatGateway ]
})
export class SharedModule {}
完事儿作为依赖注入到其他模块就行了。
@Module({
    modules: [ SharedModule ]
})
export class FeatureModule {}
完工齐活,你可以在 FeatureModule 中直接使用 ChatGateway,就跟自己模块内部一毛一样。
依赖注入
依赖注入是一个强大的特性,能够帮我们轻松管理类的依赖。在强类型语言,比如 Java 和 .Net中,依赖注入很常见。在 Nodejs 中,这种特性并不重要,因为我们已经拥有完善的模块加载机制。例如,我可以不费吹灰之力,从另外一个文件中引入一个模块。模块加载机制对于中小型应用已经足够了。但随着代码量逐步增长,系统层级复杂以后,通过引用的方式管理他们之间的依赖会越来越麻烦。现在没错,不代表未来不会错。所以自动化实现依赖管理呼之欲出。
这种方式尚不如通过构造函数导入依赖更加清晰明了,这也是 Nest 为何内置依赖注入机制的缘故。
自定义组件
依上文,你可以轻松将控制器绑定到模块,这种注入方式异常简单
@Module({
    controllers: [ UsersController ],
    components: [ UsersService ]
})
实际开发中,注入到模块的可能并非指明的这些关键字。
useValue
const value = {};
@Module({
    controllers: [ UsersController ],
    components: [ {
        provide: UsersService,
        useValue: value } ]
    })
使用场景
- 用于向服务插值,如此一来,
UsersService的元数据中就会有 value这个值, - 用于单元测试,注入初始值
useClass
@Component()
class CustomUsersService {}

@Module({
    controllers: [ UsersController ],
    components: [ {
        provide: UsersService,
        useClass: CustomUsersService } ]
    })
使用场景
- 向指定的服务注入特定的类。
useFactory
@Module({
    controllers: [ UsersController ],
    components: [
        ChatService,
        {
            provide: UsersService,
            useFactory: (chatService) => { return Observable.of('value');},
            inject: [ ChatService ]
        }]
    })
使用场景
- 使用其他组件之前需要计算得到一个值,并注入这个组件
- 服务的启动依赖一个异步值,比如读写文件或者链接数据库
注意
- 如果想要调用其他模块的内部控制器和组件,需要注明引用
自定义提供者
@Module({
    controllers: [ UsersController ],
    components: [ { provide: 'isProductionMode', useValue: false } ]
})
使用场景
- you want to provide value with a chosen key.
注意
- it is possible to use each types useValue, useClass and useFactory.
使用方法
To inject custom provided component / value with chosen key, you have to tell Nest about it, just like that:
import { Component, Inject } from 'nest.js';

@Component()
class SampleComponent {
    constructor(@Inject('isProductionMode') private isProductionMode: boolean) {
        console.log(isProductionMode); // false
    }
}
ModuleRef
Sometimes you might want to directly get component instance from module reference. It not a big thing with Nest – just inject ModuleRef in your class:
export class UsersController { constructor( private usersService: UsersService, private moduleRef: ModuleRef) {}}
ModuleRef 提供了一个方法:
-
get
(key), which returns instance for equivalent key (mainly metatype). Example moduleRef.get (UsersService) returns instance of UsersService component from current module. moduleRef.get
(UsersService)
It returns instance of UsersService component from current module.
测试
Nest gives you a set of test utilities, which boost application testing process. There are two different approaches to test your components and controllers – isolated tests or with dedicated Nest test utilities.
单元测试
Both Nest controllers and components are a simple JavaScript classes. Itmeans, that you could easily create them by yourself:
const instance = new SimpleComponent();
If your class has any dependency, you could use test doubles, for example from such libraries as Jasmine or Sinon:
const stub = sinon.createStubInstance(DependencyComponent);
const instance = new SimpleComponent(stub);
Nest 测试套件
The another way to test your applications building block is to use dedicated Nest Test Utilities. Those Test Utilities are placed in static Test class (nest.js/testing module).
import { Test } from 'nest.js/testing';
这个模块类提供了两个方法
- createTestingModule(metadata: ModuleMetadata), which receives as an parameter simple module metadata (the same as Module() class). This method creates a Test Module (the same as in real Nest Application) and stores it in memory.
- get
(metatype: Metatype ), which returns instance of chosen (metatype passed as parameter) controller / component (or null if it is not a part of module.
例如:
Test.createTestingModule({ controllers: [ UsersController ], components: [ UsersService ]});const usersService = Test.get(UsersService);
Mocks, spies, stubs
Sometimes you might not want to use a real instance of component / controller. Instead of this – you can use test doubles or custom values / objects.
const mock = {};
Test.createTestingModule({
    controllers: [ UsersController ],
    components: [ { provide: UsersService, useValue: mock } ]
});
const usersService = Test.get(UsersService); // mock
异常过滤器
With Nest you can move exception handling logic to special classes called Exception Filters. Let’s take a look at following code:
@Get('/:id')
public async getUser(@Response() res, @Param('id') id) {
    const user = await this.usersService.getUser(id);
    res.status(HttpStatus.OK).json(user);
}
Imagine that usersService.getUser(id) method could throws UserNotFoundException. What’s now? We have to catch an exception in route handler:
@Get('/:id')
public async getUser(@Response() res, @Param('id') id) {
    try {
        const user = await this.usersService.getUser(id);
        res.status(HttpStatus.OK).json(user);
    } catch(exception) {
        res.status(HttpStatus.NOT_FOUND).send();
    }
}
总的来说,我们在可能出现异常的地方添加 try...catch 语句块,更好的方式当然是使用内置的异常过滤器。
import { Catch, ExceptionFilter, HttpStatus } from 'nest.js';
export class UserNotFoundException {}
export class OrderNotFoundException {}

@Catch(UserNotFoundException, OrderNotFoundException)
export class NotFoundExceptionFilter implements ExceptionFilter {
    catch(exception, response) {
        response.status(HttpStatus.NOT_FOUND).send();
    }
}
可以在控制器中加入这个异常过滤器了。
import { ExceptionFilters } from 'nest.js';

@ExceptionFilters(NotFoundExceptionFilter)
export class UsersController {}
此时,如果找不到用户就会调起这个异常。
其他异常过滤器
Each controller may has infinite count of exception filters (just separate them by comma).
@ExceptionFilters(NotFoundExceptionFilter, AnotherExceptionFilter)
异常捕获的依赖注入
异常过滤器与组件一样工作,所以可以通过构造函数注入依赖
HttpException
注意,这个异常模块主要用于 RESTful API 构造
Nest 内置了错误处理层,可以捕获所有未处理的异常,如果抛出一个非 HttpException,Nest 会自动处理并返回下边这个 Json 对象(状态码 500):
{ "message": "Unkown exception"}
异常层次结构
在你的应用中,你应该创建你自己的错误层级。所有 HTTP异常相关都可以继承自内置 HttpException,例如,你可以创建 NotFoundException 和 UserNotFoundException。
import { HttpException } from 'nest.js';

export class NotFoundException extends HttpException {
    constructor(msg: string | object) {
        super(msg, 404);
    }
}

export class UserNotFoundException extends NotFoundException {
    constructor() {
        super('User not found.');
    }
}
当你项目中出现这两个异常的时候,Nest会调起你自己配置的这个异常处理句柄。
{ "message": "User not found."}
如此一来,你可以将将精力集中在业务逻辑和代码实现上了。
更多参考
– GitHub
– 文档
– NPM