nginx与tomcat的简单集群
实现高性能负载均衡的Tomcat集群:

工具:nginx-1.13.9和多个apache-tomcat-9.0.0.M9(解压版)nginx下载地址:https://nginx.org/en/download.html

一.多个tomcat的配置
先看安装版的界面:

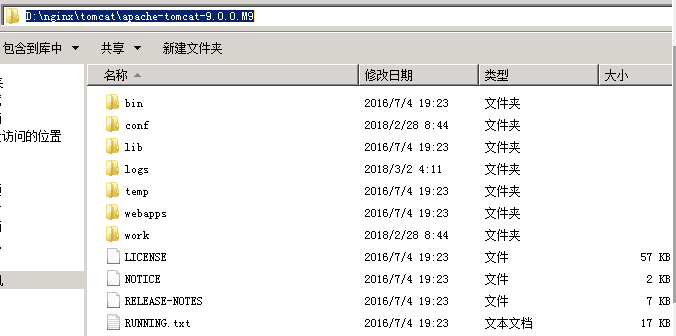
从这可以看出需要免安装版的tomcat里面需要设置的主要是server shutdown port(8005) 和 http/1.1 Connector Port (8080)和AJP/1.3 Connector Port(8009)等三个参数及windows Service Name tomcat服务器名称(对应免安装版的D:\nginx\tomcat\apache-tomcat-9.0.0.M91目录里的名字apache-tomcat-9.0.0.M91),主要是这四个参数。上面截图参数是默认参数。
故看看下面免安装版的注意点:
解压多个tomcat名字命名不一样。tomcat里面的设置点:
A.修改Tomcat的conf目录下的server.xml,修改这多个Tomcat的启动端口,分别为18080和28080等。
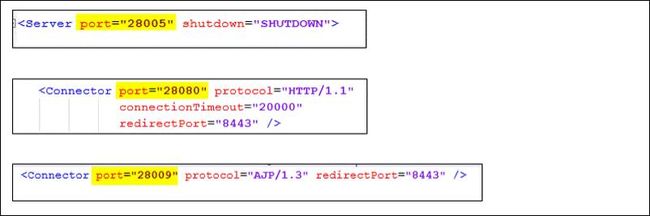
需要修改的是下面三处:蓝色的端口号(关闭,启动,?)
connectionTimeout="20000"
redirectPort="8443" />
B.在startup.bat里面开头部分设置JAVA_HOME和CATALINA_HOME
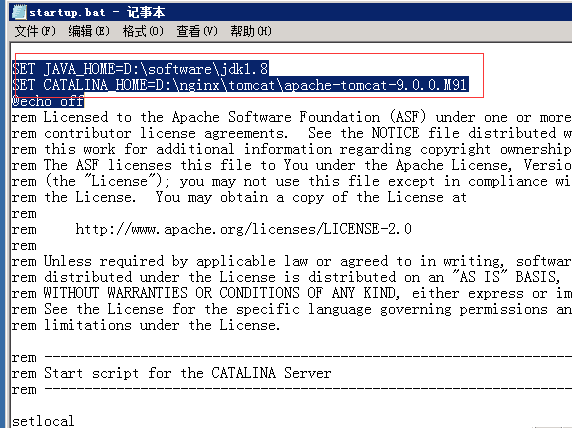
SET JAVA_HOME=D:\software\jdk1.8
SET CATALINA_HOME=D:\nginx\tomcat\apache-tomcat-9.0.0.M91
@echo off
然后启动并访问tomcat首页,看是不是能正常启动,

三个tomcat启动后截图:

这样三个tomcat能正常启动了。
注意点:tomcat启动报错:1.端口号问题2.配置环境问题
The JRE_HOME environment variable is not defined correctly(报错了)原因:Set JAVA_HOME or JRE_HOME if not already set and ensure any provided(设置了多个JAVA_HOME)
二,nginx的简单配置

nginxconf的原始代码:
#user nobody;
worker_processes 1;
#error_log logs/error.log;
#error_log logs/error.log notice;
#error_log logs/error.log info;
#pid logs/nginx.pid;
events {
worker_connections 1024;
}
http {
include mime.types;
default_type application/octet-stream;
#log_format main '$remote_addr - $remote_user [$time_local] "$request" '
# '$status $body_bytes_sent "$http_referer" '
# '"$http_user_agent" "$http_x_forwarded_for"';
#access_log logs/access.log main;
sendfile on;
#tcp_nopush on;
#keepalive_timeout 0;
keepalive_timeout 65;
#gzip on;
server {
listen 80;
server_name localhost;
#charset koi8-r;
#access_log logs/host.access.log main;
location / {
root html;
index index.html index.htm;
}
#error_page 404 /404.html;
# redirect server error pages to the static page /50x.html
#
error_page 500 502 503 504 /50x.html;
location = /50x.html {
root html;
}
# proxy the PHP scripts to Apache listening on 127.0.0.1:80
#
#location ~ \.php$ {
# proxy_pass http://127.0.0.1;
#}
# pass the PHP scripts to FastCGI server listening on 127.0.0.1:9000
#
#location ~ \.php$ {
# root html;
# fastcgi_pass 127.0.0.1:9000;
# fastcgi_index index.php;
# fastcgi_param SCRIPT_FILENAME /scripts$fastcgi_script_name;
# include fastcgi_params;
#}
# deny access to .htaccess files, if Apache's document root
# concurs with nginx's one
#
#location ~ /\.ht {
# deny all;
#}
}
# another virtual host using mix of IP-, name-, and port-based configuration
#
#server {
# listen 8000;
# listen somename:8080;
# server_name somename alias another.alias;
# location / {
# root html;
# index index.html index.htm;
# }
#}
# HTTPS server
#
#server {
# listen 443 ssl;
# server_name localhost;
# ssl_certificate cert.pem;
# ssl_certificate_key cert.key;
# ssl_session_cache shared:SSL:1m;
# ssl_session_timeout 5m;
# ssl_ciphers HIGH:!aNULL:!MD5;
# ssl_prefer_server_ciphers on;
# location / {
# root html;
# index index.html index.htm;
# }
#}
}
修改后的代码:
#user nobody;
worker_processes 1;
#error_log logs/error.log;
#error_log logs/error.log notice;
#error_log logs/error.log info;
#pid logs/nginx.pid;
events {
worker_connections 1024;
}
http {
include mime.types;
default_type application/octet-stream;
#log_format main '$remote_addr - $remote_user [$time_local] "$request" '
# '$status $body_bytes_sent "$http_referer" '
# '"$http_user_agent" "$http_x_forwarded_for"';
#access_log logs/access.log main;
sendfile on;
#tcp_nopush on;
#keepalive_timeout 0;
keepalive_timeout 65;
#gzip on;
upstream netitcast.com{
server 127.0.0.1:18080 weight=1;
server 127.0.0.1:28080 weight=1;
server 127.0.0.1:38080 weight=1;
}
server {
listen 80;
server_name localhost;
#charset koi8-r;
#access_log logs/host.access.log main;
# location / {
# root html;
# index index.html index.htm;
# }
location /{
proxy_pass http://netitcast.com;
proxy_redirect default;
}
#error_page 404 /404.html;
# redirect server error pages to the static page /50x.html
#
error_page 500 502 503 504 /50x.html;
location = /50x.html {
root html;
}
# proxy the PHP scripts to Apache listening on 127.0.0.1:80
#
#location ~ \.php$ {
# proxy_pass http://127.0.0.1;
#}
# pass the PHP scripts to FastCGI server listening on 127.0.0.1:9000
#
#location ~ \.php$ {
# root html;
# fastcgi_pass 127.0.0.1:9000;
# fastcgi_index index.php;
# fastcgi_param SCRIPT_FILENAME /scripts$fastcgi_script_name;
# include fastcgi_params;
#}
# deny access to .htaccess files, if Apache's document root
# concurs with nginx's one
#
#location ~ /\.ht {
# deny all;
#}
}
# another virtual host using mix of IP-, name-, and port-based configuration
#
#server {
# listen 8000;
# listen somename:8080;
# server_name somename alias another.alias;
# location / {
# root html;
# index index.html index.htm;
# }
#}
# HTTPS server
#
#server {
# listen 443 ssl;
# server_name localhost;
# ssl_certificate cert.pem;
# ssl_certificate_key cert.key;
# ssl_session_cache shared:SSL:1m;
# ssl_session_timeout 5m;
# ssl_ciphers HIGH:!aNULL:!MD5;
# ssl_prefer_server_ciphers on;
# location / {
# root html;
# index index.html index.htm;
# }
#}
}
核心配置:

稍微详细的配置:
1. worker_processes 1;#工作进程的个数,一般与计算机的cpu核数一致
events {
2.worker_connections 1024;#单个进程最大连接数(最大连接数=连接数*进程数)
}
http {
3. include mime.types; #文件扩展名与文件类型映射表
4. default_type application/octet-stream;#默认文件类型
5. sendfile on;#开启高效文件传输模式,sendfile指令指定nginx是否调用sendfile函数来输出文件,对于普通应用设为 on,如果用来进行下载等应用磁盘IO重负载应用,可设置为off,以平衡磁盘与网络I/O处理速度,降低系统的负载。注意:如果图片显示不正常把这个改成off。
6. keepalive_timeout 65; #长连接超时时间,单位是秒
7. gzip on;#启用Gizp压缩
#服务器的集群
8. upstream netitcast.com { #服务器集群名字
9. server 127.0.0.1:18080 weight=1;#服务器配置 weight是权重的意思,权重越大,分配的概率越大。
10. server 127.0.0.1:28080 weight=2;
}
#当前的Nginx的配置
server {
11. listen 80;#监听80端口,可以改成其他端口
12. server_name localhost; # 当前服务的域名
location / {
proxy_pass http://netitcast.com;
proxy_redirect default;
}
error_page 500 502 503 504 /50x.html;
location = /50x.html {
root html;
}
}
}
三.nginx的启动,关闭,重启
命令:(通过cmd以守护进程方式启动nginx.exe:start nginx,停止服务:nginx-s stop 或nginx -s quit,重新加载配置:nginx -s reload;)。注意点:(1.nginx.conf文件里的 pid logs/nginx.pid;要打开,不可注释掉(#pid logs/nginx.pid;),注释掉可能会导致重启或关闭失败。
2.如果nginx不是安装在c盘的话,在启动命令时一定要先cd到具体的磁盘的文件夹 命令:cd /d D:\nginx\nginx-1.13.9)

1.启动
a.启动可以直接双击nginx.exe(
注意不要直接双击nginx.exe,这样会导致修改配置后重启、停止nginx无效,需要手动关闭任务管理器内的所有nginx进程
在nginx.exe目录,打开命令行工具,用命令 启动/关闭/重启nginx
)
b.在cmd里面启动。start nginx
一些常见的错误:
在启动命令时一定要先cd到具体的磁盘的文件夹 命令:cd /d D:\nginx\nginx-1.13.9
然后start nginx ,重启也一样(nginx -s reload)
注意:除了cd到D盘具体的目录外,也可以在nginx.exe具体的文件夹用shift+鼠标右键调出cmd界面,这样直接可以用start nginx ,nginx -s reload,nginx -s stop,nginx -s quit 等命令。

2.重启(在修改了一些配置后需要重启的情况下)
nginx -s reload
3.停止
a.强制停止,就是把任务管理器里的nginx.exe进程结束掉

b.使用命令停止nginx-s stop 或nginx -s quit
在停止命令时
[error] CreateFile() "E:\nginx\nginx-1.9.3/logs/nginx.pid" failed
解决方法:
使用命令创建/logs/nginx.pid文件:
nginx -c conf/nginx.conf

***注意点:1.nginx.conf文件里的 pid logs/nginx.pid;要打开,不可注释掉(#pid logs/nginx.pid;),注释掉可能会导致重启或关闭失败。
2.如果nginx不是安装在c盘的话,在启动命令时一定要先cd到具体的磁盘的文件夹 命令:cd /d D:\nginx\nginx-1.13.9
四.对于集群服务器如果有一台tomcat宕机
怎么样可以提高nginx对于宕掉的服务器的反应与处理,以使以后的请求到来不会还将期发送到原来宕掉的服务器。
问题解决:
server {
listen 80;
server_name localhost;
location /{
proxy_pass http://localhost;
proxy_set_header Host $host;
proxy_set_header X-Real-IP $remote_addr;
proxy_set_header X-Forwarded-For $proxy_add_x_forwarded_for;
proxy_connect_timeout 1;
proxy_read_timeout 1;
proxy_send_timeout 1;
}
}
或者
upstream localhost {
server 127.0.0.1:8080 max_fails=2 fail_timeout=1s;
server 127.0.0.1:8081 max_fails=2 fail_timeout=1s;
}
均可缩短连接超时时间!
3.
注意不要直接双击nginx.exe,这样会导致修改配置后重启、停止nginx无效,需要手动关闭任务管理器内的所有nginx进程
在nginx.exe目录,打开命令行工具,用命令 启动/关闭/重启nginx
五.模式
#ip_hash; #每个请求按访问ip的hash结果分配,这样每个访客固定访问一个后端服务器,可以解决session的问题(粗暴简单,但绝对不是最佳的,因为某台服务器挂了,请求也就跟着挂了,所以不我们想要的)
server 192.168.1.215:8080 weight=1 max_fails=2 fail_timeout=30s;
server 192.168.1.216:8080 weight=2 max_fails=2 fail_timeout=30s;
注意:
安装tomcat时,老是给我报failed to install tomcat6 service ,check your setting and permissio错误,让我郁闷了好些时间。最后才发现我原来装过tomcat,而删除它时,只是简单的删除了它的文件夹,并没有删除服务里的tomcat服务,因此才出现上面的安装错误。
解决方法:
1.打开cmd,执行sc delete tomcat9
2.在运行框输入regedit,打开注册表。进入HKEY_LOCAL_MACHINE/SYSTEM/CurrentControlSet*/Services,然后删除tomcat系列即可
拓展:
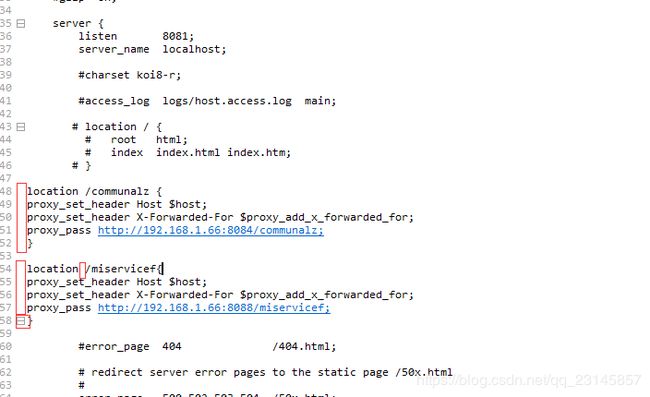
springboot项目部署到服务器常见的方式就是打成war包部署Tomcat或者打成jar包直接使用内置容易运行,很多人现在都打成war包部署到tomcat,这种方式虽然没问题 但是后期维护比较麻烦。从官方的说明中 打成jar部署是最好的方式,但是这样又有个问题 如果同时部署多个spring-boot项目 端口不一样 怎么通过域名来访问呢,接下来就需要Nginx出手了,Nginx 是一个高性能的HTTP和反向代理服务器,也是一个IMAP/POP3/SMTP服务器。很适合部署springboot,Nginx的安装这里不在做教程 给出主要nginx.conf的配置
server {
listen 80;
server_name 127.0.0.1;
access_log logs/book.log;
error_log logs/book.error;
#将/wx-service请求转发给http://127.0.0.1:8011/wx-service处理
location /wx-service {
proxy_set_header Host $host;
proxy_set_header X-Forwarded-For $proxy_add_x_forwarded_for;
proxy_pass http://127.0.0.1:8011/wx-service;
}
#将/bootdo请求转发给http://127.0.0.1:8012/bootdo处理
location /bootdo {
proxy_set_header Host $host;
proxy_set_header X-Forwarded-For $proxy_add_x_forwarded_for;
proxy_pass http://127.0.0.1:8012/bootdo;
}
#将/xcloud-service请求转发给http://127.0.0.1:8013/xcloud-api处理
location /xcloud-service {
proxy_set_header Host $host;
proxy_set_header X-Forwarded-For $proxy_add_x_forwarded_for;
proxy_pass http://127.0.0.1:8013/xcloud-api;
}
#将/eureka-service请求转发给http://127.0.0.1:8081/eureka-service处理
location /eureka-service {
proxy_pass http://127.0.0.1:8081/eureka-service; #这里的端口记得改成项目对应的哦
proxy_set_header X-Forwarded-For $proxy_add_x_forwarded_for;
proxy_set_header X-Forwarded-Proto $scheme;
proxy_set_header X-Forwarded-Port $server_port;
}
#将/xcloud-api请求转发给http://127.0.0.1:8082/xcloud-api处理
location /xcloud-api {
proxy_pass http://127.0.0.1:8082/xcloud-api; #这里的端口记得改成项目对应的哦
proxy_set_header X-Forwarded-For $proxy_add_x_forwarded_for;
proxy_set_header X-Forwarded-Proto $scheme;
proxy_set_header X-Forwarded-Port $server_port;
}
}
将nginx的端口改成80端口 域名就可以直接访问 service_name可以为localhost 代表本机 localtion /XXX这块就是配置nginx端口转发 不输了几个项目就配置几个 也可以将tomcat中的项目配置在这 也是没问题的 根据上述配置 在sbin目录执行 ./nginx -s reload 刷新nginx配置就会生效了
在这提供一个spring-boot快速重启shell脚本 亲测有效
export JAVA_HOME=/usr/local/java/jdk1.8.0_162
export PATH=$JAVA_HOME/bin:$PATH
export CLASSPATH=.:$JAVA_HOME/lib/dt.jar:$JAVA_HOME/lib/tools.jar
Port=8081
JarName=clouddo-server.jar
LogsPatch=./logs_$Port
ID=`ps -ef | grep $Port | grep -v "grep" | awk '{print $2}'`
echo $ID
echo "---------------"
for id in $ID
do
kill -s 9 $id
echo "killed $id"
done
echo "---------------"
rm -rf $LogsPatch
mkdir $LogsPatch
export LANG=zh_CN.UTF-8
set -m
nohup java -jar -Dlogging.path=$LogsPatch $JarName>$LogsPatch/catlina.out 2>&1 &
tail -f $LogsPatch/catlina.out
保存命名为xx.sh
记住 springboot项目得在配置文件中配置
server:
context-path: /xcloud-api
Spring boot默认是/ 这样直接通过http://ip:port/就可以访问到index页面 但是我们要通过nginx配置多项目的话就要给每一个项目单独指定context-path
在服务器目录根据个人喜好新建一个文件夹 专门用来存放spring-boot打包成的jar 和重启脚本 类似这样

这样方便管理 logs目录是启动脚本之后生成的日志文件夹 忽略 一个项目对应一个文件夹 里面包含项目jar和一个重启shell脚本
这样就可以同时后台启动多个springboot项目并且通过一个域名来访问这些项目 如果要实时查看日志 请进入到每个项目文件的logs-目录执行
tail -f catlina.out就可以查看了
注意点:nginx报错:nginx: [emerg] unknown directive in /etc/nginx/conf.d/test.conf:4
nginx.conf里面的格式非常严格,不能有空格