AVOD——Aggregate View Object Detection代码在centos服务器上运行过程
一、简单介绍
代码地址:https://github.com/kujason/avod
文章地址:https://arxiv.org/pdf/1712.02294
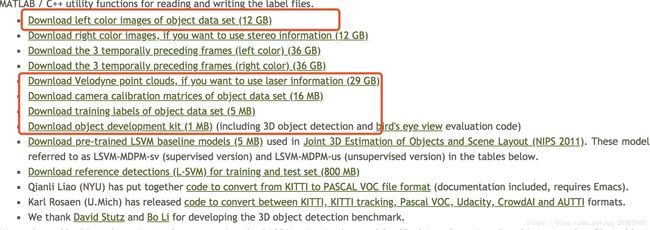
Kitti数据集:http://www.cvlibs.net/datasets/kitti/eval_object.php?obj_benchmark=3d
简介:使用Kitti数据集进行3D目标检测,同时使用LIDAR+RGB图像,先使用VGG16+FPN网络生成feature maps,然后输入到RPN网络中得到top proposals,最后进行classification+regression,得到3D box。
python版本:python3
后面会放上对AVOD论文的解读。
二、代码运行过程
1.按顺序进行git上作者说的流程:
#下载code
git clone https://github.com/kujason/avod.git

#进入wave下载avod里面带的另一个git代码,是处理kitti数据的工具
git clone https://github.com/kujason/wavedata.git

#可以pip安装requirement文件,也可以运行的时候报错就安装
cd avod
pip3 install -r requirements.txt
pip3 install tensorflow-gpu==1.3.0

#设置环境变量,很重要,而且每次打开服务器的时候都要重新设置一遍
# For nonvirtualenv users
export PYTHONPATH=$PYTHONPATH:'/path/to/avod'
export PYTHONPATH=$PYTHONPATH:'/path/to/avod/wavedata'

#Compile integral image library in wavedata
sh scripts/install/build_integral_image_lib.bash
可能出现line 7: cmake: command not found
解决方法,参考https://blog.csdn.net/a656678879/article/details/78780069
#Avod uses Protobufs to configure model and training parameters.
#Before the framework can be used, the protos must be compiled
sh avod/protos/run_protoc.sh
可能出现line 8: protoc: command not found
解决方法:
#Alternatively, you can run the protoc command directly:
protoc avod/protos/*.proto --python_out=.
2.数据的下载与安装位置
#注意因为有些文件过大,下载过程中经常断
#要熟练使用wget的断点续传和设置time out=0的方法,如:
wget -c -t0 https://s3.eu-central-1.amazonaws.com/avg-kitti/data_object_image_2.zip

#avod/avod/datasets/kitti/kitti_datasett.py中设置的数据读取路径为
self.dataset_dir = os.path.expanduser(self.config.dataset_dir)

#所以数据应该放在自己的机器的绝对路径下
#得到绝对路径:
$ pwd
#则数据存储在'path/Kitti/object'下,tree为:
Kitti
    object
        testing
        training
            calib
            image_2
            label_2
            planes
            velodyne
        train.txt
        val.txt
其中testing文件夹中对应着应该有training里面除了label以外其他的数据,下载的时候会自动下载下测试数据。
3.Mini-batch Generation
#预处理过程,把大量数据分成Mini-batch再输入到网络中,即使用8线程同时处理数据
cd avod
python3 scripts/preprocessing/gen_mini_batches.py

#Once this script is done, you should now have the following folders inside avod/data:
data
    label_clusters
    mini_batches
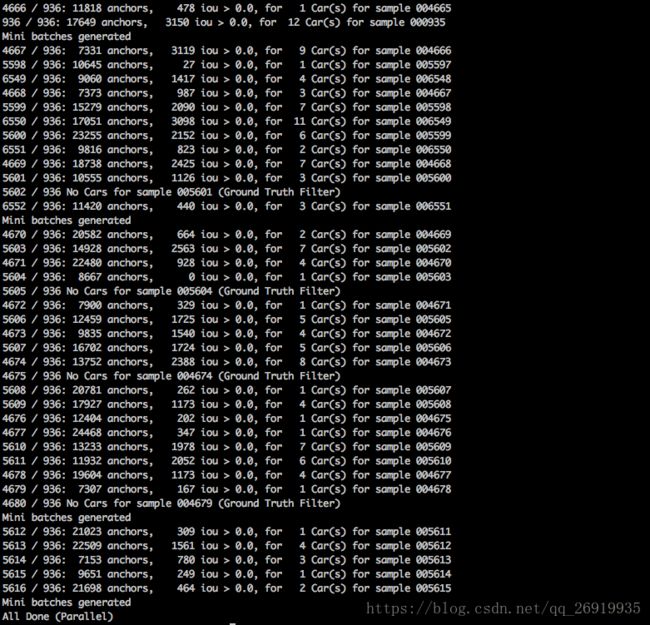
运行结果截图:

parallel的意思是多线程运行
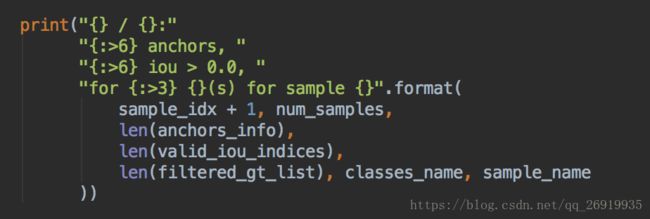
每行的输出语句在avod/core/mini_batch_preprocessor.py中

即:正在处理的image index/mini_batch的大小,该图片去掉空anchors后剩下的anchors数目,其中有多少个anchor与ground truth的iou>0,该图片对应的label中有几个某类,以及该图片的名称。
4.开始训练
#To start training, run the following:
python avod/experiments/run_training.py --pipeline_config=avod/configs/avod_cars_example.config

#(Optional) Training defaults to using GPU device 1, and the train split.
#You can specify using the GPU device and data split as follows:
python avod/experiments/run_training.py --pipeline_config=avod/configs/avod_cars_example.config  --device='0' --data_split='train'
若是报错如下:
No checkpoints found
Traceback (most recent call last):
  File "/usr/local/python3/lib/python3.5/site-packages/tensorflow/python/client/session.py", line 1322, in _do_call
    return fn(*args)
  File "/usr/local/python3/lib/python3.5/site-packages/tensorflow/python/client/session.py", line 1305, in _run_fn
    self._extend_graph()
  File "/usr/local/python3/lib/python3.5/site-packages/tensorflow/python/client/session.py", line 1340, in _extend_graph
    tf_session.ExtendSession(self._session)
tensorflow.python.framework.errors_impl.InvalidArgumentError: No OpKernel was registered to support Op 'MaxBytesInUse' with these attrs.  Registered devices: [CPU], Registered kernels:
  device='GPU'

     [[Node: MaxBytesInUse = MaxBytesInUse[]()]]