SpringCloud 熔断器仪表盘 Hystrix Dashboard实现
之前实现的熔断器的配置,SpringCloud还提供了熔断器的可视化界面仪表盘Hystrix Dashboard功能,这里配置的时候踩了一些坑,这边记录下。
之前熔断有通过Ribbon和Feign两种方式实现,这边可以通过仪表盘监控这两种方式的熔断。项目依旧基于之前的hystrix项目:
hystrix实现
目录
一、配置仪表盘
二、配置监控方
1、Ribbon方式
2、Feign方式
一、配置仪表盘
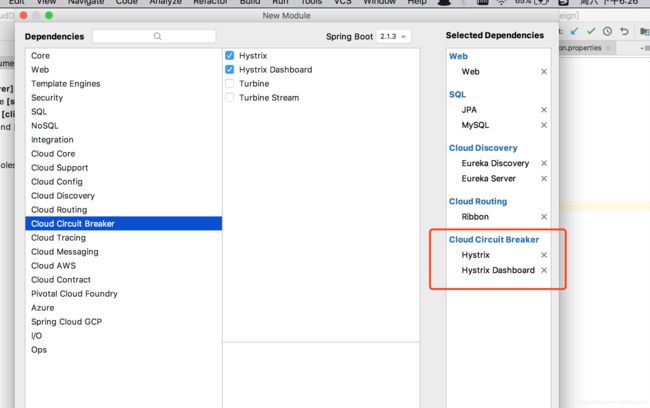
在工程中新建新的module,和之前项目创建方式一致。在组件选择中,选上hystrix,Hystrix Dashboard。这里建议选上eureka server和eureka Discovery。
创建完之后在启动类HystrixDashboarApplication上面加上注解@EnableHystrixDashboard
package com.hystrixdashboar;

import org.springframework.boot.SpringApplication;
import org.springframework.boot.autoconfigure.SpringBootApplication;
import org.springframework.cloud.client.SpringCloudApplication;
import org.springframework.cloud.netflix.hystrix.dashboard.EnableHystrixDashboard;

@SpringBootApplication
@EnableHystrixDashboard
public class HystrixDashboarApplication {

	public static void main(String[] args) {
		SpringApplication.run(HystrixDashboarApplication.class, args);
	}

}
在对应的pom.xml 文件中加上:
		org.springframework.boot
		spring-boot-starter-actuator
我这边的pom.xml文件(我这里配置了mysql)为:
	4.0.0

		org.springframework.boot
		spring-boot-starter-parent
		2.1.3.RELEASE


	com.hystrixdashboar
	hystrixdashboar
	0.0.1-SNAPSHOT
	hystrixdashboar
	Demo project for Spring Boot


		1.8
		Greenwich.RELEASE


			org.springframework.boot
			spring-boot-starter-data-jpa


			org.springframework.boot
			spring-boot-starter-web


			org.springframework.cloud
			spring-cloud-starter-netflix-eureka-client


			org.springframework.cloud
			spring-cloud-starter-netflix-eureka-server


			org.springframework.cloud
			spring-cloud-starter-netflix-hystrix


			org.springframework.cloud
			spring-cloud-starter-netflix-hystrix-dashboard


			org.springframework.cloud
			spring-cloud-starter-netflix-ribbon


		org.springframework.boot
		spring-boot-starter-actuator


			mysql
			mysql-connector-java
			runtime


			org.springframework.boot
			spring-boot-starter-test
			test


				org.springframework.cloud
				spring-cloud-dependencies
				${spring-cloud.version}
				pom
				import


				org.springframework.boot
				spring-boot-maven-plugin


			spring-milestones
			Spring Milestones
			https://repo.spring.io/milestone
然后是application.properties配置文件,配置端口号和服务名称:
server.port = 10030

spring.application.name =  SPRING-CLOUD-HYSTRIX-DASHBOARD

eureka.client.serviceUrl.defaultZone= http://localhost:12345/eureka/

spring.datasource.url=jdbc:mysql://127.0.0.1:3306/testmysql
spring.datasource.username=root
spring.datasource.password=123456
spring.datasource.driver-class-name=com.mysql.jdbc.Driver
spring.datasource.max-idle=10
spring.datasource.max-wait=10000
spring.datasource.min-idle=5
spring.datasource.initial-size=5
这里有第一个坑:如果之前有其他端口作为cloud eureka服务器的话,建议加上eureka.client.serviceUrl.defaultZone的配置,不然在启动的时候一直会报错。
这样Hystrix Dashboard这个module就弄好了,之后就是配置它监测的Ribbon或者feign了。
二、配置监控方
1、Ribbon方式
在项目的负载均衡Ribbon模块的pom.xml中加上actuator的配置:
		org.springframework.boot
		spring-boot-starter-actuator
在Ribbon的启动类上加上注解@EnableCircuitBreaker。
第二个坑:如果用的springboot 版本是2.0及以上的,在ribbon启动类里面要加上下面这段代码:
@Bean
    public ServletRegistrationBean getServlet(){
        HystrixMetricsStreamServlet streamServlet = new HystrixMetricsStreamServlet();
        ServletRegistrationBean registrationBean = new ServletRegistrationBean(streamServlet);
        registrationBean.setLoadOnStartup(1);
        registrationBean.addUrlMappings("/actuator/hystrix.stream");
        registrationBean.setName("HystrixMetricsStreamServlet");
        return registrationBean;
    }
我这边最后Ribbon启动类代码是:
package com.cloud.ribbonservice;

import com.netflix.hystrix.contrib.metrics.eventstream.HystrixMetricsStreamServlet;
import com.netflix.loadbalancer.IRule;
import com.netflix.loadbalancer.RandomRule;

import org.springframework.boot.SpringApplication;
import org.springframework.boot.autoconfigure.SpringBootApplication;
import org.springframework.boot.web.servlet.ServletRegistrationBean;
import org.springframework.cloud.client.circuitbreaker.EnableCircuitBreaker;
import org.springframework.cloud.client.discovery.EnableDiscoveryClient;
import org.springframework.cloud.client.loadbalancer.LoadBalanced;
import org.springframework.cloud.netflix.hystrix.EnableHystrix;
import org.springframework.context.annotation.Bean;
import org.springframework.web.client.RestTemplate;

@SpringBootApplication
@EnableDiscoveryClient
@EnableHystrix
@EnableCircuitBreaker
public class RibbonserviceApplication {

    public static void main(String[] args) {
        SpringApplication.run(RibbonserviceApplication.class, args);
    }

    @Bean
    @LoadBalanced
    RestTemplate restTemplate() {
        return new RestTemplate();
    }

    @Bean
    public IRule ribbonRule() {
        return new RandomRule();	//这里配置策略,和配置文件对应
    }

    @Bean
    public ServletRegistrationBean getServlet(){
        HystrixMetricsStreamServlet streamServlet = new HystrixMetricsStreamServlet();
        ServletRegistrationBean registrationBean = new ServletRegistrationBean(streamServlet);
        registrationBean.setLoadOnStartup(1);
        registrationBean.addUrlMappings("/actuator/hystrix.stream");
        registrationBean.setName("HystrixMetricsStreamServlet");
        return registrationBean;
    }

}
然后在配置文件里面加上下面这段配置:
management.endpoints.web.exposure.include= '*'
management.endpoint.health.show-details= ALWAYS
这边最后的application.properties文件内容是(我这边有导入mysql,所以有datasource内容):
server.port = 11000

eureka.client.serviceUrl.defaultZone= http://localhost:12345/eureka/
spring.application.name= SPRING-CLIENT-02

SPRING-CLIENT-01.ribbon.NFLoadBalancerRuleClassName: com.netflix.loadbalancer.RandomRule

spring.datasource.url=jdbc:mysql://127.0.0.1:3306/testmysql
spring.datasource.username=root
spring.datasource.password=123456
spring.datasource.driver-class-name=com.mysql.jdbc.Driver
spring.datasource.max-idle=10
spring.datasource.max-wait=10000
spring.datasource.min-idle=5
spring.datasource.initial-size=5

management.endpoints.web.exposure.include= '*'
management.endpoint.health.show-details= ALWAYS
然后就依次运行eureka sever,eureka client,ribbon,和 Hystrix Dashboard服务。
我这边 Hystrix Dashboard配置的端口是10030。
第三个注意的地方是:由于监控的是ribbon,所以先要在浏览器中调用下ribbon里面的服务。这个参照之前hystrix文章写的:在浏览器中输入:
http://localhost:10010/getInfoTwo调用一下。
然后在浏览器中输入 Hystrix Dashboard的本地地址:
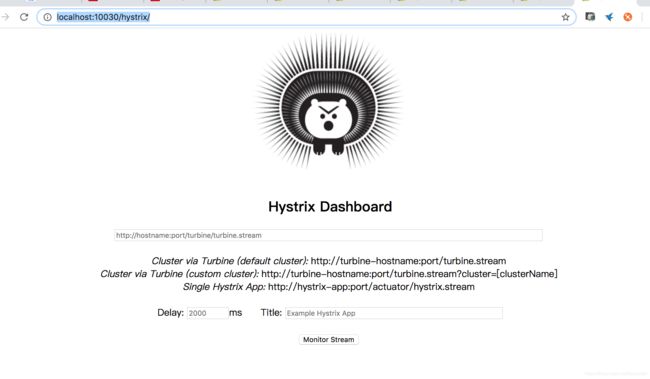
http://localhost:10030/hystrix显示的界面就是:
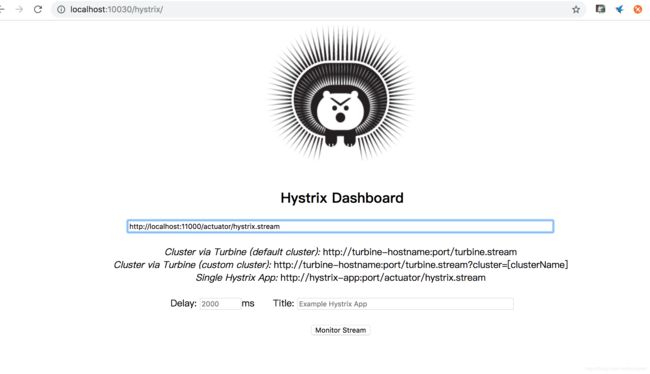
这个是说明不同情况下不同的请求地址,前两个是对于集群模式使用的,最后一个是单节点模式使用的,此篇配置的是单节点模式,所以在页面的地址栏输入 http://localhost:11000/actuator/hystrix.stream
然后输入熔断器对应的ribbon stream地址 http://localhost:11000/actuator/hystrix.stream:
点击monitor stream按钮:
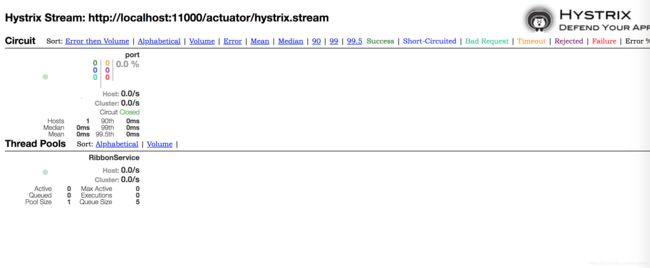
显示监控仪表盘界面:
注:有可能你进来后页面显示的是 Loading... 状态,这个是因为你的服务没有被消费调用,所以此时没有数据监控,只要调用下被监控的服务,就会出现上图状态了。
2、Feign方式
在pom.xml中加入:
            org.springframework.boot
            spring-boot-starter-actuator
在feign启动类加入注解和代码:
package com.springcloudfeign.feign;

import com.netflix.hystrix.contrib.metrics.eventstream.HystrixMetricsStreamServlet;
import org.springframework.boot.SpringApplication;
import org.springframework.boot.autoconfigure.SpringBootApplication;
import org.springframework.boot.web.servlet.ServletRegistrationBean;
import org.springframework.cloud.client.circuitbreaker.EnableCircuitBreaker;
import org.springframework.cloud.client.discovery.EnableDiscoveryClient;
import org.springframework.cloud.netflix.hystrix.EnableHystrix;
import org.springframework.cloud.openfeign.EnableFeignClients;
import org.springframework.context.annotation.Bean;

@SpringBootApplication
@EnableDiscoveryClient
@EnableFeignClients
@EnableCircuitBreaker
@EnableHystrix
public class FeignApplication {

    public static void main(String[] args) {
        SpringApplication.run(FeignApplication.class, args);
    }

    @Bean
    public ServletRegistrationBean getServlet(){
        HystrixMetricsStreamServlet streamServlet = new HystrixMetricsStreamServlet();
        ServletRegistrationBean registrationBean = new ServletRegistrationBean(streamServlet);
        registrationBean.setLoadOnStartup(1);
        registrationBean.addUrlMappings("/actuator/hystrix.stream");
        registrationBean.setName("HystrixMetricsStreamServlet");
        return registrationBean;
    }


}
application.properties文件加上:
management.endpoints.web.exposure.include= '*'
management.endpoint.health.show-details= ALWAYS
这样就可以了,然后先在浏览器中调用这个Feign 中的服务接口:参照之前构建hystrix实现中在浏览器中输入:
http://localhost:10010/getInfoTwo调用之后,在仪表盘界面中输入需要监控的页面地址:http://localhost:10010/actuator/hystrix.stream:
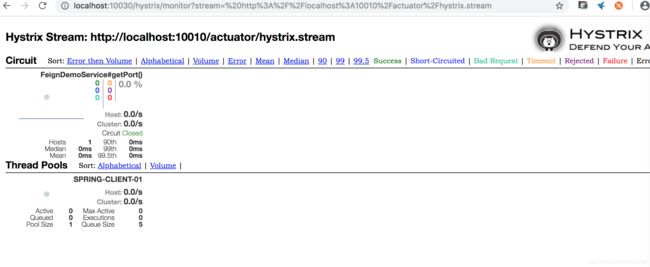
显示的结果界面:
这样基本的仪表盘监控就实现了。
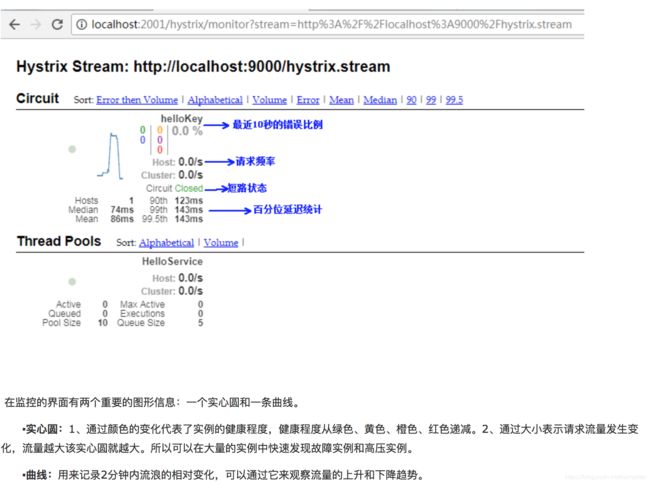
仪表盘中:实心圆:颜色代表健康度,(绿-黄-红-橙递减);大小代表并发量。
曲线:请求量的变化
以上代码github地址: 源码地址
