zynq 维修调试记录 客服支持 工作记录
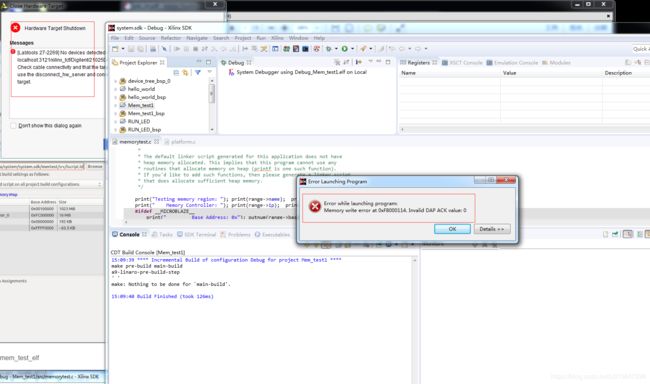
米联的板子用底板供电,用JTAG往里面下程序的时候也出现了如下问题:
跟客服进行沟通,客服的回答是:一般是两种可能,一个是开发板坏了,
进行如下操作,操作的程序和过程见下图:
1.运行测试程序(按照02_基于zynq的soc入门基础中01 hello_world实验 编写测试程序)
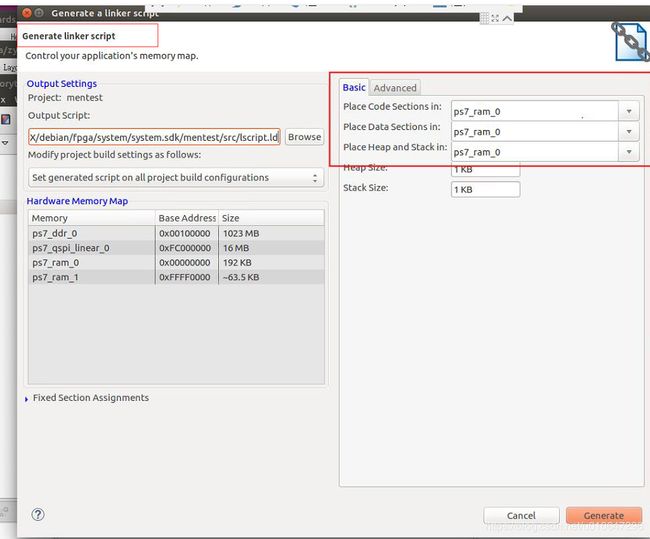
2.(在你要调试的工程 右键--generate linker script) 把程序调整放到ARM自带的RAM中运行了
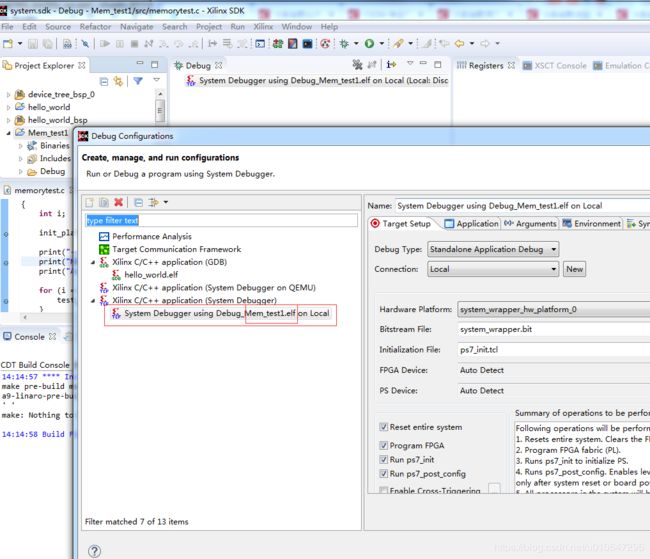
出现了找不到mem_test_elf
把这个选项中的elf都删除,重新编译就行了。
测试结果 :memory fail
另外在测试的时候还有另外一个问题:
这个核心板 单独拿下来不行 但是放到底板上就可以。。
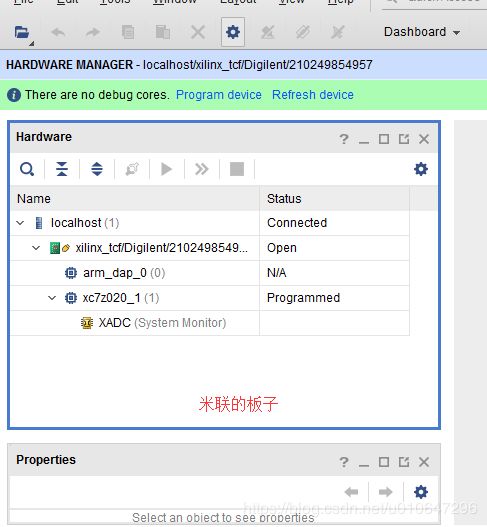
单独通过microUSB接口,原装的充电器,出现芯片不能识别的问题,但是接在底板上就没有问题,下图是两种方式:
返厂维修,客服打电话反映处理情况:
电源模块出现问题了,五个电源模块全部换掉了,测试的时候可以看电源(的电感引脚?)跟地是不是短接,如果短接,卸掉电源模块再看是不是短接,最终的处理方案就是换电源模块: 全部换掉。核心板也没有再发现识别不到的问题。
核心板供电5V,输入要确保稳定 ,文波不要超过5.4V以上,自己设计电路也要确保,因为DC-DC的芯片耐压最大5.5V,超过电源芯片容易坏
但是最好建议JTAG放到底板,而且加ESD静电保护
总结:
在硬件调试的时候,第一步要看原理图,不止要看连接关系,还要电源分布,各个器件应该是多少的电源。测试的时候出现问题,先看电压电流对不对,然后测试各个测试点的电压是不是对
自己的板子的问题应该就是 电源的问题
20190511:
sdk log里面的输出为:
注意:17:27:10 ERROR : Memory write error at 0xF8000114. Invalid DAP ACK value: 0
17:26:00 INFO	: Connected to target on host '127.0.0.1' and port '3121'.
17:26:55 INFO	: Jtag cable 'Digilent JTAG-SMT2 21025DA09189' is selected.
17:26:55 INFO	: 'jtag frequency' command is executed.
17:26:55 INFO	: Sourcing of 'G:/ZYNQ/osrc-lab/boards/MZ7X/debian/fpga/system/system.sdk/system_wrapper_hw_platform_0/ps7_init.tcl' is done.
17:26:55 INFO	: Context for 'APU' is selected.
17:26:55 INFO	: System reset is completed.
17:26:58 INFO	: 'after 3000' command is executed.
17:27:07 INFO	: 'targets -set -filter {jtag_cable_name =~ "Digilent JTAG-SMT2 21025DA09189" && level==0} -index 1' command is executed.
17:27:10 INFO	: FPGA configured successfully with bitstream "G:/ZYNQ/osrc-lab/boards/MZ7X/debian/fpga/system/system.sdk/system_wrapper_hw_platform_0/system_wrapper.bit"
17:27:10 INFO	: Context for 'APU' is selected.
17:27:10 INFO	: Hardware design information is loaded from 'G:/ZYNQ/osrc-lab/boards/MZ7X/debian/fpga/system/system.sdk/system_wrapper_hw_platform_0/system.hdf'.
17:27:10 INFO	: 'configparams force-mem-access 1' command is executed.
17:27:10 INFO	: Context for 'APU' is selected.
17:27:10 ERROR	: Memory write error at 0xF8000114. Invalid DAP ACK value: 0
17:27:10 INFO	: ----------------XSDB Script----------------
connect -url tcp:127.0.0.1:3121
source G:/ZYNQ/osrc-lab/boards/MZ7X/debian/fpga/system/system.sdk/system_wrapper_hw_platform_0/ps7_init.tcl
targets -set -nocase -filter {name =~"APU*" && jtag_cable_name =~ "Digilent JTAG-SMT2 21025DA09189"} -index 0
rst -system
after 3000
targets -set -filter {jtag_cable_name =~ "Digilent JTAG-SMT2 21025DA09189" && level==0} -index 1
fpga -file G:/ZYNQ/osrc-lab/boards/MZ7X/debian/fpga/system/system.sdk/system_wrapper_hw_platform_0/system_wrapper.bit
targets -set -nocase -filter {name =~"APU*" && jtag_cable_name =~ "Digilent JTAG-SMT2 21025DA09189"} -index 0
loadhw -hw G:/ZYNQ/osrc-lab/boards/MZ7X/debian/fpga/system/system.sdk/system_wrapper_hw_platform_0/system.hdf -mem-ranges [list {0x40000000 0xbfffffff}]
configparams force-mem-access 1
targets -set -nocase -filter {name =~"APU*" && jtag_cable_name =~ "Digilent JTAG-SMT2 21025DA09189"} -index 0
ps7_init
----------------End of Script----------------
火华:
下载失败,你看看是不是线没插好
_phenomenal:
线? 下载线吗?
_phenomenal:
可以检测到硬件
火华:
可以识别到芯片?
正常的啊
硬件管理:
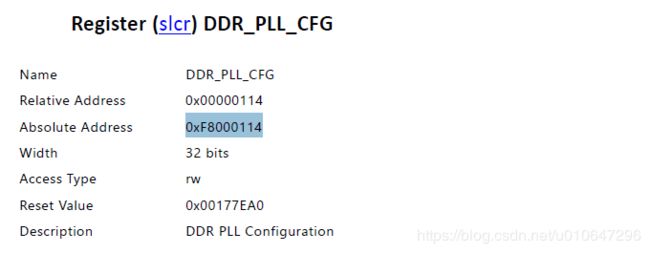
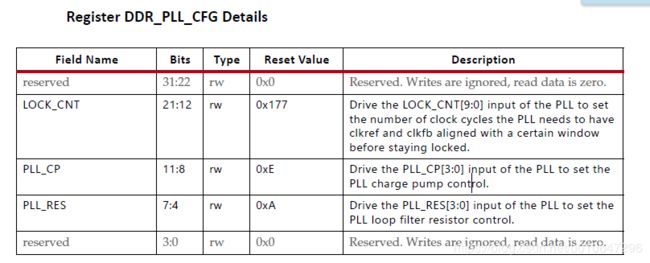
这里错误是memory write error at 0XF8000114,invalid DAP ACK value:0; 在viavado 里面可以显示硬件,用XMD% connect arm hw 输出error: unkonwn error occured.
那么通过手册查看0xf8000114,得到:
可以判断是DDR 出问题?
这个是正常的板子的sdk log :
21:53:07 INFO	: Connected to target on host '127.0.0.1' and port '3121'.
21:53:08 INFO	: Jtag cable 'Digilent JTAG-HS1 210249854957' is selected.
21:53:08 INFO	: 'jtag frequency' command is executed.
21:53:08 INFO	: Sourcing of 'G:/ZYNQ/osrc-lab/boards/MZ7X/debian/fpga/system/system.sdk/system_wrapper_hw_platform_0/ps7_init.tcl' is done.
21:53:08 INFO	: Context for 'APU' is selected.
21:53:08 INFO	: System reset is completed.
21:53:11 INFO	: 'after 3000' command is executed.
21:53:11 INFO	: 'targets -set -filter {jtag_cable_name =~ "Digilent JTAG-HS1 210249854957" && level==0} -index 1' command is executed.
21:53:15 INFO	: FPGA configured successfully with bitstream "G:/ZYNQ/osrc-lab/boards/MZ7X/debian/fpga/system/system.sdk/system_wrapper_hw_platform_0/system_wrapper.bit"
21:53:15 INFO	: Context for 'APU' is selected.
21:53:15 INFO	: Hardware design information is loaded from 'G:/ZYNQ/osrc-lab/boards/MZ7X/debian/fpga/system/system.sdk/system_wrapper_hw_platform_0/system.hdf'.
21:53:15 INFO	: 'configparams force-mem-access 1' command is executed.
21:53:15 INFO	: Context for 'APU' is selected.
21:53:16 INFO	: 'ps7_init' command is executed.
21:53:16 INFO	: 'ps7_post_config' command is executed.
21:53:16 INFO	: Context for processor 'ps7_cortexa9_0' is selected.
21:53:16 INFO	: The application 'G:/ZYNQ/osrc-lab/boards/MZ7X/debian/fpga/system/system.sdk/Mem_test1/Debug/Mem_test1.elf' is downloaded to processor 'ps7_cortexa9_0'.
21:53:16 INFO	: 'configparams force-mem-access 0' command is executed.
21:53:16 INFO	: ----------------XSDB Script----------------
connect -url tcp:127.0.0.1:3121
source G:/ZYNQ/osrc-lab/boards/MZ7X/debian/fpga/system/system.sdk/system_wrapper_hw_platform_0/ps7_init.tcl
targets -set -nocase -filter {name =~"APU*" && jtag_cable_name =~ "Digilent JTAG-HS1 210249854957"} -index 0
rst -system
after 3000
targets -set -filter {jtag_cable_name =~ "Digilent JTAG-HS1 210249854957" && level==0} -index 1
fpga -file G:/ZYNQ/osrc-lab/boards/MZ7X/debian/fpga/system/system.sdk/system_wrapper_hw_platform_0/system_wrapper.bit
targets -set -nocase -filter {name =~"APU*" && jtag_cable_name =~ "Digilent JTAG-HS1 210249854957"} -index 0
loadhw -hw G:/ZYNQ/osrc-lab/boards/MZ7X/debian/fpga/system/system.sdk/system_wrapper_hw_platform_0/system.hdf -mem-ranges [list {0x40000000 0xbfffffff}]
configparams force-mem-access 1
targets -set -nocase -filter {name =~"APU*" && jtag_cable_name =~ "Digilent JTAG-HS1 210249854957"} -index 0
ps7_init
ps7_post_config
targets -set -nocase -filter {name =~ "ARM*#0" && jtag_cable_name =~ "Digilent JTAG-HS1 210249854957"} -index 0
dow G:/ZYNQ/osrc-lab/boards/MZ7X/debian/fpga/system/system.sdk/Mem_test1/Debug/Mem_test1.elf
configparams force-mem-access 0
----------------End of Script----------------

21:53:16 INFO	: Memory regions updated for context APU
21:53:16 INFO	: Context for processor 'ps7_cortexa9_0' is selected.
21:53:16 INFO	: 'con' command is executed.
21:53:16 INFO	: ----------------XSDB Script (After Launch)----------------
targets -set -nocase -filter {name =~ "ARM*#0" && jtag_cable_name =~ "Digilent JTAG-HS1 210249854957"} -index 0
con
----------------End of Script----------------

21:53:16 INFO	: Launch script is exported to file 'G:\ZYNQ\osrc-lab\boards\MZ7X\debian\fpga\system\system.sdk\.sdk\launch_scripts\xilinx_c-c++_application_(system_debugger)\system_debugger_using_debug_mem_test1.elf_on_local.tcl'
20190512
让程序运行到zynq内部的ram之后,DAP白条旁边的板子 运行 connect arm hw 出现正常结果,R66已经去掉
http://m.elecfans.com/article/480727.html zynq的三种启动方式(JTAG,SD,QSPI) 这个可以看看
这里样调用ps7_init()只适用于只用OCM的情况,经测试打开DDR3后再这样调用会在ps7_init()中初始化失败,调试发现在初始化PLL时失败(原因未知)
对照sdk log ps7_init 以及上面这个报错信息
connect -url tcp:127.0.0.1:3121
source G:/ZYNQ/osrc-lab/boards/MZ7X/debian/fpga/system/system.sdk/system_wrapper_hw_platform_0/ps7_init.tcl
targets -set -nocase -filter {name =~"APU*" && jtag_cable_name =~ "Digilent JTAG-SMT2 21025DA09189"} -index 0
rst -system
after 3000
targets -set -filter {jtag_cable_name =~ "Digilent JTAG-SMT2 21025DA09189" && level==0} -index 1
fpga -file G:/ZYNQ/osrc-lab/boards/MZ7X/debian/fpga/system/system.sdk/system_wrapper_hw_platform_0/system_wrapper.bit
targets -set -nocase -filter {name =~"APU*" && jtag_cable_name =~ "Digilent JTAG-SMT2 21025DA09189"} -index 0
loadhw -hw G:/ZYNQ/osrc-lab/boards/MZ7X/debian/fpga/system/system.sdk/system_wrapper_hw_platform_0/system.hdf -mem-ranges [list {0x40000000 0xbfffffff}]
configparams force-mem-access 1
targets -set -nocase -filter {name =~"APU*" && jtag_cable_name =~ "Digilent JTAG-SMT2 21025DA09189"} -index 0
ps7_init
可以判断是ps7_init 出了问题
可以参照:https://forum.digilentinc.com/topic/3176-zybo-getting-started-scenario-invalid-dap-ack-value-0/
和https://forums.xilinx.com/t5/Embedded-Development-Tools/how-to-recover-from-Invalid-DAP-ACK-value-0-on-linux/td-p/937907
以及https://blog.csdn.net/weixin_39673080/article/details/89047629 ZYNQ_SDK报错解决_"AP transaction error, DAP status f0000021"
在xilinx官网上有人提到了:https://forums.xilinx.com/t5/Embedded-Boot-and-Configuration/INVALID-DAP-ACK-VALUE-7-ERROR/m-p/737260/highlight/true 降低JTAG的频率: https://forums.xilinx.com/t5/Embedded-Boot-and-Configuration/INVALID-DAP-ACK-VALUE-7-ERROR/m-p/737260/highlight/true
问题解决了。。。解决了 哈哈 降低JTAG的频率就好了 其实不是 是因为电压给的不到位 电压不稳导致的下载不成功
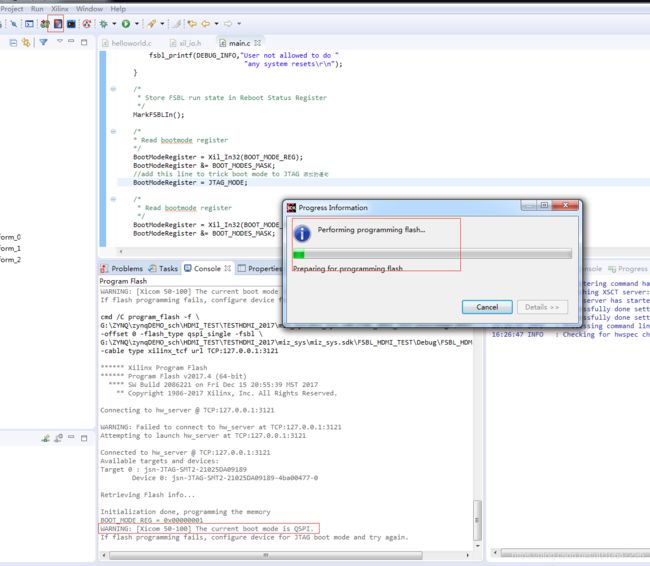
烧写flash的时候会显示启动方式
逻辑分析仪看不到:据说在hardware manager 里面可以看到
20190519
设置程序运行在内部的RAM里面,写错误不在出现,但是DAP的 ack 一直存在
先查电压
ip核的生成 --加载的时候显示没有IP核 所以我重新生成了一下
并将原来的ip删掉 加入我生成的IP 连线关系不变,但是在最后综合的时候 原来的IP 核报错,怎么re mak这个项目 最好好像是report 一下 IP stauta
进行vivado开发时,Generate Bitstream报错[DRC NSTD-1],详细解决步骤
您正在按预期获得版本错误。 使用项目发布和测试的Vivado版本。 如果您仍想自己进行升级,可以通过手动将每个驱动程序和操作系统版本更新为当前版本,或重新创建BSP并手动导入旧版本的所有设置来修复此特定SDK错误。
更新了版本,到时没有说 什么版本不存在的问题但是在下载过程中出现了 cannot access JTAG-DP:invalid ACK value(0x07,excepted=0x02),error address=0
用xmd 查看,参照FPGA design from scratch. Part 37: connect mb mdm
20190602
第一个事情:
1. Make sure the clock connected to the debug hub (dbg_hub) core is a free running clock and is active.
要ps 起来 要不然会报WARNING:
第二个事情:
ARNING: [Labtools 27-3403] Dropping logic core with cellname:'system_i/ila_0' from probes file, since it cannot be found on the programmed device.
WARNING: [Labtools 27-1974] Mismatch between the design programmed into the device xc7z020_1 and the probes file(s) G:/ZYNQ/zynqDEMO_sch/project_CL0426_2017/project_CL0426/project_CL0426/project_CL0426.runs/impl_1/system_wrapper.ltx.
The device design has 1 ILA core(s) and 0 VIO core(s). The probes file(s) have 0 ILA core(s) and 0 VIO core(s).
加载的文件不对 要加载project_CL0426.runs/impl_1/debug.ltx
ila 在hardware 管理里面
开始看lvds 协议
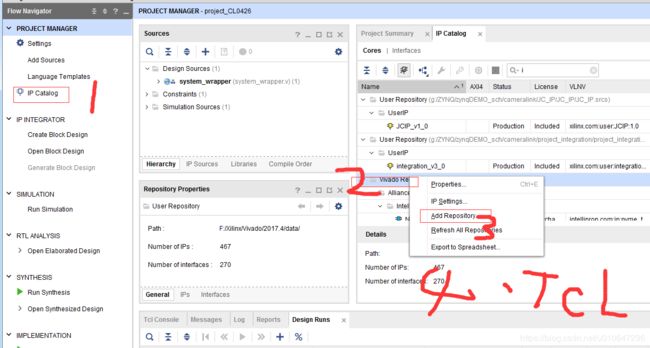
怎么添加封装IP 以及添加IP核:
参考https://blog.csdn.net/kenjianqi1647/article/details/84821462
添加的的时候 打开相应的工程:
在这里program flash可以看到启动方式:
cmd /C program_flash -f \
G:\ZYNQ\原来资料\MZ702B\S02_CH05_UBOOT\Miz_sys\Miz_sys.sdk\fsbl\bootimage\BOOT.bin -offset 0 \
-flash_type qspi_single -fsbl \
G:\ZYNQ\原来资料\MZ702B\S02_CH05_UBOOT\Miz_sys\Miz_sys.sdk\fsbl\Debug\fsbl.elf -cable type \
xilinx_tcf url TCP:127.0.0.1:3121

****** Xilinx Program Flash
****** Program Flash v2017.4 (64-bit)
  **** SW Build 2086221 on Fri Dec 15 20:55:39 MST 2017
    ** Copyright 1986-2017 Xilinx, Inc. All Rights Reserved.

Connecting to hw_server @ TCP:127.0.0.1:3121

Connected to hw_server @ TCP:127.0.0.1:3121
Available targets and devices:
Target 0 : jsn-JTAG-HS1-210249854957
    Device 0: jsn-JTAG-HS1-210249854957-4ba00477-0

Retrieving Flash info...

Initialization done, programming the memory
BOOT_MODE REG = 0x00000005
WARNING: [Xicom 50-100] The current boot mode is SD.//这里显示 启动方式
If flash programming fails, configure device for JTAG boot mode and try again.
Problem in Initializing Hardware
Flash programming initialization failed.

ERROR: Flash Operation Failed
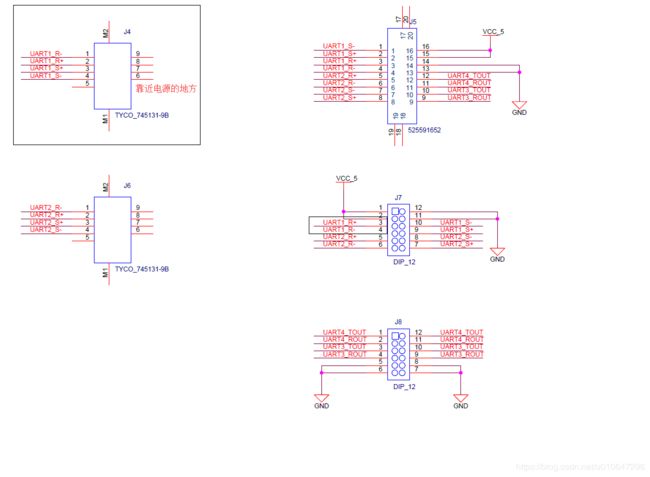
米联串口:
对应uart1
底板上,是422,之前一直当成是232了
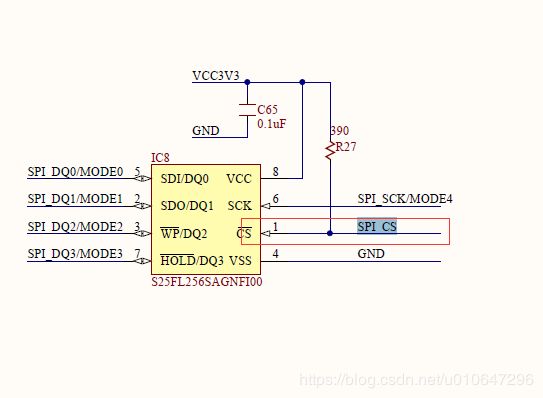
flash的连接方式,米联:
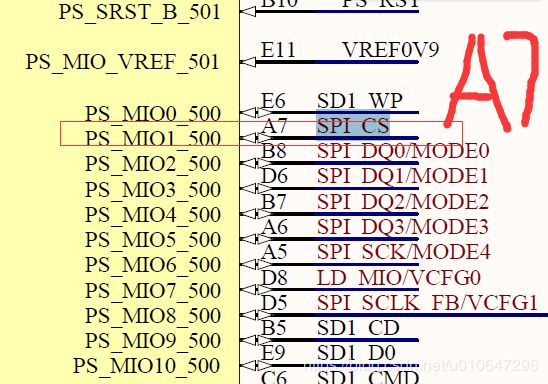
但是原理图上:SPI_CS 接的PS_MIO1 A7
看一下我们的原理图: SPI_CS 也是A7
大于12M的flash 需要软件和硬件的设置
https://www.cnblogs.com/liuwanpeng/p/6180308.html文章中讲,zynq默认是3byte寻址,就是最大能寻到16M,如果不更改zynq中的设置,启动的时候bootrom 默认是16M的寻址。但是,ZYNQ有个设计问题,固化到片子内部的bootrom,“固执”得认为外面接的qpsi flash是16MB的,只能访问这16MB:
处理方法:第一 更换成4byte寻址,第二:高位用bank寻址
官网给出答案:If a larger than 16MB QSPI flash is used, then in order to access data on the portion of the flash over 16MB, the software driver (standalone, u-boot, Linux) needs to extend the 3-bytes address storing the 4th byte into a vendor specific QSPI register called "extended address register".
This will be supported by 2013.3/14.7 software drivers and Xilinx tools.
Boot Image requirements when using larger than 16MB QSPI and RSA Authentication :给出了QSPI flash 的bank连接
http://xilinx.eetop.cn/viewnews-2562
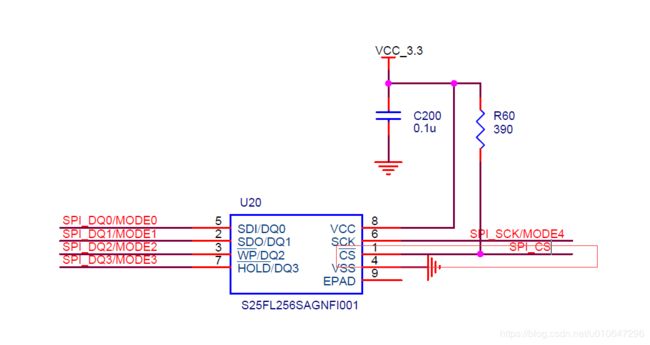
CS 信号:
再看一下米联的cs信号
