Spring Boot
一、什么是 Spring Boot?
主要是简化了使用 Spring 的难度,简省了繁重的配置,提供了各种启动器,开发者能快速上手。
1、Spring Boot的优点
Features
Create stand-alone Spring applications
Embed Tomcat, Jetty or Undertow directly (no need to deploy WAR files)
Provide opinionated 'starter' dependencies to simplify your build configuration
Automatically configure Spring and 3rd party libraries whenever possible
Provide production-ready features such as metrics, health checks, and externalized configuration
Absolutely no code generation and no requirement for XML configuration
-
独立运行
Spring Boot而且内嵌了各种servlet容器,Tomcat、Jetty等,现在不再需要打成war包部署到容器中,Spring Boot只要打成一个可执行的jar包就能独立运行,所有的依赖包都在一个jar包内。
-
简化配置
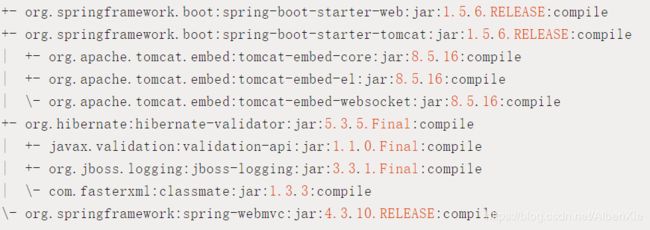
spring-boot-starter-web启动器自动依赖其他组件,简少了maven的配置。
-
自动配置
Spring Boot能根据当前类路径下的类、jar包来自动配置bean,如添加一个spring-boot-starter-web启动器就能拥有web的功能,无需其他配置。
-
无代码生成和XML配置
Spring Boot配置过程中无代码生成,也无需XML配置文件就能完成所有配置工作,这一切都是借助于条件注解完成的,这也是Spring4.x的核心功能之一。
-
应用监控
Spring Boot提供一系列端点可以监控服务及应用,做健康检测。
2、Spring Boot的缺点
Spring Boot虽然上手很容易,但如果你不了解其核心技术及流程,所以一旦遇到问题就很棘手,而且现在的解决方案也不是很多,需要一个完善的过程。
二、Spring Boot 的核心配置文件有哪几个?它们的区别是什么?
用过 Spring Boot 的都知道在 Spring Boot 中有以下两种配置文件:
- bootstrap (.yml 或者 .properties)
- application (.yml 或者 .properties)
为什么会有这两种配置文件呢?大家都清楚它们的区别和具体使用场景吗?
1、bootstrap/ application 的区别
特意去翻了下 Spring Boot 的官方文档,没有找到关于这两种文件的具体定义,然后再翻了下 Spring Cloud 的官方文档找到了它们的区别。
如下为原文翻译:
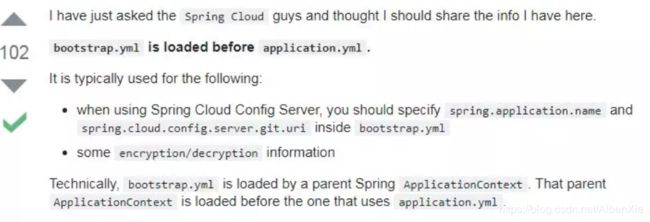
Spring Cloud 构建于 Spring Boot 之上,在 Spring Boot 中有两种上下文,一种是 bootstrap, 另外一种是 application, bootstrap 是应用程序的父上下文,也就是说 bootstrap 加载优先于 applicaton。bootstrap 主要用于从额外的资源来加载配置信息,还可以在本地外部配置文件中解密属性。这两个上下文共用一个环境,它是任何Spring应用程序的外部属性的来源。bootstrap 里面的属性会优先加载,它们默认也不能被本地相同配置覆盖。
因此,对比 application 配置文件,bootstrap 配置文件具有以下几个特性:
- boostrap 由父 ApplicationContext 加载,比 applicaton 优先加载
- boostrap 里面的属性不能被覆盖
2、bootstrap/ application 的应用场景
application 配置文件这个容易理解,主要用于 Spring Boot 项目的自动化配置。
bootstrap 配置文件有以下几个应用场景:
- 使用 Spring Cloud Config 配置中心时,这时需要在 bootstrap 配置文件中添加连接到配置中心的配置属性来加载外部配置中心的配置信息;
- 一些固定的不能被覆盖的属性;
- 一些加密/解密的场景;
以下这个截图是一个国外网友问了一个 Spring Cloud 工程师得到的回答。
做过 Spring Cloud 微服务的朋友应该对 bootstrap 的应用十分清楚。
三、Spring Boot 的核心注解是哪个?它主要由哪几个注解组成的?
启动类上面的注解是@SpringBootApplication,它也是 Spring Boot 的核心注解,主要组合包含了以下 3 个注解:
@SpringBootConfiguration:组合了 @Configuration 注解,实现配置文件的功能。
@EnableAutoConfiguration:打开自动配置的功能,也可以关闭某个自动配置的选项,如关闭数据源自动配置功能:
- @SpringBootApplication(exclude = { DataSourceAutoConfiguration.class })。
@ComponentScan:Spring组件扫描。
四、开启 Spring Boot 特性有哪几种方式?
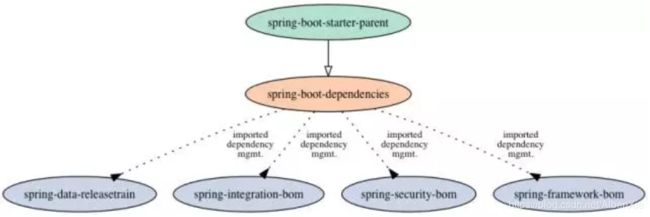
Spring Boot开启的2种方式:
1)继承spring-boot-starter-parent项目
2)导入spring-boot-dependencies项目依赖
使用Spring Boot很简单,先添加基础依赖包,有以下两种方式:
1. 继承spring-boot-starter-parent项目
	 org.springframework.boot
	 spring-boot-starter-parent
	 1.5.6.RELEASE
2. 导入spring-boot-dependencies项目依赖
			org.springframework.boot
			spring-boot-dependencies
			1.5.6.RELEASE
			pom
			import
五、Spring Boot 需要独立的容器运行吗?
可以不需要,内置了 Tomcat/ Jetty 等容器。
六、运行 Spring Boot 有哪几种方式?
1)打包用命令或者放到容器中运行
2)用 Maven/ Gradle 插件运行
3)直接执行 main 方法运行
七、Spring Boot 自动配置原理是什么?
注解 @EnableAutoConfiguration, @Configuration, @ConditionalOnClass 就是自动配置的核心,首先它得是一个配置文件,其次根据类路径下是否有这个类去自动配置。
具体看这篇文章:https://blog.csdn.net/AlbenXie/article/details/105709166
八、Spring Boot 的目录结构是怎样的?
cn
 +- javastack
     +- MyApplication.java
     |
     +- customer
     |   +- Customer.java
     |   +- CustomerController.java
     |   +- CustomerService.java
     |   +- CustomerRepository.java
     |
     +- order
         +- Order.java
         +- OrderController.java
         +- OrderService.java
         +- OrderRepository.java
这个目录结构是主流及推荐的做法,而在主入口类上加上 @SpringBootApplication 注解来开启 Spring Boot 的各项能力,如自动配置、组件扫描等。
Spring Boot 主类及目录结构介绍
Spring Boot 与传统项目最大的区别是,传统项目都是打成 WAR 包部署到服务器上面,需要额外的 Servlet 容器, 而 Spring Boot 则可以直接打成 jar 包,并内置集成了 Servlet 容器,通过命令 java -jar xx.jar 则可以直接运行,不需要独立的 Servlet 容器。
打成可执行 jar 包后,我们来看下其中的 META-INF/MANIFEST.MF 文件。
Manifest-Version: 1.0
Archiver-Version: Plexus Archiver
Built-By: admin
Start-Class: cn.javastack.MyApplication
Spring-Boot-Classes: BOOT-INF/classes/
Spring-Boot-Lib: BOOT-INF/lib/
Spring-Boot-Version: 2.0.4.RELEASE
Created-By: Apache Maven 3.5.0
Build-Jdk: 1.8.0_151
Main-Class: org.springframework.boot.loader.JarLauncher
其中有一个 Start-Class 便是这个 jar 包的入口类,这个入口类推荐是放在一个项目的顶层包中,其他所有的类都放在其子包下面,目录结构如以下所示。
cn
 +- javastack
     +- MyApplication.java
     |
     +- customer
     |   +- Customer.java
     |   +- CustomerController.java
     |   +- CustomerService.java
     |   +- CustomerRepository.java
     |
     +- order
         +- Order.java
         +- OrderController.java
         +- OrderService.java
         +- OrderRepository.java
这个目录结构是主流及推荐的做法,而在主入口类上加上 @SpringBootApplication 注解来开启 Spring Boot 的各项能力,如自动配置、组件扫描等。
package cn.javastack.MyApplication;

import org.springframework.boot.SpringApplication;
import org.springframework.boot.autoconfigure.SpringBootApplication;

@SpringBootApplication
public class MyApplication {

    public static void main(String[] args) {
        SpringApplication.run(MyApplication.class, args);
    }
}
如果你不想这么做,你也可以充分利用 @EnableAutoConfiguration 和@ComponentScan 注解自定义你的行为,不过这不是推荐的做法。
九、你如何理解 Spring Boot 中的 Starters?
Starters可以理解为启动器,它包含了一系列可以集成到应用里面的依赖包,你可以一站式集成 Spring 及其他技术,而不需要到处找示例代码和依赖包。如你想使用 Spring JPA 访问数据库,只要加入 spring-boot-starter-data-jpa 启动器依赖就能使用了。
Starters包含了许多项目中需要用到的依赖,它们能快速持续的运行,都是一系列得到支持的管理传递性依赖。
Spring Boot Starters启动器:
Starters是什么?
Starters可以理解为启动器,它包含了一系列可以集成到应用里面的依赖包,你可以一站式集成Spring及其他技术,而不需要到处找示例代码和依赖包。如你想使用Spring JPA访问数据库,只要加入spring-boot-starter-data-jpa启动器依赖就能使用了。
Starters包含了许多项目中需要用到的依赖,它们能快速持续的运行,都是一系列得到支持的管理传递性依赖。
Starters命名
Spring Boot官方的启动器都是以spring-boot-starter-命名的,代表了一个特定的应用类型。
第三方的启动器不能以spring-boot开头命名,它们都被Spring Boot官方保留。一般一个第三方的应该这样命名,像mybatis的mybatis-spring-boot-starter。
Starters分类
1. Spring Boot应用类启动器
| 启动器名称 | 功能描述 |
|---|---|
| spring-boot-starter | 包含自动配置、日志、YAML的支持。 |
| spring-boot-starter-web | 使用Spring MVC构建web 工程,包含restful,默认使用Tomcat容器。 |
| ... | ... |
2. Spring Boot生产启动器
| 启动器名称 | 功能描述 |
|---|---|
| spring-boot-starter-actuator | 提供生产环境特性,能监控管理应用。 |
3. Spring Boot技术类启动器
| 启动器名称 | 功能描述 |
|---|---|
| spring-boot-starter-json | 提供对JSON的读写支持。 |
| spring-boot-starter-logging | 默认的日志启动器,默认使用Logback。 |
| ... | ... |
4. 其他第三方启动器
十、如何在 Spring Boot 启动的时候运行一些特定的代码?
可以实现接口 ApplicationRunner 或者 CommandLineRunner,这两个接口实现方式一样,它们都只提供了一个 run 方法。
Spring Boot Runner启动器:
Runner启动器
如果你想在Spring Boot启动的时候运行一些特定的代码,你可以实现接口 ApplicationRunner或者 CommandLineRunner,这两个接口实现方式一样,它们都只提供了一个run方法。
CommandLineRunner:启动获取命令行参数。
@FunctionalInterface
public interface CommandLineRunner {

	/**
	 * Callback used to run the bean.
	 * @param args incoming main method arguments
	 * @throws Exception on error
	 */
	void run(String... args) throws Exception;

}ApplicationRunner:启动获取应用启动的时候参数。
@FunctionalInterface
public interface ApplicationRunner {

	/**
	 * Callback used to run the bean.
	 * @param args incoming application arguments
	 * @throws Exception on error
	 */
	void run(ApplicationArguments args) throws Exception;

}
使用方式
import org.springframework.boot.CommandLineRunner;
import org.springframework.stereotype.Component;

@Component
public class MyBean implements CommandLineRunner {
    @Override
    public void run(String... args) throws Exception {
        // Do something...
    }
}
或者这样
@Bean
public CommandLineRunner init() {

    return (String... strings) -> {

    };

}
启动顺序
如果启动的时候有多个ApplicationRunner和CommandLineRunner,想控制它们的启动顺序,可以实现 org.springframework.core.Ordered接口或者使用 org.springframework.core.annotation.Order注解。
十一、Spring Boot 有哪几种读取配置的方式?
Spring Boot 可以通过 @PropertySource,@Value,@Environment, @ConfigurationProperties 来绑定变量。
Spring Boot读取配置的几种方式:
读取application文件
在application.yml或者properties文件中添加:
info.address=USA
info.company=Spring
info.degree=high
1、@Value注解读取方式
import org.springframework.beans.factory.annotation.Value;
import org.springframework.stereotype.Component;

@Component
public class InfoConfig1 {

    @Value("${info.address}")
    private String address;

    @Value("${info.company}")
    private String company;

    @Value("${info.degree}")
    private String degree;

    public String getAddress() {
        return address;
    }

    public void setAddress(String address) {
        this.address = address;
    }

    public String getCompany() {
        return company;
    }

    public void setCompany(String company) {
        this.company = company;
    }

    public String getDegree() {
        return degree;
    }

    public void setDegree(String degree) {
        this.degree = degree;
    }
}
2、@ConfigurationProperties注解读取方式
@Component
@ConfigurationProperties(prefix = "info")
public class InfoConfig2 {

    private String address;
    private String company;
    private String degree;

    public String getAddress() {
        return address;
    }

    public void setAddress(String address) {
        this.address = address;
    }

    public String getCompany() {
        return company;
    }

    public void setCompany(String company) {
        this.company = company;
    }

    public String getDegree() {
        return degree;
    }

    public void setDegree(String degree) {
        this.degree = degree;
    }
}
读取指定文件
资源目录下建立config/db-config.properties:
db.username=root
db.password=123456
1、@PropertySource+@Value注解读取方式
@Component
@PropertySource(value = {"config/db-config.properties"})
public class DBConfig1 {

    @Value("${db.username}")
    private String username;

    @Value("${db.password}")
    private String password;

    public String getUsername() {
        return username;
    }

    public void setUsername(String username) {
        this.username = username;
    }

    public String getPassword() {
        return password;
    }

    public void setPassword(String password) {
        this.password = password;
    }
}
注意:@PropertySource不支持yml文件读取。
2、@PropertySource+@ConfigurationProperties注解读取方式
@Component
@ConfigurationProperties(prefix = "db")
@PropertySource(value = {"config/db-config.properties"})
public class DBConfig2 {

    private String username;
    private String password;

    public String getUsername() {
        return username;
    }

    public void setUsername(String username) {
        this.username = username;
    }

    public String getPassword() {
        return password;
    }

    public void setPassword(String password) {
        this.password = password;
    }
}
Environment读取方式
以上所有加载出来的配置都可以通过Environment注入获取到。
@Autowired
private Environment env;

//获取参数
String getProperty(String key);
总结
从以上示例来看,Spring Boot可以通过@PropertySource,@Value,@Environment,@ConfigurationProperties来绑定变量。
十二、Spring Boot 支持哪些日志框架?推荐和默认的日志框架是哪个?
Spring Boot 支持 Java Util Logging, Log4j2, Lockback 作为日志框架,如果你使用 Starters 启动器,Spring Boot 将使用 Logback 作为默认日志框架,具体请看这篇文章《Spring Boot日志集成》。
十三、SpringBoot 实现热部署有哪几种方式?
主要有两种方式:
- Spring Loaded
- Spring-boot-devtools
Spring-boot-devtools 使用方式可以参考这篇文章《Spring Boot实现热部署》。
十四、你如何理解 Spring Boot 配置加载顺序?
在 Spring Boot 里面,可以使用以下几种方式来加载配置。
1)properties文件;
2)YAML文件;
3)系统环境变量;
4)命令行参数;
等等……
配置属性加载的顺序如下:
1、开发者工具 `Devtools` 全局配置参数;
2、单元测试上的 `@TestPropertySource` 注解指定的参数;
3、单元测试上的 `@SpringBootTest` 注解指定的参数;
4、命令行指定的参数,如 `java -jar springboot.jar --name="Java技术栈"`;
5、命令行中的 `SPRING_APPLICATION_JSONJSON` 指定参数, 如 `java -Dspring.application.json='{"name":"Java技术栈"}' -jar springboot.jar`
6、`ServletConfig` 初始化参数;
7、`ServletContext` 初始化参数;
8、JNDI参数(如 `java:comp/env/spring.application.json`);
9、Java系统参数(来源:`System.getProperties()`);
10、操作系统环境变量参数;
11、`RandomValuePropertySource` 随机数,仅匹配:`ramdom.*`;
12、JAR包外面的配置文件参数(`application-{profile}.properties(YAML)`)
13、JAR包里面的配置文件参数(`application-{profile}.properties(YAML)`)
14、JAR包外面的配置文件参数(`application.properties(YAML)`)
15、JAR包里面的配置文件参数(`application.properties(YAML)`)
16、`@Configuration`配置文件上 `@PropertySource` 注解加载的参数;
17、默认参数(通过 `SpringApplication.setDefaultProperties` 指定);
数字小的优先级越高,即数字小的会覆盖数字大的参数值,我们来实践下,验证以上配置参数的加载顺序。
1、在主应用程序中添加 Java 系统参数。
@Bean
public CommandLineRunner commandLineRunner() {
    return (args) -> {
        System.setProperty("name", "javastack-system-properties");
    };
}
2、在 application.properties 文件中添加属性。
name = javastack-application
3、在 application-dev.properties 文件中添加属性。
name = javastack-application-dev
4、添加测试类
@RunWith(SpringRunner.class)
@SpringBootTest(value = { "name=javastack-test", "sex=1" })
@ActiveProfiles("dev")
public class SpringBootBestPracticeApplicationTests {

    @Value("${name}")
    private String name;

    @Test
    public void test() {
        System.out.println("name is " + name);
    }

}
运行 test 单元测试,程序输出:
name is javastack-test
根据以上参数动态调整,发现参数会被正确被覆盖。了解了 Spring Boot 各种配置的加载顺序,如果配置被覆盖了我们就知道是什么问题了。
十五、Spring Boot 如何定义多套不同环境配置?
提供多套配置文件,如:
applcation.properties

application-dev.properties

application-test.properties

application-prod.properties
运行时指定具体的配置文件,具体请看这篇文章《Spring Boot Profile 不同环境配置》。
十六、Spring Boot 可以兼容老 Spring 项目吗,如何做?
可以兼容,使用 @ImportResource 注解导入老 Spring 项目配置文件。
十七、保护 Spring Boot 应用有哪些方法?
- 在生产中使用HTTPS
- 使用Snyk检查你的依赖关系
- 升级到最新版本
- 启用CSRF保护
- 使用内容安全策略防止XSS攻击
- ...
更多请看这篇文章《10 种保护 Spring Boot 应用的绝佳方法》。
十八、Spring Boot 2.X 有什么新特性?与 1.X 有什么区别?
- 配置变更
- JDK 版本升级
- 第三方类库升级
- 响应式 Spring 编程支持
- HTTP/2 支持
- 配置属性绑定
- 更多改进与加强...
具体请看这篇文章《Spring Boot 2.x 新特性总结及迁移指南》。


