Shiro框架:Shiro简介、登陆认证入门程序、认证执行流程、使用自定义Realm进行登陆认证、Shiro的MD5散列算法
一、Shiro介绍:
1、什么是shiro:
(1)shiro是apache的一个开源框架,是一个权限管理的框架,实现用户认证、用户授权。
(2)spring中有spring security,是一个权限框架,但是它和spring依赖过于紧密,没有shiro使用简单。shiro不依赖于spring,shiro不仅可以实现 web应用的权限管理,还可以实现c/s系统,分布式系统权限管理,shiro属于轻量框架,越来越多企业项目开始使用shiro。
(3)使用shiro实现系统 的权限管理,有效提高开发效率,从而降低开发成本。
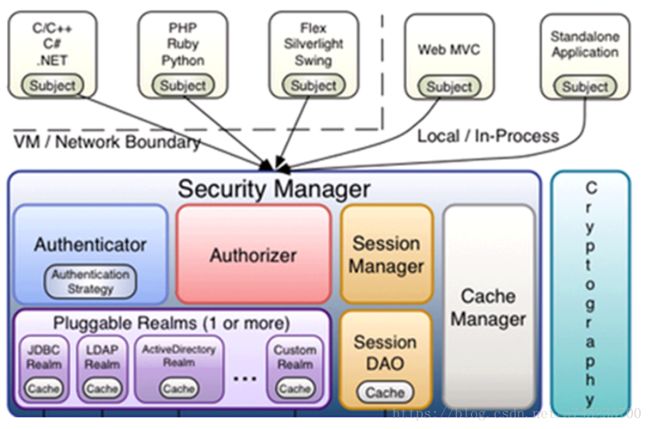
2、shiro架构:
(1)subject:主体,可以是用户也可以是程序,主体要访问系统,系统需要对主体进行认证、授权。
(2)securityManager:安全管理器,主体进行认证和授权都 是通过securityManager进行。
(3)authenticator:认证器,主体进行认证最终通过authenticator进行的。
(4)authorizer:授权器,主体进行授权最终通过authorizer进行的。
(5)sessionManager:web应用中一般是用web容器对session进行管理,shiro也提供一套session管理的方式。
(6)SessionDao: 通过SessionDao管理session数据,针对个性化的session数据存储需要使用sessionDao。
(7)cache Manager:缓存管理器,主要对session和授权数据进行缓存,比如将授权数据通过cacheManager进行缓存管理,和ehcache整合对缓存数据进行管理。
(8)realm:域,领域,相当于数据源,通过realm存取认证、授权相关数据。在realm中存储授权和认证的逻辑。
(9)cryptography:密码管理,提供了一套加密/解密的组件,方便开发。比如提供常用的散列、加/解密等功能。比如 md5散列算法。
3、相关jar包依赖:
与其它java开源框架类似,将shiro的jar包加入项目就可以使用shiro提供的功能了。shiro-core是核心包必须选用,还提供了与web整合的shiro-web、与spring整合的shiro-spring、与任务调度quartz整合的shiro-quartz等
			org.apache.shiro
			shiro-core
			1.4.0


			org.apache.shiro
			shiro-web
			1.4.0


			org.apache.shiro
			shiro-spring
			1.4.0


			org.apache.shiro
			shiro-ehcache
			1.4.0


			org.apache.shiro
			shiro-quartz
			1.4.0
也可以通过引入shiro-all包括shiro所有的包:
	org.apache.shiro
	shiro-all
	1.4.0
二、Shiro认证入门程序搭建:
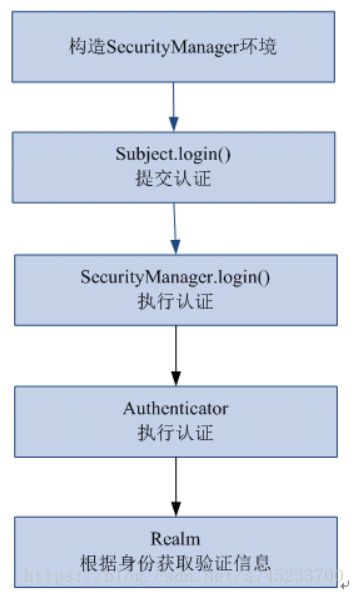
1、shiro认证流程:
2、导入jar包依赖:shiro-core.jar
3、工程结构:
4、编写shiro-first.ini配置文件:
通过此配置文件创建securityManager工厂。
#对用户信息进行配置
[users]
#用户账户和密码
zhangsan=111111
lisi=222222
5、Authentication类:
//shiro入门程序测试类:
public class Authentication {

	//用户登陆和退出测试
	@Test
	public void testLogin(){
		//1、创建securityManager工厂,通过ini配置文件创建securityManager工厂
		Factory factory=
				new IniSecurityManagerFactory("classpath:shiro-first.ini");
		//2、创建securityManager
		SecurityManager securityManager=factory.getInstance();
		//3、将SecurityManager设置在当前运行环境中
		SecurityUtils.setSecurityManager(securityManager);
		//4、从SecurityUtils里面 创建一个subject;
		Subject subject=SecurityUtils.getSubject();

		//5、在认证提交前准备token(令牌)
		UsernamePasswordToken token=new UsernamePasswordToken("zhangsan","111111");

		try{
			//6、执行认证提交;
			subject.login(token);
		}catch (AuthenticationException  e) {
			e.printStackTrace();
		}

		//7、是否认证通过
		boolean isAuthenticated = subject.isAuthenticated();
		System.out.println("是否认证通过:"+isAuthenticated);

		//8、退出操作
		subject.logout();
		isAuthenticated = subject.isAuthenticated();
		System.out.println("是否认证通过:"+isAuthenticated);
	}
}
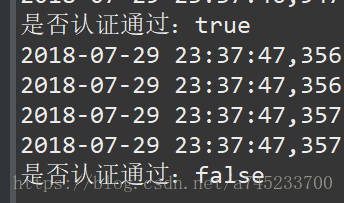
6、运行结果:
至此,一个简单的shiro入门程序就搭建完成了。
三、shiro的执行流程:
1、通过ini配置文件创建securityManager;
2、调用subject.login方法主体提交认证,提交的token;
3、securityManager进行认证,securityManager最终由ModularRealmAuthenticator进行认证;
4、ModularRealmAuthenticator调用IniRealm(给realm传入token) 去ini配置文件中查询用户信息;
5、IniRealm根据输入的token(UsernamePasswordToken)从 shiro-first.ini查询用户信息,根据账号查询用户信息(账号和密码):
(1)如果查询到用户信息,就给ModularRealmAuthenticator返回用户信息(账号和密码)
(2)如果查询不到,就给ModularRealmAuthenticator返回null
6、ModularRealmAuthenticator接收IniRealm返回Authentication认证信息
(1)如果返回的认证信息是null,ModularRealmAuthenticator抛出异常(org.apache.shiro.authc.UnknownAccountException)
(2)如果返回的认证信息不是null(说明inirealm找到了用户),对IniRealm返回用户密码 (在ini文件中存在)和 token中的密码 进行对比,如果不一致抛出异常(org.apache.shiro.authc.IncorrectCredentialsException)
小结:
ModularRealmAuthenticator的作用是进行认证,需要调用realm查询用户信息(在数据库中存在用户信息),
ModularRealmAuthenticator进行密码对比(认证过程)。
realm:需要根据token中的身份信息去查询数据库(入门程序使用ini配置文件),如果查到用户返回认证信息,如果查询不到返回null。
四、自定义Reaml进行用户认证:
实际开发需要realm从数据库中查询用户信息。
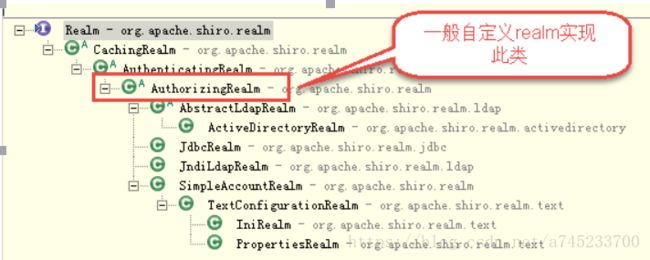
1、继承realm接口:
2、自定义realm的示例:
工程结构:
3、自定义realm:
//自定义的Realm,需要继承AuthorizingRealm
public class CustomRealm extends AuthorizingRealm{

	// 设置realm的名称
	@Override
	public void setName(String name) {
		super.setName("customRealm");
	}

	// 用于认证
	@Override
	protected AuthenticationInfo doGetAuthenticationInfo(
			AuthenticationToken token) throws AuthenticationException {

		// token是用户输入的
		// 第一步从token中取出身份信息
		String userCode = (String) token.getPrincipal();

		// 第二步:根据用户输入的userCode从数据库查询
		// ....
		// 如果查询不到返回null
		//这个例子中假设数据库中用户账号是zhangsansan
		if(!userCode.equals("zhangsan")){//
			return null;
		}
		// 模拟从数据库查询到密码是111111
		String password = "111111";

		// 如果查询到返回认证信息AuthenticationInfo
		SimpleAuthenticationInfo simpleAuthenticationInfo = new SimpleAuthenticationInfo(
				userCode, password, this.getName());

		return simpleAuthenticationInfo;
	}

	// 用于授权
	@Override
	protected AuthorizationInfo doGetAuthorizationInfo(
			PrincipalCollection principals) {
		// TODO Auto-generated method stub
		return null;
	}
}
4、配置realm:
需要在shiro-realm.ini配置realm注入到securityManager中:
[main]
#自定义的realm
customRealm=com.zwp.shiro.realm.CustomRealm
#将realm设置到securityManager,相当于spring中的注入
securityManager.realms=$customRealm
5、测试:
	@Test
	public void testCustomRealm() {
		//1、创建securityManager工厂,通过ini配置文件创建securityManager工厂
		Factory factory=
				new IniSecurityManagerFactory("classpath:shiro-realm.ini");
		//2、创建securityManager
		SecurityManager securityManager=factory.getInstance();
		//3、将SecurityManager设置在当前运行环境中
		SecurityUtils.setSecurityManager(securityManager);
		//4、从SecurityUtils里面 创建一个subject;
		Subject subject=SecurityUtils.getSubject();

		//5、在认证提交前准备token(令牌)
		UsernamePasswordToken token=new UsernamePasswordToken("zhangsan","111111");

		try{
			//6、执行认证提交;
			subject.login(token);
		}catch (AuthenticationException  e) {
			e.printStackTrace();
		}

		//7、是否认证通过
		boolean isAuthenticated = subject.isAuthenticated();
		System.out.println("是否认证通过:"+isAuthenticated);

		//8、退出操作
		subject.logout();
		isAuthenticated = subject.isAuthenticated();
		System.out.println("是否认证通过:"+isAuthenticated);
	}
6、测试结果:
至此,Realm的配置就完成了。
五、Shiro的MD5加密算法:
1、散列算法:
在项目中,通常需要对密码进行散列,常用的有MD5、SHA。
(1)对md5密码,如果知道散列后的值可以通过穷举算法,得到md5密码对应的明文。因此,建议对md5进行散列时加salt(盐),进行加密相当于对原始密码+盐进行散列。
(2)正常使用时散列方法:
在程序中对原始密码+盐进行散列,将散列值存储到数据库中,并且还要将盐也要存储在数据库中。
(3)如果进行密码对比时,使用相同方法,将原始密码+盐进行散列,进行比对。
2、MD5散列测试程序:
public class MD5Test {
	public static void main(String[] args) {
		//原始 密码
		String source = "111111";
		//盐
		String salt = "qwerty";
		//散列次数
		int hashIterations = 2;
		//上边散列1次:f3694f162729b7d0254c6e40260bf15c
		//上边散列2次:36f2dfa24d0a9fa97276abbe13e596fc

		//构造方法中:
		//第一个参数:明文,原始密码
		//第二个参数:盐,通过使用随机数
		//第三个参数:散列的次数,比如散列两次,相当 于md5(md5(''))
		Md5Hash md5Hash = new Md5Hash(source, salt, hashIterations);

		String password_md5 =  md5Hash.toString();
		System.out.println(password_md5);
		//第一个参数:散列算法
		SimpleHash simpleHash = new SimpleHash("md5", source, salt, hashIterations);
		System.out.println(simpleHash.toString());
	}
}
3、自定义realm支持散列算法:
需求:实际开发时,realm要进行MD5值(明文散列后的值)的对比;
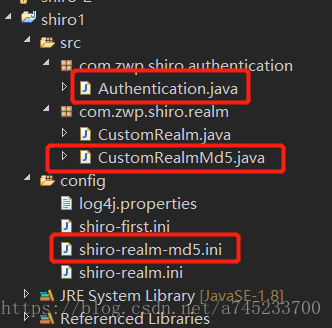
(1)项目结构:
(2)新建realm:(CustomRealmMd5.java)
//自定义realm支持散列算法:
public class CustomRealmMd5 extends AuthorizingRealm {
	// 设置realm的名称
	@Override
	public void setName(String name) {
		super.setName("customRealmMd5");
	}

	@Override
	protected AuthenticationInfo doGetAuthenticationInfo(AuthenticationToken token) throws AuthenticationException {
		// token是用户输入的
		// 第一步从token中取出身份信息
		String userCode = (String) token.getPrincipal();

		// 第二步:根据用户输入的userCode从数据库查询
		// ....
		// 如果查询不到返回null
		// 数据库中用户账号是zhangsansan
		if(!userCode.equals("zhangsan")){
			 return null;
		 }

		// 模拟从数据库查询到密码,散列值
		String password = "13f79dafcbbedc313273e2b891ac84d3";
		// 从数据库获取salt
		String salt = "qwerty";
		//上边散列值和盐对应的明文:123456 散列次数2

		// 如果查询到返回认证信息AuthenticationInfo
		SimpleAuthenticationInfo simpleAuthenticationInfo = new SimpleAuthenticationInfo(
				userCode, password, ByteSource.Util.bytes(salt), this.getName());

		return simpleAuthenticationInfo;
	}

	@Override
	protected AuthorizationInfo doGetAuthorizationInfo(PrincipalCollection principals) {
		return null;
	}
}
(3)在realm的ini文件中配置凭证匹配器:
[main]
#定义凭证匹配器:
credentialsMatcher=org.apache.shiro.authc.credential.HashedCredentialsMatcher
#散列算法:
credentialsMatcher.hashAlgorithmName=md5
#散列次数:
credentialsMatcher.hashIterations=2

#将凭证匹配器设置到realm
customRealm=com.zwp.shiro.realm.CustomRealmMd5
customRealm.credentialsMatcher=$credentialsMatcher
securityManager.realms=$customRealm
(4)测试类:
//自定义realm支持散列算法测试:
	@Test
	public void testCustomRealmMd5() {
		//1、创建securityManager工厂,通过ini配置文件创建securityManager工厂
		Factory factory=
				new IniSecurityManagerFactory("classpath:shiro-realm-md5.ini");
		//2、创建securityManager
		SecurityManager securityManager=factory.getInstance();
		//3、将SecurityManager设置在当前运行环境中
		SecurityUtils.setSecurityManager(securityManager);
		//4、从SecurityUtils里面 创建一个subject;
		Subject subject=SecurityUtils.getSubject();

		//5、在认证提交前准备token(令牌)
		UsernamePasswordToken token=new UsernamePasswordToken("zhangsan","123456");

		try{
			//6、执行认证提交;
			subject.login(token);
		}catch (AuthenticationException  e) {
			e.printStackTrace();
		}

		//7、是否认证通过
		boolean isAuthenticated = subject.isAuthenticated();
		System.out.println("是否认证通过:"+isAuthenticated);

		//8、退出操作
		subject.logout();
		isAuthenticated = subject.isAuthenticated();
		System.out.println("是否认证通过:"+isAuthenticated);
	}
至此,自定义realm支持散列算法的就完成了。
