【小家Spring】Spring容器(含父子容器)的启动过程源码级别分析(含web.xml启动以及全注解驱动,和ContextLoader源码分析)
每篇一句
不是没有人愿意给你公平,而是事实上做不到
前言
最近在编写Spring相关博文的时候,发现有不少小伙伴对口头上经常说到的Spring容器、父子容器等等概念,既熟悉,又默认。大体知道它是干啥的,但是却有不太能知道所以然
因此本文自己也本着一个学习的态度,主要介绍Spring容器(父子容器)的启动过程。由于我们有web.xml配置文件的方式以及这里讲到过的全注解驱动的方式,因此本文都分开来讲述。
备注:本文讲述不包括Spring Boot中容器初始化的过程,这个在后面专讲Spring Boot的时候会着重讲解,敬请关注
当ContextLoaderListener和DispatcherServlet一起使用时, ContextLoaderListener 先创建一个根applicationContext,然后DispatcherSerlvet创建一个子applicationContext并且绑定到根applicationContext
基于注解驱动方式
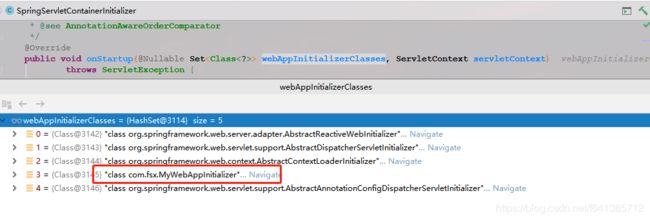
按照这篇博文搭建的项目环境 【小家Spring】Spring注解驱动开发—Servlet 3.0整合Spring MVC(不使用web.xml部署描述符,全注解驱动) debug启动项目:

可以发现,只有我自己一个实现类MyWebAppInitializer来配置当前的web环境。从这句代码可以看出,它只处理实体类,接口和抽象类一概不管:
if (!waiClass.isInterface() && !Modifier.isAbstract(waiClass.getModifiers()) &&
						WebApplicationInitializer.class.isAssignableFrom(waiClass)) {
	try {
		initializers.add((WebApplicationInitializer)
				ReflectionUtils.accessibleConstructor(waiClass).newInstance());
	} catch (Throwable ex) {
		throw new ServletException("Failed to instantiate WebApplicationInitializer class", ex);
	}
}

...

//排序后,循环调用onStartup方法 进行初始化
AnnotationAwareOrderComparator.sort(initializers);
for (WebApplicationInitializer initializer : initializers) {
	initializer.onStartup(servletContext);
}
接下来看看onStart()方法的实现AbstractDispatcherServletInitializer#onStartup:
@Override
public void onStartup(ServletContext servletContext) throws ServletException {
	super.onStartup(servletContext);
	registerDispatcherServlet(servletContext);
}

super如下:
@Override
public void onStartup(ServletContext servletContext) throws ServletException {
	registerContextLoaderListener(servletContext);
}
到此我们发现我们注解驱动,和我们的web.xml驱动可以说就一样了。分两步了:
- registerContextLoaderListener(servletContext):注册
ContextLoaderListener监听器,让它去初始化Spring父容器 - registerDispatcherServlet(servletContext);注册
DispatcherServlet,让它去初始化Spring MVC的子容器
protected void registerContextLoaderListener(ServletContext servletContext) {
	WebApplicationContext rootAppContext = createRootApplicationContext();
	if (rootAppContext != null) {
		// 创建listener 并且把已经创建好的容器放进去
		ContextLoaderListener listener = new ContextLoaderListener(rootAppContext);
		//放入监听器需要的一些上下文,此处木有。一般都为null即可~~~。若有需要(自己定制),子类复写此方法即可
		listener.setContextInitializers(getRootApplicationContextInitializers());
		// 把监听器加入进来  这样该监听器就能监听ServletContext了,并且执行contextInitialized方法
		servletContext.addListener(listener);
	}
}
createRootApplicationContext:如下,创建了一个AnnotationConfigWebApplicationContext并且把配置文件注册进去了
@Override
@Nullable //Spring告诉我们,这个是允许返回null的,也就是说是允许我们返回null的,后面会专门针对这里如果返回null,后面会是怎么样的流程的一个说明
protected WebApplicationContext createRootApplicationContext() {
	Class<?>[] configClasses = getRootConfigClasses();
	if (!ObjectUtils.isEmpty(configClasses)) {
		AnnotationConfigWebApplicationContext context = new AnnotationConfigWebApplicationContext();
		//配置文件可以有多个  会以累加的形式添加进去
		context.register(configClasses);
		return context;
	}
	else {
		return null;
	}
}
继续往下走:执行registerDispatcherServlet
protected void registerDispatcherServlet(ServletContext servletContext) {
	//Servlet名称 一般用系统默认的即可,否则自己复写此方法也成
	String servletName = getServletName();
	Assert.hasLength(servletName, "getServletName() must not return null or empty");

	//创建web的子容易。创建的代码和上面差不多,也是使用调用者提供的配置文件,创建AnnotationConfigWebApplicationContext.  备注:此处不可能为null哦
	WebApplicationContext servletAppContext = createServletApplicationContext();
	Assert.notNull(servletAppContext, "createServletApplicationContext() must not return null");

	//创建DispatcherServlet,并且把子容器传进去了。其实就是new一个出来,最后加到容器里,就能够执行一些init初始化方法了~
	FrameworkServlet dispatcherServlet = createDispatcherServlet(servletAppContext);
	Assert.notNull(dispatcherServlet, "createDispatcherServlet(WebApplicationContext) must not return null");
	//同样的 getServletApplicationContextInitializers()一般也为null即可
	dispatcherServlet.setContextInitializers(getServletApplicationContextInitializers());

	//注册servlet到web容器里面,这样就可以接收请求了
	ServletRegistration.Dynamic registration = servletContext.addServlet(servletName, dispatcherServlet);
	if (registration == null) {
		throw new IllegalStateException("Failed to register servlet with name '" + servletName + "'. " +
				"Check if there is another servlet registered under the same name.");
	}

	//1表示立马执行哦,没有第一次惩罚了
	registration.setLoadOnStartup(1);
	registration.addMapping(getServletMappings()); //调用者必须实现
	registration.setAsyncSupported(isAsyncSupported()); //默认就是开启了支持异步的

	//处理自定义的Filter进来,一般我们Filter不这么加进来,而是自己@WebFilter,或者借助Spring,  备注:这里添加进来的Filter都仅仅只拦截过滤上面注册的dispatchServlet
	Filter[] filters = getServletFilters();
	if (!ObjectUtils.isEmpty(filters)) {
		for (Filter filter : filters) {
			registerServletFilter(servletContext, filter);
		}
	}

	//这个很清楚:调用者若相对dispatcherServlet有自己更个性化的参数设置,复写此方法即可
	customizeRegistration(registration);
}
然后继续执行,就来到了ContextLoaderListener#contextInitialized执行此监听器的初始化方法(注意:到了此处,就和web.xml方式一模一样了)
但是不一样的是,注解驱动的此时候,我们的ContextLoaderListener对象已经持有WebApplicationContext的引用了(但是还没有放进ServletContext里面去,需要注意),所以会稍微有点不一样。 注意源码中,我删除掉了一些日志语句。。。

public WebApplicationContext initWebApplicationContext(ServletContext servletContext) {
	// 虽然注解驱动传进来的监听器对象持有WebApplicationContext的引用,但是并没有放进ServletContext容器哦
	if (servletContext.getAttribute(WebApplicationContext.ROOT_WEB_APPLICATION_CONTEXT_ATTRIBUTE) != null) {
		throw new IllegalStateException(
				"Cannot initialize context because there is already a root application context present - " +
				"check whether you have multiple ContextLoader* definitions in your web.xml!");
	}


	long startTime = System.currentTimeMillis();

	try {
		// 这句特别重要,兼容了web.xml的方式以及注解驱动的方式。本文中是注解驱动的方式,所以此处不会null。下面讲解web.xml的方式的时候,我再会去详细讲解createWebApplicationContext(servletContext)这个方法~~~
		if (this.context == null) {
			this.context = createWebApplicationContext(servletContext);
		}

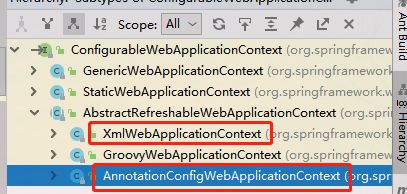
		//从上图可以看出:XmlWebApplicationContext(xml驱动)和AnnotationConfigWebApplicationContext(注解驱动)都是复合的,都会进来
		if (this.context instanceof ConfigurableWebApplicationContext) {
			ConfigurableWebApplicationContext cwac = (ConfigurableWebApplicationContext) this.context;

			//一般来说刚创建的context并没有处于激活状态,所以会进来完善一些更多的容器信息。比如刷新容器等等
			if (!cwac.isActive()) {
				if (cwac.getParent() == null) {
					//在web.xml中配置了的parentContextKey才会指定父级应用(或者我们自己复写此方法)   绝大多数情况下,Spring容器不用再给设置父容器
					ApplicationContext parent = loadParentContext(servletContext);
					cwac.setParent(parent);
				}

				//读取相应的配置并且刷新context对象   这一步就极其重要了,因为刷新容器做了太多的事,属于容器的最最最核心逻辑(详解且见下问分解)
				configureAndRefreshWebApplicationContext(cwac, servletContext);
			}
		}
		//放进ServletContext上下文,避免再次被初始化,也让我们能更加方便的获取到容器
		servletContext.setAttribute(WebApplicationContext.ROOT_WEB_APPLICATION_CONTEXT_ATTRIBUTE, this.context);

		//此处把容器和当前线程绑定,public static WebApplicationContext getCurrentWebApplicationContext()这样就可以更加方便得得到容器.类为:ContextLoader
		ClassLoader ccl = Thread.currentThread().getContextClassLoader();
		if (ccl == ContextLoader.class.getClassLoader()) {
			currentContext = this.context;
		}
		else if (ccl != null) {
			currentContextPerThread.put(ccl, this.context);
		}
}
下面介绍最重要的一个方法:ContextLoader#configureAndRefreshWebApplicationContext
protected void configureAndRefreshWebApplicationContext(ConfigurableWebApplicationContext wac, ServletContext sc){
     //一般此处为真,给ApplicationContext设置一个id
     if (ObjectUtils.identityToString(wac).equals(wac.getId())) {
           //获取servletContext中的contextId属性  contextId,可在web.xml里配置,一般也不用配置,采用else里的默认值即可
           String idParam = sc.getInitParameter(CONTEXT_ID_PARAM);
           if (idParam != null) {
               //存在则设为指定的id名
               wac.setId(idParam);
           } else {
               // 生成默认id... 一般为org.springframework.web.context.WebApplicationContext:${contextPath}
               wac.setId(ConfigurableWebApplicationContext.APPLICATION_CONTEXT_ID_PREFIX +
                       ObjectUtils.getDisplayString(sc.getContextPath()));
           }
       }

	   //让容器关联上servlet上下文
       wac.setServletContext(sc);

       //读取contextConfigLocation属性(在web.xml配置,但是注解驱动里没有,因此为null)
       String configLocationParam = sc.getInitParameter(CONFIG_LOCATION_PARAM);
       if (configLocationParam != null) {
           //设置指定的spring文件所在地,支持classpath前缀并多文件,以,;为分隔符
           wac.setConfigLocation(configLocationParam);
       }
       //这里有一个注意的地方,ConfigurableEnvironment生成的地方
       //====wac.setConfigLocation(configLocationParam); 时根据 configLocationParam设置配置参数路径时就会初始化StandardServletEnvironment(ConfigurableEnvironment的子类)

       //StandardServletEnvironment符合条件,因此会执行initPropertySources方法。只与此方法的作用,后面再有相关文章详解
       ConfigurableEnvironment env = wac.getEnvironment();
       if (env instanceof ConfigurableWebEnvironment) {
           ((ConfigurableWebEnvironment) env).initPropertySources(sc, null);
       }
       //检查web.xml是否有一些其余初始化类的配置,极大多数情况都不需要,所以粗暴理解为没什么卵用
       customizeContext(sc, wac);

       //容器的核心方法,也是最难的一个方法,这个在Spring容器详解中,会继续降到此方法
       //这里先理解为就是初始化容器,比如加载bean、拦截器、各种处理器的操作就够了~(也是最耗时的一步操作)
       wac.refresh();
}
该方法完成之后,看到控制台log日志:
Root WebApplicationContext: initialization completed in 75383 ms
就证明Spring根容器就初始化完成了。
初始化DispatcherServlet,web子容器
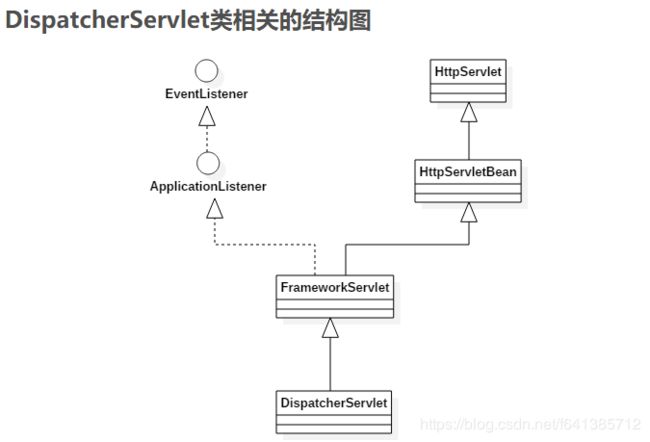
由于设置了registration.setLoadOnStartup(1); 在容器启动完成后就调用servlet的init() DispatcherServlet 继承FrameworkServlet继承HttpServletBean继承 HttpServlet。
在HttpServletBean实现了init():

这里先科普一下Servlet初始化的四大步骤:
- Servlet容器加载Servlet类,把类的.class文件中的数据读到内存中;
- Servlet容器中创建一个
ServletConfig对象。该对象中包含了Servlet的初始化配置信息; - Servlet容器创建一个Servlet对象(我们也可以手动new,然后手动添加进去);
- Servlet容器调用Servlet对象的init()方法进行初始化。
	@Override
	public final void init() throws ServletException {
		// 把servlet的初始化参数封装进来...
		PropertyValues pvs = new ServletConfigPropertyValues(getServletConfig(), this.requiredProperties);

		//这里面我们并没有给此Servlet初始化的一些参数,所以此处为空,为false
		//若进来了,可以看到里面会做一些处理:将这个DispatcherServlet转换成一个BeanWrapper对象,从而能够以spring的方式来对初始化参数的值进行注入。这些属性如contextConfigLocation、namespace等等。
		//同时注册一个属性编辑器,一旦在属性注入的时候遇到Resource类型的属性就会使用ResourceEditor去解析。再留一个initBeanWrapper(bw)方法给子类覆盖,让子类处真正执行BeanWrapper的属性注入工作。
		//但是HttpServletBean的子类FrameworkServlet和DispatcherServlet都没有覆盖其initBeanWrapper(bw)方法,所以创建的BeanWrapper对象没有任何作用。

		//备注:此部分把当前Servlet封装成一个BeanWrapper在把它交给Spring管理部分非常重要,比如后续我们讲到SpringBoot源码的时候,会看出来这部分代码的重要性了。。。
		if (!pvs.isEmpty()) {
			try {
				BeanWrapper bw = PropertyAccessorFactory.forBeanPropertyAccess(this);
				ResourceLoader resourceLoader = new ServletContextResourceLoader(getServletContext());
				bw.registerCustomEditor(Resource.class, new ResourceEditor(resourceLoader, getEnvironment()));
				initBeanWrapper(bw);
				bw.setPropertyValues(pvs, true);
			} catch (BeansException ex) {
				throw ex;
			}
		}

		// Let subclasses do whatever initialization they like.
		// 从官方注解也能读懂。它把这个init方法给final掉了,然后开了这个口,子类可以根据自己的需要,在初始化的的时候可以复写这个方法,而不再是init方法了~
		initServletBean();
	}
因此我们只需要再看看initServletBean()方法的实现即可,它是由FrameworkServlet去实现的:
	@Override
	protected final void initServletBean() throws ServletException {
		long startTime = System.currentTimeMillis();

		try {
			// 这是重点,开始初始化这个子容器了
			this.webApplicationContext = initWebApplicationContext();
			//继续留一个口,给子类去复写初始化所需要的操作  一般都为空实现即可,除非自己要复写DispatcherServlet,做自己需要做的事
			initFrameworkServlet();
		}

		//当我们看到这句日志,就能知道dispatcherServlet已经初始化完成,web子容器也就初始化完成了
		if (this.logger.isInfoEnabled()) {
			long elapsedTime = System.currentTimeMillis() - startTime;
			this.logger.info("FrameworkServlet '" + getServletName() + "': initialization completed in " +
					elapsedTime + " ms");
		}
	}
initWebApplicationContext方法如下:创建一个web子容器,并且和上面Spring已经创建好了的父容器关联上
	protected WebApplicationContext initWebApplicationContext() {
		// 从ServletContext中把上面已经创建好的根容器拿到手
		WebApplicationContext rootContext = WebApplicationContextUtils.getWebApplicationContext(getServletContext());
		WebApplicationContext wac = null;

		//但是,但是,但是此处需要注意了,因为本处我们是注解驱动的,在上面已经看到了,我们new DispatcherServlet出来的时候,已经传入了根据配置文件创建好的子容器web容器,因此此处肯定是不为null的,因此此处会进来,和上面一样,完成容器的初始化、刷新工作,因此就不再解释了~
		if (this.webApplicationContext != null) {
			// A context instance was injected at construction time -> use it
			wac = this.webApplicationContext;
			if (wac instanceof ConfigurableWebApplicationContext) {
				ConfigurableWebApplicationContext cwac = (ConfigurableWebApplicationContext) wac;
				if (!cwac.isActive()) {
					if (cwac.getParent() == null) {
						//此处吧根容器,设置为自己的父容器
						cwac.setParent(rootContext);
					}
					//根据绑定的配置,初始化、刷新容器
					configureAndRefreshWebApplicationContext(cwac);
				}
			}
		}

		//若是web.xml方式,会走这里,进而走findWebApplicationContext(),因此此方法,我会在下面详细去说明,这里占时略过
		if (wac == null) {
			wac = findWebApplicationContext();
		}
		if (wac == null) {
			wac = createWebApplicationContext(rootContext);
		}

		// 此处需要注意了:下面有解释,refreshEventReceived和onRefresh方法,不会重复执行~
		if (!this.refreshEventReceived) {
			onRefresh(wac);
		}

		//我们是否需要吧我们的容器发布出去,作为ServletContext的一个属性值呢?默认值为true哦,一般情况下我们就让我true就好
		if (this.publishContext) {
			// Publish the context as a servlet context attribute.
			// 这个attr的key的默认值,就是FrameworkServlet.SERVLET_CONTEXT_PREFIX,保证了全局唯一性
			// 这么一来,我们的根容器、web子容器其实就都放进ServletContext上下文里了,拿取都非常的方便了。   只是我们一般拿这个容器的情况较少,一般都是拿跟容器,比如那个工具类就是获取根容器的~~~~~~
			String attrName = getServletContextAttributeName();
			getServletContext().setAttribute(attrName, wac);
		}
		return wac;
	}
备注,在DispatcherServlet的doService方法里都有这样的一段代码,方便我们非常方便获取到一些参数,比如web子容器等等
		request.setAttribute(WEB_APPLICATION_CONTEXT_ATTRIBUTE, getWebApplicationContext());
		request.setAttribute(LOCALE_RESOLVER_ATTRIBUTE, this.localeResolver);
		request.setAttribute(THEME_RESOLVER_ATTRIBUTE, this.themeResolver);
		request.setAttribute(THEME_SOURCE_ATTRIBUTE, getThemeSource());

FrameworkServlet策略式的实现了监听方法,监听应用的刷新事件。当我们刷新应用的时候(比如上面执行refresh()方法,这里就会执行,并且打上标记说已经执行过了),然而onRefresh()是一个模版方法,具体实现交给子类,这样子DispatcherServlet就可以做做初始化web组件的一些事情了~ 这种设计模式可谓非常优秀,
这就是为何会抽象出FrameworkServlet的原因,因为它设计的初衷不仅仅只想支持到Servlet
所以此处就不得不说一下,子类自己实现的onRefresh()方法:
	@Override
	protected void onRefresh(ApplicationContext context) {
		initStrategies(context);
	}

	//初始化Spring MVC的9大组件(至此,才算全部初始化完成了~不容器啊)
	protected void initStrategies(ApplicationContext context) {
		initMultipartResolver(context);
		initLocaleResolver(context);
		initThemeResolver(context);
		initHandlerMappings(context);
		initHandlerAdapters(context);
		initHandlerExceptionResolvers(context);
		initRequestToViewNameTranslator(context);
		initViewResolvers(context);
		initFlashMapManager(context);
	}
至于初始化Spring MVC9大组件的详细工作问题,此处也不展开了,参见此篇博文:~~~~~~~~~~~~~~~~~~
当看到这句日志,就能证明整个Spring父子容器全部初始化、启动完成了~
14:42:47.354 [RMI TCP Connection(2)-127.0.0.1] INFO o.s.web.servlet.DispatcherServlet - FrameworkServlet 'dispatcher': initialization completed in 1674475 ms
这里顺便解释一下SpringMVC中的Servlet的三个层次:
- HttpServletBean直接继承自java的HttpServlet,其作用是将Servlet中配置的参数设置到相应的Bean属性上
- FrameworkServlet初始化了WebApplicationContext
- DispatcherServlet初始化了自身的9个组件(本文重点)
配置多个DispatcherServletServlet
从本文中我们看到Spring的容器存在父子容器的。因此我们可以很容器的配置多个web子容器,然后父容器都是Root容器,这是被允许的。
当然一般情况下,定义多个 dispatcherservlect 实际上是没有什么特别的用处的。但能够解决可能存在的jar包内的访问路径冲突问题。
比较常用的一个应用场景为:web请求和rest请求分离处理。
比如/rest/api/v1/全部为rest风格的请求,返回json数据不返回页面,交给一个。
/page/api/v1前缀的就返回渲染的页面,交给另外一个
当然静态资源的请求,也可以用对应的处理方式~~~~~~
Spring MVC是有提供配置多个web子容器的能力的,但是使用的时候,路径方面要谨慎处理
ContextLoader类
在继续讲解web.xml方式启动之前,我觉得有必要深入讲解一些ContextLoader这个类。因为从上面我们发现,初始化Spring的根容器,ContextLoaderListener所有事情都是委派给它来完成的,因此我们来讲解一下。
常量解释:
	// init-param定义root根容器id的key
	public static final String CONTEXT_ID_PARAM = "contextId";
	// init-param 定义root根容器的配置文件的路径地址的key
	public static final String CONFIG_LOCATION_PARAM = "contextConfigLocation";
	// init-param 自己可以指定一个WebApplicationContext的实现类(一般都不需要~)
	public static final String CONTEXT_CLASS_PARAM = "contextClass";
	// init-param 可以伴随着容器初始化的时候,我们自己做一些工作的类们。注意需要实现对应接口哦~ key
	public static final String CONTEXT_INITIALIZER_CLASSES_PARAM = "contextInitializerClasses";
	// 基本同上
	public static final String GLOBAL_INITIALIZER_CLASSES_PARAM = "globalInitializerClasses";
	// 多值分隔符号
	private static final String INIT_PARAM_DELIMITERS = ",; \t\n";
	// 默认的配置文件  里面内容只有一句话: org.springframework.web.context.WebApplicationContext=org.springframework.web.context.support.XmlWebApplicationContext
	// 由此课件,它默认是采用XmlWebApplicationContext来初始化上下文的
	private static final String DEFAULT_STRATEGIES_PATH = "ContextLoader.properties";

	// ContextLoader在被实例化的时候,会执行下面的这个静态代码块。做了一件事:把默认的配置文件加载进来而已
	private static final Properties defaultStrategies;
	static {
		try {
			ClassPathResource resource = new ClassPathResource(DEFAULT_STRATEGIES_PATH, ContextLoader.class);
			defaultStrategies = PropertiesLoaderUtils.loadProperties(resource);
		}
	}

	// 这两个属性主要拿到当前的容器上下文。其中static的工具方法ContextLoader.getCurrentWebApplicationContext是基于此的
	private static final Map<ClassLoader, WebApplicationContext> currentContextPerThread = new ConcurrentHashMap<>(1);
	@Nullable
	private static volatile WebApplicationContext currentContext;
有了上面的 一些配置:这句
if (this.context == null) {
    this.context = createWebApplicationContext(servletContext);
}
这时一般就会创建前点所述的XmlWebApplicationContext,至于我们怎么替换,下文会有介绍
最后介绍这个类的一个静态方法:
	public static WebApplicationContext getCurrentWebApplicationContext() {
		ClassLoader ccl = Thread.currentThread().getContextClassLoader();
		if (ccl != null) {
			WebApplicationContext ccpt = currentContextPerThread.get(ccl);
			if (ccpt != null) {
				return ccpt;
			}
		}
		return currentContext;
	}
此静态方法,可以在任何地方都获取到Spring容器(根容器),非常好用。
我们知道还有一种方法如下:
ApplicationContext ctx = WebApplicationContextUtils.getWebApplicationContext(request.getSession().getServletContext());
这个毕竟要请求与request对象,相对来说麻烦点,比如在Service层呢,就不太好获取了嘛,所以我们就可以用这个啦。
    @Autowired
    private HttpServletRequest request;

    @Override
    public Object hello() {

        ApplicationContext ctx1 = WebApplicationContextUtils.getWebApplicationContext(request.getSession().getServletContext());
        WebApplicationContext ctx2 = ContextLoader.getCurrentWebApplicationContext();
        System.out.println(ctx1); //Root WebApplicationContext: startup date ...
        System.out.println(ctx1 == ctx2); //true

        return "service hello";
    }
由此看出,我们以后可以用这种方式来获取容器
FrameworkServlet
DispatcherServlet创建自己的WebApplicationContext并管理这个WebApplicationContext里面的 handlers/controllers/view-resolvers
简单理解,功能有点想ContextLoader。FrameworkServlet实现了ApplicationContextAware接口的setApplicationContext()方法,可知DispatcherServlet的applicationContext来自FrameworkServlet。
	@Override
	public void setApplicationContext(ApplicationContext applicationContext) {
		if (this.webApplicationContext == null && applicationContext instanceof WebApplicationContext) {
			this.webApplicationContext = (WebApplicationContext) applicationContext;
			this.webApplicationContextInjected = true;
		}
	}
注意,注意,注意一句doc:Primarily added to support use in embedded servlet containers.,它是Spring4.0之后有的,只用于嵌入式的Servlet环境。war同期环境这里是不会执行的,因为它并不会以Bean的形式存在于Spring容器(说白了,就是init方法里的这段代码)

生效了,就能注入了~
一些常量介绍:
//getNameSpace会返回你在web.xml中配置的servlet-name加上"-servlet",这个namespace会在之后application context加载spring MVC配置文件时候用到
//比如你给servlet取名叫 SpringMVCServlet,那么当Spring MVC初始化的时候,会去寻找名为/WEB-INF/SpringMVCServlet-servlet.xml的配置文件。
// 不过个人建议:还是配置上配置文件比较好  不要用默认的
public static final String DEFAULT_NAMESPACE_SUFFIX = "-servlet";
public String getNamespace() {
	return (this.namespace != null ? this.namespace : getServletName() + DEFAULT_NAMESPACE_SUFFIX);
}

// 默认的容器类型。若没有配置contextClass就用它
public static final Class<?> DEFAULT_CONTEXT_CLASS = XmlWebApplicationContext.class;


// 这些值,都可以通过将Servlet初始化参数(init-param)设置到该组件上(如contextAttribute、contextClass、namespace、contextConfigLocation)
@Nullable
private String contextAttribute;
private Class<?> contextClass = DEFAULT_CONTEXT_CLASS;
@Nullable
private String contextId;
@Nullable
private String namespace;
@Nullable
private String contextConfigLocation;
基于web.xml方式
最常用配置如下:
<listener>
    <listener-class>org.springframework.web.context.ContextLoaderListenerlistener-class>
listener>
<context-param>
    <param-name>contextConfigLocationparam-name>
    <param-value>classpath:spring/applicationContext.xmlparam-value>
context-param>


<servlet>
  <servlet-name>springMvcservlet-name>
  <servlet-class>org.springframework.web.servlet.DispatcherServletservlet-class>

  <init-param>
      <param-name>contextConfigLocationparam-name>
      <param-value>classpath:spring/spring-mvc.xmlparam-value>
   init-param>

  <load-on-startup>1load-on-startup>
  <async-supported>trueasync-supported>
servlet>
<servlet-mapping>
  <servlet-name>springMvcservlet-name>
  <url-pattern>/url-pattern>
servlet-mapping>
注意:如果没有指定spring-mvc.xml 配置,则默认使用DispatcherServlet的默认配置DispatcherServlet.properties
# Default implementation classes for DispatcherServlet's strategy interfaces.
# Used as fallback when no matching beans are found in the DispatcherServlet context.
# Not meant to be customized by application developers.

org.springframework.web.servlet.LocaleResolver=org.springframework.web.servlet.i18n.AcceptHeaderLocaleResolver

org.springframework.web.servlet.ThemeResolver=org.springframework.web.servlet.theme.FixedThemeResolver

org.springframework.web.servlet.HandlerMapping=org.springframework.web.servlet.handler.BeanNameUrlHandlerMapping,\
	org.springframework.web.servlet.mvc.method.annotation.RequestMappingHandlerMapping

org.springframework.web.servlet.HandlerAdapter=org.springframework.web.servlet.mvc.HttpRequestHandlerAdapter,\
	org.springframework.web.servlet.mvc.SimpleControllerHandlerAdapter,\
	org.springframework.web.servlet.mvc.method.annotation.RequestMappingHandlerAdapter

org.springframework.web.servlet.HandlerExceptionResolver=org.springframework.web.servlet.mvc.method.annotation.ExceptionHandlerExceptionResolver,\
	org.springframework.web.servlet.mvc.annotation.ResponseStatusExceptionResolver,\
	org.springframework.web.servlet.mvc.support.DefaultHandlerExceptionResolver

org.springframework.web.servlet.RequestToViewNameTranslator=org.springframework.web.servlet.view.DefaultRequestToViewNameTranslator

org.springframework.web.servlet.ViewResolver=org.springframework.web.servlet.view.InternalResourceViewResolver

org.springframework.web.servlet.FlashMapManager=org.springframework.web.servlet.support.SessionFlashMapManager
有了上面基于注解的分析,这里就非常容易了。注解驱动,容器都是它自己根据配置类进行创建的,而此处基于xml的形式,我们只需要区别的看两个创建方法即可,上面也已经提到了:
ContextLoader#createWebApplicationContext() 根据xml创建根容器
	protected WebApplicationContext createWebApplicationContext(ServletContext sc) {
		// 找到上下文类型。若自己没有配置实现类,那就是XmlApplicationContext
		Class<?> contextClass = determineContextClass(sc);
		// 由此看出  用户diy的也必须是ConfigurableWebApplicationContext的子类才行
		if (!ConfigurableWebApplicationContext.class.isAssignableFrom(contextClass)) {
			throw new ApplicationContextException("Custom context class [" + contextClass.getName() +
					"] is not of type [" + ConfigurableWebApplicationContext.class.getName() + "]");
		}
		// 使用无参构造实例化一个实例
		return (ConfigurableWebApplicationContext) BeanUtils.instantiateClass(contextClass);
	}
determineContextClass方法如下:
	protected Class<?> determineContextClass(ServletContext servletContext) {
		// 显然,一般情况下我们都不会自己配置一个容器类,自己去实现~ 所有走else
		String contextClassName = servletContext.getInitParameter(CONTEXT_CLASS_PARAM);
		if (contextClassName != null) {
			try {
				return ClassUtils.forName(contextClassName, ClassUtils.getDefaultClassLoader());
			}
		} else {
			// 采用默认配置文件里的XmlApplicationContext来初始化上下文
			contextClassName = defaultStrategies.getProperty(WebApplicationContext.class.getName());
			try {
				return ClassUtils.forName(contextClassName, ContextLoader.class.getClassLoader());
			}
		}
	}
FrameworkServlet#initWebApplicationContext
涉及到这两个方法:
	protected WebApplicationContext findWebApplicationContext() {
		// 只有调用过setContextAttribute(String contextAttribute)这里才有值,否则为null  或者web.xml里配置:contextAttribute为key的属性值
		String attrName = getContextAttribute();
		if (attrName == null) {
			return null;
		}
		//按照这个attr去Servlet容器里面找
		WebApplicationContext wac =
				WebApplicationContextUtils.getWebApplicationContext(getServletContext(), attrName);
		if (wac == null) {
			throw new IllegalStateException("No WebApplicationContext found: initializer not registered?");
		}
		return wac;
	}
这里一般都会返回null,因此此处继续创建:
	protected WebApplicationContext createWebApplicationContext(@Nullable ApplicationContext parent) {
		// 没有配置的话,默认值为public static final Class DEFAULT_CONTEXT_CLASS = XmlWebApplicationContext.class;
		Class<?> contextClass = getContextClass();

		// 校验必须是ConfigurableWebApplicationContext的子类
		if (!ConfigurableWebApplicationContext.class.isAssignableFrom(contextClass)) {
			throw new ApplicationContextException(
					"Fatal initialization error in servlet with name '" + getServletName() +
					"': custom WebApplicationContext class [" + contextClass.getName() +
					"] is not of type ConfigurableWebApplicationContext");
		}
		// 创建一个容器实例
		ConfigurableWebApplicationContext wac =
				(ConfigurableWebApplicationContext) BeanUtils.instantiateClass(contextClass);

		// 设置好父容器、Enviroment等等
		wac.setEnvironment(getEnvironment());
		wac.setParent(parent);

		//看看有没有配置配置文件的位置
		String configLocation = getContextConfigLocation();
		if (configLocation != null) {
			wac.setConfigLocation(configLocation);
		}

		// 这个是重点,如完善、初始化、刷新容器
		configureAndRefreshWebApplicationContext(wac);

		return wac;
	}
configureAndRefreshWebApplicationContext()如下:
	protected void configureAndRefreshWebApplicationContext(ConfigurableWebApplicationContext wac) {
		if (ObjectUtils.identityToString(wac).equals(wac.getId())) {
			if (this.contextId != null) {
				wac.setId(this.contextId);
			} else {
				// 默认的id  这里面和contextpath有关了
				wac.setId(ConfigurableWebApplicationContext.APPLICATION_CONTEXT_ID_PREFIX +
						ObjectUtils.getDisplayString(getServletContext().getContextPath()) + '/' + getServletName());
			}
		}

		// 关联到了Namespace/servlet等等
		wac.setServletContext(getServletContext());
		wac.setServletConfig(getServletConfig());
		wac.setNamespace(getNamespace());
		//添加了一个容器监听器  此监听器SourceFilteringListener在后面还会碰到
		wac.addApplicationListener(new SourceFilteringListener(wac, new ContextRefreshListener()));

		// 同之前~
		ConfigurableEnvironment env = wac.getEnvironment();
		if (env instanceof ConfigurableWebEnvironment) {
			((ConfigurableWebEnvironment) env).initPropertySources(getServletContext(), getServletConfig());
		}

		//留给子类,可以复写此方法,做一些初始化时候自己的实行
		postProcessWebApplicationContext(wac);

		//同样的 执行一些初始化类们  一般也是用不着。备注:用到了这个常量ContextLoader.GLOBAL_INITIALIZER_CLASSES_PARAM
		applyInitializers(wac);
		wac.refresh();
	}
至此,web子容器就全部创建、刷新完成了~
Spring父子容器的优缺点
优点:能让web环境和普通的Spring环境达到隔离的效果。web容器专注于管理web相关Bean,其余的交给父容器即可。 这样子强制隔离,也能驱动我们在编码过程中注重分层,使得层次结构更加的明晰
缺点:父子容器的设计提高了Spring初始化、管理Bean的复杂度(虽然对我们使用者一般都无感),我们万一要用到相关功能的时候,若不理解原理会有莫名其妙的一些问题,提高了复杂性
理论上我们可以有任意多个容器(只是我们一般其它的都只放进主容器统一管理上,但Spring是提供了这样的功能的),比如
- 主容器:applicationContext.xml(主文件,包括JDBC配置,hibernate.cfg.xml,与所有的Service与DAO基类)
- web子容器:application-servlet.xml(管理Spring MVC9打组件以及相关的Bean)
- cache子容器:applicationContext-cache.xml(cache策略配置,管理和缓存相关的Bean)
- JMX子容器:applicationContext-jmx.xml(JMX相关的Bean)
- …
总之:通过父子容器分层管理是好的设计思想,但是在编码使用中,大道至简才是我们追求的方式。所以我个人觉得:父子容器的设计并不是一根很好的设计(理想是好的,但实施上却不见得是好的),估计这也是为何Spring Boot中只采用一个容器的原因吧,简单的或许就是最好的(仅个人意见,不喜勿喷)
总结
本篇文章基本介绍了Spring容器以及Spring MVC容器的一个初始化过程,包括了web.xml和注解驱动两种方式。
然后里面涉及到的Spring容器刷新过程的核心逻辑,以及Dispatcher的9打组件,以及处理请求的过程,请关注接下来的博文~
值得注意的是,springMVC在调用HandlerMapper进行url到controller函数方法映射解析的时候,HandlerMapper会在springMVC容器中寻找controller,也就是在子容器中寻找,不会去父容器spring容器中寻找的。
所以如果用父容器来管理controller的话,子容器不去管理,在访问页面的时候会出现404错误。
所以我们姑且可以这么认为:我们可以用子容器统一管理Bean(包括父容器的Bean),但是不能用父容器管理所有Bean
知识交流
![]()
若群二维码失效,请加微信号(或者扫描下方二维码):fsx641385712。
并且备注:“java入群” 字样,会手动邀请入群
![]()

