前言
Core Graphics 是iOS上非常酷的API,开发人员可以用它来画出各种不同需求的自定义UI。
开发环境
Xcode 4.6, ARC
基础操作
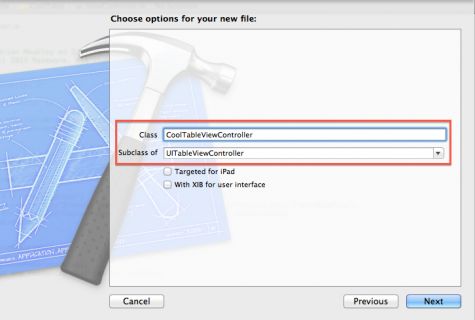
创建一个名为 CoolTable 的工程

创建一个名为 CoolTableViewController的类,该类继承UItableViewController
点击项目导航栏的Main.storyboard文件,加载完毕后删除viewcontroller,并从对象仓库中拖取一个Navigator Controller到故事版上,如下图所示:
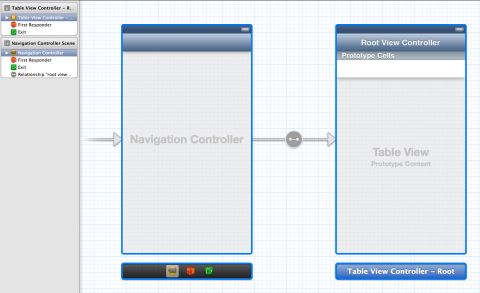
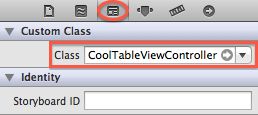
然后,你必须更改UITableViewcontroller的指向类.选中UITableviewcontroller并且点击类标示选项.在Custom Class选项上,在Class栏输入CoolTableViewController
最后,给Prototype Cell添加复用标志符.选中cell,然后点击 Attributes Inspector.在identifier框输入Cell.

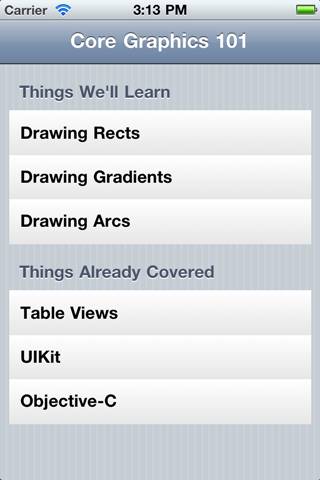
运行工程,效果如图所示:

现在我们给这个空白的列表添加一些简单的数据吧.打开CoolTableViewController.m文件,输入以下代码:
@interface CoolTableViewController ()

@property (copy) NSMutableArray *thingsToLearn;
@property (copy) NSMutableArray *thingsLearned;

@end
给两个数组添加数据,用来展示.这里需要注意的是我们添加的两个数组是私有属性,因为没有必要将这些数组曝光给其他类.将@implementation CoolTableViewController和@end之间的代码全部删掉,输入下面的代码:
- (void)viewDidLoad
{
    [super viewDidLoad];
    self.title = @"Core Graphics 101";
    self.thingsToLearn = [@[@"Drawing Rects", @"Drawing Gradients", @"Drawing Arcs"] mutableCopy];
    self.thingsLearned = [@[@"Table Views", @"UIKit", @"Objective-C"] mutableCopy];
}

#pragma mark - Table view data source

- (NSInteger)numberOfSectionsInTableView:(UITableView *)tableView
{
    // Return the number of sections.
    return 2;
}

- (NSInteger)tableView:(UITableView *)tableView numberOfRowsInSection:(NSInteger)section
{
    if (section == 0) {
        return self.thingsToLearn.count;
    } else {
        return self.thingsLearned.count;
    }
}

- (UITableViewCell *)tableView:(UITableView *)tableView cellForRowAtIndexPath:(NSIndexPath *)indexPath
{
    static NSString * CellIdentifier = @"Cell";
    UITableViewCell * cell = [tableView dequeueReusableCellWithIdentifier:CellIdentifier];
    NSString * entry;

    if (indexPath.section == 0) {
        entry = self.thingsToLearn[indexPath.row];
    } else {
        entry = self.thingsLearned[indexPath.row];
    }
    cell.textLabel.text = entry;

    return cell;
}

-(NSString *) tableView:(UITableView *)tableView titleForHeaderInSection:(NSInteger)section
{
    if (section == 0) {
        return @"Things We'll Learn";
    } else {
        return @"Things Already Covered";
    }
}
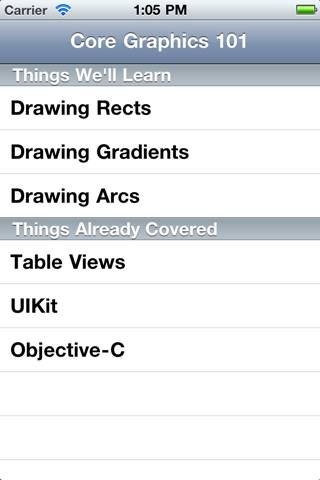
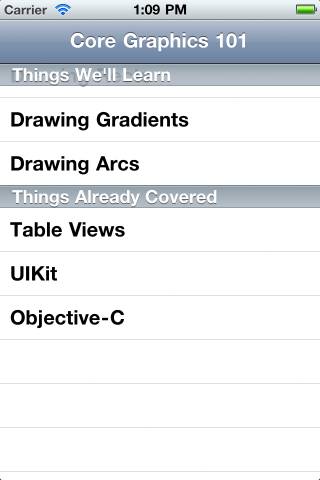
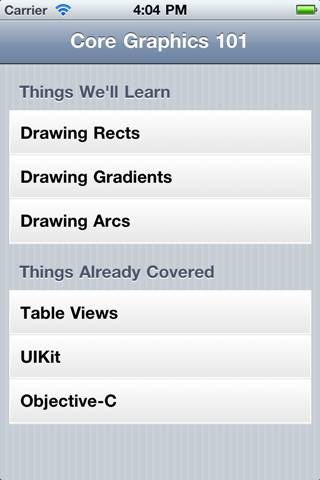
再次跑起工程,这次展示的是有数据的列表:
但你向上滚动table view的时候你会发现它的headers悬浮在上面:
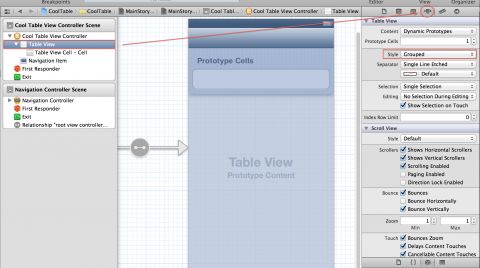
这个是tableview的plain样式.将它更改为grouped样式!
打开Main.storyboard,在CoolTableViewController,选中Table View,然后选中Attributes Inspector,将style更改为Grouped:
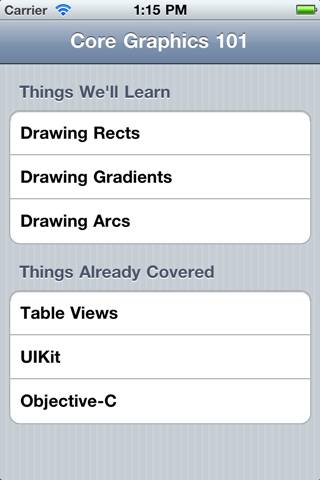
再次跑工程:
现在我们来学习如何使用Core Graphics美化这写界面,下面是更新方法:
分析表视图样式
我们的最终结果是要在表头,cell和表尾三个部分绘制:
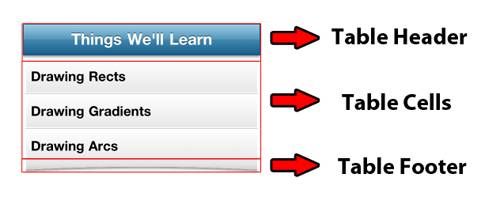
本文,我们只绘制单元格,所以我们仔细看看它们是什么样子的:

注意下面这几点:
1.单元格是从白色到浅灰色的渐变效果
2.每个单元格都有一个围绕边缘的白色边框,以提供定义(除了最后一个单元格,它只是在两侧)
3.单元格之间都有一条灰色的分隔线(除了最后一个)
4.纸张从单元格的实际边缘缩进一点,以与表头中的“掉落的纸张”对齐
分析完如何绘制cells的效果之后,你只需要知道如何使用Core Graphics绘制一些线条和渐变.这是Core Graphics教程的重点.
你好,Core Graphics
每当你想在iOS上做自定义绘图的时候,你的绘图代码应该放在一个UIView中。在drawRect方法中输入你所有的绘图代码.
一开始,您将创建一个“Hello,World”视图,将整个视图绘制为红色,然后将其设置为cell的backGround,以确保其工作。
新建一个CustomCellBackground类,继承自UIView类,在CustomCellBackground.m的drawRect方法输入以下代码:
-(void) drawRect: (CGRect) rect
{
    CGContextRef context = UIGraphicsGetCurrentContext();

    UIColor * redColor = [UIColor colorWithRed:1.0 green:0.0 blue:0.0 alpha:1.0];

    CGContextSetFillColorWithColor(context, redColor.CGColor);
    CGContextFillRect(context, self.bounds);
}
这里有用到一些新的方法,
在第一行中,调用UIGraphicsGetCurrentContext()方法来获取图形上下文,后面的方法会用到.
我喜欢把上下文看成是画画的“画布”。在这种情况下,“画布”是视图,但你也可以获得其他类型的上下文,例如屏幕外缓冲区,以后可以转换为图像。
还有一件有趣的事情就是图形上下文是有状态的.这意味着当你调用方法设置填充色的时候,填充色会一直保留,除非你调用方法更改填充色.
代码中第三行调用CGContextSetFillColorWithColor方法将填充色设置为红色,在以后填充形状的时候你都会使用这个功能.
你可能注意到,当你调用该方法是,你不能直接提供UIColor对象,而是要提供CGColorRef对象.UIColor可以通过调用CGColor属性直接获取CGColorRef对象
最后一个方法将绘制一个和自身视图大小一样的长方形.(填充色是之前设置的颜色)
现在我们将其设置为table view cell的背景颜色,第一步导入头文件:
#import "CustomCellBackground.h"
修改tableView:cellForRowAtIndexPath源码:
- (UITableViewCell *)tableView:(UITableView *)tableView cellForRowAtIndexPath:(NSIndexPath *)indexPath
{
    static NSString * CellIdentifier = @"Cell";
    UITableViewCell * cell = [tableView dequeueReusableCellWithIdentifier:CellIdentifier];
    NSString * entry;

    // START NEW
    if (![cell.backgroundView isKindOfClass:[CustomCellBackground class]]) {
        cell.backgroundView = [[CustomCellBackground alloc] init];
    }

    if (![cell.selectedBackgroundView isKindOfClass:[CustomCellBackground class]]) {
        cell.selectedBackgroundView = [[CustomCellBackground alloc] init];
    }
    // END NEW

    if (indexPath.section == 0) {
        entry = self.thingsToLearn[indexPath.row];
    } else {
        entry = self.thingsLearned[indexPath.row];
    }
    cell.textLabel.text = entry;

    cell.textLabel.backgroundColor = [UIColor clearColor]; // NEW

    return cell;
}
运行工程,你会返现cell的背景颜色改变了:

到目前为止,我们已经学会了如何获取上下文来绘制,如何更改填充色,以及如何使用填充色来绘制矩形.
但是你会进一步了解一个更有用的技术,制作一个优秀的UI:渐变效果!
绘制渐变效果
在这个项目中你会有许多地方会绘制渐变效果,所以将你的绘制代码封装在一个公共方法中,避免重复编写这些代码.
在项目中创建一个Common类,继承NSObject
删除Common.h中的所有代码,输入下面这些代码:
#import
#import  //不引用下面代码会报错

void drawLinearGradient(CGContextRef context, CGRect rect, CGColorRef startColor, CGColorRef endColor);
我们不是要创建一个类,而是要去写一个全局函数.
接着我们也把Common.m的代码全部清理掉吧,加入下面这些代码:
#import "Common.h"

void drawLinearGradient(CGContextRef context, CGRect rect, CGColorRef startColor, CGColorRef endColor)
{
    CGColorSpaceRef colorSpace = CGColorSpaceCreateDeviceRGB();
    CGFloat locations[] = { 0.0, 1.0 };

    NSArray *colors = @[(__bridge id) startColor, (__bridge id) endColor];

    CGGradientRef gradient = CGGradientCreateWithColors(colorSpace, (__bridge CFArrayRef) colors, locations);

    // More coming...
}
在这个函数里有很多要点.
调用CGColorSpaceCreateDeviceRGB函数来获取colorSpace
初始化一个数组来跟踪渐变颜色范围内每种颜色的位置.0表示渐变的开始,1表示渐变的结束.这里有两种颜色,我们想让第一个在开始,第二个在结束,所以传值0和1.
需要注意的是你可以在渐变中使用三种或者更多中颜色,并且你可以设置每种颜色在渐变中开始的位置.这在其他效果中可能会用到.
然后创建一个数组,保存函数传入的两中color,这里利用桥接转换将Core Foundation转换为Cocoa对象.
了解有关桥接转换和内存管理的更多信息,请查Automatic Reference Counting。
就这样我们用CGGradientCreateWithColors创建gradient对象,传入之前创建的colorSpace,colors和locations.需要注意的是需要将NSarray转换为CFArrayRef.
你现在有一个gradient引用,但它实际上还没有绘制任何东西 - 它只是一个指针。现在我们将绘制内容的代码写入drawLinearGradient函数中:
//计算渐变绘制开始和结束的位置.我们只需要将它设置为一条从矩形"顶部中间"到"底部中的"线就好了.
CGPoint startPoint = CGPointMake(CGRectGetMidX(rect), CGRectGetMinY(rect));
CGPoint endPoint = CGPointMake(CGRectGetMidX(rect), CGRectGetMaxY(rect));

CGContextSaveGState(context);
CGContextAddRect(context, rect);
CGContextClip(context);
CGContextDrawLinearGradient(context, gradient, startPoint, endPoint, 0);
CGContextRestoreGState(context);

CGGradientRelease(gradient);
CGColorSpaceRelease(colorSpace);
1.第一件事就是计算渐变绘制开始和结束的位置.我们只需要将它设置为一条从矩形"顶部中间"到"底部中的"线就好了.
2.剪切是Core Graphics一个非常棒的特性,你可以将绘图限制在任意的形状中.我们只需要给当前上下文添加一个区域就好了,调用CGContextClip函数,那么以后所有的绘图都会限制在这个区域中了.
3.将矩形添加到上下文,设置为剪切区域,然后调用CGContextDrawLinearGradient函数,传入之前设置的所有变量.
4.CGContextSaveCGState和CGContextRestoreCGState函数是用来保存当前状态的,之前有说过Core Graphics是有状态特性的,一旦你设定了某种状态,它就会一直保存知道你再次改变.
5.最后一件事就是释放内存,调用CGGradientRelease函数
接下来我们在CustomCellBackground.m文件中引用头文件
#import "Common.h"
将drawRect:方法中的代码替换成下面的:
-(void) drawRect: (CGRect) rect
{
    CGContextRef context = UIGraphicsGetCurrentContext();

    UIColor * whiteColor = [UIColor colorWithRed:1.0 green:1.0 blue:1.0 alpha:1.0];
    UIColor * lightGrayColor = [UIColor colorWithRed:230.0/255.0 green:230.0/255.0 blue:230.0/255.0 alpha:1.0];

    CGRect paperRect = self.bounds;

    drawLinearGradient(context, paperRect, whiteColor.CGColor, lightGrayColor.CGColor);
}
运行工程,如图:
是不是出现了神奇的渐变效果..
画路径
目前为止它看起来不错,现在我们再给他增加一些元素,让它看起来比较时尚.我们在它边缘绘制一个白色的矩形,并在单元格之间绘制一个灰色的分割符.
我们已经学会了填充矩形,但是我告诉你,绘制矩形线一样很容易,代码如下:
-(void) drawRect: (CGRect) rect
{
    CGContextRef context = UIGraphicsGetCurrentContext();

    UIColor * whiteColor = [UIColor colorWithRed:1.0 green:1.0 blue:1.0 alpha:1.0];
    UIColor * lightGrayColor = [UIColor colorWithRed:230.0/255.0 green:230.0/255.0 blue:230.0/255.0 alpha:1.0];
    UIColor * redColor = [UIColor colorWithRed:1.0 green:0.0 blue:0.0 alpha:1.0]; // NEW

    CGRect paperRect = self.bounds;

    drawLinearGradient(context, paperRect, whiteColor.CGColor, lightGrayColor.CGColor);

    // START NEW
    CGRect strokeRect = CGRectInset(paperRect, 5.0, 5.0);
    CGContextSetStrokeColorWithColor(context, redColor.CGColor);
    CGContextSetLineWidth(context, 1.0);
    CGContextStrokeRect(context, strokeRect);
    // END NEW
CGRectInset函数作用是从矩形的X和Y边减去一个给定的数量,并返回之后的结果.
运行工程,效果如图:

现在我们设置正确的颜色和位置。在CustomCellBackground.m中修改drawRect,如下所示:
-(void) drawRect: (CGRect) rect
{
    CGContextRef context = UIGraphicsGetCurrentContext();

    UIColor * whiteColor = [UIColor colorWithRed:1.0 green:1.0 blue:1.0 alpha:1.0];
    UIColor * lightGrayColor = [UIColor colorWithRed:230.0/255.0 green:230.0/255.0 blue:230.0/255.0 alpha:1.0];
//    UIColor * redColor = [UIColor colorWithRed:1.0 green:0.0 blue:0.0 alpha:1.0]; // NEW

    CGRect paperRect = self.bounds;

    drawLinearGradient(context, paperRect, whiteColor.CGColor, lightGrayColor.CGColor);

    // START NEW
    CGRect strokeRect = CGRectInset(paperRect, 1.0, 1.0);
    CGContextSetStrokeColorWithColor(context, whiteColor.CGColor);
    CGContextSetLineWidth(context, 1.0);
    CGContextStrokeRect(context, strokeRect);
    // END NEW

    CGContextSetLineWidth(context, 1.0);
    CGContextStrokeRect(context, strokeRect);

}
运行之后,效果图:
画线条
在Common.h文件中声明下面这个全局方法:
void draw1PxStroke(CGContextRef context, CGPoint startPoint, CGPoint endPoint, CGColorRef color);
Common.m中的实现:
void draw1PxStroke(CGContextRef context, CGPoint startPoint, CGPoint endPoint, CGColorRef color)
{
    //保存状态
    CGContextSaveGState(context);
    //设置线帽
    CGContextSetLineCap(context, kCGLineCapSquare);
    //设置绘制的色织
    CGContextSetStrokeColorWithColor(context, color);
    //设置线的宽度
    CGContextSetLineWidth(context, 1.0);
    //开始绘制的点
    CGContextMoveToPoint(context, startPoint.x + 0.5, startPoint.y + 0.5);
    //向B点添加一条线
    CGContextAddLineToPoint(context, endPoint.x + 0.5, endPoint.y + 0.5);
    //在上下文绘制路线
    CGContextStrokePath(context);
    //恢复上下文
    CGContextRestoreGState(context);
}
在函数的开始和结束处,我们 save/restore 上下文,以便不会留下任何所做的更改。
通过对CustomCellBackground.m中的drawRect进行以下更改来实现它来绘制分隔线:
-(void) drawRect: (CGRect) rect
{

    ...
    UIColor * lightGrayColor = [UIColor colorWithRed:230.0/255.0 green:230.0/255.0 blue:230.0/255.0 alpha:1.0]; // Previous Code
    UIColor * separatorColor = [UIColor colorWithRed:208.0/255.0 green:208.0/255.0 blue:208.0/255.0 alpha:1.0];
    ...

    CGPoint startPoint = CGPointMake(paperRect.origin.x, paperRect.origin.y + paperRect.size.height - 1);
    CGPoint endPoint = CGPointMake(paperRect.origin.x + paperRect.size.width - 1, paperRect.origin.y + paperRect.size.height - 1);
    draw1PxStroke(context, startPoint, endPoint, separatorColor.CGColor);
}
运行工程,效果如下:

相关链接
原文:Core Graphics Tutorial: Lines, Rectangles, and Gradients
原文代码:CoolTable
本文代码:CoreGraphics_CoolTable