Spring实战教程 | 第十三篇:Spring高级功能
##1、Spring Aware
Spring Aware目的是为了让Bean获得Spring容器的服务,因为ApplicationContext接口集成了MessageSOurce接口、ApplicationEventPublisher接口和ResourceLoader接口,所以Bean继承ApplicationContextAware就可以获得spring容器的所有服务

###AwareService
实现BeanNameAware, ResourceLoaderAware接口,这样就获得Bean名称和资源加载的服务
@Service
public class AwareService implements BeanNameAware, ResourceLoaderAware {

	private String beanName;
	private ResourceLoader loader;

	@Override
	public void setResourceLoader(ResourceLoader resourceLoader) {
		this.loader = resourceLoader;

	}

	@Override
	public void setBeanName(String name) {
		this.beanName = name;
	}

	public void outputResult() {
		System.out.println("Bean的名称为" + beanName);
		Resource resource = loader.getResource("classpath:spring/aware/test.txt");
		try {
			System.out.println("ResourceLoader加载的文件内容为:" +
			resource.getInputStream().toString());
		} catch (IOException e) {
			// TODO Auto-generated catch block
			e.printStackTrace();
		}
	}
}
###配置类
@Configuration
@ComponentScan("spring.aware")
public class AwareConfig {

}
###运行类
public class Main {

	public static void main(String[] args) {
		AnnotationConfigApplicationContext context = new AnnotationConfigApplicationContext(AwareConfig.class);
		AwareService awareService = context.getBean(AwareService.class);
		awareService.outputResult();
		context.close();
	}
}
##2、多线程
Spring通过任务执行器(TaskExecutor)来实现多线程和并发编程,使用ThreadPoolTaskExecutor 来实现基于线程池的TaskExecutor。我们需要在配置类通过@EnableAsync开启对异步任务的支持,通过在实际执行的Bean的方法使用@Async注解来声明一个异步任务
###配置类
@Configuration
@ComponentScan("spring.executor")
@EnableAsync   //开启异步
public class TaskExectorConfig implements AsyncConfigurer{

	@Override
	public Executor getAsyncExecutor() {
		ThreadPoolTaskExecutor taskExecutor=new ThreadPoolTaskExecutor();
		taskExecutor.setCorePoolSize(5);//线程池维护线程的最少数量
		taskExecutor.setMaxPoolSize(10);//线程池维护线程的最大数量
		taskExecutor.setQueueCapacity(25);//线程池所使用的缓冲队列
		taskExecutor.initialize();
		return taskExecutor;//返回基于线程池TaskExecutor
	}

	@Override
	public AsyncUncaughtExceptionHandler getAsyncUncaughtExceptionHandler() {
		// TODO Auto-generated method stub
		return null;
	}

}
###任务执行类
@Service
public class AsyncTaskService {
	@Async   //声明一个异步任务
	public void executeAsyncTask(Integer i){
		System.out.println("执行异步任务:"+i);
	}
	@Async
	public void executeAsyncTaskPlus(Integer i){
		System.out.println("执行异步任务+1:"+(i+1));
	}
}
###运行
public class Main {
	public static void main(String[] args) {
		AnnotationConfigApplicationContext context=
				new AnnotationConfigApplicationContext(TaskExectorConfig.class);
		AsyncTaskService asyncTaskService=context.getBean(AsyncTaskService.class);
		for(int i=0;i<10;i++){
			asyncTaskService.executeAsyncTask(i);
			asyncTaskService.executeAsyncTaskPlus(i);
		}
		context.close();
	}
}
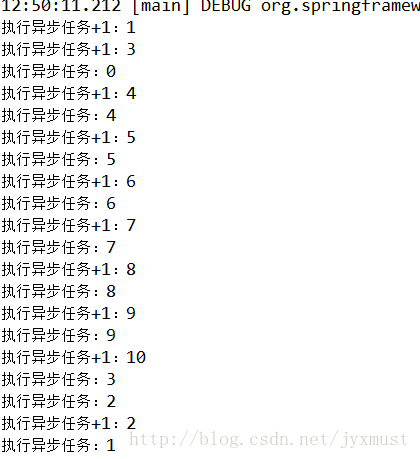
并发执行的运行结果

##3、计划任务
Spring通过@Scheduled支持多种类型的计划任务,包括cron、fixDelay、fixRate等
###计划任务执行类
@Service
public class ScheduledTaskService {

	private static final SimpleDateFormat dateFormat=
			new SimpleDateFormat("HH:mm:ss");

	@Scheduled(fixedRate=2000)  //fixedRate属性每隔固定时间执行
	public void reportCurrentTime(){
		System.out.println("每隔2秒执行一次"+dateFormat.format(new Date()));
	}

	@Scheduled(cron="0 28 11 ? * *")  //cron属性可按照指定时间执行,这里指每天11点28分执行,cron是Linux系统的定时任务
	public void fixTimeExecution(){
		System.out.println("在指定时间 "+dateFormat.format(new Date())+"执行");
	}
}
###配置类
@Configuration
@ComponentScan("spring.schedule")
@EnableScheduling  //开启对计划任务的支持
public class TaskSchedulerConfig {

}
运行
public class Main {
	public static void main(String[] args) {
		AnnotationConfigApplicationContext context=
				new AnnotationConfigApplicationContext(TaskSchedulerConfig.class);

	}
}
##4、条件注解@Conditional
@Conditional根据满足某一个特定条件创建一个特定的Bean,比如只有某个Bean被创建后才会创建另一个Bean,总而言之,就是根据特定条件来控制Bean的创建行为。下面以不同的操作系统作为条件,通过实现Condition接口,并重写器matches方法来构建判断条件
###判断条件定义
(1)判断windows
public class WindowCondition implements Condition{

	@Override
	public boolean matches(ConditionContext context,
			AnnotatedTypeMetadata metadata) {
		// TODO Auto-generated method stub
		return context.getEnvironment().getProperty("os.name").contains("Windows");
	}

}
(2)判断Linux
public class LinuxCondition implements Condition{

	@Override
	public boolean matches(ConditionContext context, AnnotatedTypeMetadata arg1) {
		// TODO Auto-generated method stub
		return context.getEnvironment().getProperty("os.name").contains("Linux");
	}

}
###不同系统下的Bean的类
(1)接口
public interface ListService {
	public String showListCmd();
}
(2)windows下所要创建的Bean类
public class WindowListService implements ListService{
	@Override
	public String showListCmd() {
		// TODO Auto-generated method stub
		return "dir";
	}
}
(3)linux下所要创建的Bean类
public class LinuxListService implements ListService{
	@Override
	public String showListCmd() {
		// TODO Auto-generated method stub
		return "ls";
	}
}
###配置类
@Configuration
public class ConditionConfig {

	@Bean
	@Conditional(WindowCondition.class)   //符合Windows条件实例化windowsListService
	public ListService windowsListService(){
		return new WindowListService();
	}

	@Bean
	@Conditional(LinuxCondition.class)    //符合Linux条件实例化linuxListService
	public ListService linuxListService(){
		return new LinuxListService();
	}
}
###运行
public class Main {

	public static void main(String[] args) {
		AnnotationConfigApplicationContext context=
				new AnnotationConfigApplicationContext(ConditionConfig.class);
		ListService listService = context.getBean(ListService.class);
		System.out.println(context.getEnvironment().getProperty("os.name")
				+"系统下的列表命令为"+listService.showListCmd());
	}

}
##组合注解与元注解
元注解是可以注解到别的注解上的注解,被注解的注解称为组合注解,下面将两个元注解组合一个组合注解,也就只需一个注解就可以表示两个注解
###组合注解
@Target(ElementType.TYPE)
@Retention(RetentionPolicy.RUNTIME)
@Documented
@Configuration   //组合@Configuration元注解
@ComponentScan   //组合@ComponentScan元注解
public @interface WiselyConfiguration {
	String value();//覆盖value参数
}
###演示服务bean
@Service
public class DemoService {
	public void outputService(){
		System.out.println("从组合注解配置照样获得bean");
	}

}
###新配置类
@WiselyConfiguration("spring.annotation")//使用@WiselyConfiguration组合注解代替@Configuration  @ComponentScan
public class DemoConfig {

}
###运行
public class Main {
	public static void main(String[] args) {
		AnnotationConfigApplicationContext context=
				new AnnotationConfigApplicationContext(DemoConfig.class);

		DemoService demoService=context.getBean(DemoService.class);
		demoService.outputService();
		context.close();
	}

}
##6、@Enable注解的工作原理
观察下这些@Enable注解的源码,可以发现所有的注解都有一个@Import注解。
@Import注解是用来导入配置类的,这也就是说这些自动开启的实现其实是导入了一些自动配置的Bean。
这些导入配置方式主要分为以下三种类型。
###第一类:直接导入配置类
@Target({ElementType.TYPE})
@Retention(RetentionPolicy.RUNTIME)
@Import({SchedulingConfiguration.class})
@Documented
public @interface EnableScheduling {
}
直接导入配置类SchedulingConfiguration,这个类注解了@Configuration,且注册了一个scheduledAnnotationProcessor的Bean,源码如下:
@Configuration
@Role(BeanDefinition.ROLE_INFRASTRUCTURE)
public class SchedulingConfiguration {

    @Bean(name = TaskManagementConfigUtils.SCHEDULED_ANNOTATION_PROCESSOR_BEAN_NAME)
    @Role(BeanDefinition.ROLE_INFRASTRUCTURE)
    public ScheduledAnnotationBeanPostProcessor scheduledAnnotationProcessor() {
        return new ScheduledAnnotationBeanPostProcessor();
    }

}
###第二类:依据条件选择配置类
@Target(ElementType.TYPE)
@Retention(RetentionPolicy.RUNTIME)
@Documented
@Import(AsyncConfigurationSelector.class)
public @interface EnableAsync {
    Class annotation() default Annotation.class;
    boolean proxyTargetClass() default false;
    AdviceMode mode() default AdviceMode.PROXY;
    int order() default Ordered.LOWEST_PRECEDENCE;

}
AsyncConfigurationSelector通过条件来选择需要导入的配置类,
AsyncConfigurationSelector的根接口为ImportSelector,这个接口需要重写selectImports方法,在此方法内进行事先条件判断。
在下面的源码中,若adviceMode为PORXY,则返回ProxyAsyncConfiguration这个配置类。
若activeMode为ASPECTJ,则返回AspectJAsyncConfiguration配置类。
源码如下:
public class AsyncConfigurationSelector extends AdviceModeImportSelector {

    private static final String ASYNC_EXECUTION_ASPECT_CONFIGURATION_CLASS_NAME =
            "org.springframework.scheduling.aspectj.AspectJAsyncConfiguration";

    @Override
    public String[] selectImports(AdviceMode adviceMode) {
        switch (adviceMode) {
            case PROXY:
                return new String[] { ProxyAsyncConfiguration.class.getName() };
            case ASPECTJ:
                return new String[] { ASYNC_EXECUTION_ASPECT_CONFIGURATION_CLASS_NAME };
            default:
                return null;
        }
    }

}
###第三类:动态注册Bean
@Target(ElementType.TYPE)
@Retention(RetentionPolicy.RUNTIME)
@Documented
@Import(AspectJAutoProxyRegistrar.class)
public @interface EnableAspectJAutoProxy {
    boolean proxyTargetClass() default false;
}
AspectJAutoProxyRegistrar 事先了ImportBeanDefinitionRegistrar接口,ImportBeanDefinitionRegistrar的作用是在运行时自动添加Bean到已有的配置类,通过重写方法:
@Override
    public void registerBeanDefinitions(
            AnnotationMetadata importingClassMetadata, BeanDefinitionRegistry registry)
其中,AnnotationMetadata参数用来获得当前配置类上的注解;
BeanDefinittionRegistry参数用来注册Bean。
源码如下:
class AspectJAutoProxyRegistrar implements ImportBeanDefinitionRegistrar {


    @Override
    public void registerBeanDefinitions(
            AnnotationMetadata importingClassMetadata, BeanDefinitionRegistry registry) {

        AopConfigUtils.registerAspectJAnnotationAutoProxyCreatorIfNecessary(registry);

        AnnotationAttributes enableAJAutoProxy =
                AnnotationConfigUtils.attributesFor(importingClassMetadata, EnableAspectJAutoProxy.class);
        if (enableAJAutoProxy.getBoolean("proxyTargetClass")) {
            AopConfigUtils.forceAutoProxyCreatorToUseClassProxying(registry);
        }
    }

}