配置Apache 和 配置Nginx 的默认站点
配置 Apache 的虚拟主机
配置Apache的虚拟主机是根据 /usr/local/apache2/conf/extra/httpd-vhosts.conf 文件配置的。
# cat /usr/local/apache2/conf/extra/httpd-vhosts.conf
编辑:
# vim /usr/local/apache2/conf/httpd.conf
在末尾加入:
NameVirtualHost *:80
DocumentRoot "/tmp/123"
ServerName 123.com
并找到 Deny from all (否认所有)将其修改为Allow from all (允许所有) :
AllowOverride None
Order deny,allow
Deny from all
修改为:
Options FollowSymLinks
AllowOverride None
Order deny,allow
Allow from all
保存配置。
检测配置文件是否正确:
# /usr/local/apache2/bin/apachectl -t
如果是 Syntax OK 表示正确。
重启Apache :
# /usr/local/apache2/bin/apachectl restart
创建目录:
# mkdir /tmp/123
并写入:
# vim /tmp/123/index.html
123
Rongqiang!
保存。
测试:
# curl localhost 或 127.0.0.1 都可以
123
Rongqiang!
如果显示,表示成功。 如果错误,就要查看配置文件了。
如果你在 123 下建立了1.txt , 没有创建 index.html 你使用 curl localhost 时会报 403 那是因为默认访问的是 index.html ,你就要指定目录 curl localhost/1.txt
# curl -x127.0.0.1:80 www.baidu.com
123
Rongqiang!
-x 作用就是把 www.baidu.com 解析到 127.0.0.1 ,这里的 www.baidu.com 可以随便写 可以写成 www.11111.com 、www.fsajl.com 等,无论什么域名都会访问到你在/usr/local/apache2/conf/httpd.conf 下 配置的Virtualhosts 。
在增加一个 Virtualhosts 虚拟主机:
DocumentRoot "/tmp/234"
ServerName 234.com
创建目录:
# mkdir /tmp/234
并写入:
# vim /tmp/234/index.html
234
Hello word!
# vim /tmp/234/1.txt
234
1.txt
Hello word!
保存后,重启 Apache :
# /usr/local/apache2/bin/apachectl restart
测试:
# curl -x127.0.0.1:80 234.com
234
Hello word!
# curl -x127.0.0.1:80 234.com/1.txt
234
1.txt
Hello,word!234
只有 234.com 才能访问到 234 , 只要输入其他的域名就会访问到第一个虚拟主机上去,说明配置的第一个虚拟主机就是默认站点,默认网站就是第一个虚拟主机。
配置 Nginx 的虚拟主机
# vim /usr/local/nginx/conf/nginx.conf
这你的虚拟主机:
server
{
listen 80;
server_name localhost;
index index.html index.htm index.php;
root /usr/local/nginx/html;
location ~ \.php$ {
include fastcgi_params;
fastcgi_pass unix:/tmp/php-fcgi.sock;
fastcgi_index index.php;
fastcgi_param SCRIPT_FILENAME /usr/local/nginx/html$fastcgi_script_name;
}
}
在下面再添加一个,需要修改的地方为 server_name 和 fastcgi_param SCRIPT_FILENAME :
server
{
listen 80 default;
server_name www.1212.com;
index index.html index.htm index.php;
root /tmp/234;
location ~ \.php$ {
include fastcgi_params;
fastcgi_pass unix:/tmp/php-fcgi.sock;
fastcgi_index index.php;
fastcgi_param SCRIPT_FILENAME /tmp/234$fastcgi_script_name;
}
}
其中 listen 80 default; 语句中的 default 表示为默认站点 ,Nginx 比Apache 的好处就是 ,默认站点可以自己设置。
测试:
# curl 127.0.0.1
234
Hello word!
这时就会访问到你设置的目录 /tmp/234/ 目录下的 index.html 文件。
# curl -x127.0.0.1:80 www.1212.com
234
Hello word!
下面这个就会访问到 /usr/local/nginx/html/ 目录下的 index。html 文件。
# curl -x127.0.0.1:80 localhost
Hello word!
Nginx 有一个优点就是可以把一个文件里的内容分开存放:
# vim /usr/local/nginx/conf/nginx.conf
在 server 上加入一行 :
include vhosts/*;
server
{
******
}
保存该文件。
# cd /usr/local/nginx/conf/
这个目录下就是用来我们放虚拟主机的文件。
# mkdir vhosts
编辑 vhosts 目录下的文件:
# cd vhosts
# vim localhost.conf
server
{
listen 80;
server_name localhost;
index index.html index.htm index.php;
root /usr/local/nginx/html;
location ~ \.php$ {
include fastcgi_params;
fastcgi_pass unix:/tmp/php-fcgi.sock;
fastcgi_index index.php;
fastcgi_param SCRIPT_FILENAME /usr/local/nginx/html$fastcgi_script_name;
}
}
保存后,在编辑 1212.conf :
# vim 1212.conf
server
{
listen 80 default;
server_name www.1212.com;
index index.html index.htm index.php;
root /tmp/234;
location ~ \.php$ {
include fastcgi_params;
fastcgi_pass unix:/tmp/php-fcgi.sock;
fastcgi_index index.php;
fastcgi_param SCRIPT_FILENAME /tmp/234$fastcgi_script_name;
}
}
保存,检测配置文件是否正确:
# /usr/local/nginx/sbin/nginx -t
nginx: the configuration file /usr/local/nginx/conf/nginx.conf syntax is ok
nginx: configuration file /usr/local/nginx/conf/nginx.conf test is successful
如果显示上面两行东西,表示配置正确重启:
# /etc/init.d/nginx restart
测试就会显示你设置的默认站点:
# curl 127.0.0.1
234
Hello word!
# curl -x127.0.0.1:80 www.1212.com
234
Hello word!
# curl -x127.0.0.1:80 localhost
Hello word!
有时你把文件分开成多分,怎么知道那个是默认虚拟主机呢,看 listen 80 default; 谁 listen 80 有 default 就去解析谁。
搭建 Discuz 站点
进入默认打开你虚拟主机的那个目录下,我是按照我刚才设置的 listen 80 default; 默认站点的那个目录:
# cd /tmp/234
# wget http://download.comsenz.com/DiscuzX/3.1/Discuz_X3.1_SC_GBK.zip
解压:
# unzip Discuz_X3.1_SC_GBK.zip
如果你没安装 unzip 命令# yum install -y unzip 安装。
你 ls 命令会看到三个目录 readme 、 upload 、 utility ,程序在 upload 下。
把 upload 目录下的所有东西 ,移到当前目录下 :
# mv upload/* ./
然后在你浏览器里输入:IP/install 如果不行的话就输入:IP/install/index.html
会显示 Discuz 的安装向导:
点击“ 我同意 ”会有 好多目录不可写,那是没有权限, 这里的要写就是 php 进程里 php-
fpm 他需要写,执行下面命令在刷新下,就可以了。
# chown -R php-fpm config/ data/ uc_client/ uc_server/
点击 下一步 会显示,这里我们默认就可以了:
仅安装 Discuz! X (手工指定已经安装的 UCenter Server)
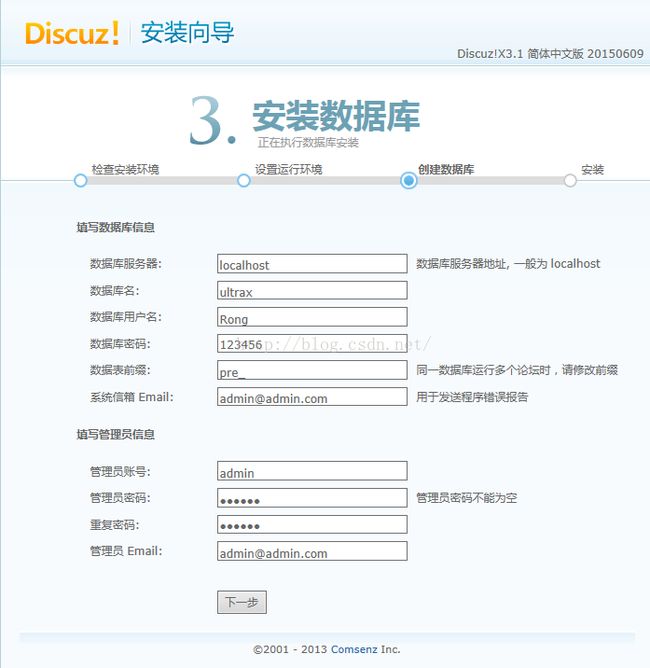
然后点击下一步它就安装了。

这代表就成功了 ,然后打来浏览器输入: IP/index.php