一 沙盒
NSString *path = NSHomeDirectory();
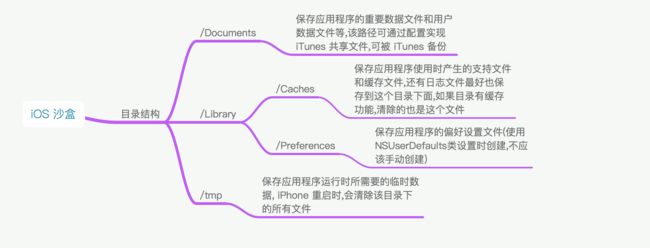
上面的代码是应用程序目录的路径,在该目录下有三个文件夹: Documents, library, temp 以及一个.app 包,该目录下就是应用程序的沙盒,
应用程序只能访问该目录下的文件夹
1./Documents: 保存应用程序的重要数据文件和用户数据文件等, 该路径可通过配置实现 iTunes 共享文件,可被 iTunes 备份
2.Liberary 目录下有两个子目录:
/Preferences 目录: 包含了应用程序的偏好设置文件,不应该直接创建偏好设置文件,应该使用 NSUserDefaults 类来取得和设置应用程序的偏好
/Caches 目录: 保存应用程序使用时产生的支持文件和缓存文件,还有日志文件最好也在这个目录下面,iTunes 同步不会备份该目录,应用程序如果有清除缓存功能清除的也是这个文件夹的内容
3./tmp 保存应用运行时所需要的临时数据, iPhone 重启时,会清除该目录下的所有文件
获取沙盒各个文件夹路径
1.沙盒根目录
NSLog(@"%@", NSHomeDirectory());
2.MyApp.app
应用程序包: 存放的是应用程序的源文件: 资源文件和可执行文件
NSLog(@“%@“, [[NSBundle mainBundle] bundlePath]);
3./Documents
// 参数1: 要查找的目录

// 参数2: 是否是用户主目录

// 参数3: YES/NO 是否获取全路径

 NSArray *paths = NSSearchPathForDirectoriesInDomains(NSDocumentDirectory, NSUserDomainMask, YES);

 NSString *documentpath = paths.lastObject;

 NSLog(@"documentpath---%@", documentpath);
4./Library
  NSArray *paths2 = NSSearchPathForDirectoriesInDomains(NSLibraryDirectory, NSUserDomainMask, YES);

   NSString *library = paths2.lastObject;

   NSLog(@"library---%@", library);
5./Library/caches
    NSArray *patchs3 = NSSearchPathForDirectoriesInDomains(NSCachesDirectory, NSUserDomainMask, YES);

    NSString *cachesPath = patchs3.lastObject;

    NSLog(@"cachesPath---%@", cachesPath);
6./Library/Preference
// Preferences,只能用拼接的方式找到

// preferencePanes iphone 没有这个目录

NSArray * paths4 = NSSearchPathForDirectoriesInDomains(NSLibraryDirectory, NSUserDomainMask, YES); NSString * preferencePath = [[paths4 lastObject] stringByAppendingPathComponent:@"Preferences"]; NSLog(@"%@", preferencePath);
7./Tmp
NSArray * paths4 = NSSearchPathForDirectoriesInDomains(NSLibraryDirectory, NSUserDomainMask, YES); NSString * preferencePath = [[paths4 lastObject] stringByAppendingPathComponent:@"Preferences"]; NSLog(@"%@", preferencePath);
二 plist 文件
plist 的全名是: Property List, 属性列表文件, 它是一种存储串行化后的对象的文件。属性列表文件的扩展名为. plist, 因此通常被称为 plist 文件
plist 保存的地方
1.工程的沙盒里 (就是程序 user Document文件夹下,用代码创建,可以读取数据,写入数据)
2.工程自身里 (使用Xcode手动创建一个. plist 文件,数据需要手工写入)
3.工程沙盒里 (保存到 user Document 下,使用NSUserdefault可以快速保存添加读取删除基本数据类型)
plist 文件是通过 XML 文件的方式保存在目录中, 以下类型可以被序列化:
NSString;//字符串

NSMutableString;//可变字符串

NSArray;//数组

NSMutableArray;//可变数组

NSDictionary;//字典

NSMutableDictionary;//可变字典

NSData;//二进制数据

NSMutableData;//可变二进制数据

NSNumber;//基本数据

NSDate;//日期
从手工创建Plist 文件的数据读取
// testPlist 是你用 Xcode 创建的 plist 文件的文件名

NSString *plistPath = [[NSBundle mainBundle]pathForResource:@"PropertyListTest" ofType:@"plist"];

NSMutableDictionary *dataDic = [[NSMutableDictionary alloc]initWithContentsOfFile:plistPath];

NSLog(@"%@",dataDic);//直接打印数据
代码创建 Plist 文件 以及相关操作
- (void)getDataFromPlist{
    //沙盒获取路径
    NSArray *pathArray = NSSearchPathForDirectoriesInDomains(NSDocumentDirectory, NSUserDomainMask, YES);
    NSString *path = [pathArray objectAtIndex:0];
    //获取文件的完整路径
    NSString *filePatch = [path stringByAppendingPathComponent:@"PropertyListTest.plist"];//没有会自动创建
    NSLog(@"file patch%@",filePatch);
    NSMutableDictionary *sandBoxDataDic = [[NSMutableDictionary alloc]initWithContentsOfFile:filePatch];
    if (sandBoxDataDic==nil) {
        sandBoxDataDic = [NSMutableDictionary new];
        sandBoxDataDic[@"test"] = @"test";
        [sandBoxDataDic writeToFile:filePatch atomically:YES];
    }
    NSLog(@"sandBox %@",sandBoxDataDic);//直接打印数据
}
- (void)writeDataToPlist{
    //这里使用位于沙盒的plist(程序会自动新建的那一个)
    NSArray *pathArray = NSSearchPathForDirectoriesInDomains(NSDocumentDirectory, NSUserDomainMask, YES);
    NSString *path = [pathArray objectAtIndex:0];
    //获取文件的完整路径
    NSString *filePatch = [path stringByAppendingPathComponent:@"PropertyListTest.plist"];
    NSMutableDictionary *sandBoxDataDic = [[NSMutableDictionary alloc]initWithContentsOfFile:filePatch];
    NSLog(@"old sandBox is %@",sandBoxDataDic);
    sandBoxDataDic[@"test"] = @"hello world";
    [sandBoxDataDic writeToFile:filePatch atomically:YES];
    sandBoxDataDic = [[NSMutableDictionary alloc]initWithContentsOfFile:filePatch];
    NSLog(@"new sandBox is %@",sandBoxDataDic);
三 preference 偏好设置
使用NSUserdefaults来进行偏好设置,例如设置一些默认背景色,图片,常用信息等
-
NSUserdefaults是一个单例,在整个 app 中都可以使用,同时也是线程安全的,NSUserdefaults存储的本质就是一个 Plist 文件 -
NSUserdefaults存储的位置在沙盒目录下的/ Library/Preferences - plist文件可以存储的数据类型
NSUserdefaults都可以存储 -
NSUserdefaults为了避免每次读取数据时都打开用户默认数据的操作,所以调用set方法后不会立即写入,而是根据时间戳定时把缓存中的数据写入本地磁盘,所有有可能调用了set方法后数据还没来得及写入磁盘应用程序就终止了,可以使用synchornize方法强制写入 - 从
NSUserdefaults返回的值是不可变的,即便你存储的时候使用的是可变的值
获得 NSUserdefaults 的对象
+ (NSUserDefaults *)standardUserDefaults;
存储数据
- (void)setObject:(nullable id)value forKey:(NSString *)defaultName;
- (void)setInteger:(NSInteger)value forKey:(NSString *)defaultName;
- (void)setFloat:(float)value forKey:(NSString *)defaultName;
- (void)setDouble:(double)value forKey:(NSString *)defaultName;
- (void)setBool:(BOOL)value forKey:(NSString *)defaultName;
- (void)setURL:(nullable NSURL *)url forKey:(NSString *)defaultName NS_AVAILABLE(10_6, 4_0);
读取数据
- (nullable id)objectForKey:(NSString *)defaultName;
- (nullable NSString *)stringForKey:(NSString *)defaultName;
- (nullable NSArray *)arrayForKey:(NSString *)defaultName;
- (nullable NSDictionary *)dictionaryForKey:(NSString *)defaultName;
- (nullable NSData *)dataForKey:(NSString *)defaultName;
- (nullable NSArray *)stringArrayForKey:(NSString *)defaultName;
- (NSInteger)integerForKey:(NSString *)defaultName;
- (float)floatForKey:(NSString *)defaultName;
- (double)doubleForKey:(NSString *)defaultName;
- (BOOL)boolForKey:(NSString *)defaultName;
- (nullable NSURL *)URLForKey:(NSString *)defaultName NS_AVAILABLE(10_6, 4_0);
移除数据
- (void)removeObjectForKey:(NSString *)defaultName;
同步数据
- (BOOL)synchronize;
NSKeyedArchiver 归档 解归档
归档(序列化)是把对象转为字节码,以文件的形式存储到磁盘上;程序运行过程中或者再次重新打开程序的时候,可以通过解归档(反序列化)还原这些对象,归档和解归档用于少量数据的持久化存储和读取
归档之后的文件存储在/ Documents 目录下
在 iOS中,只要遵循了NSCoding 协议的对象都可以通过它来实现序列化
NSCoding 协议有2个方法是必须实现的:
- (void)encodeWithCoder:(NSCoder *)aCoder;
- (instancetype)initWithCoder:(NSCoder *)aDecoder
使用示例
.h 文件
#import
@interface Student : NSObject
@property (nonatomic, copy) NSString *name;
@property (nonatomic, copy) NSString *sex;
@property (nonatomic, assign) NSUInteger height;
@end
.m 文件
#import "Student.h"

@implementation Student
// 归档
- (void)encodeWithCoder:(NSCoder *)aCoder
{
    [aCoder encodeObject:self.name forKey:@"name"];
    [aCoder encodeObject:self.sex forKey:@"sex"];
    [aCoder encodeInteger:self.height forKey:@"height"];
}

// 解档
- (instancetype)initWithCoder:(NSCoder *)aDecoder
{
    if (self = [super init]) {
        self.name = [aDecoder decodeObjectForKey:@"name"];
        self.sex = [aDecoder decodeObjectForKey:@"sex"];
        self.height = [aDecoder decodeIntegerForKey:@"height"];
    }
    return self;
}
@end
viewController (或其他地方)里面的使用:
// 归档
- (void)archiver{
    NSArray *paths = NSSearchPathForDirectoriesInDomains(NSDocumentDirectory,NSUserDomainMask , true);
    NSString *documentPath = paths.lastObject;
    NSString *filePath = [documentPath stringByAppendingPathComponent:@"test.data"];
    Student *student = [[Student alloc] init];
    student.name = @"cc";
    student.sex = @"女";
    student.height = 170;
    [NSKeyedArchiver archiveRootObject:student toFile:filePath];
}

// 解档
- (void)unArchiver
{
    NSArray *paths = NSSearchPathForDirectoriesInDomains(NSDocumentDirectory, NSUserDomainMask, true);
    NSString *documentPath = paths.lastObject;
    NSString *filePath = [documentPath stringByAppendingPathComponent:@"test.data"];
    Student *student = [NSKeyedUnarchiver unarchiveObjectWithFile:filePath];
    if (student) {
        NSLog(@"名字:%@ 性别:%@ 身高:%lu", student.name, student.sex, student.height);
    }
}
