ZYNQ 动态更新bit流 ZynqMP PL Programming
项目最后的几个事宜,本以为很简单,结果深坑不浅。公司为某部分设计的XX板,设计128MB QSPI Flash,无SD卡。先需要在内核启动后动态加载bit流,使用脚本完成。参考Xilinx官方的方案,应该比较简单,但实际上差点坑出翔。
本文内容简介,没时间写的太详细!!!
1 配置步骤
1.1 Kernel Configuration
The following config options has to be enabled in order to use FPGA Manager, Please note that these options are enabled by default through xilinx_zynqmp_defconfig except for the fpga debugfs option. If user wants to test readback feature they have enable it.
Zynq UltraScale+ MPSoC FPGA Manager Configuration:
Select: Device Drivers → FPGA Configuration Framework → Xilinx Zynq UltraScale+ MPSoC FPGA
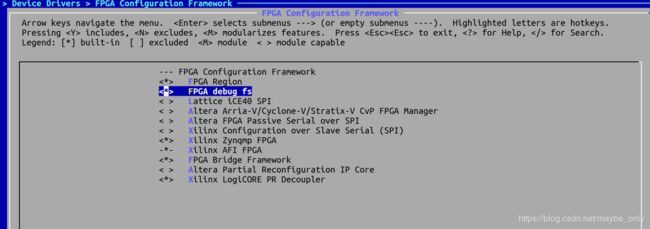
 In-order to test readback feature user needs to enable FPGA debug fs
Select: Device Drivers → FPGA Configuration Framework --> FPGA debug fs
 DT overlay ConfigFS interface Configuration:
In-order to load Bitstream with DTBO user needs to enable below options
Select: Device Drivers --> Device Tree and Open Firmware support
 Contiguous Memory Allocator Configuration:
CONFIG_CMA
Select: Kernel Features --> Contiguous Memory Allocator
此处地址有出入,根据实际情况确定!
 CONFIG_DMA_CMA
Select: Device Drivers --> Generic Driver Options → DMA Contiguous Memory Allocator
 Devicetree
pcap {
       compatible = "xlnx,zynqmp-pcap-fpga";
       clocks = <&clk 41>;
};

fpga_full: fpga-full {
       compatible = "fpga-region";
       fpga-mgr = <&pcap>;
       #address-cells = <2>;
       #size-cells = <2>;
};
2 步骤
2.1 生成bin文件
From 2018.3 release onwards FPGA Manager supports loading of vivado and bootgen generated Bitstream and Bin files vivadobootgen[1]
Note: For releases earlier to 2018.3 FPGA Manager was capable of loading only bootgen generated bin files. bootgen
.Bit Format
Generated by Vivado
.Bin Format
Generated by Vivado
Generated by Bootgen by converting vivado generated bit file
Bootgen Command to generate bin file:
# bootgen -image Bitstream.bif -arch zynqmp -o ./Bitstream.bin -w (2018.1 or later releases)
# bootgen -image Bitstream.bif -arch zynqmp -process_Bitstream bin (2017.4 and earlier releases)
Bitstream.bif file should contains the below lines:
all:
{
        [destination_device = pl] Full.bit (or)  Partial.bit /* Bitstream file name */
}
2.2 Vivado生成bin文件
在vivado TCL 命令行中输入命令:dir
查看当前目录
 目录如上,修改bif文件,添加bit文件绝对路径:
all:
{
	[destination_device = pl] C:\Users\Administrator\Desktop\wt31003_bram_test_success_9.17\wt31003.runs\impl_1\design_1_wrapper.bit	/* Bitstream file name */
}
输入:bootgen -image all.bif -arch zynqmp -o ./Bitstream.bin -w
完成bin文件制作。
2.3 在petalinux中生成bin文件
只写一句话:
petalinux命令默认根目录为petalinux根目录。
然后使用bootgen命令生成bin文件。

3 更新bit流
	因使用的位RAM类型的文件系统,更新bit文件总是出错:
	1.内核死掉
	2. 串口终端死掉
	3.其他错误
3.1 挂接jffs2文件系统,更新bit文件成功
先更接ram类型文件系统,在挂接jffs2文件系统,方法不可行(此处没有行通)。
查看以前的RAM文件系统:
发现文件系统目录有缺少。以后在研究。
而且使用jffs2文件系统,linux内核运行非常卡顿。
建议:
使用SD卡,ext4文件系统
如有疑问,联系QQ:810871522
参考:
https://xilinx-wiki.atlassian.net/wiki/spaces/A/pages/18841847/Solution+ZynqMP+PL+Programming