yolo v3系列之训练自己的数据集(上篇)
所有代码已经上传到github上了,求star:
本篇文章是基于https://github.com/SpikeKing/keras-yolo3-detection,这个人脸检测repo进行训练的
环境是ubuntu 14.04,cuda 8.0,cudnn 6.0.21
requirements:请参考https://github.com/SpikeKing/keras-yolo3-detection/blob/master/requirements-gpu.txt
一.准备阶段:
具体参考:https://www.jianshu.com/p/8214d947e031
先运行convert.py将cfg模型+weights文件转化为yolo.h5文件作为预训练模型
下载好wider数据集之后,对于数据进行处理,运行wider_annotation.py文件,变成yolo v3可以读入的数据格式
二.训练阶段
修改这四个变量的路径,使其找到相应的文件
annotation_path = '/home/xuy/code/keras-yolo3/2007_train.txt'
log_dir = 'logs/'
classes_path = 'model_data/voc_classes.txt'
anchors_path = 'model_data/yolo_anchors.txt'
并且,如果电脑配置低的话,需要调小batch_size以及epoch的次数,否则会在unfreeze阶段产生out of memory的错误
具体参数设置请参考:https://github.com/SpikeKing/keras-yolo3-detection/issues/4
最终的结果:训练到60epoch左右被early stop了,loss值大概在26左右
三.利用模型进行测试:
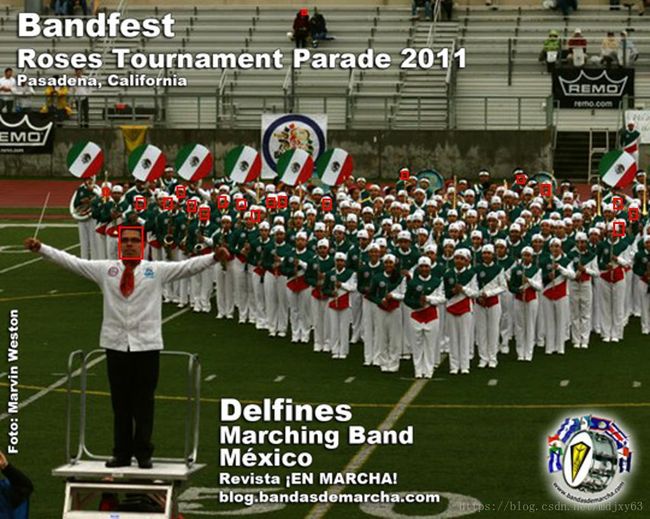
1.图片测试:【对于小物体的效果并不是很好,对于单个人效果很好】
贴一个效果比较差的图
2.对于视频进行检测:
yolo3_predict_pic.py:对于图片进行测试
#!/usr/bin/env python
# -- coding: utf-8 --
"""
Copyright (c) 2018. All rights reserved.
Created by C. L. Wang on 2018/7/4
"""

"""
Run a YOLO_v3 style detection model on test images.
"""

import colorsys
import os
from timeit import default_timer as timer

import numpy as np
from PIL import Image, ImageFont, ImageDraw
from keras import backend as K
from keras.layers import Input
from yolo3.model import yolo_eval, yolo_body
from yolo3.utils import letterbox_image

#用来存储预测结果的txt文件
predict_result = '/home/xuy/code/mAP/predicted/'
#wider数据集的val-set的图片
img_root_path = '/home/xuy/code/keras-yolo3-detection/wider_dataset/WIDER_val/images'
#img_path是单个图片的测试
# img_path = '/home/xuy/code/keras-yolo3-detection/wider_dataset/WIDER_train/images/0--Parade/0_Parade_marchingband_1_5.jpg'  # 先拿单张图片测试一下
#将预测结果的图片输出的路径
result_path = '/home/xuy/code/keras-yolo3-detection/result/'
def iterbrowse(path):
    for home, dirs, files in os.walk(path):
        for filename in files:
            yield os.path.join(home, filename)
class YOLO(object):
    def __init__(self):
        self.anchors_path = 'configs/yolo_anchors.txt'  # Anchors
        # self.model_path = 'model_data/yolo_weights.h5'  # 模型文件
        self.model_path = '/home/xuy/code/keras-yolo3-detection/logs/trained_weights_final_train.h5'  # 模型文件
        # self.classes_path = 'configs/coco_classes.txt'  # 类别文件
        self.classes_path = '/home/xuy/code/keras-yolo3-detection/configs/wider_classes.txt'  # 类别文件

        self.score = 0.1
        # self.iou = 0.45
        self.iou = 0.20
        self.class_names = self._get_class()  # 获取类别
        self.anchors = self._get_anchors()  # 获取anchor
        self.sess = K.get_session()
        self.model_image_size = (416, 416)  # fixed size or (None, None), hw
        self.boxes, self.scores, self.classes = self.generate()

    def _get_class(self):
        classes_path = os.path.expanduser(self.classes_path)
        with open(classes_path) as f:
            class_names = f.readlines()
        class_names = [c.strip() for c in class_names]
        return class_names

    def _get_anchors(self):
        anchors_path = os.path.expanduser(self.anchors_path)
        with open(anchors_path) as f:
            anchors = f.readline()
        anchors = [float(x) for x in anchors.split(',')]
        return np.array(anchors).reshape(-1, 2)

    def generate(self):
        model_path = os.path.expanduser(self.model_path)  # 转换~
        assert model_path.endswith('.h5'), 'Keras model or weights must be a .h5 file.'

        num_anchors = len(self.anchors)  # anchors的数量
        num_classes = len(self.class_names)  # 类别数

        # 加载模型参数
        self.yolo_model = yolo_body(Input(shape=(None, None, 3)), 3, num_classes)
        self.yolo_model.load_weights(model_path)

        print('{} model, {} anchors, and {} classes loaded.'.format(model_path, num_anchors, num_classes))

        # 不同的框,不同的颜色
        hsv_tuples = [(float(x) / len(self.class_names), 1., 1.)
                      for x in range(len(self.class_names))]  # 不同颜色
        self.colors = list(map(lambda x: colorsys.hsv_to_rgb(*x), hsv_tuples))
        self.colors = list(map(lambda x: (int(x[0] * 255), int(x[1] * 255), int(x[2] * 255)), self.colors))  # RGB
        np.random.seed(10101)
        np.random.shuffle(self.colors)
        np.random.seed(None)

        # 根据检测参数,过滤框
        self.input_image_shape = K.placeholder(shape=(2,))
        boxes, scores, classes = yolo_eval(self.yolo_model.output, self.anchors, len(self.class_names),
                                           self.input_image_shape, score_threshold=self.score, iou_threshold=self.iou)
        return boxes, scores, classes

    def detect_image(self, image,img_path):#检测每一张图片的人脸位置
        start = timer()  # 起始时间
        pic_filename=os.path.basename(img_path)
        # txt_filename=pic_filename.replace("jpg","txt")
        portion=os.path.splitext(pic_filename)
        if portion[1]=='.jpg':
            txt_result=predict_result+portion[0]+'.txt'
        print('txt_result的路径是:'+txt_result)
        if self.model_image_size != (None, None):  # 416x416, 416=32*13,必须为32的倍数,最小尺度是除以32
            assert self.model_image_size[0] % 32 == 0, 'Multiples of 32 required'
            assert self.model_image_size[1] % 32 == 0, 'Multiples of 32 required'
            boxed_image = letterbox_image(image, tuple(reversed(self.model_image_size)))  # 填充图像
        else:
            new_image_size = (image.width - (image.width % 32), image.height - (image.height % 32))
            boxed_image = letterbox_image(image, new_image_size)
        image_data = np.array(boxed_image, dtype='float32')
        print('detector size {}'.format(image_data.shape))
        image_data /= 255.  # 转换0~1
        image_data = np.expand_dims(image_data, 0)  # 添加批次维度,将图片增加1维

        # 参数盒子、得分、类别;输入图像0~1,4维;原始图像的尺寸
        out_boxes, out_scores, out_classes = self.sess.run(
            [self.boxes, self.scores, self.classes],
            feed_dict={
                self.yolo_model.input: image_data,
                self.input_image_shape: [image.size[1], image.size[0]],
                K.learning_phase(): 0
            })

        print('Found {} boxes for {}'.format(len(out_boxes), 'img'))  # 检测出的框

        font = ImageFont.truetype(font='font/FiraMono-Medium.otf',
                                  size=np.floor(3e-2 * image.size[1] + 0.5).astype('int32'))  # 字体
        thickness = (image.size[0] + image.size[1]) // 512  # 厚度
        with open(txt_result,'a')as new_f:
            for i, c in reversed(list(enumerate(out_classes))):
                predicted_class = self.class_names[c]  # 类别
                box = out_boxes[i]  # 框
                score = out_scores[i]  # 执行度

                label = '{} {:.2f}'.format(predicted_class, score)  # 标签
                draw = ImageDraw.Draw(image)  # 画图
                label_size = draw.textsize(label, font)  # 标签文字

                top, left, bottom, right = box
                top = max(0, np.floor(top + 0.5).astype('int32'))
                left = max(0, np.floor(left + 0.5).astype('int32'))
                bottom = min(image.size[1], np.floor(bottom + 0.5).astype('int32'))
                right = min(image.size[0], np.floor(right + 0.5).astype('int32'))
                print(label, (left, top), (right, bottom))  # 边框,这个就是【置信值,xmin,ymin,xmax,ymax】,可以做一下mAP值的分析了
                new_f.write(str(label)+" "+ str(left) + " " + str(top) + " " + str(right) + " " + str(bottom) + '\n')
                if top - label_size[1] >= 0:  # 标签文字
                    text_origin = np.array([left, top - label_size[1]])
                else:
                    text_origin = np.array([left, top + 1])

                # My kingdom for a good redistributable image drawing library.
                for i in range(thickness):  # 画框
                    draw.rectangle(
                        [left + i, top + i, right - i, bottom - i],
                        outline=self.colors[c])
                #draw.rectangle(  # 文字背景是红色
                    #[tuple(text_origin), tuple(text_origin + label_size)],
                   # fill=self.colors[c])
                #draw.text(text_origin, label, fill=(0, 0, 0), font=font)  # 文字内容,face+是人脸的概率值
                del draw

        end = timer()
        print(end - start)  # 检测执行时间
        return image

    def close_session(self):
        self.sess.close()


def detect_img_for_test(yolo):

    for img_path in iterbrowse(img_root_path):
        print('img_path的路径是:'+img_path)
        image = Image.open(img_path)
        filename=os.path.basename(img_path)
        print('filename'+filename)
        r_image = yolo.detect_image(image,img_path)
        # r_image.show()  # 先显示,然后再保存
        r_image.save(result_path+filename)


    # for parent,dirnames,filenames in os.walk(img_root_path):    #三个参数:分别返回1.父目录 2.所有文件夹名字(不含路径) 3.所有文件名字
    #     for dirname in dirnames:
    #         for filename in filenames:
    #             img_path=img_root_path+'/'+dirname+'/'+filename
    #             print(img_path)
            #     image = Image.open(img_path)
            #     r_image = yolo.detect_image(image)
            #     # r_image.show()  # 先显示,然后再保存
            #     r_image.save(result_path+filename)


    # image = Image.open(img_path)
    # r_image = yolo.detect_image(image)
    # # r_image.show()#先显示,然后再保存
    # r_image.save('/home/xuy/code/keras-yolo3-detection/' + 'result2.jpg')


    yolo.close_session()


if __name__ == '__main__':
    detect_img_for_test(YOLO())
然后使用yolo3_predict_video.py调用yolo class
# -*- coding:utf-8 -*-
__author__ = 'xuy'

'''
基于视频的人脸检测
usage:
python yolo_video.py [video_path] [output_path(optional)]

'''
import colorsys
import os
import sys
from timeit import default_timer as timer

import numpy as np
from keras import backend as K
from keras.models import load_model
from keras.layers import Input
from PIL import Image, ImageFont, ImageDraw

from yolo3.model import yolo_eval, yolo_body, tiny_yolo_body
from yolo3.utils import letterbox_image
if len(sys.argv) < 2:
    print("Usage: $ python {0} [video_path] [output_path(optional)]", sys.argv[0])
    exit()

from yolo3_predict_pic import YOLO

def detect_video(yolo, video_path, output_path=""):
    import cv2
    vid = cv2.VideoCapture(video_path)
    if not vid.isOpened():
        raise IOError("Couldn't open webcam or video")
    video_FourCC    = int(vid.get(cv2.CAP_PROP_FOURCC))
    video_fps       = vid.get(cv2.CAP_PROP_FPS)
    video_size      = (int(vid.get(cv2.CAP_PROP_FRAME_WIDTH)),
                        int(vid.get(cv2.CAP_PROP_FRAME_HEIGHT)))
    isOutput = True if output_path != "" else False
    if isOutput:
        print("!!! TYPE:", type(output_path), type(video_FourCC), type(video_fps), type(video_size))
        out = cv2.VideoWriter(output_path, video_FourCC, video_fps, video_size)
    accum_time = 0
    curr_fps = 0
    fps = "FPS: ??"
    prev_time = timer()
    while True:
        return_value, frame = vid.read()
        image = Image.fromarray(frame)
        image = yolo.detect_image(image)
        result = np.asarray(image)
        curr_time = timer()
        exec_time = curr_time - prev_time
        prev_time = curr_time
        accum_time = accum_time + exec_time
        curr_fps = curr_fps + 1
        if accum_time > 1:
            accum_time = accum_time - 1
            fps = "FPS: " + str(curr_fps)
            curr_fps = 0
        cv2.putText(result, text=fps, org=(3, 15), fontFace=cv2.FONT_HERSHEY_SIMPLEX,
                    fontScale=0.50, color=(255, 0, 0), thickness=2)
        cv2.namedWindow("result", cv2.WINDOW_NORMAL)
        cv2.imshow("result", result)
        if isOutput:
            out.write(result)
        if cv2.waitKey(1) & 0xFF == ord('q'):
            break
    yolo.close_session()

if __name__ == '__main__':
    video_path = sys.argv[1]
    if len(sys.argv) > 2:
        output_path = sys.argv[2]
        detect_video(YOLO(), video_path, output_path)#在这里调用YOLO函数,从而使用了已经训练好的
    else:
        detect_video(YOLO(), video_path)
