基于k210的水果分拣
基于k210的水果分拣 yolov2tiny模型训练(采用darknet)
- 前言
- darknet
- darknet安装
- 训练数据处理
- cfg文件配置
- weights文件获取
- 训练前准备
- 开始训练
- darknet模型转pb
前言
由于疫情原因,只完成识别部分,主控采用具有kpu加速的k210进行识别,网络传输打算采用esp32。水果分拣是本学期的一次综合实践课程,识别效果一般,勉强可以使用。

哔哩哔哩识别效果
采用堪智官方sdk,帧率大概29左右,在人脸识别demo基础上进行编写
darknet
darknet概述
darknet是基于c语言的小众深度学习框架,是有yolo作者编写,其官网地址darknet官网
darknet安装
在darknet官网有安装的详细方式,安装过程也相对简单,官网教程
这里采用百度aistudio演示,首先是通过git下载源码git clone https://github.com/pjreddie/darknet.git
之后便会在当前文件夹下建立darknet文件夹,cd darknet进入darknet文件夹,
编辑配置可以在makefile文件进行更改,aistudio可以将文件后缀改为txt进行编辑,也可以使用vi进行编辑。
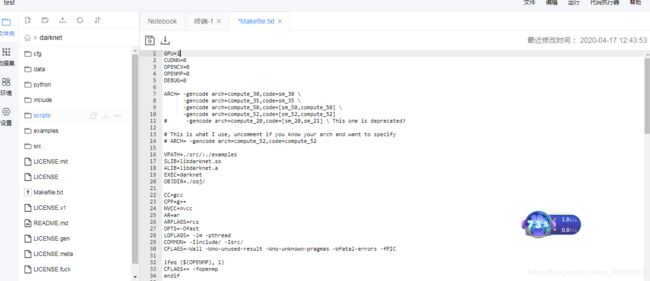
将gpu设置成1,如果使用cpu来训练,速度相当慢。
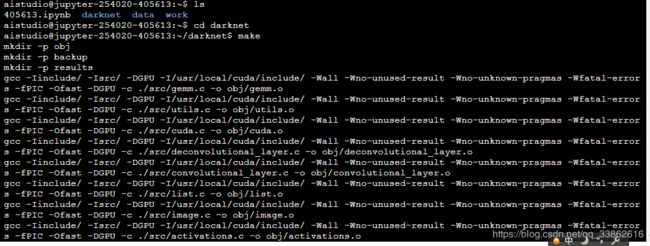
保存设置,使用make命令完成编译,会在当前文件夹下生成darknet文件。

至此darknet安装完成
训练数据处理
数据处理参照网上一篇文章进行处理link,使用LabelImg工具进行标注,工具采用python和qt进行编译,需要安装相应的库,软件的使用方式在github上有详细介绍,这里不做太多介绍labelimg,
首先是获取训练图片,如果使用的是maix板,可以使用micropython对目标图片进行获取这里借鉴link的代码
import sensor, image, time, lcd
from fpioa_manager import *
from Maix import GPIO
import os

def getMax():
   maxnum = 0;
   files = os.listdir('/sd')
   for file in files:
       name = file.split(".")
       if(len(name)>1 and name[1] == "jpg"):
           if(int(name[0])>maxnum):
               maxnum = int(name[0])
   return maxnum

fm.register(board_info.LED_R, fm.fpioa.GPIO0)
led_r=GPIO(GPIO.GPIO0,GPIO.OUT)

lcd.init(freq=15000000)

sensor.reset()
sensor.set_pixformat(sensor.RGB565) # Set pixel format to RGB565 (or GRAYSCALE)
sensor.set_framesize(sensor.QVGA)   # Set frame size to QVGA (320x240)
sensor.skip_frames(time = 2000)     # Wait for settings take effect.
sensor.set_hmirror(0)
sensor.set_windowing((224,224))
clock = time.clock()                # Create a clock object to track the FPS.

i = getMax() + 1

def capture():
   global i
   img = sensor.snapshot()
   filename = '/sd/' + str(i) + '.jpg'
   print(filename)
   img.save(filename)
   img.draw_string(2,2, ("%2.1f" %(i)), color=(0,128,0), scale=2)
   lcd.display(img)
   i = i + 1;

print("Start from %d" % i)

while True:
   led_r.value(0)
   time.sleep(1)
   led_r.value(1)
   capture()
这里会自动拍照并进行保存,图片分辨率为224*224
使用labelimg工具对目标进行标注,在
保存文件选择yolo格式,这里有两种保存方式,一种是voc数据集采用的xml文件保存放松,另一种是现在使用的txt文件保存格式,打开保存的txt文件,会显示5个值0 0.48567335243553006 0.5214899713467048 0.9255014326647564 0.9570200573065902
分别代表
物体类别 物体中心位置 x 物体中心位置 y 物体宽度 x 物体高度y

接下来便是划分训练集和测试集
import glob, os

# Current directory
current_dir = os.path.dirname(os.path.abspath(__file__))

# Directory where the data will reside, relative to 'darknet.exe'
# 修改为你自己的目录
path_data = './train/'

# Percentage of images to be used for the test set
percentage_test = 10;

# Create and/or truncate train.txt and test.txt
file_train = open('train.txt', 'w')
file_test = open('test.txt', 'w')

# Populate train.txt and test.txt
counter = 1
index_test = round(100 / percentage_test)
for pathAndFilename in glob.iglob(os.path.join(current_dir, "*.jpg")):
    title, ext = os.path.splitext(os.path.basename(pathAndFilename))

    if counter == index_test:
        counter = 1
        file_test.write(path_data + title + '.jpg' + "\n")
    else:
        file_train.write(path_data + title + '.jpg' + "\n")
        counter = counter + 1
之后便会获得train.txt和test.txt两个文件
里面包含训练集和测试集相对与darknet的路径
至此我们已经完成数据集的处理
cfg文件配置
我们训练的模型为yolov2tiny模型,在darknet下训练需要获取一个weights权重文件和cfg配置文件,权重文件包含预训练的参数,cfg文件为神经网络的结构,通过调整cfg文件可以调整神经网络的结构
下面是完整的yolov2tiny结构,文件在darknet下cfg文件夹中的yolov2-tiny.cfg文件
[net]
# Testing
batch=1
subdivisions=1
# Training
# batch=64
# subdivisions=2
width=416
height=416
channels=3
momentum=0.9
decay=0.0005
angle=0
saturation = 1.5
exposure = 1.5
hue=.1

learning_rate=0.001
burn_in=1000
max_batches = 500200
policy=steps
steps=400000,450000
scales=.1,.1

[convolutional]
batch_normalize=1
filters=16
size=3
stride=1
pad=1
activation=leaky

[maxpool]
size=2
stride=2

[convolutional]
batch_normalize=1
filters=32
size=3
stride=1
pad=1
activation=leaky

[maxpool]
size=2
stride=2

[convolutional]
batch_normalize=1
filters=64
size=3
stride=1
pad=1
activation=leaky

[maxpool]
size=2
stride=2

[convolutional]
batch_normalize=1
filters=128
size=3
stride=1
pad=1
activation=leaky

[maxpool]
size=2
stride=2

[convolutional]
batch_normalize=1
filters=256
size=3
stride=1
pad=1
activation=leaky

[maxpool]
size=2
stride=2

[convolutional]
batch_normalize=1
filters=512
size=3
stride=1
pad=1
activation=leaky

[maxpool]
size=2
stride=1

[convolutional]
batch_normalize=1
filters=1024
size=3
stride=1
pad=1
activation=leaky

###########

[convolutional]
batch_normalize=1
size=3
stride=1
pad=1
filters=512
activation=leaky

[convolutional]
size=1
stride=1
pad=1
filters=425
activation=linear

[region]
anchors =  0.57273, 0.677385, 1.87446, 2.06253, 3.33843, 5.47434, 7.88282, 3.52778, 9.77052, 9.16828
bias_match=1
classes=80
coords=4
num=5
softmax=1
jitter=.2
rescore=0

object_scale=5
noobject_scale=1
class_scale=1
coord_scale=1

absolute=1
thresh = .6
random=1
需要更改的地方
1.如果是进行测试,可以将第三行和第四行改为
batch=1
subdivisions=1
如果是训练则需要调整batch和subdivisions大小
第一个参数代表每次训练图片数量,第二个代表将训练图片数量分为几次进行训练,即每次训练数目为batch/subdivision,
在训练是batch越大越容易收敛,但太大需要运算量随之增加,所以可以通过调整subdivisons将其分为多次,使用gpu训练
一般为
batch=64
subdivisions=2
2.在[region]层有一个参数classes需要更改为自己的类别数,我的是只有一个类别苹果,故改为classes=1
3.在[region]层上方最后一层卷积网络中
将filters改为filters = (classes + 5) * 5,我的classes为1,故
filters=30,为什么要这样设置,这和yolov2的模型有关,具体可以参考yolov2的模型结构
4.更改anchors参数,anchors可不更改,但好的anchors值可以显著提高效果,anchors是作者在yolov2上的改进,在v1版本,物体的坐标直接通过回归进行预测,但这种预测具有很大的缺点,于是作者在v2版本引入anchors,anchors是通过聚类算法计算出较可能出现的框的大小,这样回归预测的不是目标的坐标,而是相对于预选框的位移,在yolo2中一共是10个anchors,代表5个形状的预选框,通过回归相对位移而不是直接回归坐标提高了准确性。
这里提供一个计算anchor的python脚本
from os import listdir
from os.path import isfile, join
import argparse
#import cv2
import numpy as np
import sys
import os
import shutil
import random
import math

def IOU(x,centroids):
    '''
    :param x: 某一个ground truth的w,h
    :param centroids:  anchor的w,h的集合[(w,h),(),...],共k个
    :return: 单个ground truth box与所有k个anchor box的IoU值集合
    '''
    IoUs = []
    w, h = x  # ground truth的w,h
    for centroid in centroids:
        c_w,c_h = centroid   #anchor的w,h
        if c_w>=w and c_h>=h:   #anchor包围ground truth
            iou = w*h/(c_w*c_h)
        elif c_w>=w and c_h<=h:    #anchor宽矮
            iou = w*c_h/(w*h + (c_w-w)*c_h)
        elif c_w<=w and c_h>=h:    #anchor瘦长
            iou = c_w*h/(w*h + c_w*(c_h-h))
        else: #ground truth包围anchor     means both w,h are bigger than c_w and c_h respectively
            iou = (c_w*c_h)/(w*h)
        IoUs.append(iou) # will become (k,) shape
    return np.array(IoUs)

def avg_IOU(X,centroids):
    '''
    :param X: ground truth的w,h的集合[(w,h),(),...]
    :param centroids: anchor的w,h的集合[(w,h),(),...],共k个
    '''
    n,d = X.shape
    sum = 0.
    for i in range(X.shape[0]):
        sum+= max(IOU(X[i],centroids))  #返回一个ground truth与所有anchor的IoU中的最大值
    return sum/n    #对所有ground truth求平均

def write_anchors_to_file(centroids,X,anchor_file,input_shape,yolo_version):
    '''
    :param centroids: anchor的w,h的集合[(w,h),(),...],共k个
    :param X: ground truth的w,h的集合[(w,h),(),...]
    :param anchor_file: anchor和平均IoU的输出路径
    '''
    f = open(anchor_file,'w')

    anchors = centroids.copy()
    print(anchors.shape)

    if yolo_version=='yolov2':
        for i in range(anchors.shape[0]):
            #yolo中对图片的缩放倍数为32倍,所以这里除以32,
            # 如果网络架构有改变,根据实际的缩放倍数来
            #求出anchor相对于缩放32倍以后的特征图的实际大小(yolov2)
            anchors[i][0]*=input_shape/32.
            anchors[i][1]*=input_shape/32.
    elif yolo_version=='yolov3':
        for i in range(anchors.shape[0]):
            #求出yolov3相对于原图的实际大小
            anchors[i][0]*=input_shape
            anchors[i][1]*=input_shape
    else:
        print("the yolo version is not right!")
        exit(-1)

    widths = anchors[:,0]
    sorted_indices = np.argsort(widths)

    print('Anchors = ', anchors[sorted_indices])

    for i in sorted_indices[:-1]:
        f.write('%0.2f,%0.2f, '%(anchors[i,0],anchors[i,1]))

    #there should not be comma after last anchor, that's why
    f.write('%0.2f,%0.2f\n'%(anchors[sorted_indices[-1:],0],anchors[sorted_indices[-1:],1]))

    f.write('%f\n'%(avg_IOU(X,centroids)))
    print()

def kmeans(X,centroids,eps,anchor_file,input_shape,yolo_version):

    N = X.shape[0] #ground truth的个数
    iterations = 0
    print("centroids.shape",centroids)
    k,dim = centroids.shape  #anchor的个数k以及w,h两维,dim默认等于2
    prev_assignments = np.ones(N)*(-1)    #对每个ground truth分配初始标签
    iter = 0
    old_D = np.zeros((N,k))  #初始化每个ground truth对每个anchor的IoU

    while True:
        D = []
        iter+=1
        for i in range(N):
            d = 1 - IOU(X[i],centroids)
            D.append(d)
        D = np.array(D) # D.shape = (N,k)  得到每个ground truth对每个anchor的IoU

        print("iter {}: dists = {}".format(iter,np.sum(np.abs(old_D-D))))  #计算每次迭代和前一次IoU的变化值

        #assign samples to centroids
        assignments = np.argmin(D,axis=1)  #将每个ground truth分配给距离d最小的anchor序号

        if (assignments == prev_assignments).all() :  #如果前一次分配的结果和这次的结果相同,就输出anchor以及平均IoU
            print("Centroids = ",centroids)
            write_anchors_to_file(centroids,X,anchor_file,input_shape,yolo_version)
            return

        #calculate new centroids
        centroid_sums=np.zeros((k,dim),np.float)   #初始化以便对每个簇的w,h求和
        for i in range(N):
            centroid_sums[assignments[i]]+=X[i]         #将每个簇中的ground truth的w和h分别累加
        for j in range(k):            #对簇中的w,h求平均
            centroids[j] = centroid_sums[j]/(np.sum(assignments==j)+1)

        prev_assignments = assignments.copy()
        old_D = D.copy()

def main(argv):
    parser = argparse.ArgumentParser()
    parser.add_argument('-filelist', default = r'./train.txt',
                        help='path to filelist\n' )
    parser.add_argument('-output_dir', default = r'./anchor', type = str,
                        help='Output anchor directory\n' )
    parser.add_argument('-num_clusters', default = 0, type = int,
                        help='number of clusters\n' )
    '''
    需要注意的是yolov2输出的值比较小是相对特征图来说的,
    yolov3输出值较大是相对原图来说的,
    所以yolov2和yolov3的输出是有区别的
    '''
    parser.add_argument('-yolo_version', default='yolov2', type=str,
                        help='yolov2 or yolov3\n')
    parser.add_argument('-yolo_input_shape', default=240, type=int,
                        help='input images shape,multiples of 32. etc. 416*416\n')
    args = parser.parse_args()

    if not os.path.exists(args.output_dir):
        os.mkdir(args.output_dir)

    f = open(args.filelist)

    lines = [line.rstrip('\n') for line in f.readlines()]

    annotation_dims = []

    for line in lines:
        line = line.replace('JPEGImages','labels')
        line = line.replace('.jpg','.txt')
        line = line.replace('.png','.txt')
        print(line)
        f2 = open(line)
        for line in f2.readlines():
            line = line.rstrip('\n')
            w,h = line.split(' ')[3:]
            #print(w,h)
            annotation_dims.append((float(w),float(h)))
    annotation_dims = np.array(annotation_dims) #保存所有ground truth框的(w,h)

    eps = 0.005

    if args.num_clusters == 0:
        for num_clusters in range(1,11): #we make 1 through 10 clusters
            anchor_file = join( args.output_dir,'anchors%d.txt'%(num_clusters))

            indices = [ random.randrange(annotation_dims.shape[0]) for i in range(num_clusters)]
            centroids = annotation_dims[indices]
            kmeans(annotation_dims,centroids,eps,anchor_file,args.yolo_input_shape,args.yolo_version)
            print('centroids.shape', centroids.shape)
    else:
        anchor_file = join( args.output_dir,'anchors%d.txt'%(args.num_clusters))
        indices = [ random.randrange(annotation_dims.shape[0]) for i in range(args.num_clusters)]
        centroids = annotation_dims[indices]
        kmeans(annotation_dims,centroids,eps,anchor_file,args.yolo_input_shape,args.yolo_version)
        print('centroids.shape', centroids.shape)

if __name__=="__main__":
    main(sys.argv)
使用python3 anchor.py -filelist 你的训练txt路径 -yolo_input_shape 你的输入形状
会生成anchor文件夹,在里面有多种数目的anchors
我的命令为
python3 anchor.py -filelist ./train.txt yolo_input_shape 224
5.这一步也是至关重要的一步,完整的yolov2模型转换为kmodel大约为16m,这是不能在k210上实时运行的,需要对模型裁减,这需要一定的神经网络知识,如果不太了解这方面的知识(比如我),可以对512通道和1024通道进行减小,可大幅度减少参数,同样也会导致精度下降。
至此已经完成cfg文件配置工作,接下来是weights文件获取
weights文件获取
yolov2-tiny的权重文件在官网上即可下载
https://pjreddie.com/media/files/yolov3-tiny.weights
使用
wget https://pjreddie.com/media/files/yolov2-tiny.weights
便可获取
训练前准备
1.新建类别文件
这里我们在darknet所在文件夹下新建一个name.txt
里面存放我们类别的名称,我的只有一个 apple
2.新建训练路径文件
同样,我们之前获取了训练集和测试集,但训练时如何找到呢,通过生成的train.txt和test.txt便可找到训练图片,所以我们需要一个文件用来存放train.txt和test.txt路径
新建obj.txt,将下列写入文件
classes= 1
train  = ./data/train.txt
valid  = ./data/test.txt
names =./name.txt
backup = backup/
上面所有路径均是相对darknet这个文件的路径,注意,不是darknet文件夹,而是相对于darknet文件夹下通过make生成的darknet文件的相对路径。
到此所有的准备工作就完成了
开始训练
训练命令
./darknet detector train ./obj.txt ./cfg/yolov2-tiny.cfg yolov2-tiny.weights
即可开始训练,训练完成后会在backup下生成最终的权重文件,一般当平均loss降至0.06便达到比较好的效果,训练过程比较漫长,一定
测试训练后权重
./darknet detector test cfg/coco.data cfg/yolov3.cfg backup/final.weights data/1.jpg
至此获得了weights和cfg文件,如何转换成k210可以使用的kmodel文件呢,需要使用darkflow这个工具,具体的使用方法我会在下一篇中更新。