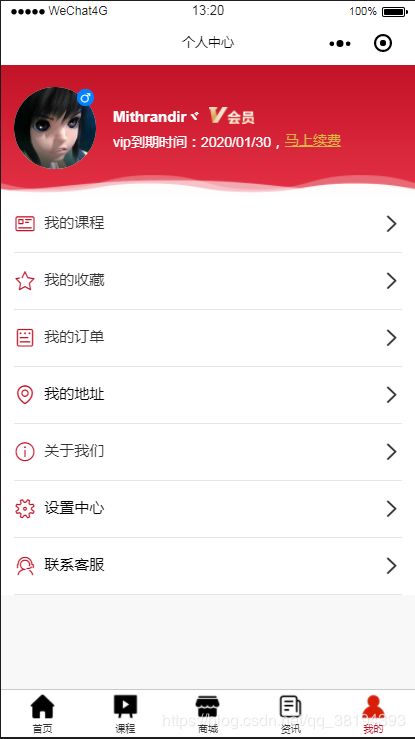
小程序实现漂亮的个人中心版面
先放上效果图,然后再解构如何实现。

常见的个人中心内容包括了:
头像,用户昵称,会员信息,充值信息,还有个人设置,收货地址,订单历史,收藏记录,浏览历史等等。
这些板块都可以用组件来实现。
页面逻辑中:
将头像和昵称还有会员信息放在顶部在一个宣传版面展示。剩余的个人中心的功能则单独拿出来做一个列表功能。很多人可能会想到,实现列表功能,列表有多少是不是对应的功能函数就要有多少呢,其实大可不必。除了navgator组件和button组件外,我们也可以使用view来实现。个人中心的原生API则直接使用button组件的opentype能力,其余我们则用view的属性绑定来实现操作传参。
详细见view标签内的属性:
bindtap=“openPage” class=“item” data-url="/pages/my_course/my_course" formType=“submit” hoverClass=“none”
统一命名一个openPage方法来跳转,跳转的url就是data-url。参数需要添加的同样以data-xx的形式,在openpage的参数中就可以获取到。
实现页面的代码:
样式上为了美观,可以自定义,这里使用的样式使用的是colorUi提供的UI样式。
/* pages/my/my.wxss */

page {
  padding-bottom: 50rpx;
  background: #f8f8f8;
}

.header {
  padding: 0 25rpx;
  padding-top: 40rpx;
  padding-bottom: 50rpx;
  width: 100%;
  background: linear-gradient(#c21327, #e42e42);
  position:relative;
}

.user {
  display: flex;
  justify-content: space-between;
  align-items: center;
}
.header .gif-wave{
  position: absolute;
  width: 100%;
  bottom: 0;
  left: 0;
  z-index: 99;
  mix-blend-mode: screen;
  height: 100rpx;
}
.user_box {
  display: flex;
  align-items: center;
}

.edit {
  display: flex;
  width: 70rpx;
  height: 70rpx;
  padding: 18rpx;
  box-sizing: border-box;
}

.edit image {
  width: 100%;
  height: 100%;
  transform: rotate(180deg);
}

.logo {
  width: 150rpx;
  height: 150rpx;
  border-radius: 50%;
  background: #fff;
  will-change: transform;
  position:relative;
}

.logo image {
  width: 100%;
  height: 100%;
}

.logo image {
  width: 100%;
  height: 100%;
  border-radius: 100%;
  will-change: transform;
}

.user_info {
  padding-left: 32rpx;
}

.user_name {
  display: flex;
  align-items: center;
  font-size: 36rpx;
  font-weight: bold;
  color: #fff;
}

.user_name image {
  margin-left: 16rpx;
  width: 84rpx;
  height: 31rpx;
}

.vip_expires {
  margin-top: 12rpx;
  font-size: 27rpx;
  color: #fff;
}

.info {
  display: flex;
  margin-top: 62rpx;
  width: 100%;
  height: 110rpx;
}

.info .item {
  flex: 1;
  display: flex;
  justify-content: center;
  align-items: center;
  flex-direction: column;
  line-height: 1.5;
  border-right: 1px solid #fff;
}

.info .item:last-child {
  border-right: none;
}

.info .item .count {
  font-size: 46rpx;
  color: #fff;
}

.info .item .title {
  font-size: 24rpx;
  color: #fff;
}

.card {
  display: flex;
  justify-content: space-between;
  padding: 25rpx;
  background: #fff;
}

.card .item {
  display: flex;
  justify-content: center;
  align-items: center;
  width: 340rpx;
  height: 200rpx;
  font-size: 34rpx;
  color: #fff;
  border-radius: 16rpx;
  background: #d2d2d2;
  overflow: hidden;
  will-change: transform;
}

.card .item image {
  width: 100%;
  height: 100%;
}

.nav {
  padding: 0 25rpx;
  font-size: 34rpx;
  background: #fff;
}

.nav .item {
  display: flex;
  justify-content: space-between;
  border-bottom: 1px solid #e5e5e5;
  padding: 30rpx 0;
}


.nav button.item {
  margin: 0;
  line-height: inherit;
  font-size: inherit;
}

.nav button.item .new_tips {
  position: relative;
}

.nav button.item .new_tips:before {
  content: '';
  position: absolute;
  top: -2rpx;
  right: -14rpx;
  width: 20rpx;
  height: 20rpx;
  background-color: #f43530;
  border-radius: 100%;
}

.nav .icon {
  display: flex;
  align-items: center;
  font-size: 40rpx;
  color:#333;
}
.nav .wallet{
  display:inline-flex;
}
.nav .wallet .icon {
  color: #c21327;
}

.nav .discount_coupon .icon {
  color: #bd9445;
}

.nav image {
  margin-left: 20rpx;
  width: 40rpx;
  height: 40rpx;
}
.joinVip{
  font-size:27rpx;
  line-height:27rpx;
  display:inline-block;
  color:#dab643;
  text-decoration:underline;
}
最重要的就是JS了,其实从页面功能实现来讲,几乎内容都是要靠获取后台数据来实现的。用户信息,在登陆的时候存储在后台服务器中,在打开个人中心页面的时候请求出来,用户性别标志的显示,同样以后台用户信息的sex值来判断显示图片。
会员信息也是携带在用户信息中一起请求出来,不是会员则显示为不是会员,请购买,是会员则显示会员身份并显示到期时间。图片显示和信息显示可用wx:if
// pages/my/my.js
var e = require("../../utils/util.js"), time = require('../../utils/util.js');
var app = getApp();
Page({
  data: {
    defaultAvatarUrl: "/images/main/default_avatar.png",
    defaultNickName: "用户名称",
    presentCount: 0,
    practiceday: '',
    studytime: '',
    practicetime: "",
    today_s: "",
    vip: false,
    StatusBar: app.globalData.StatusBar,
    CustomBar: app.globalData.CustomBar,
    ColorList: app.globalData.ColorList,
  },

  onLoad: function(options) {
    var that = this,
      userInfo = wx.getStorageSync("_userInfo");
    var userNid = wx.getStorageSync("unionid");
    wx.request({ //位登录
      url: app.globalData.Url + '/api/login/event/userinfo/',
      data: {
        unionid: userNid,
      },
      method: 'POST',
      header: {
        'content-type': 'application/x-www-form-urlencoded' // 默认值
      },
      success: function (res) {
        console.log('----用户信息', res)
        if (res.data.data.utype == 2) {
          res.data.data.uvipdaoqi = time.toDate(res.data.data.uvipdaoqi)
          that.setData({
            vip: true,
            vip_time: res.data.data.uvipdaoqi,
          })
        } else if (res.data.data.utype == 1) {
          console.log(res.errMsg)
          that.setData({
            vip: false,
          })
        }
        that.setData({
          male:res.data.data.usex
        })
      },
    })
    that.setData({ //转换完毕存储
      userInfo: userInfo,
    })
    wx.getSystemInfo({
      success: function(res) {
        var windowWidth = res.windowWidth * 0.5;
        that.setData({
          //圆点坐标,x为屏幕一半,y为半径与margin-top之和,px
          //后面获取的触摸坐标是px,所以这里直接用px.
          dotPoint: {
            clientX: windowWidth,
            clientY: 250
          }
        })
      }
    })
  },

  onReady: function() {


  },
  openPage: function(a) {
    var e = a.currentTarget.dataset.url;
    wx.navigateTo({
      url: e
    });
  },
  joinVip: function() { //加入VIP
    wx.navigateTo({
      url: '../vip/vip',
    })
  },
  chooseGeren: function() {
    wx.navigateTo({
      url: '../form/form',
    })
  },
  changeView: function() {
    wx.openSetting({
      success: (res) => {
        console.log("授权结果..")
        console.log(res)
        if (!res.authSetting["scope.userInfo"] || !res.authSetting["scope.userLocation"] || !res.authSetting["scope.address"] || !res.authSetting["scope.camera"]) {
          console.log(res)
        }
      }
    })
  },
  sign_in: function() {
    wx.navigateTo({
      url: '../sign_in/sign_in',
    })
  },
  onPullDownRefresh() {

  },
  /**
   * 用户点击右上角分享
   */
  onShareAppMessage: function(res) {
    if (res.from === 'button') {
      // 来自页面内转发按钮
      console.log(res.target)
    }
    return {
      title: '看看',
      path: 'pages/study/study',
      success: function(res) {
        // 转发成功
        wx.showShareMenu({
          // 要求小程序返回分享目标信息
          withShareTicket: true
        });
      },
      fail: function(res) {
        // 转发失败
      }
    }
  }
})
下一章讲解微信钱包功能。