OpenCV On Raspberry Pi #Day_4
Preliminary understanding OpenCV
在第四天的学习内容中,我们将了解OpenCV的基本使用方法,并结合Picamera模块,使用树莓派3B实时显示树莓派所拍摄的图像。
更多内容请关注我的GitHub库:https://github.com/TonyStark1997,如果喜欢,star并follow我!
Step 0:准本材料 & 环境介绍
材料:Raspberry Pi 3B、Camera V2、5V电源线和插头、Wi-Fi
环境:OpenCV3.4.1、Python3.5.3、picamera、numpy、matplotlib
Step 1:打开树莓派摄像头功能
首先需要在树莓派设置页面中打开摄像头功能。
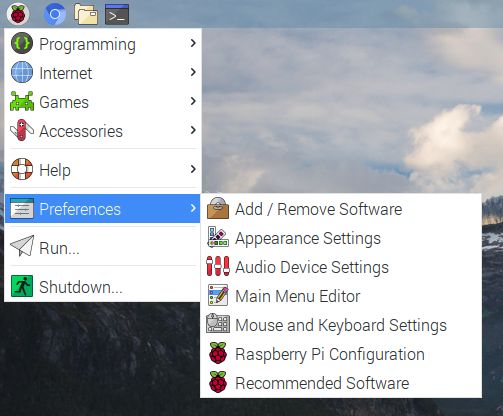
点击左上角树莓派标志 > Preferences > Raspberry Pi Configuration
打开树莓派设置页面后选择interfaces页面,将Camera功能设置为Enabled,即打开了摄像头功能。
Step 2:安装所需模块
在本篇的学习内容中,我们不仅需要已经搭建好的OpenCV3.4.1和Python3.5.3环境,还需要在Python编写的代码中使用numpy、picamera和matplotlib模块,所以我们先使用pip安装这三个模块:
~ $ sudo pip3 install numpy picamera matplotlib
Step 3:几个使用OpenCV的基本例子
OpenCV的Python使用方法请自行到OpenCV官网的学习教程页面进行学习,也可以阅读我的在GitHub中发表的OpenCV Python Tutorial中文翻译文章进行学习,我的教程翻译文章将持续在GitHub仓库和我的CSDN博客上更新。进入跳转页面请直接点击前面一句话的关键字超链接。
接下来,我们在树莓派中建立几个Python程序,简单了解以下OpenCV的基本使用方法
demo1
在第一个程序中,我们学习如何使用OpenCV加载并显示一副图片:
import numpy as np
import cv2 as cv

img = cv.imread('opencv_logo.jpg',0)
cv.imshow('image',img)
k = cv.waitKey(0)
if k == 27:         # wait for ESC key to exit
    cv.destroyAllWindows()
elif k == ord('s'): # wait for 's' key to save and exit
    cv.imwrite('opencv.png',img)
    cv.destroyAllWindows()
在程序所在目录中有一张名为‘opencv_logo’的jpg格式图片,具体是什么图片读者可以自己定义,只要准确知道图片的名字和格式即可。在以上的程序中,我们使用OpenCV加载并显示了opencv_logo.jpg,并可以通过键盘按键“Esc”和“s”选择关闭显示窗口或者在程序所在目录将图片另存为opencv.png文件。
demo2
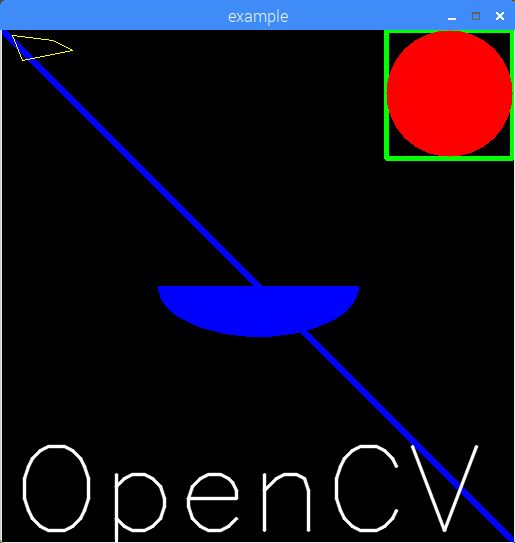
在第二个程序中,我们学习如何使用OpenCV绘制图形:
import numpy as np
import cv2 as cv

# Create a black image
img = np.zeros((512,512,3), np.uint8)

# Draw a diagonal blue line with thickness of 5 px
cv.line(img,(0,0),(511,511),(255,0,0),5)
cv.rectangle(img,(384,0),(510,128),(0,255,0),3)
cv.circle(img,(447,63), 63, (0,0,255), -1)
cv.ellipse(img,(256,256),(100,50),0,0,180,255,-1)
pts = np.array([[10,5],[20,30],[70,20],[50,10]], np.int32)
pts = pts.reshape((-1,1,2))
cv.polylines(img,[pts],True,(0,255,255))
font = cv.FONT_HERSHEY_SIMPLEX
cv.putText(img,'OpenCV',(10,500), font, 4,(255,255,255),2,cv.LINE_AA)

winname = 'example'
cv.namedWindow(winname)

while(1):
    cv.imshow(winname, img)
    if cv.waitKey(1) & 0xFF == ord('q'):
        break

cv.destroyWindow(winname)
上面这段程序在一个窗口内分别绘制了一条直线、一个矩形、一个圆、半个椭圆、一个不规则四边形和添加了“OpenCV”一段文字。并可以通过键盘按键“q”退出并关闭窗口。
demo3
在第三个程序中,我们学习如何使用OpenCV鼠标事件在双击的地方画出一个蓝色的圆,并通过键盘按键“Esc”退出并关闭窗口:
import numpy as np
import cv2 as cv
# mouse callback function
def draw_circle(event,x,y,flags,param):
    if event == cv.EVENT_LBUTTONDBLCLK:
        cv.circle(img,(x,y),100,(255,0,0),-1)
# Create a black image, a window and bind the function to window
img = np.zeros((512,512,3), np.uint8)
cv.namedWindow('image')
cv.setMouseCallback('image',draw_circle)
while(1):
    cv.imshow('image',img)
    if cv.waitKey(20) & 0xFF == 27:
        break
cv.destroyAllWindows()
demo4
在第四个程序中,我们学习如何使用OpenCV的鼠标和键盘事件绘制矩形和圆形两种不同的图案:
import numpy as np
import cv2 as cv
drawing = False # true if mouse is pressed
mode = True # if True, draw rectangle. Press 'm' to toggle to curve
ix,iy = -1,-1
# mouse callback function
def draw_circle(event,x,y,flags,param):
    global ix,iy,drawing,mode
    if event == cv.EVENT_LBUTTONDOWN:
        drawing = True
        ix,iy = x,y
    elif event == cv.EVENT_MOUSEMOVE:
        if drawing == True:
            if mode == True:
                cv.rectangle(img,(ix,iy),(x,y),(0,255,0),-1)
            else:
                cv.circle(img,(x,y),5,(0,0,255),-1)
    elif event == cv.EVENT_LBUTTONUP:
        drawing = False
        if mode == True:
            cv.rectangle(img,(ix,iy),(x,y),(0,255,0),-1)
        else:
            cv.circle(img,(x,y),5,(0,0,255),-1)
img = np.zeros((512,512,3), np.uint8)
cv.namedWindow('image')
cv.setMouseCallback('image',draw_circle)
while(1):
    cv.imshow('image',img)
    k = cv.waitKey(1) & 0xFF
    if k == ord('m'):
        mode = not mode
    elif k == 27:
        break
cv.destroyAllWindows()
demo5
在第五个程序中,我们学习如何使用OpenCV建立一个使用轨迹栏调色的调色板:
import numpy as np
import cv2 as cv
def nothing(x):
    pass
# Create a black image, a window
img = np.zeros((300,512,3), np.uint8)
cv.namedWindow('image')
# create trackbars for color change
cv.createTrackbar('R','image',0,255,nothing)
cv.createTrackbar('G','image',0,255,nothing)
cv.createTrackbar('B','image',0,255,nothing)
# create switch for ON/OFF functionality
switch = '0 : OFF \n1 : ON'
cv.createTrackbar(switch, 'image',0,1,nothing)
while(1):
    cv.imshow('image',img)
    k = cv.waitKey(1) & 0xFF
    if k == 27:
        break
    # get current positions of four trackbars
    r = cv.getTrackbarPos('R','image')
    g = cv.getTrackbarPos('G','image')
    b = cv.getTrackbarPos('B','image')
    s = cv.getTrackbarPos(switch,'image')
    if s == 0:
        img[:] = 0
    else:
        img[:] = [b,g,r]
    if cv.waitKey(1) & 0xFF == ord('q'):
        break

cv.destroyAllWindows()
demo6
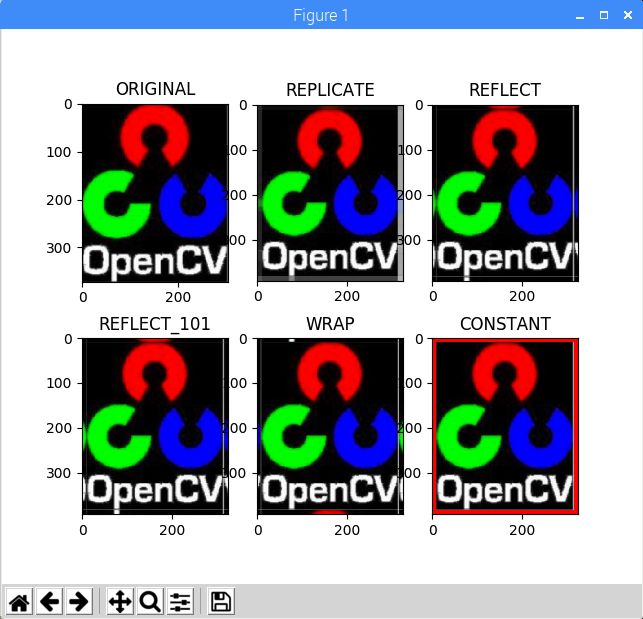
在第六个程序中,我们学习如何使用OpenCV和matplotlib建立五种图片边框:
import cv2 as cv
import numpy as np
from matplotlib import pyplot as plt
BLUE = [255,0,0]
img1 = cv.imread('opencv-logo.png')
replicate = cv.copyMakeBorder(img1,10,10,10,10,cv.BORDER_REPLICATE)
reflect = cv.copyMakeBorder(img1,10,10,10,10,cv.BORDER_REFLECT)
reflect101 = cv.copyMakeBorder(img1,10,10,10,10,cv.BORDER_REFLECT_101)
wrap = cv.copyMakeBorder(img1,10,10,10,10,cv.BORDER_WRAP)
constant= cv.copyMakeBorder(img1,10,10,10,10,cv.BORDER_CONSTANT,value=BLUE)
plt.subplot(231),plt.imshow(img1,'gray'),plt.title('ORIGINAL')
plt.subplot(232),plt.imshow(replicate,'gray'),plt.title('REPLICATE')
plt.subplot(233),plt.imshow(reflect,'gray'),plt.title('REFLECT')
plt.subplot(234),plt.imshow(reflect101,'gray'),plt.title('REFLECT_101')
plt.subplot(235),plt.imshow(wrap,'gray'),plt.title('WRAP')
plt.subplot(236),plt.imshow(constant,'gray'),plt.title('CONSTANT')
plt.show()
Step 4:实时显示摄像头所拍摄画面
通过以上学习我们了解了OpenCV的一些基本使用方法,下面我们结合picamera实时显示摄像头所拍摄的画面:
from picamera.array import PiRGBArray
from picamera import PiCamera
import cv2
import time

camera = PiCamera()
camera.resolution = (640, 480)
camera.framerate = 32
camera.hflip = True
#水平方向反转画面
#camera.hflip = True
#垂直方向反转画面
rawCapture = PiRGBArray(camera, size = (640, 480))

time.sleep(0.1)

for frame in camera.capture_continuous(rawCapture, format="bgr", use_video_port=True):
    image = frame.array
    cv2.imshow("Frame", image)
    key = cv2.waitKey(1) & 0xFF
    rawCapture.truncate(0)
    if key == ord("q"):
        break
使用python3运行上面一段程序即可通过窗口显示出摄像头所拍摄的实时画面
没错,以上就是作者本人了。
本篇文章的内容就到这里。


