本文第8节原理部分大量参考了图解Git工作原理及操作命令,进行了语言的梳理,其中rebase部分,原文解释的有些问题,在本文8-7小节中进行了重新整理。
1 创建项目,创建仓库,推送到远程仓库(需要先创建远程仓库)
//1. 初始化项目为git仓库
git init
git add .

//2. 将README.md文件加入到仓库中
git add README.md

//3. 将文件commit到本地仓库
git commit -m "first commit"

//4.  添加远程仓库
git remote add origin https://github.com/Hello/Yang.git

//5. 将本地仓库push远程仓库,并将origin设为默认远程仓库
git push -u origin master
也可以把远程仓库拉下来,然后在把代码copy过来,再提交。
2 创建分支,删除分支
//0. 查看分支
git branch
git branch -a

//1. 切换分支
git checkout product

//2. 新建分支并切换到其上
git checkout -b issueXXXX

//3. 提交本地分支到远程分支
git push origin dev

//4. merge,把branch_pach分支合并到product分支
git checkout product
git merge branch_pach

//5. 拉取远程分支到本地
git checkout origin/remoteName -b localName
//删除分支
git branch -D branchname    //删除本地分支
git push origin --delete branchname   //删除远程分支
3 查看本地分支关联的远程分支,重新关联本地分支、远程分支
git branch -vv

//重新关联本地分支、远程分支
git branch --unset-upstream
git push --set-upstream origin branchname
3.1 重命名本地分支。(本地修改代码后,提交到新的远程分支,而不是当前远程分支)
git branch -m [oldname] newname

//此时本地分支关联的远程分支仍然是oldname
git branch --unset-upstream
git push --set-upstream origin newname
4 查看本地仓库对应的远程仓库(https or git),修改远程仓库地址
//查看
git remote

//查看你当前的remote url,https的还是git的
$ git remote -v

//修改远程仓库地址
git remote rm origin
git remote add origin [url]
5 gitignore
全局gitignore
$ cd ~
$ touch .gitignore_global
$ git config --global core.excludesfile ~/.gitignore_global
$ git config --get core.excludesfile
# OS X
.DS_Store
# Xcode
build/
*.pbxuser
!default.pbxuser
*.mode1v3
!default.mode1v3
*.mode2v3
!default.mode2v3
*.perspectivev3
!default.perspectivev3
xcuserdata/
*.xccheckout
profile
*.moved-aside
DerivedData
*.hmap
*.ipa

# Bundler
.bundle
Carthage

# We recommend against adding the Pods directory to your .gitignore. However
# you should judge for yourself, the pros and cons are mentioned at:
# http://guides.cocoapods.org/using/using-cocoapods.html#should-i-ignore-the-pods-directory-in-source-control
#
# Note: if you ignore the Pods directory, make sure to uncomment
# `pod install` in .travis.yml
#
Pods/
Podfile.lock
5.1 .gitignore规则不生效的解决办法
git rm -r --cached .
git add .
git commit -m 'update .gitignore'
6 合并分支中,解决冲突处理
//保留本地修改,并入新内容,自己解决冲突
//1. 相当于将本地修改拉到临时分支。
git stash
//2. 这时候pull过来就不会有任何问题。
git pull
//3. 把临时分支中自己的修改拉回到当前分支。
git stash pop

//上面三句效果等同于
git pull origin --rebase [remote branch name]    //【远程分支合并】
git rebase [local branch name]效果一样的    //【本地分支合并】

//放弃本地修改,使用仓库代码完全覆盖本地内容
git reset --hard
git pull
7 回滚本地代码,回滚服务器代码,针对文件的回滚
//放弃本地修改,强制更新
git reset --hard commit-id      //回滚到commit-id,讲commit-id之后提交的commit都去除
git reset --hard HEAD~3         //将最近3次的提交回滚
//回滚远程分支:本地回滚,删除远程分支,再提交
//1. 切换到想回滚的分支,并更新
git checkout the_branch
git pull -f    //强制更新

//2. 备份
git branch the_branch_backup

//3. 对the_branch进行本地回滚
git reset --hard the_commit_id

//4. 删除远程 the_branch
git push origin --delete the_branch

//5. 重建远程分支,并提交回滚后的代码
git push origin the_branch

//6. 确认成功后,删除备份分支
git push origin --delete the_branch_backup
//针对文件回退本地修改
git checkout HEAD file/to/restore
8 原理
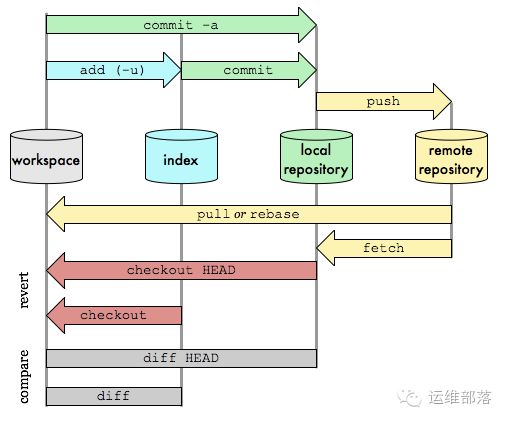
8.1 workspace / index / local repo
HEAD,始终指向当前所处分支的最新的提交点(local repo)。你所处的分支变化了,或者产生了新的提交点,HEAD就会跟着改变。
只有一个人开发的话,可以认为
workspace的内容是当前看到的,也是最新的;
index区标记了当前workspace中,哪些内容是被git管理的;
local repo保存了对象被提交过的各个版本,比起workspace和index的内容,它要更旧一些;
remote repo是local repo的异地备份,它的内容是最旧的。
- 多人开发是,pull必须在commit之后进行
因为remote repo的内容可能被分布在多个地点的处于协作关系的local repo修改,因此它可能与local repo同步,也可能不同步。
pull是直接拉到workspace,此时index/local repo还是旧的。
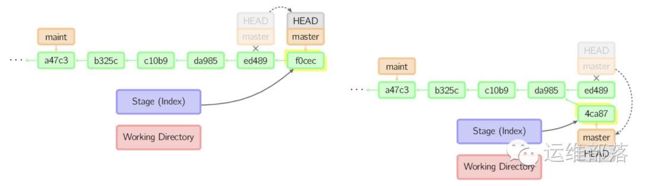
8.2 commit时,HEAD/Index/Workspace的变化
commit把Index的内容存入到local repo,并使得当前分支的HEAD向后移动一个提交点。
撤销提交,git commit --amend来进行撤销,修改之后再提交。如图,ed489被4ca87取代,git log里看不到ed489。
8.3 checkout时,HEAD/Index/Workspace的变化
checkout切换分支成功后,HEAD、Index、workspace都会指向被检出分支的最后一次提交点。

8.4 reset时,HEAD/Index/Workspace的变化
reset把当前分支回滚,并且相应的变动index和workspace。如下图,执行git reset HEAD~3后,当前分支回滚3个提交点,由ed489回到了b325c:
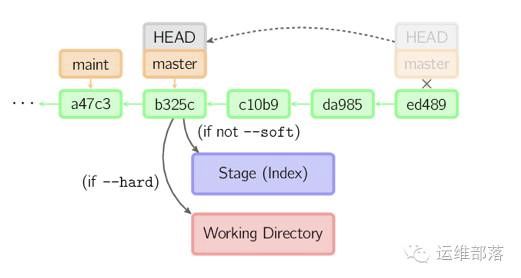
soft,只改变提交点,index和workspace的内容都不改变
mixed,改变提交点,同时改变index的内容。这是默认的回滚方式
hard,index、workspace的内容都会被修改到与提交点完全一致的状态
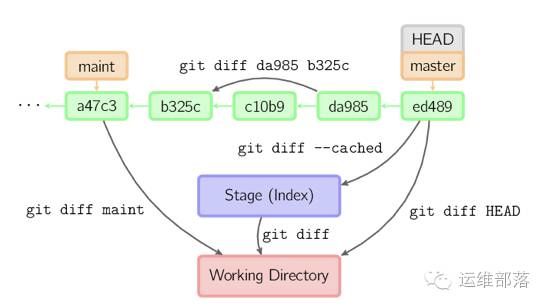
8.5 diff的使用
8.6 merge,在当前分支合并其他分支的修改。
HEAD处于master分支的ed489提交点上,other分支处于33104提交点上。
把other分支的代码合并到master分支,执行git merge other,如果没有发生冲突,other就成功合并到master分支了。

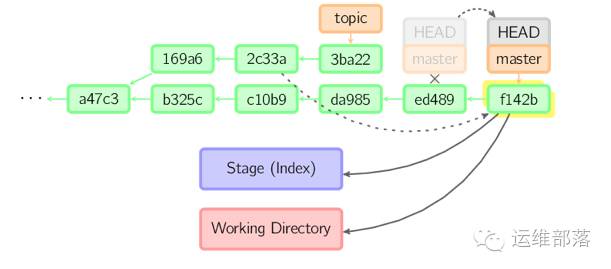
8.7 rebase,修改分支拉出来的“基址”
- merge两个分支时,从分叉开始(上图中b325c)无论发生多少次提交,合并在当前的分支上,只产生一次提交日志(如上图中f8bc5)
- 这样,如果某天需要回滚,只能把merge整体回滚。
- merge更常见于 branch的修改 merge到 master,而 rebase更常见于 把master上的修改 拉到 branch上(即,修改branch的拉出节点)。

- 处于topic分支上,执行git rebase master。
- 和merge是一样的,合并前后
位于的分支不变(上图中,前后都位于topic分支),内容和节点位置变,另一个分支(master)的内容和节点位置都不变。 - 结果看上去,这个分支是从master上的新Header拉出来的。
8.8 cherry-pick
复制一个提交点所做的工作,把它完整的应用到当前分支的某个提交点上。有点儿像rebase的部分内容。
9 利用rebase修改提交历史
9.1 原理:
rebase可以保留提交的全路径,同时给了我们权限,怎么处理路径上的每次提交记录。利用“合并提交,来修改git log”
实际流程:新建一个同名临时分支,在新分支上修改,最后通过push -f覆盖原分支。
9.2 场景:合并掉错误的提交历史
希望图中最近两次提交,并入到1.0.2中。

9.3 步骤
- 先git rebase -i 到1.0.1对应的版本。
- 选择如何处理期间的提交
- 处理冲突
//1. 代码层面

//2. Index层面的冲突
git add .

//3. 完成rebase
git rebase --continue/--abort

//4. 提交覆盖
git push -f
- rebase细节
//rebase命令后,处理期间提交
pick 1269c30 update framework
s aae8115 0.1.1
s 2e8d962 Update README

# Rebase e77739c..2e8d962 onto e77739c (3 commands)
#
# Commands:
# p, pick = use commit
# r, reword = use commit, but edit the commit message
# e, edit = use commit, but stop for amending
# s, squash = use commit, but meld into previous commit
# f, fixup = like "squash", but discard this commit's log message
# x, exec = run command (the rest of the line) using shell
# d, drop = remove commit

s和pick用的较多
10 非自己项目的修改
10.1 fork来的项目需要同步远程仓库的更新,源码学习时很有用(加了注释后、别人更新了版本)
fork过来的项目更新了,如何保持fork过来的代码保持同步,并且提交自己的代码未验证
//1. 首先添加你从github上fork的源仓库到本地的git工程
git remote add source_repository_name [url]

//2. 假设origin仓库和source_repository_name源仓库都有一个分支branch_name,你在该分支上进行开发,将本地修改commit后,在每次Push前做如下操作,即可实现和上游source_repository_name仓库同步
 //(1)同步源仓库的信息到本地
      $ git remote update source_repository_name
 //(2)将源仓库的信息merge到本地分支:
      $ git checkout branch_name
      $ git rebase source_repository_name/branch_name
10.2 给别人的仓库提交pull request
之后用到再补充
11 github配置
git config --global user.email "xx"
git config --global user.password "xx"
git config --global --list
一台电脑多个git账号.md
12 其他问题
12.1 git tag
git tag 0.1.0
git push origin 0.1.0
git tag -d 0.1.1        #删本地
git push --delete origin 0.1.1 #删远程
12.2 git alias 别名,缩写
在 ~/.gitconfig 文件中使用 alias 定义简写,如:
[alias]
st = status -s
ci = commit
l  = log --oneline --decorate -12 --color
ll = log --oneline --decorate --color
lc = log --graph --color
co = checkout
br = branch
ba = branch -a
rb = rebase
dci = dcommit
lg = log --color --graph --pretty=format:'%Cred%h%Creset -%C(yellow)%d%Creset %s %Cgreen(%cr) %C(bold blue)<%an>%Creset' --abbrev-commit