yolov3批量车辆检测并根据识别框裁剪
利用yolov3进行批量目标识别并根据识别框将所检测目标裁剪下来
根据项目需要,我需要提取有关车辆的一些信息,因此将yolov3识别后的带框的车辆给裁剪下来。
根据opencv绘制的矩形框将矩形框裁剪
# image是原图,左上点坐标, 右下点坐标, 颜色, 画线的宽度
cv2.rectangle(image, (x, y), (x + w, y + h), color, 2)
text = "{}: {:.4f}".format(LABELS[classIDs[i]], confidences[i])
# 各参数依次是:图片,添加的文字,左上角坐标(整数),字体,字体大小,颜色,字体粗细
cv2.putText(image, text, (x, y -5)cv2.FONT_HERSHEY_SIMPLEX,0.5,color,2)
# 图片裁剪,裁剪区域[Ly:Ry,Lx:Rx](这是对应坐标)
cut = image[y:(y+h), x:(x + w)]
将裁剪后的图片保存,并将每一幅裁剪后的车辆按照原图片文件名+a/b/c等保存。
//由于我的filename后缀有.jpg,因此用split切割一下,t是定义的字母,后续源码有详细的说明
cv.imwrite(savepath+"/"+filename.split(".")[0]+"_"+t+".jpg",cut)
源码
import os
import cv2 as cv
import argparse
import numpy as np
import cv2
weightsPath="F:/testScala/src/main/python/yolov3.weights"
configPath="F:/testScala/src/main/python/yolov3.cfg"
labelsPath="F:/testScala/src/main/python/coco.names"
rootdir = "F:/test"   #图像读取地址
savepath = "F:/detectioncam1"  # 图像保存地址

#初始化一些参数
LABELS = open(labelsPath).read().strip().split("\n")  #物体类别
COLORS = np.random.randint(0, 255, size=(len(LABELS), 3),dtype="uint8")#颜色


filelist = os.listdir(rootdir)  # 打开对应的文件夹
total_num = len(filelist)  #得到文件夹中图像的个数
print(total_num)
# 如果输出的文件夹不存在,创建即可
if not os.path.isdir(savepath):
    os.makedirs(savepath)

for(dirpath,dirnames,filenames) in os.walk(rootdir):
    for filename in filenames:
    # 必须将boxes在遍历新的图片后初始化
        boxes = []
        confidences = []
        classIDs = []
        net = cv2.dnn.readNetFromDarknet(configPath, weightsPath)
        path = os.path.join(dirpath,filename)
        image = cv.imread(path)
        (H, W) = image.shape[:2]
    # 得到 YOLO需要的输出层
        ln = net.getLayerNames()
        ln = [ln[i[0] - 1] for i in net.getUnconnectedOutLayers()]
        #从输入图像构造一个blob,然后通过加载的模型,给我们提供边界框和相关概率
        blob = cv2.dnn.blobFromImage(image, 1 / 255.0, (416, 416),swapRB=True, crop=False)
        net.setInput(blob)
        layerOutputs = net.forward(ln)
        #在每层输出上循环
        for output in layerOutputs:
            # 对每个检测进行循环
            for detection in output:
                scores = detection[5:]
                classID = np.argmax(scores)
                confidence = scores[classID]
                #过滤掉那些置信度较小的检测结果
                if confidence > 0.5:
                    #框后接框的宽度和高度
                    box = detection[0:4] * np.array([W, H, W, H])
                    (centerX, centerY, width, height) = box.astype("int")
                    #边框的左上角
                    x = int(centerX - (width / 2))
                    y = int(centerY - (height / 2))
                    # 更新检测出来的框
                   # 批量检测图片注意此处的boxes在每一次遍历的时候要初始化,否则检测出来的图像框会叠加
                    boxes.append([x, y, int(width), int(height)])
                    confidences.append(float(confidence))
                    classIDs.append(classID)
        # 极大值抑制
        idxs = cv2.dnn.NMSBoxes(boxes, confidences, 0.2,0.3)
        k = -1
        if len(idxs) > 0:
            # for k in range(0,len(boxes)):
            for i in idxs.flatten() :
                (x, y) = (boxes[i][0], boxes[i][1])
                (w, h) = (boxes[i][2], boxes[i][3])
                # 在原图上绘制边框和类别
                color = [int(c) for c in COLORS[classIDs[i]]]
                # image是原图,     左上点坐标, 右下点坐标, 颜色, 画线的宽度
                cv2.rectangle(image, (x, y), (x + w, y + h), color, 2)
                text = "{}: {:.4f}".format(LABELS[classIDs[i]], confidences[i])
                # 各参数依次是:图片,添加的文字,左上角坐标(整数),字体,        字体大小,颜色,字体粗细
                cv2.putText(image, text, (x, y - 5), cv2.FONT_HERSHEY_SIMPLEX,0.5, color, 2)
                # 图像裁剪注意坐标要一一对应
                # 图片裁剪 裁剪区域【Ly:Ry,Lx:Rx】
                cut = image[y:(y+h), x:(x + w)]
            # boxes的长度即为识别出来的车辆个数,利用boxes的长度来定义裁剪后车辆的路径名称
                if k < len(boxes):
                    k = k+1
               # 从字母a开始每次+1
                t = chr(ord("a")+k)
                # 写入文件夹,这块写入的时候不支持int(我也不知道为啥),所以才用的字母
                cv.imwrite(savepath+"/"+filename.split(".")[0]+"_"+t+".jpg",cut)
实验结果
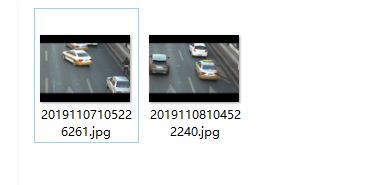
这是我实验的原图,拿了两张图片来测试。
最后效果:

最后根据识别框将识别的目标全部裁剪下来,然后命名格式为:
原图名称+_+a/b/c/d.jpg
代码可以直接跑,改其中的路径即可,有不足之处欢迎评论留言。