企业微信之发送图片消息(源码下载)
github地址:https://github.com/tanghh0410/sendNews.git
另外一篇发送文本消息:https://blog.csdn.net/tangthh123/article/details/100181930
前言:
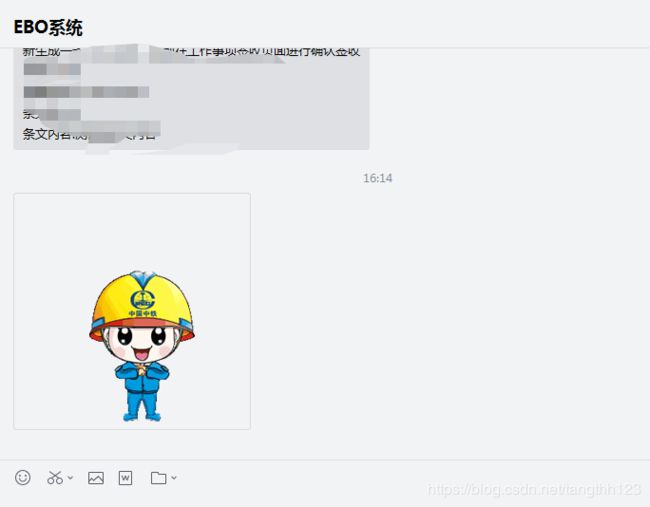
本篇文章我将围绕如何实现应用发送图片消息给用户,
发送方:一个自建应用 接收方:企业微信用户。
准备内容:
1.如果没有自建应用的话,需要在企业微信管理后台建立一个自建应用。
2.准备企业微信的公司id 和 应用的AgentID 和 AgentSecret,这些都可以在企业微信管理后台看到。
3.在本地准备一张图片 供上传使用。
发送图片功能逻辑:
点击图片上传功能,将需要发送的图片通过调用上传文件素材接口存到企业微信服务器上,然后调用企业微信下载文件素材接口得到该图片的media_id ,接下来就可以组装发送图片消息的代码,发送请求,图片发送成功!
准备开始:
1.TestController
package com.test.controller;

import com.test.service.WeiMessageService;
import com.test.wechat.SendApplicationMessage;
import org.springframework.beans.factory.annotation.Autowired;
import org.springframework.web.bind.annotation.GetMapping;
import org.springframework.web.bind.annotation.RestController;

/**
 * Created by tanghh on 2019/9/1
 */
@RestController
public class TestController {

    @Autowired
    private WeiMessageService weiMessageService;


    @GetMapping(value = "/testSendNews")
    public void testSendNews(){
        //1.发送文本消息
//        SendApplicationMessage message = new SendApplicationMessage();
//        message.testSendText();
        //2.发送图片消息
        weiMessageService.sendImageMessage("D:/project/csdn/有钱.gif","image");
    }
}
2.Service
package com.test.service;

/**
 * @Author tanghh
 * @Date 2020/6/29 15:41
 */
public interface WeiMessageService {
    /**
     * 发送图片消息
     * @param filePath
     * @param type
     */
    void sendImageMessage(String filePath,String type);
}
package com.test.service;

import com.alibaba.fastjson.JSON;
import com.alibaba.fastjson.JSONObject;
import com.test.model.Image;
import com.test.model.ImageMessage;
import com.test.util.QiWeiParametersUtil;
import com.test.util.QiYeWeiUtil;
import com.test.wechat.SendRequest;
import org.slf4j.Logger;
import org.slf4j.LoggerFactory;
import org.springframework.stereotype.Service;

import java.io.File;

/**
 * @Author tanghh
 * @Date 2020/6/29 15:41
 */
@Service
public class WeiMessageServiceImpl implements WeiMessageService {

    private Logger logger = LoggerFactory.getLogger(WeiMessageServiceImpl.class);

    @Override
    public void sendImageMessage(String filePath, String type) {
        //1.将获取到的图片上传到企业微信服务器
        JSONObject resultJsonObject = uploadTempMaterial(filePath,"image");
        String mediaId = resultJsonObject.getString("media_id");
        //将图片发给用户(企业微信或者是微信) 微信用户如果在24小时之内没有与微信公众平台交互,微信用户将接收不到微信公众号的消息
        String accessToken = QiWeiParametersUtil.getAccessToken();
        //2.组装图片消息
        //2.1.创建图片消息对象
        ImageMessage sendImgMessage = new ImageMessage();
        //2.2非必需 发送用户id
        sendImgMessage.setTouser("TangHuiHong");
        //2.3 发送类型
        sendImgMessage.setMsgtype(type);
        sendImgMessage.setAgentid(QiWeiParametersUtil.agentId);

        Image image = new Image();
        image.setMedia_id(mediaId);
        sendImgMessage.setImage(image);
        //2.获取请求的url
        String sendMessage_url = QiWeiParametersUtil.sendAccessTokenUrl.replace("ACCESS_TOKEN", accessToken);
        String json = JSON.toJSONString(sendImgMessage);
        //3.发送消息:调用业务类,发送消息
        JSONObject jsonObject = SendRequest.sendPost(sendMessage_url, json);
        //4.错误消息处理
        if (null != jsonObject) {
            if (0 != jsonObject.getIntValue("errcode")) {
                logger.error("发送消息失败 errcode:{} errmsg:{}", jsonObject.getIntValue("errcode"), jsonObject.getString("errmsg"));
            }
        }
    }

    /**
     * 企业微信上传临时素材
     * 文件上传并获取上传文件的mediaId
     * type   媒体文件类型,分别有图片(image)、语音(voice)、视频(video),普通文件(file)
     *
     * @param
     * @return
     */
    public JSONObject uploadTempMaterial(String filePath, String type) {
        //1.创建本地文件
        File file = new File(filePath);
        String accessToken = QiWeiParametersUtil.getAccessToken();
        //2.拼接请求url
        String uploadTempMaterialUrl = QiWeiParametersUtil.uploadMediaUrl.replace("ACCESS_TOKEN", accessToken)
                .replace("TYPE", type);
        //3.调用接口,发送请求,上传文件到微信服务器
        String result = QiYeWeiUtil.httpRequest(uploadTempMaterialUrl, file);
        //4.json字符串转对象:解析返回值,json反序列化
        result = result.replaceAll("[\\\\]", "");
        JSONObject resultJSON = JSONObject.parseObject(result);

        //5.返回参数判断
        if (resultJSON != null) {
            if (resultJSON.get("media_id") != null) {
                System.out.println("上传" + type + "永久素材成功");
                return resultJSON;
            } else {
                System.out.println("上传" + type + "永久素材失败");
            }
        }
        return resultJSON;
    }


}
3.涉及的实体类
package com.test.model;

import lombok.Data;

/**
 * Created by tanghh on 2019/8/30
 */
public @Data
class ImageMessage {
    private String touser;
//    private String toparty;
//    private String totag;
    private String msgtype;
    private Integer agentid;
    private Image image;
    private Integer safe;
}
package com.test.model;

import lombok.Data;

/**
 * 图片消息
 * @Author: tanghh18
 * @Date: 2019/8/30 17:02
 */
public @Data
class Image {
    private String media_id;
}
4.参数类
参数类中有些参数必须要替换掉 corpId agentId secret
package com.test.util;

import com.alibaba.fastjson.JSONObject;
import com.test.wechat.SendRequest;

/**
 * 企业微信参数配置类
 *
 * @Author: tanghh18
 * @Date: 2019/8/30 16:21
 */
public class QiWeiParametersUtil {
    /**
     * 1.获取AccessToken
     */
    public static String getAccessTokenUrl = "https://qyapi.weixin.qq.com/cgi-bin/gettoken?corpid={corpid}&corpsecret={corpsecret}";

    /**
     * 发送企业微信AccessToken
     */
    public static String sendAccessTokenUrl = "https://qyapi.weixin.qq.com/cgi-bin/message/send?access_token=ACCESS_TOKEN";

    /**
     * 上传临时文件素材
     * @param
     * @return
     */
    public static String uploadMediaUrl="https://qyapi.weixin.qq.com/cgi-bin/media/upload?access_token=ACCESS_TOKEN&type=TYPE";
    /**
     * 企业ID
     */
    public final static String corpId = "*****";

    /**
     * 企业应用的id,整型。可在应用的设置页面查看(yes)项目测试(ebo0.2版本)
     */
    public final static int agentId = 0;
    /**
     * 应用secret
     */
    public static String secret = "**********riBPcYSDsA64AQ4YmOs";

    /**
     * 获得各种access_token
     *
     * @return
     */
    public static String getAccessToken() {
        String url = getAccessTokenUrl.replace("{corpid}", corpId).replace("{corpsecret}", secret);
        JSONObject departmentJson = SendRequest.sendGet(url);
        return departmentJson.getString("access_token");
    }
}
5.上传文件素材的类。
package com.test.util;

import org.slf4j.Logger;
import org.slf4j.LoggerFactory;

import javax.net.ssl.HttpsURLConnection;
import javax.net.ssl.SSLContext;
import javax.net.ssl.SSLSocketFactory;
import javax.net.ssl.TrustManager;
import java.io.*;
import java.net.HttpURLConnection;
import java.net.URL;

/**
 * @author tanghh
 * @Date: 2019/4/17
 */
public class QiYeWeiUtil {
    private static Logger logger = LoggerFactory.getLogger(QiYeWeiUtil.class);
    // 微信加密签名
    private String msg_signature;
    // 时间戳
    private String timestamp;
    // 随机数
    private String nonce;

    /**
     * 1.企业微信上传素材的请求方法
     *
     * @param
     * @return
     */
    public static String httpRequest(String requestUrl, File file) {
        StringBuffer buffer = new StringBuffer();

        try {
            //1.建立连接
            URL url = new URL(requestUrl);
            //打开链接
            HttpURLConnection httpUrlConn = (HttpURLConnection) url.openConnection();

            //1.1输入输出设置
            httpUrlConn.setDoInput(true);
            httpUrlConn.setDoOutput(true);
            // post方式不能使用缓存
            httpUrlConn.setUseCaches(false);
            //1.2设置请求头信息
            httpUrlConn.setRequestProperty("Connection", "Keep-Alive");
            httpUrlConn.setRequestProperty("Charset", "UTF-8");
            //1.3设置边界
            String BOUNDARY = "----------" + System.currentTimeMillis();
            httpUrlConn.setRequestProperty("Content-Type", "multipart/form-data; boundary=" + BOUNDARY);

            // 请求正文信息
            // 第一部分:
            //2.将文件头输出到微信服务器
            StringBuilder sb = new StringBuilder();
            // 必须多两道线
            sb.append("--");
            sb.append(BOUNDARY);
            sb.append("\r\n");
            sb.append("Content-Disposition: form-data;name=\"media\";filelength=\"" + file.length()
                    + "\";filename=\"" + file.getName() + "\"\r\n");
            sb.append("Content-Type:application/octet-stream\r\n\r\n");
            byte[] head = sb.toString().getBytes("utf-8");
            // 获得输出流
            OutputStream outputStream = new DataOutputStream(httpUrlConn.getOutputStream());
            // 将表头写入输出流中:输出表头
            outputStream.write(head);

            //3.将文件正文部分输出到微信服务器
            // 把文件以流文件的方式 写入到微信服务器中
            DataInputStream in = new DataInputStream(new FileInputStream(file));
            int bytes = 0;
            byte[] bufferOut = new byte[1024];
            while ((bytes = in.read(bufferOut)) != -1) {
                outputStream.write(bufferOut, 0, bytes);
            }
            in.close();
            //4.将结尾部分输出到微信服务器
            // 定义最后数据分隔线
            byte[] foot = ("\r\n--" + BOUNDARY + "--\r\n").getBytes("utf-8");
            outputStream.write(foot);
            outputStream.flush();
            outputStream.close();


            //5.将微信服务器返回的输入流转换成字符串
            InputStream inputStream = httpUrlConn.getInputStream();
            InputStreamReader inputStreamReader = new InputStreamReader(inputStream, "utf-8");
            BufferedReader bufferedReader = new BufferedReader(inputStreamReader);

            String str = null;
            while ((str = bufferedReader.readLine()) != null) {
                buffer.append(str);
            }

            bufferedReader.close();
            inputStreamReader.close();
            // 释放资源
            inputStream.close();
            inputStream = null;
            httpUrlConn.disconnect();


        } catch (IOException e) {
            System.out.println("发送POST请求出现异常!" + e);
            e.printStackTrace();
        }
        return buffer.toString();
    }

    /**
     * 2.发送https请求之获取临时素材
     *
     * @param requestUrl
     * @param savePath   文件的保存路径,此时还缺一个扩展名
     * @return
     * @throws Exception
     */
    public static File getFile(String requestUrl, String savePath) throws Exception {
        //String path=System.getProperty("user.dir")+"/img//1.png";
        // 创建SSLContext对象,并使用我们指定的信任管理器初始化
        TrustManager[] tm = {new MyX509TrustManager()};
        SSLContext sslContext = SSLContext.getInstance("SSL", "SunJSSE");
        sslContext.init(null, tm, new java.security.SecureRandom());
        // 从上述SSLContext对象中得到SSLSocketFactory对象
        SSLSocketFactory ssf = sslContext.getSocketFactory();

        URL url = new URL(requestUrl);
        HttpsURLConnection httpUrlConn = (HttpsURLConnection) url.openConnection();
        httpUrlConn.setSSLSocketFactory(ssf);

        httpUrlConn.setDoOutput(true);
        httpUrlConn.setDoInput(true);
        httpUrlConn.setUseCaches(false);
        // 设置请求方式(GET/POST)
        httpUrlConn.setRequestMethod("GET");

        httpUrlConn.connect();

        //获取文件扩展名
        String ext = getExt(httpUrlConn.getContentType());
        savePath = savePath + ext;
        System.out.println("savePath" + savePath);
        //下载文件到f文件
        File file = new File(savePath);


        // 获取微信返回的输入流
        InputStream in = httpUrlConn.getInputStream();

        //输出流,将微信返回的输入流内容写到文件中
        FileOutputStream out = new FileOutputStream(file);

        int length = 100 * 1024;
        //存储文件内容
        byte[] byteBuffer = new byte[length];

        int byteread = 0;
        int bytesum = 0;
        //字节数 文件大小
        while ((byteread = in.read(byteBuffer)) != -1) {
            bytesum += byteread;
            out.write(byteBuffer, 0, byteread);

        }
        System.out.println("bytesum: " + bytesum);

        in.close();
        // 释放资源
        out.close();
        in = null;
        out = null;

        httpUrlConn.disconnect();


        return file;
    }

    private static String getExt(String contentType) {
        if ("image/jpeg".equals(contentType)) {
            return ".jpg";
        } else if ("image/png".equals(contentType)) {
            return ".png";
        } else if ("image/gif".equals(contentType)) {
            return ".gif";
        }

        return null;
    }


}
6.发送请求的类
package com.test.wechat;

import com.alibaba.fastjson.JSON;
import com.alibaba.fastjson.JSONObject;
import org.springframework.web.context.request.RequestContextHolder;
import org.springframework.web.context.request.ServletRequestAttributes;

import javax.servlet.http.HttpServletRequest;
import javax.servlet.http.HttpSession;
import java.io.*;
import java.net.URL;
import java.net.URLConnection;

/**
 * 用来发送请求的类
 *
 * @Author: tanghh18
 * @Date: 2019/8/30 16:21
 */

public class SendRequest {
    /**
     * 发送GET请求
     *
     * @param url
     * @return
     */
    public static JSONObject sendGet(String url) {
        HttpServletRequest request = ((ServletRequestAttributes) RequestContextHolder.getRequestAttributes()).getRequest();
        HttpSession session = request.getSession();
        JSONObject jsonObject = null;
        StringBuffer sb = new StringBuffer();
        BufferedReader in = null;
        try {
            String urlName = url;
            URL realUrl = new URL(urlName);
            // 打开和URL之间的连接
            URLConnection conn = realUrl.openConnection();
            // 设置通用的请求属性
            conn.setRequestProperty("accept", "*/*");
            conn.setRequestProperty("connection", "Keep-Alive");
            conn.setRequestProperty("user-agent", "Mozilla/4.0 (compatible; MSIE 6.0; Windows NT 5.1; SV1)");
            //针对群晖NAS请求,加一个Cookie
            if (session.getAttribute("sid") != null) {
                conn.addRequestProperty("Cookie", "id=" + session.getAttribute("sid"));
            }
            conn.setConnectTimeout(10000);
            // 建立实际的连接
            conn.connect();
            // 定义BufferedReader输入流来读取URL的响应
            in = new BufferedReader(new InputStreamReader(conn.getInputStream(), "UTF-8"));
            String line;
            while ((line = in.readLine()) != null) {
                sb.append(line);
            }
            jsonObject = JSON.parseObject(sb.toString());
        } catch (Exception e) {
            System.out.println("发送GET请求出现异常!" + e);
        } finally {
            // 使用finally块来关闭输入流
            try {
                if (in != null) {
                    in.close();
                }
            } catch (IOException ex) {
                System.out.println("关闭流异常");
            }
        }
        return jsonObject;
    }


    /**
     * 发送post请求(返回json)
     *
     * @param url
     * @param param
     * @return
     */
    public static JSONObject sendPost(String url, String param) {
        PrintWriter out = null;
        BufferedReader in = null;
        JSONObject jsonObject = null;
        String result = "";
        try {
            URL realUrl = new URL(url);
            // 打开和URL之间的连接
            URLConnection conn = realUrl.openConnection();
            // 发送POST请求必须设置如下两行
            conn.setDoOutput(true);
            conn.setDoInput(true);
//            conn.addRequestProperty("Cookie", "stay_login=1 smid=DumpWzWQSaLmKlFY1PgAtURdV_u3W3beoei96zsXkdSABwjVCRrnnNBsnH1wGWI0-VIflgvMaZAfli9H2NGtJg id=EtEWf1XZRLIwk1770NZN047804");//设置获取的cookie
            // 获取URLConnection对象对应的输出流(设置请求编码为UTF-8)
            out = new PrintWriter(new OutputStreamWriter(conn.getOutputStream(), "UTF-8"));
            // 发送请求参数
            out.print(param);
            // flush输出流的缓冲
            out.flush();
            // 获取请求返回数据(设置返回数据编码为UTF-8)
            in = new BufferedReader(
                    new InputStreamReader(conn.getInputStream(), "UTF-8"));
            String line;
            while ((line = in.readLine()) != null) {
                result += line;
            }
            jsonObject = JSONObject.parseObject(result);
        } catch (IOException e) {
            e.printStackTrace();
        } finally {
            try {
                if (out != null) {
                    out.close();
                }
                if (in != null) {
                    in.close();
                }
            } catch (IOException ex) {
                ex.printStackTrace();
            }
        }
        return jsonObject;
    }

}
7.其他类
package com.test.util;

import javax.net.ssl.X509TrustManager;
import java.security.cert.X509Certificate;

public class MyX509TrustManager implements X509TrustManager {

    @Override
    public void checkClientTrusted(X509Certificate[] chain, String authType) {
    }

    @Override
    public void checkServerTrusted(X509Certificate[] chain, String authType) {
    }

    @Override
    public X509Certificate[] getAcceptedIssuers() {
        return null;
    }
}
文章中涉及的代码已经贴出,如果觉得小编写的不错的话 ,可以给小编点个赞喔 谢谢。
有什么问题的话欢迎评论区留言。


