AWS Lambda 部署 SpringBoot 应用
AWS Lambda 部署 SpringBoot 应用
配置 AWS CLI 和 Severless
AWS CLI 和 Serverless 都可以用于部署 Serverless 应用
获取密钥
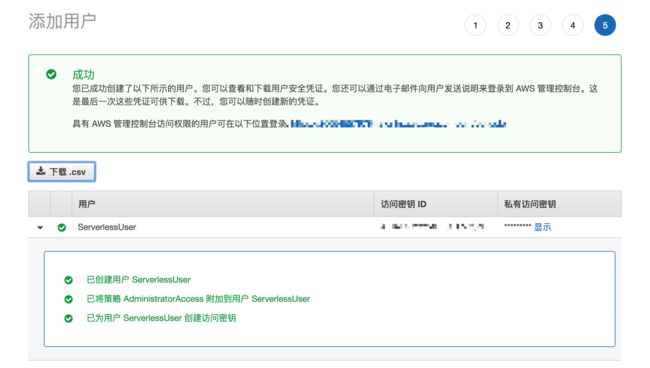
- 登录 AWS, 在服务中搜索并选择 IAM,之后选择用户,添加用户
- 输入用户名,选择编程访问
- 选择权限-直接附加现有策略,搜索
AdministratorAccess并选中(有最高权限)
- 选择下一步直到完成,然后保存好密钥(只会出现这一次,否则就只能重新创建)
安装配置 AWS CLI
安装
参考 AWS 命令行界面 安装
- Win 下载 https://s3.amazonaws.com/aws-cli/AWSCLI64.msi 安装
- Mac/Linux 执行
pip install awscli
配置 AWS CLI
aws configure
然后输入刚才的密钥的 Key 和 Secret,Region 可以选择常用的 region,如us-east-1
安装配置 Severless
安装
npm install -g serverless

或

yarn global add serverless
配置
serverless config credentials --provider aws --key YOUR_KEY --secret YOUR_SECRET
安装配置 AWS SAM Local
aws-sam-local 是用于本地调试 Serverless 应用的工具
安装
npm install -g aws-sam-local

或

yarn global add aws-sam-local
创建 Spring Boot 应用
通过 Maven 插件快速生成
mvn archetype:generate \
        -DgroupId=io.github.helloworlde \
        -DartifactId=serverless-spring-boot \
        -Dversion=1.0-SNAPSHOT \
        -DarchetypeGroupId=com.amazonaws.serverless.archetypes \
        -DarchetypeArtifactId=aws-serverless-springboot2-archetype \
        -DarchetypeVersion=1.3.1
- 项目文件
.
├── README.md
├── build.gradle
├── pom.xml
├── sam.yaml
└── src
    ├── assembly
    │   └── bin.xml
    ├── main
    │   ├── java
    │   │   └── io
    │   │       └── github
    │   │           └── helloworlde
    │   │               ├── Application.java
    │   │               ├── StreamLambdaHandler.java
    │   │               └── controller
    │   │                   └── PingController.java
    │   └── resources
    │       └── application.properties
    └── test
        └── java
            └── io
                └── github
                    └── helloworlde
                        └── StreamLambdaHandlerTest.java
手动创建
- 创建 SpringBoot 应用
- 修改 build.gradle
buildscript {
    ext {
        springBootVersion = '2.1.1.RELEASE'
    }
    repositories {
        mavenCentral()
    }
    dependencies {
        classpath("org.springframework.boot:spring-boot-gradle-plugin:${springBootVersion}")
    }
}


apply plugin: 'java'
apply plugin: 'org.springframework.boot'
apply plugin: 'io.spring.dependency-management'


archivesBaseName = 'serverless-spring-boot'
group = 'io.github.helloworlde'
version = '0.0.1-SNAPSHOT'
sourceCompatibility = 1.8

repositories {
    jcenter()
    mavenLocal()
    mavenCentral()
}

dependencies {
    compile(
            'org.springframework.boot:spring-boot-starter-web',
            'com.amazonaws.serverless:aws-serverless-java-container-spring:[1.0,)',
            'io.symphonia:lambda-logging:1.0.1'
    )

    testCompile("junit:junit:4.12")
}

task buildZip(type: Zip) {
    from compileJava
    from processResources
    into('lib') {
        from(configurations.compileClasspath) {
            exclude 'tomcat-embed-*'
        }
    }
}

build.dependsOn buildZip
- 添加 PingController.java
package io.github.helloworlde.controller;


import org.springframework.web.bind.annotation.*;
import org.springframework.web.servlet.config.annotation.EnableWebMvc;

import java.util.HashMap;
import java.util.Map;


@RestController
@EnableWebMvc
public class PingController {
    @RequestMapping(path = "/ping", method = RequestMethod.GET)
    public Map<String, String> ping() {
        Map<String, String> pong = new HashMap<>();
        pong.put("pong", "Hello, World!");
        return pong;
    }
}
- 添加 StreamLamdbaHandler.java
StreamLamdbaHandler 相当于一个代理层,将访问 Lambda 的流量转发给 SpringBoot应用;handleRequest方法每次请求都会被调用
package io.github.helloworlde;


import com.amazonaws.serverless.exceptions.ContainerInitializationException;
import com.amazonaws.serverless.proxy.model.AwsProxyRequest;
import com.amazonaws.serverless.proxy.model.AwsProxyResponse;
import com.amazonaws.serverless.proxy.spring.SpringBootLambdaContainerHandler;
import com.amazonaws.services.lambda.runtime.Context;
import com.amazonaws.services.lambda.runtime.RequestStreamHandler;

import java.io.IOException;
import java.io.InputStream;
import java.io.OutputStream;


public class StreamLambdaHandler implements RequestStreamHandler {
    private static SpringBootLambdaContainerHandler<AwsProxyRequest, AwsProxyResponse> handler;
    static {
        try {
            handler = SpringBootLambdaContainerHandler.getAwsProxyHandler(Application.class);
        } catch (ContainerInitializationException e) {
            // if we fail here. We re-throw the exception to force another cold start
            e.printStackTrace();
            throw new RuntimeException("Could not initialize Spring Boot application", e);
        }
    }

    @Override
    public void handleRequest(InputStream inputStream, OutputStream outputStream, Context context)
            throws IOException {
        handler.proxyStream(inputStream, outputStream, context);
    }
}
- 添加 sam.yaml
sam 用于本地测试Serverless 应用,依赖于 Python 和 Docker
需要注意的是,Resources.ServerlessSpringBootFunction.Properties.CodeUri这个路径需要根据使用 Gradle 或 Maven 进行修改
AWSTemplateFormatVersion: '2010-09-09'
Transform: AWS::Serverless-2016-10-31
Description: AWS Serverless Spring Boot 2 API - io.github.helloworlde::serverless-spring-boot
Globals:
  Api:
    EndpointConfiguration: REGIONAL

Resources:
  ServerlessSpringBootFunction:
    Type: AWS::Serverless::Function
    Properties:
      Handler: io.github.helloworlde.StreamLambdaHandler::handleRequest
      Runtime: java8
      CodeUri: build/distributions/serverless-spring-boot.zip
      MemorySize: 512
      Policies: AWSLambdaBasicExecutionRole
      Timeout: 30
      Events:
        GetResource:
          Type: Api
          Properties:
            Path: /{proxy+}
            Method: any

Outputs:
  ServerlessSpringBootApi:
    Description: URL for application
    Value: !Sub 'https://${ServerlessRestApi}.execute-api.${AWS::Region}.amazonaws.com/Prod/ping'
    Export:
      Name: ServerlessSpringBootApi
测试
编译生成 zip
gradle clean build
测试应用接口
- 启动应用
- 访问
http://localhost:8080/ping,应当返回结果:
{
  "pong": "Hello, World!"
}
使用 SAM 测试
sam local start-api --template sam.yaml
curl -s http://127.0.0.1:3000/ping
将会看到输出结果:
{"pong":"Hello, World!"}%
部署
Serverless 部署
- 在项目根路径中添加 serverless.yml 配置
service: spring-boot-serverless

provider:
  name: aws
  runtime: java8

package:
  artifact: build/distributions/serverless-spring-boot.zip

functions:
  springBootServerless:
    handler: io.github.helloworlde.StreamLambdaHandler::handleRequest
    events:
      - http:
          path: /ping
          method: get
    timeout: 30
- 发布
sls deploy
日志:
sls deploy
Serverless: Packaging service...
Serverless: Uploading CloudFormation file to S3...
Serverless: Uploading artifacts...
Serverless: Uploading service serverless-spring-boot.zip file to S3 (12.73 MB)...
Serverless: Validating template...
Serverless: Updating Stack...
Serverless: Checking Stack update progress...
..............
Serverless: Stack update finished...
Service Information
service: spring-boot-serverless
stage: dev
region: us-east-1
stack: spring-boot-serverless-dev
resources: 10
api keys:
  None
endpoints:
  GET - https://cmu9z3fmd1.execute-api.us-east-1.amazonaws.com/dev/ping
functions:
  springBootServerless: spring-boot-serverless-dev-springBootServerless
layers:
  None
- 访问
访问 https://cmu9z3fmd1.execute-api.us-east-1.amazonaws.com/dev/ping
{
  "pong": "Hello, World!"
}
使用 AWS CLI 发布
上传到 S3
上传到 S3 时需要有一个 Bucket 存在,可以在 AWS 服务-S3 中创建
- 创建 Bucket
aws s3 mb s3://spring-boot-serverless --region us-east-1
- 上传应用
aws cloudformation package --template-file sam.yaml --output-template-file output-sam.yaml --s3-bucket spring-boot-serverless
这个命令执行之后会在项目根目录下生成一个 output-sam.yaml
输出
Uploading to e793ef8960075db672fce0a8ac65f03b  13353411 / 13353411.0  (100.00%)
Successfully packaged artifacts and wrote output template to file output-sam.yaml.
Execute the following command to deploy the packaged template
aws cloudformation deploy --template-file /Users/HelloWood/Dev/Projects/Serverless/serverless-spring-boot/output-sam.yaml --stack-name spring-boot-serverless
部署
aws cloudformation deploy --template-file /Users/HelloWood/Dev/Projects/Serverless/serverless-spring-boot/output-sam.yaml --stack-name spring-boot-serverless-demo --capabilities CAPABILITY_IAM
需要注意的是 --capabilities CAPABILITY_IAM会创建一个新的角色,会使用 AWSLambdaBasicExecutionRole,该策略仅允许该角色访问 Lambda 相关的资源,也可以使用 CAPABILITY_AUTO_EXPAND或CAPABILITY_NAMED_IAM使用已有的角色;创建后的角色可以在 AWS IAM 的角色下面管理
测试
- 获取应用信息
aws cloudformation describe-stacks --stack-name spring-boot-serverless-demo
{
    "Stacks": [
        {
            "StackId": "arn:aws:cloudformation:us-east-1:266545579784:stack/spring-boot-serverless-demo/1074b6a0-6f97-11e9-835b-0e348661d726",
            "StackName": "spring-boot-serverless-demo",
            "ChangeSetId": "arn:aws:cloudformation:us-east-1:266545579784:changeSet/awscli-cloudformation-package-deploy-1557103210/fe06fc3b-a353-4d42-814a-4e4f736a2026",
            "Description": "AWS Serverless Spring Boot 2 API - io.github.helloworlde::serverless-spring-boot",
            "CreationTime": "2019-05-06T00:37:01.857Z",
            "LastUpdatedTime": "2019-05-06T00:40:17.502Z",
            "RollbackConfiguration": {},
            "StackStatus": "CREATE_COMPLETE",
            "DisableRollback": false,
            "NotificationARNs": [],
            "Capabilities": [
                "CAPABILITY_IAM"
            ],
            "Outputs": [
                {
                    "OutputKey": "ServerlessSpringBootApi",
                    "OutputValue": "https://gf2c9fhhql.execute-api.us-east-1.amazonaws.com/Prod/ping",
                    "Description": "URL for application",
                    "ExportName": "ServerlessSpringBootApi"
                }
            ],
            "Tags": [],
            "EnableTerminationProtection": false,
            "DriftInformation": {
                "StackDriftStatus": "NOT_CHECKED"
            }
        }
    ]
}
- 访问 OutputValue 的 URL
curl https://gf2c9fhhql.execute-api.us-east-1.amazonaws.com/Prod/ping
{"pong":"Hello, World!"}%
页面手动部署
创建函数
- 选择服务 - Lambda - 函数 - 创建函数 - 从头开始创作
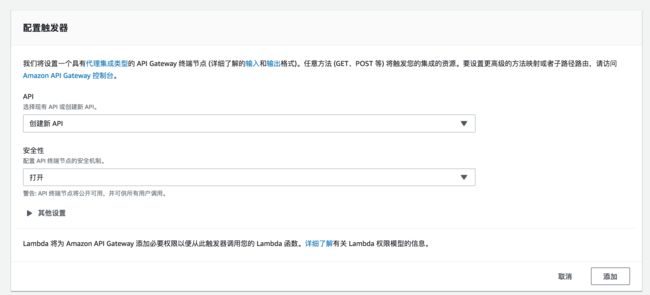
- 添加触发器,选择 API-Gateway 作为触发器,然后保存
- 点击Layers 的 Spring 应用,上传 zip,在
build/或target/下;运行语言选择 Java8,处理程序为io.github.helloworlde.StreamLambdaHandler::handleRequest,点击保存
测试
- 选择配置测试事件 - 创建新测试事件 - 选择
AWS API Gateway AWS Proxy,修改相关的path和httpMethod
- Gateway 的 URL 可以点击 API Gateway查看
项目地址
https://github.com/helloworlde/serverless-spring-boot
参考文章
- A complete guide for running Spring Boot MVC in the cloud using AWS Lambda
- 使用 Java 构建 Lambda 函数
- Installing the AWS SAM CLI on macOS
- Installing the AWS SAM CLI
- Key Tasks for the AWS Toolkit for JetBrains
- 如何看待 AWS Lambda
- aws-serverless-java-container
- Quick start Spring Boot


