Mac Pro下终端配置Zsh(iterm2 3.3.0 + oh-my-zsh + solarized配色)
Mac Pro下终端配置Zsh(iterm2 3.3.0 + oh-my-zsh + solarized配色)
- 完成配置后的终端具备功能:
- 1. 下载[iTerm2](https://www.iterm2.com/)
- 2.解压后安装iTerm2并打开
- 1. iTerm2 -> Make iTerm2 Default Term
- 2. 打开偏好设置preference
- 3.配色方案
- 4.安装oh-my-zsh
- 5.配置主题
- 1.安装字体库到系统字体册
- 2. 在iTerm2中应用字体和颜色
- 6.指令高亮
- 7.自动补全
- 8.修改iterm2终端显示用户名@主机名
完成配置后的终端具备功能:
- 语法高亮
- 命令行tab补全
- 自动提示符
1. 下载iTerm2
2.解压后安装iTerm2并打开
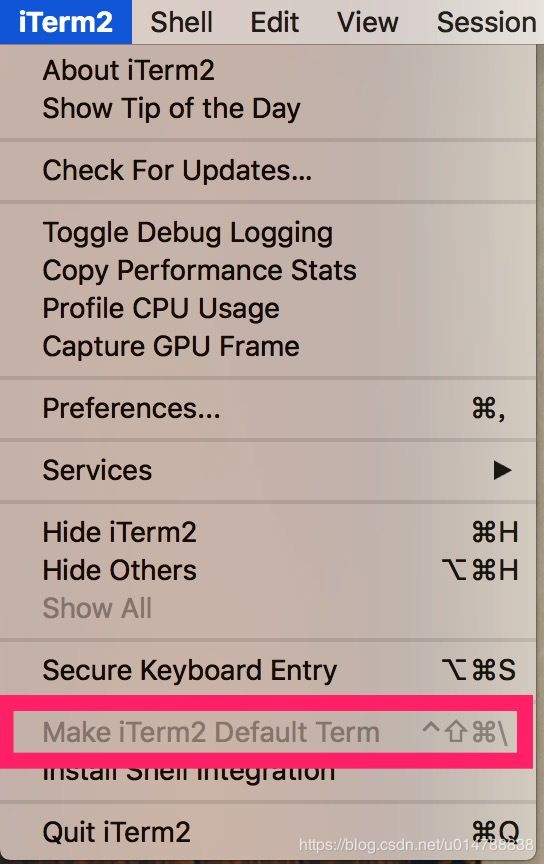
1. iTerm2 -> Make iTerm2 Default Term
2. 打开偏好设置preference
选中Keys,勾选Hotkey下的Show/hide iTerm2 with a system-wide hotkey,将热键设置为 ⌘+. ,这样你就可以通过 ⌘+. 全局热键来打开或关闭iTerm2窗口,非常方便。

3.配色方案
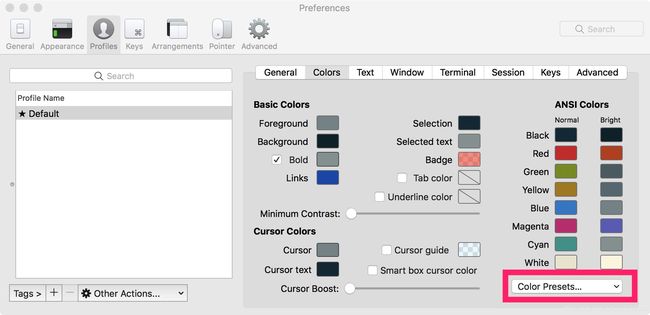
选用 solarized,下载解压,然后打开 iTerm2 下的偏好设置 preference ,点开 profiles 下的 Colors 选项,点击右下角的 Color Presets 选项,选择import ,导入解压到的 solarized 文件下的 /solarized/iterm2-colors-solarizedSolarized Dark.itermcolors 文件。

4.安装oh-my-zsh
github:https://github.com/robbyrussell/oh-my-zsh
官方提供 curl 和 wget 两种安装方式
curl 安装:
sh -c "$(curl -fsSL https://raw.githubusercontent.com/robbyrussell/oh-my-zsh/master/tools/install.sh)"
wget安装:
sh -c "$(wget -O- https://raw.githubusercontent.com/robbyrussell/oh-my-zsh/master/tools/install.sh)"
5.配置主题
安装oh-my-zsh成功后,用 vim 编辑隐藏文件 .zshrc,终端输入 vim ~/.zshrc
将 ZSH_THEME=“agnoster” zsh主题修改为 “agnoster”
注意:应用“agnoster"主题需要特殊的字体支持,否则会出现乱码情况,使用 Powerline 字体库。
1.安装字体库到系统字体册
git clone https://github.com/powerline/fonts.git --depth=1
cd fonts
./install.sh
cd ..
rm -rf fonts
2. 在iTerm2中应用字体和颜色
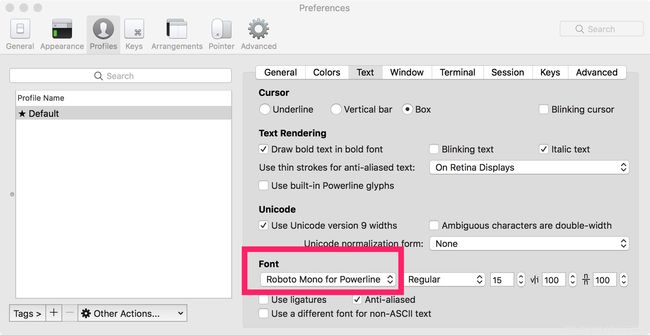
iTerm -> Preferences -> Profiles ->Text ->Font 选择 Roboto Mono for Powerline

重新打开iTerm2窗口即可以看到字体效果
iTerm -> Preferences -> Profiles -> Colors -> Color Presets 更改颜色为Solarized Dark

6.指令高亮
指令高亮效果作用是当用户输入正确命令时指令会绿色高亮,错误时命令红色高亮。
1、切换目录
cd ~/.oh-my-zsh/custom/plugins
2、下载插件
git clone git://github.com/zsh-users/zsh-syntax-highlighting.git
3、配置插件
打开.zshrc文件,查找到plugins字段。
vim ~/.zshrc
/plugins
在后面添加zsh-syntax-highlighting插件名称。(zsh默认支持git,所以安装时自带安装了git插件,所以这里首次编辑时发现已经存在有git插件了)
plugins=(zsh-syntax-highlighting git)
修改完成后,保存文件
7.自动补全
zsh 的命令补全功能非常强大,可以补齐路径,补齐命令,补齐参数等。
1、切换目录
cd ~/.oh-my-zsh/custom/plugins
2、下载插件
git clone git://github.com/zsh-users/zsh-autosuggestions $ZSH_CUSTOM/plugins/zsh-autosuggestions
3、配置插件
打开.zshrc文件,查找到plugins字段。
vim ~/.zshrc
/plugins
添加zsh-autosuggertions
plugins=(zsh-autosuggestions zsh-syntax-highlighting git)
4、切换目录,利用vim打开配置文件zsh-autosuggestions.zsh
cd ~/.oh-my-zsh/custom/plugins/zsh-autosuggestions
vim zsh-autosuggestions.zsh
5、修改提示内容显示大小。
查找到ZSH_AUTOSUGGEST_HIGHLIGHT_STYLE,将其值由默认值'fg=8'修改为'fg=10'
保存修改后退出。
8.修改iterm2终端显示用户名@主机名
如果用的是 item2 + oh-my-zsh 组合,假如你用的主题是 agnoster,修改方法是进入 oh-my-zsh/themes/然后 vi agnoster.zsh-theme,编辑主题配置文件,找到如下代码:
# Context: user@hostname (who am I and where am I)
prompt_context() {
  if [[ "$USER" != "$DEFAULT_USER" || -n "$SSH_CLIENT" ]]; then
   # 修改如下代码,@Mac可以你自己定义,也可以直接把该行注释掉
   # prompt_segment black default "%(!.%{%F{yellow}%}.)$USER@%m"
   prompt_segment black default "%(!.%{%F{yellow}%}.)$USER@Mac"
  fi
}
