【Project】Face Recognition
文章目录
- 准备工作
- 软件设计
- 预期功能
- 模块规划
- 数据库基本操作:db.py
- 数据格式
- 连接数据库
- 其他数据库操作
- 人脸识别基本操作:face_recog.py
- 其他基本操作:myLib.py
- 显示界面设计
- GUI设计--mainWin
- GUI设计--win_inputData
- GUI设计--win_recogFaceInPic
- GUI设计--win_recogFaceInVideo
- 逻辑功能设计
- mainWin.py主窗口模块
- win_inputData.py录入数据模块
- 全局变量
- 类初始化
- 成员函数
- win_recogFaceInPic.py照片中人脸匹配
- 类初始化
- 成员函数
- win_recogFaceInVideo.py视频中人脸匹配
- 类初始化
- 成员函数
- 软件入口:main. py
- 打包发布
- 安装Pyinstaller模块
- 使用pyinstaller打包文件
- 最后
准备工作
实现本工程需要以下基础:
- face_recognition的使用:Face Recognition 人脸识别
- Qt的基本用法:初识QT
- MongoDB基础:MongoDB
- openCV基本用法:OpenCV
软件设计
预期功能
本工具分以几个功能:
- 人脸特征数据录入数据库;
- 识别未知图片中人脸并标记出来;
- 识别摄像头或视频文件画面中人脸,并标记出来。
运行本工具时,先弹出主界面。
主界面包含三个按钮:“录入人脸数据”,“识别图中人脸”,“识别视频画面中人脸”。
点击这三个按钮后,弹出对应的功能窗口,并隐藏主界面窗口。
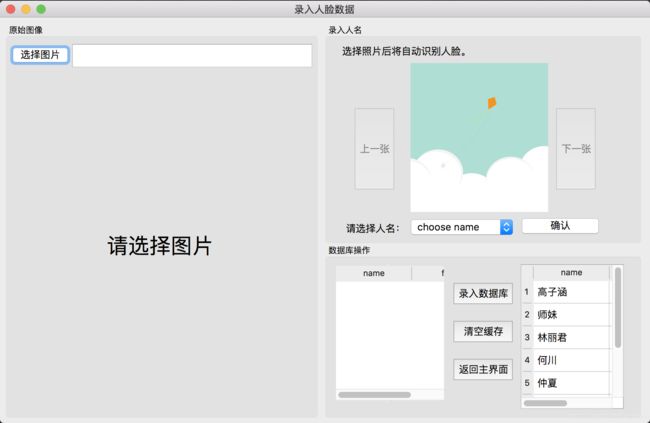
录入人脸数据窗口主要分三块,可实现如下功能:
groupBox1:用户从本机中选择一张照片打开,原图显示在界面的左侧的groupBox1中,点击“识别图中人脸”按钮,软件识别出图中所有人脸。
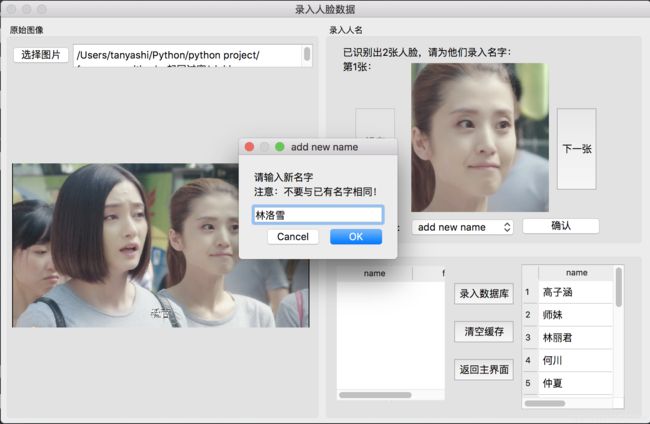
groupBox2:在界面中间的groupBox2中显示出识别出的第一张人脸头像,头像下方的选项框可选择数据库中已有数据的人名,也可以添加新人物名,用户写好名字后点击“确认按钮”,提取出该头像的面部特征信息编码,每张脸的特征编码都是一条128维的向量,将该组姓名和特征编码加入缓存中,用户点击下一张按钮,跳到下一张人脸头像,等待用户确认姓名。以此循环,直到用户确认完识别出的全部头像名字后,用户点击“提交数据库”按钮,则将缓存中数据逐条更新到数据库。
groupBox3:包含两个table,第一个table用于显示已确认名字的缓存数据,第二个table主要用于显示数据库中已存入的所有人物名字和对应的面部特征信息条数。用户每提交一次人物信息,更新一次此table。
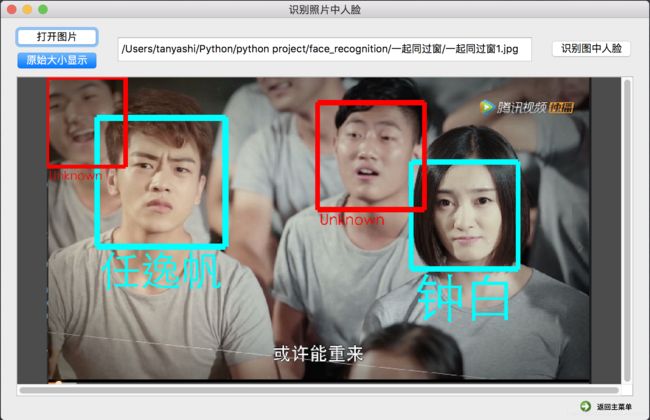
识别图中人脸窗口有以下功能:
用户从本机中选择一张照片打开,原图显示在界面中,点击“识别人物”按钮,软件先定位出照片中所有人脸并用方框标出,然后依次将识别出的人脸与数据库中的所有特征编码比对,匹配成功则在显示的方框下方显示人物名字(绿色),匹配失败则提示“unknown”(红色)。
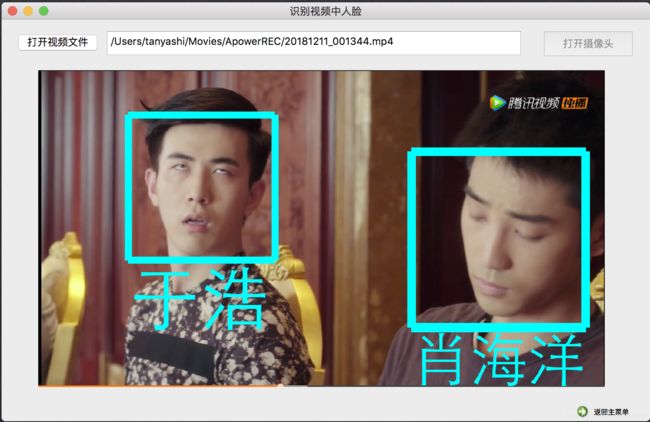
识别视频画面中人脸窗口有以下功能:
用户点击“启动摄像头”按钮启动本机摄像头,或点击“打开视频文件”按钮选择视频文件,视频画面显示在界面中间,点击“识别人脸”按钮后,软件识别画面中人脸,与数据库中面部特征比对,找到匹配的人物则在画面中标出绿色人名,否则用红色标记出“unknown”。
模块规划
本工程可划分为以下几个模块:
-
数据库基本操作模块:
db.py -
人脸识别基本操作模块:
face_recog.py -
其他基本操作:
myLib.py -
显示界面模块:
主界面:ui_mainWin.ui,ui_mainWin.py;
录入人脸数据窗口:ui_win_inputData.ui,ui_win_inputData.py;
识别图中人脸窗口:ui_win_recogFaceInPic.ui,ui_win_recogFaceInPic.py;
识别视频中人脸窗口:ui_win_recogFaceInVideo.ui,ui_win_recogFaceInVideo.py; -
逻辑函数模块:
mian_win.py
win_inputData.py
win_recogFaceInPic.py
win_recogFaceInVideo.py
数据库基本操作:db.py
本模块定义了数据库中数据的存储格式,并提供主要的数据库操作接口,文件名db.py。
数据格式
MongoDB数据库中数据以键值对形式表示,因此本例中数据将已字典形式导入,存储每个人物的信息格式如下:
{
    "name":,
    "facial_feature":[,,...]
}
其中
由于每条特征信息都是一个128维向量,所以feature1本身是一个包含128个数字元素的list,因此[是一个二维数组。数组的长度即为该人物的特征向量数。
连接数据库
引用本数据库时将自动连接本地数据库并创建数据集合:
from pymongo import MongoClient
#创建本地连接,localhost指本地连接,若要连接到网络中的数据库,localhost改成ip地址
conn = MongoClient('localhost', 27017)
#连接到face_recog数据库,没有则自动创建,且在本模块中用db表示
db = conn.face_recog
#使用facial_features集合,没有则自动创建,且在本模块中用face_data表示
face_data = db.facial_features
其他数据库操作
- get_features_of(name)
用于获取指定人物的全部特征数据;
输入参数:name为人物名称字符串;
返回值:列表形式,当数据库中能查找到指定人物的信息时,返回特征列表(二维数组),当数据库中不存在此人物信息时,返回空列表[]。
代码如下:
def get_features_of(name):
    data = [i for i in face_data.find({"name":name})]
    if data:
        return data[0]['facial_feature']
    else:
        return []
- insert_data(name,facial_feature)
用于插入一张面部信息;
输入参数:name为人物名称字符串,facial_feature为一张人脸的特征编码向量,即包含128元素的一维数组。
本函数先获取数据库中该人物的特征信息,并将待插入的特征向量添加到列表的最后,最后将全部特征信息更新到数据库中,若数据库中不存在指定人物的数据,则插入一条新信息。
def insert_data(name,facial_feature):
    features = get_features_of(name)
    features += [facial_feature]
    face_data.update({"name": name}, {'$set': {"facial_feature": features}},upsert=True)
- delet_data_of(name)
用于删除指定人物的全部信息
def delet_data_of(name):
    face_data.remove({'name': name})
- get_all_names()
用于获取数据库中全部人物名称,在数据库中查找全部信息,将所有的人物名称以列表的形式返回。
def get_all_names():
    names = []
    for i in face_data.find():
        names.append(i['name'])
    return names
- get_all_namesAndNum()
用于获取数据库中全部人物及数据量,在数据库中查找全部信息,将所有的人物名称以二维列表的形式返回,供显示数据库信息使用。
返回值格式[name,number].
def get_all_namesAndNum():
    name_nums = []
    for i in face_data.find():
        name_nums.append([i['name'],len(i['facial_feature'])])
    return name_nums
- get_all_features()
用于获取全部面部特征向量;
返回数据库中全部特征向量列表及与之对应的人物列表,供人脸匹配使用。
def get_all_features():
    features = []
    names = []
    for i in face_data.find():
        features += i['facial_feature']
        names += [i['name']] * len(i['facial_feature'])
    return features,names
注意:取name的时候必须先装进列表里再复制,否则字符串会被拆成字符复制。
人脸识别基本操作:face_recog.py
本模块封装了一些本工具中常用的面部识别操作接口,且包含了录入数据时常用的全局变量及其操作:
- find_faces_locations_in(f_name)
用于识别出图中全部人脸,并对每张脸定位。
输入图像文件名,返回列表[top, right, bottom, left].
def find_faces_locations_in(f_name):
    # 将jpg文件加载到numpy 数组中
    image = face_recognition.load_image_file(f_name)
    face_locations = face_recognition.face_locations(image)
    # 使用CNN模型, 另请参见: find_faces_in_picture_cnn.py
    # face_locations = face_recognition.face_locations(image, number_of_times_to_upsample=0, model="cnn")
    return face_locations
- get_img_by_location(img,location)
由上面的函数获取的locations参数截取出单张脸的图片,且图片范围扩大20%;
返回值格式与第一个参数相同,第一个参数是np格式的原始图像,第二个参数为需要截取的图像框位置信息。
def get_img_by_location(img,location):
    top, right, bottom, left = location
    print(top, bottom, left, right,'raw')
    w = right - left
    h = bottom - top
    top = int(top - h / 5.0)
    top = top if top >= 0 else 0
    bottom = int(bottom + h / 5.0)
    bottom = bottom if bottom <= img.shape[0] else img.shape[0]
    right = int(right + w / 5.0)
    right = right if right <= img.shape[1] else img.shape[1]
    left = int(left - h / 5.0)
    left = left if left >= 0 else 0
    print(top,bottom,left,right)
    return img[top:bottom, left:right]
- find_faces_in(f_name)
找出图像文件中所有的面部特征信息,保存在全局变量中faces_info,face_num和face_now。
输入参数为文件名(含路径);返回值是faces_info,也可通过import此全局变量获取。
此函数主要供录入数据窗口中加载图片后调用。
此函数中实现:加载图片,识别出图片中所有人脸,并分割出人脸图片,每张人脸的图像信息(覆盖)保存到全局变量faces_info中,并初始化全局变量face_num和face_now。
face_num表示本次识别的照片中识别出的人脸总数;
face_now表示当前在界面显示出人脸照片在faces_info中的编号;
faces_info为list型,其元素是字典,包含以下键值对:
face[‘location’] :表示当前人脸在原始图片中的位置,列表型[top, right, bottom, left]
face[‘np_img’] :存储当前人脸图像,为numpyarray型的RGB数据
face[‘Qimg’] :存储当前人脸图像,为QImage型,便于在pt环境中使用和显示,可转换成pix_map型后显示在label中。
代码如下:
def find_faces_in(f_name):
    image = face_recognition.load_image_file(f_name)
    face_locations = face_recognition.face_locations(image)
    global face_num,face_now,faces_info
    faces_info = []
    face_num = len(face_locations)
    face_now = 0
    for face_location in face_locations:
        face = {}
        np_img = get_img_by_location(image,face_location)
        face['location'] = face_location
        face['np_img'] = np_img
        img2 = cv2.resize(src=np_img, dsize=None, fx=0.2, fy=0.2)
        face['Qimg'] = QImage(img2[:], img2.shape[1], img2.shape[0], img2.shape[1] * 3, QImage.Format_RGB888)
        faces_info.append(face)
    return faces_info
- get_face_encoding_of(face_image)
获取单张脸的list型特征数据。
输入参数是是np的图像数据,输入图像中最好只包含一张脸,因为本函数只返回检测到的第一张脸的特征信息编码。
face_recognition.face_encodings()方法编码出的特征信息是nparray型,而数据库不支持此类型数据的存储,因此通过tolist()转换成list型。
#返回单张脸的list型特征数据
def get_face_encoding_of(face_image):
    encode_nparray = face_recognition.face_encodings(face_image)[0]
    encode_list = encode_nparray.tolist()
    return encode_list
- get_featuresArray_fromDB()
获取数据库中所有面部特征信息列表和与之对应的名字列表,用于面部特征比对用。
由于数据库中存储的特征信息是list型,所以在使用特征信息列表时,需先将list型转换成array型,才能供特征信息比对的接口使用。numpy.array()方法用于list到array的转换。
返回值是包含array型元素的列表和名字列表。
def get_featuresArray_fromDB():
    features_li , names = get_all_features()
    features_array = []
    for i in features_li:
        features_array.append(numpy.array(i))
    return features_array,names
- update_knownFace_list()
此函数用于更新全局变量known_face_encodings, known_face_names。
在特征信息比对之前先要将数据库中的全部特征信息加载出来,此函数用于将数据库中全部特征信息和对应的名字列表更新到本模块的全局变量known_face_encodings, known_face_names中。在匹配人脸之前调用,识别视频中人脸时不需要处理每一帧时都更新特征信息,只需要在开始播视频之前调用一次即可。
def update_knownFace_list():
    global known_face_encodings, known_face_names
    known_face_encodings, known_face_names = get_featuresArray_fromDB()
- recog_in( frame , update_features = True ,frame_type = ‘rgb’,scale_rate = 1.0 )
识别一帧图像中的人脸,并将所有识别出的人脸名字标记出来。
输入参数:
frame :一帧图像数据,可以是rgb格式也可以是bgr格式,传入bgr格式数据时还需要通过frame_type指明;
update_features :选择是否更新数据库中数据,默认更新;
frame_type :用于指明第一个参数传入的是rgb数据还是bgr数据;
scale_rate :缩放倍率,当图像帧太大时识别速度会较慢,尤其是在处理视频数据时会影响用户体验,此时适当的缩小图像尺寸可以加快识别速度。默认值为1.0表示不缩放。
以下代码是识别人脸后使用CV2加头像框和标签的过程:
#视频和图片通用:
#video call: recog_in( bgrframe , update_features  = False ,frame_type = 'bgr_frame',scale_rate = 4.0 )
#pic call: recog_in( rgbframe , update_features  = True , frame_type = 'rgb_frame',scale_rate = 1.0 )
def recog_in( frame , update_features  = True ,frame_type = 'rgb',scale_rate = 1.0 ):
    #预处理
    #是否更新数据库中读出的数据
    if update_features :
        update_knownFace_list()
    #是否需要缩放图像后做识别,scale_rate=2.0时表示画面缩小一倍
    if scale_rate != 1.0 :
        frame2 = cv2.resize(frame, (0, 0), fx = (1/scale_rate) , fy = ( 1/scale_rate ) )
    else:
        frame2 = frame
    #根据指定图像类型准备好rgb和bgr两种数据
    if frame_type == "rgb":
        rgb_frame= frame
        bgr_frame = cv2.cvtColor(frame, cv2.COLOR_RGB2BGR)  #cv画图用
    else:
        rgb_frame = cv2.cvtColor(frame2, cv2.COLOR_BGR2RGB)
        bgr_frame = frame
    #编码面部特征
    face_locations = face_recognition.face_locations(rgb_frame)
    face_encodings = face_recognition.face_encodings(rgb_frame, face_locations)
    face_names = []
    for face_encoding in face_encodings:
        #对图中识别出的人脸一次与数据库中已知人脸信息比对
        matches = face_recognition.compare_faces(known_face_encodings, face_encoding)
        name = "Unknown"# 默认为unknown
        if True in matches:
            #若匹配上,则找出对应的name
            first_match_index = matches.index(True)
            name = known_face_names[first_match_index]
        face_names.append(name)
    # 将捕捉到的人脸标记出来
    for (top, right, bottom, left), name in zip(face_locations, face_names):
        # 缩放后的图像放大回原尺寸,在原图上标记
        top *= scale_rate      #视频 scale_rate = 4
        right *= scale_rate
        bottom *= scale_rate
        left *= scale_rate
        #使用CV2标记出人脸框和名字
        # 矩形框
        cv2.rectangle(bgr_frame, (left, top), (right, bottom), (0, 0, 255), 2)
        # 加上标签
        cv2.rectangle(bgr_frame, (left, bottom - 35), (right, bottom), (0, 0, 255), cv2.FILLED)
        font = cv2.FONT_HERSHEY_DUPLEX
        cv2.putText(bgr_frame, name, (left + 6, bottom - 6), font, 2.0, (255, 255, 255), 1)
    #CV2加过标签的图像再转换回rgb格式
    rgb_npImg = cv2.cvtColor(bgr_frame, cv2.COLOR_BGR2RGB)
    #rgb数组转换成QImage格式数据
    Qimg = QImage(rgb_npImg[:], rgb_npImg.shape[1], rgb_npImg.shape[0], rgb_npImg.shape[1] * 3, QImage.Format_RGB888)
    return Qimg
测试后发现以上代码存在一些BUG,例如:
1.名字标签只能显示英文字符,中文会变成乱码,这是因为cv2官方并没有提供中文字体,因此需要自行导入编译;
2.头像框的线是固定粗细,当图像尺寸很大时甚至会看不见头像框;
3.标签字体大小固定;
4.当人脸相较于画面很小时,头像框太小,基本看不清人脸;
5.匹配出名字的人脸与未匹配成功的人脸标记颜色不同,不易读。
针对以上问题,做出了如下改动:
1.使用CV2加标签和头像框改为使用PIL模块加标签,因为PIL可引用中文字体文件,且可避免rgb与bgr格式的转换问题;
2.画头像框时的线宽根据头像框大小设置,线宽设置为头像框高度的1/20;
3.画头像框和加字体时,根据name做区分,name为“unknown”时标为红色,否则为绿色;
4.识别图中人脸界面中添加了“原始尺寸显示/适应窗口显示”按钮,当画面太小时可切换为原始大小显示;
5.字体大小由头像框宽度除以字符数算出,确保无论字符刚好显示在头像框下面,字符不突兀。
改为以下代码:
def recog_in( frame , update_features  = True ,frame_type = 'rgb',scale_rate = 1.0 ):
    from PIL import Image, ImageDraw, ImageFont
    #预处理
    if update_features :
        update_knownFace_list()
    if scale_rate != 1.0 :
        frame2 = cv2.resize(frame, (0, 0), fx = (1/scale_rate) , fy = ( 1/scale_rate ) )
    else:
        frame2 = frame
    if frame_type == "rgb":
        rgb_frame= frame
        rgb_frame_big = frame
        #bgr_frame = cv2.cvtColor(frame, cv2.COLOR_RGB2BGR)  #cv画图用
    else:
        rgb_frame = cv2.cvtColor(frame2, cv2.COLOR_BGR2RGB)
        #bgr_frame = frame
        rgb_frame_big = cv2.cvtColor(frame, cv2.COLOR_BGR2RGB)
    #编码
    face_locations = face_recognition.face_locations(rgb_frame)
    face_encodings = face_recognition.face_encodings(rgb_frame, face_locations)
    face_names = []
    for face_encoding in face_encodings:
        # 默认为unknown
        matches = face_recognition.compare_faces(known_face_encodings, face_encoding,tolerance=0.39)
        name = "Unknown"
        if True in matches:
            first_match_index = matches.index(True)
            name = known_face_names[first_match_index]
        face_names.append(name)
    # 将捕捉到的人脸标记出来
    pimg = Image.fromarray(rgb_frame_big.astype('uint8')).convert('RGB')
    print(type(pimg))
    draw = ImageDraw.Draw(pimg)
    for (top, right, bottom, left), name in zip(face_locations, face_names):
        # Scale back up face locations since the frame we detected in was scaled to 1/4 size
        top = int(top * scale_rate)      #视频 scale_rate = 4
        right =int(right * scale_rate)
        bottom = int(bottom * scale_rate)
        left = int(left * scale_rate)

        w = right - left
        h = bottom - top
        top = int(top - h / 5.0)
        top = top if top >= 0 else 0
        bottom = int(bottom + h / 5.0)
        bottom = bottom if bottom <= frame.shape[0] else frame.shape[0]
        right = int(right + w / 5.0)
        right = right if right <= frame.shape[1] else frame.shape[1]
        left = int(left - h / 5.0)
        left = left if left >= 0 else 0
        #0,0,255蓝 #0,255,255蓝绿 #255,0,0红 #0,255,0绿 #255,255,0黄
        if name == "Unknown":
            fill = (255,0,0)
        else:
            fill = (0,255,0)
        line_width = int((bottom-top)/20)
        draw.line([(left, top), (left, bottom)], fill=fill,width=line_width)
        draw.line([(right, top), (right, bottom)], fill=fill,width=line_width)
        draw.line([(left, top), (right, top)], fill=fill,width=line_width)
        draw.line([(left, bottom), (right, bottom)], fill=fill,width=line_width)
        font_size = int((bottom - top - 12) // len(name))
        print(font_size)
        font = ImageFont.truetype('STHeiti Light.ttc', font_size, encoding='utf-8')
        # 第一个参数是文字的起始坐标,第二个需要输出的文字,第三个是字体颜色,第四个是字体类型
        draw.text((left + 6, bottom + 10), name, fill, font=font)
    rgb_npImg = numpy.array(pimg)#np.array(rgb_frame_big)
    Qimg = QImage(rgb_npImg[:], rgb_npImg.shape[1], rgb_npImg.shape[0], rgb_npImg.shape[1] * 3, QImage.Format_RGB888)
    return Qimg
其他基本操作:myLib.py
- loadFile(self , fileType)
弹出选择文件对话框,支持图像/视频格式的文件选择。
第一个返回值表示用户选择的完整文件名(含路径),第二个返回值表示是否成功选择到文件名,当第二返回值为True时第一返回值才有效。
#加载文件,第一个返回值是文件名
def loadFile(self , fileType):
    if fileType in ['p','P','photo','pic','*.jpg',' *.gif ','*.jpeg',' *.png']:
        type =  'Image files(*.jpg *.gif *.jpeg *.png)'
        title = '加载图片'
        path = './'
    elif fileType in ['v','V','video','mp4','*.mp4',' *.avi','*.mkv',' *.mov']:
        type = 'Video files(*.mp4 *.avi *.mkv *.mov)'
        title = '加载视频'
        path = './'
    return  QtWidgets.QFileDialog.getOpenFileName( self , title, path ,type)
- show_img_in_lable_center( label, pix_map)
用于在指定标签中居中显示指定图像文件。
第一个参数传用来显示图像的label,第二个参数是pic_map型的图像。
本函数将会将pix_map图像自适应的显示到label的正中间。若图像比label大,则将图像缩小到最大可完整显示在label中的大小后居中显示在label中;若图像比label小,则将图片宽高都居中按原始尺寸显示在label中。
def show_img_in_lable_center( label, pix_map):
    img_w = pix_map.width()
    img_h = pix_map.height()
    lab_w = label.width()
    lab_h = label.height()
    if (img_w > lab_w) | (img_h > lab_h):
        w_rate = float(img_w) / float(lab_w)
        h_rate = float(img_h) / float(lab_h)
        if w_rate >= h_rate:
            w = lab_w
            h = int(img_h / w_rate)
        else:
            w = int(img_w / h_rate)
            h = lab_h
    else:
        w = img_w
        h = img_h
    label.setPixmap(pix_map.scaled(w, h))
显示界面设计
GUI设计–mainWin
工具主界面“mainWin”主要包含三个按钮:录入人脸数据(button_inputData),识别图中人脸(button_recogFaceInPic),识别视频画面中人脸(button_recogFaceInVideo),点击这三个按钮后弹出对应功能的窗口界面:win_inputData,win_recogFaceInPic,win_recogFaceInVideo.

GUI设计–win_inputData
此窗口界面分三部分:选择图片区,显示待识别图片区,录入人物信息区。
- 选择图片区给出一个“选择图片”(
button_choosePic)按钮,和一个文件地址显示/编辑框(edit_picPath),用户点击按钮,弹出加载文件选项框,用户选择好文件后,文件路径显示在edit_picPath中。还包含一个图像显示框(label_rawPic),用户选择完图片地址后,此标签中居中显示出用户选择的原始图像。 - 录入人物信息区:包含一个头像显示框(
label_faceImg),上一张按钮button_lastFace、下一张按钮button_nextFace,一个列表选项框(comboBox_chooseName)和一个他的伙伴标签,一个确认按钮(button_nameConfirm),提示信息标签label_recogNote。 - 缓存与数据库区:包含有数据库已有信息显示列表
table_nameInDB,显示数据库已有人物名字和信息数量;缓存数据信息显示列表table_confirmedNames,显示已加入缓存中的人物名字和他是当前识别出的第几张人脸;添加缓存数据到数据库的按钮button_addData2DB;清空缓存按钮button_clearCache;返回主界面按钮button_back2main.


GUI设计–win_recogFaceInPic
识别图中人脸界面中主要包括:打开图片按钮button_openPicFile,文件地址显示框textEdit,识别图中人脸按钮button_recogFaceInPic,带滚动条的图像显示框scrollArea和label,图像显示大小切换按钮button_picBigSize,和返回主菜单按钮commandLinkButton。


GUI设计–win_recogFaceInVideo
识别视频中人脸界面主要包括:打开视频文件按钮button_openVideoFile,文件地址显示框textEdit,打开摄像头按钮button_openCamera,画面显示框label,和返回主菜单按钮commandLinkButton。


逻辑功能设计
mainWin.py主窗口模块
此模块很简单,定义了主窗口类MainWindow,他继承于界面Ui_MainWindow和QtWidgets.QMainWindow类,此类中只包含三个按钮和他们对应的槽函数,实现窗口间的切换。
初始化中包含三个按钮跟槽函数的连接,如下:
class MainWindow(QtWidgets.QMainWindow, Ui_MainWindow):
    def __init__(self, parent=None):
        super(MainWindow, self).__init__(parent)
        self.setupUi(self)
        self.button_inputData.clicked.connect(self.button_inputData_clicked_Event)
        self.button_recogFaceInPic.clicked.connect(self.button_recogFaceInPic_clicked_Event)
        self.button_recogFaceInVideo.clicked.connect(self.button_recogFaceInVideo_clicked_Event)
    #windowList成员用于在各窗口间切换
    windowList = []
MainWindow类除了初始化函数,还包含一下三个成员函数,如下:
1.button_inputData_clicked_Event()
此函数用于关闭主窗口,打开录入数据窗口。
#添加若干个槽函数
def button_inputData_clicked_Event(self):
    #实例化一个录入数据窗口
    winInputData = Win_InputData()
    #禁止窗口最大化
    winInputData.setWindowFlags(winInputData.windowFlags() & ~ QtCore.Qt.WindowMaximizeButtonHint)
    #禁止改变窗口大小
    winInputData.setFixedSize(winInputData.width(), winInputData.height())
    #用于连接主窗口和新窗口
    self.windowList.append(winInputData)
    #关闭主窗口
    self.close()
    #显示录入数据窗口
    winInputData.show()
2.button_recogFaceInPic_clicked_Event()
此函数用于关闭主窗口,打开识别图中人脸窗口。过程与打开录入数据窗口类似,不再列出。
2.button_recogFaceInVideo_clicked_Event()
此函数用于关闭主窗口,打开识别图中人脸窗口。过程与打开录入数据窗口类似,不再列出详细说明。
win_inputData.py录入数据模块
点击“录入人脸数据”按钮,选择已知人物的照片,由face_recognition.face_locations对图像中所有人脸定位,依次显示出定位出的人脸,由用户依次判定人物名字,人物名字由选项卡给出,若该人物不存在数据库中,则向数据库中添加该人物的面部特征数据,若该人物已存在,则将本次识别出的面部特征数据添加进该人物对应的数据库中,若用户选择不认识,则不录入此人信息,舍弃此信息即可。
全局变量
本模块包含一下四个全局变量,在本模块被引用时即初始化:
#缓存数据,用户确认过名字后的面部编码等信息存入此列表,元素为字典
cache_data = []
#缓存数据中名字列表,即已加入缓存的所有人物名字
cache_name_list = []
#数据库中所有信息的名字列表
db_name_list = db.get_all_names()
#数据库中每个人物所包含的信息条数
db_name_num_list = db.get_all_namesAndNum()
本模块定义了Win_RecogFaceInPic类,继承于Ui_win_inputData类和QWidget类,Ui_win_inputData类是窗口界面的类,Win_InputData类定义了此窗口的操作逻辑。
类初始化
Win_RecogFaceInPic类的初始化函数包含了信号与槽的连接,和按钮的状态设置等,如下:
class Win_InputData(QWidget, Ui_win_inputData):
    def __init__(self, parent=None):
        super(Win_InputData, self).__init__(parent)
        self.setupUi(self)
        #每次启动此窗口时,清空缓存
        global cache_data,cache_name_list
        cache_data = []
        cache_name_list = []
        #初始化下拉类表选项,在数据库已存人物基础上添加'choose name'和'add new name'
        nameList = ['choose name']
        nameList += db_name_list
        nameList.append('add new name')
        self.comboBox_chooseName.addItems(nameList)
        #设置槽函数
        self.button_choosePic.clicked.connect(self.choosePic)
        self.button_lastFace.clicked.connect(self.clickedLastFace)
        self.button_nextFace.clicked.connect(self.clickedNextFace)
        self.edit_picPath.textChanged.connect(self.loadPicFileUsePath)
        self.button_nameConfirm.clicked.connect(self.addNameToCache)
        self.comboBox_chooseName.currentTextChanged.connect(self.addNewName)
        self.button_addData2DB.clicked.connect(self.addCache2DB)
        self.button_clearCache.clicked.connect(self.clearCache)
        self.button_back2main.clicked.connect(self.close)
        #未载入图片时上一张下一张按钮全部禁用
        self.button_lastFace.setEnabled(False)
        self.button_nextFace.setEnabled(False)
        #初始化数据库已存数据量表格
        self.model = QStandardItemModel()
        self.model.setColumnCount(2)
        self.model.setHeaderData(0,Qt.Horizontal,'name')
        self.model.setHeaderData(1,Qt.Horizontal,"info_nums")
        #插入DB中已存的人物名和对应信息条数
        for i in range(len(db_name_num_list)):
            self.model.setItem(i,0,QStandardItem(db_name_num_list[i][0]))
            self.model.setItem(i,1,QStandardItem(str(db_name_num_list[i][5])))
        self.table_nameInDB.setModel(self.model)
        self.table_nameInDB.setColumnWidth(self.table_nameInDB.width()/2,self.table_nameInDB.width()/2)
        #初始化缓存信息表格
        self.model2 = QStandardItemModel()
        self.model2.setColumnCount(2)
        self.model2.setHeaderData(0, Qt.Horizontal, 'name')
        self.model2.setHeaderData(1, Qt.Horizontal, "face")
        self.table_confirmedNames.setModel(self.model2)
        #初始化标志位
        self.flag =True
windowList = []
成员函数
除了以上初始化函数和成员声明外,Win_RecogFaceInPic还含有13个成员函数,如下:
- closeEvent()
重写关闭事件,回到主界面
#

def closeEvent(self, event):
    from mainWin import MainWindow
    mainWin = MainWindow()
    self.windowList.append(mainWin)  ##注:没有这句,是不打开另一个主界面的!
    mainWin.show()
    event.accept()
- clearCache()
清空缓存,是清空缓存按钮的槽函数
# 添加若干个槽函数
def clearCache(self):
    #清空全局变量中数据
    global cache_data
    cache_data = []
    #清空缓存后更新一下下拉列表带
    self.checkCacheInfo()
- addCache2DB()
录入数据库按钮的槽函数,用于将cache中数据全部添加到数据库中。
def addCache2DB(self):
    #声明cache_data是全局变量,便于本函数内改动保存到全局变量中
    global cache_data
    while cache_data:
        #录入一条数据到DB中就从缓存中删除一条
        data = cache_data.pop()
        db.insert_data( data['name'], data['facial_feature'])
    #数据库和缓存数据都有改动,因此操作完后需要刷新一下显示信息
    self.checkCacheInfo()
    self.checkDBInfo()
- checkDBInfo()
刷新数据库已存信息到全局变量和显示表格
def checkDBInfo(self):
    #全局声明,更改作用域
    global db_name_list,db_name_num_list
    #重新读取数据库中所有名字列表到全局变量中,便于刷新下拉列表
    db_name_list = db.get_all_names()
    #重新读取数据库已存名字和对应信息条数到全局变量
    db_name_num_list = db.get_all_namesAndNum()
    将已存名字和信息条数更新到显示表格中
    for i in range(len(db_name_num_list)):
        self.model.setItem(i,0,QStandardItem(db_name_num_list[i][0]))
        self.model.setItem(i,1,QStandardItem(str(db_name_num_list[i][6])))
- checkCacheInfo()
刷新缓存数据到下拉列表中
def checkCacheInfo(self):
    #先清空缓存显示表格中数据,并重新设置表头
    self.model2.clear()
    self.model2.setColumnCount(2)
    self.model2.setHeaderData(0, Qt.Horizontal, 'name')
    self.model2.setHeaderData(1, Qt.Horizontal, "face")
    #将缓存中数据依次插入表格中,第一列显示名字,第二列显示此条信息是当前第几张脸
    for i in range(len(cache_data)):
        self.model2.setItem(i, 1, QStandardItem('第{}张'.format(cache_data[i]['index_now'])))
        self.model2.setItem(i, 0, QStandardItem(cache_data[i]['name']))
    self.table_confirmedNames.setModel(self.model2)
- addNewName()
下拉列表选中选项变化时的槽函数,即用户选择下拉列表的人名后调用此函数。
def addNewName(self):
    #由于用户添加名字后,本函数将选中新加入的选项,将会再次触发此函数,
    #因此设置标志位flag用于记录本次操作是否是用户发起的切换选项操作
    #flag 初始值为True
    if self.flag :
        #获取用户选择的名字
        name = self.comboBox_chooseName.currentText()
        #如果用户选择'add new name'
        if name == 'add new name':
            #弹出输入新名字的对话框
            new_name, ok = QInputDialog.getText(self, "add new name", "请输入新名字\n注意:不要与已有名字相同!", QLineEdit.Normal, "")
            #获取已有的名字列表,并去重
            name_list = set(cache_name_list + db_name_list)
            #判断用户点击的是OK,且已有名字中不包含用户键入的名字,则允许插入
            if ok & (new_name not in name_list):
                #缓存中加入新名字
                cache_name_list.append(new_name)
                #下一步将会再次触发此槽函数,因此先更改标志位
                self.flag = False
                #下拉列表中加入新名字,且选中新名字
                self.comboBox_chooseName.insertItem(1, new_name)
                self.comboBox_chooseName.setCurrentText(new_name)
            else:
                #若用户点击的不是OK或键入的名字已存在,则下拉列表自动切回第一项
                self.comboBox_chooseName.setCurrentIndex(0)
    else:
        #本次进此槽函数是由于槽函数中切换了选项导致的,
        #而本次操作未再触发切换选项信号,则下一次进入此槽函数将是由用户操作触发
        #因此标志位设为True
        self.flag = True
- addNameToCache()
确认按钮的槽函数,用于将用户选定的名字与当前显示的人脸编码信息组对,插入缓存中。
def addNameToCache(self):
    #获取当前选中的人名
    name = self.comboBox_chooseName.currentText()
    #若用户选择'choose name'则不操作
    if name == 'choose name':
        pass
    #用户实际无法在选择'add new name'时点击确认
    elif name == 'add new name':
        self.addNewName()
    #用户选择的是人名,不是提示项
    else:
        #通过face_recog模块的全局变量获取当前显示在确认框中的人脸的np数组格式图像
        np_img = face_recog.faces_info[face_recog.face_now]['np_img']
        #对人脸图像进行编码
        new_encode = get_face_encoding_of(np_img)
        #组织一条新信息
        new_data = {}
        #名字
        new_data['name'] = name
        #编码
        new_data['facial_feature'] = new_encode
        #当前编号,从1开始
        new_data['index_now'] = face_recog.face_now+1
        #此条信息插入缓存
        cache_data.append(new_data)
        cache_name_list.append(name)
        #刷新缓存信息到缓存表格
        self.checkCacheInfo()
- choosePic()
选择图像文件按钮的槽函数,用于引导用户选择图像文件,并加载图像
def choosePic(self):
    #弹出选择图像文件的对话框
    fname, ret = myLib.loadFile(self,'p')
    #若用户成功选择文件
    if ret :
        #加载图像文件,并识别和显示
        self.loadPicFile(fname)
        #根据识别的结果刷新上一张下一张等按钮的状态
        self.check_buttonStatus()
        #将文件路径显示在编辑框中
        self.edit_picPath.setText(fname)
- loadPicFile()
加载图像文件,用户成功选择出图像文件路径后调用。
def loadPicFile(self,fname):
    #加载图像
    pix_map = QPixmap(fname)
    #原始图像居中显示在图像框中
    myLib.show_img_in_lable_center(self.label_rawPic, pix_map)
    #识别原始图像中所有人脸,并将信息存入全局变量中
    face_recog.find_faces_in(fname)
    #获取face_recog中的全局变量faces_info
    from face_recog import faces_info
    #当识别出至少一张人脸时
    if len(faces_info):
        #更新提示文本
        self.label_recogNote.setText('已识别出{}张人脸,请为他们录入名字:\n第{}张:'.format(len(faces_info),face_recog.face_now+1))
        #将识别出的第一张人脸头像显示在确认框中
        self.label_faceImg.setPixmap(QPixmap.fromImage(faces_info[0]['Qimg']))
        return True
    else:
        #若没有识别出人脸,更新提示信息和确认框显示区
        self.label_recogNote.setText('该图像中未识别出人脸,请重新选择照片。')
        self.label_faceImg.setText('识别失败')
        return False
- loadPicFileUsePath()
编辑框文本改动的槽函数,通过文件路径编辑框的操作加载图片及后续操作。
def loadPicFileUsePath(self):
    #获取编辑框中的文本
    fname = self.edit_picPath.toPlainText()
    #用户在编辑框中键入回车时才执行以下操作,否则不响应
    if '\n' in fname:
        #去掉文件名中的换行字符
        fname = fname.replace('\n','')
        #加载图像
        self.loadPicFile(fname)
        #根据识别的结果刷新上一张下一张等按钮的状态
        self.check_buttonStatus()
        #将去掉回车后的文件路径显示在编辑框中,由于不含回车所以不会再次进此if
        self.edit_picPath.setText(fname)
- check_buttonStatus()
刷新上一张下一张按钮等控件状态。
def check_buttonStatus(self):
    #引入全局变量
    from face_recog import face_now, face_num,faces_info
    #刷新
    self.label_recogNote.setText('已识别出{}张人脸,请为他们录入名字:\n第{}张:'.format(len(faces_info), face_now + 1))
    #当前显示第一张头像时,禁止上一张按钮
    if face_recog.face_now == 0:
        self.button_lastFace.setText('没有\n上一张')
        self.button_lastFace.setDisabled(True)
    else:
        #否则解禁
        self.button_lastFace.setEnabled(True)
        self.button_lastFace.setText('上一张')
    #当前显示为最后一张头像时,禁止下一张按钮
    if face_now == (face_num-1):
        self.button_nextFace.setText('没有\n下一张')
        self.button_nextFace.setEnabled(False)
    else:
        #否则解禁
        self.button_nextFace.setEnabled(True)
        self.button_nextFace.setText('下一张')
- clickedLastFace()
上一张按钮的槽函数,点击后显示上一张头像。
def clickedLastFace(self):
    #只有在当前显示的不是第一张时有效
    if face_recog.face_now > 0:
        #当前显示的序号换到上一张
        face_recog.face_now -=1
        #显示上一张头像
        self.label_faceImg.setPixmap(QPixmap.fromImage(face_recog.faces_info[face_recog.face_now]['Qimg']))
    #切换完之后再次刷新控件状态:上一张下一张按钮和提示信息
    self.check_buttonStatus()
- clickedNextFace()
下一张按钮的槽函数,点击后显示下一张头像。
def clickedNextFace(self):
    from face_recog import face_now, face_num, faces_info
    #只有在当前显示的不是最后一张时有效
    if face_recog.face_now < face_num:
        #当前显示的序号换到下一张
        face_recog.face_now = face_now + 1
        #显示下一张头像
        self.label_faceImg.setPixmap(QPixmap.fromImage(faces_info[face_recog.face_now]['Qimg']))
    #切换完之后再次刷新控件状态:上一张下一张按钮和提示信息
    self.check_buttonStatus()
win_recogFaceInPic.py照片中人脸匹配
本界面由用户导入图像文件后,再进行人脸比对,最后在原图中标记出人脸和名字显示出来。
本模块定义了Win_RecogFaceInPic类,继承于Ui_win_recogFaceInPic类和QWidget类,Ui_win_recogFaceInPic类是窗口界面的类,Win_RecogFaceInPic类定义了此窗口的操作逻辑。
类初始化
Win_RecogFaceInPic类的初始化函数包含了信号与槽的连接,和按钮的状态设置,如下:
class Win_RecogFaceInPic(QWidget, Ui_win_recogFaceInPic):
    def __init__(self, parent=None ):
        super(Win_RecogFaceInPic, self).__init__(parent)
        self.setupUi(self)
        #初始化成员pix_map,用于显示在label中
        self.pix_map = None
        #设置滚动条位置大小,与窗口保持一致
        self.scrollArea.setGeometry(QtCore.QRect(20, 75, self.width() - 40, self.height() - 105))
        #设置图像显示区域位置大小,依赖于scrollArea
        self.label.setGeometry(QtCore.QRect(0, 0, self.scrollArea.width(), self.scrollArea.height()))
        #设置槽函数连接
        self.button_openPicFile.clicked.connect(self.open_pic_file)
        self.commandLinkButton.clicked.connect(self.close)
        self.button_recogFaceInPic.clicked.connect(self.recog_start)
        self.button_picBigSize.clicked.connect(self.change_pic_size)
        #未加载图像文件时不能开始识别
        self.button_recogFaceInPic.setEnabled(False)
    windowList = []
除了以上初始化函数和成员声明外,Win_RecogFaceInPic还含有4个成员函数,如下:
成员函数
- closeEvent()
重写关闭事件,用于回到主界面
def closeEvent(self, event):
    from mainWin import MainWindow
    mainWin = MainWindow()
    self.windowList.append(mainWin)
    mainWin.show()
    event.accept()
- open_pic_file()
打开图像文件
def open_pic_file(self):
    fname, ret = myLib.loadFile(self,'p')
    #用户成功选择图像文件才执行以下步骤
    if ret:
        #文件名(含路径)显示在提示框中
        self.textEdit.setText(fname)
        #使能开始识别按钮,可以启动识别过程
        self.button_recogFaceInPic.setEnabled(True)
        #加载用户选定的图像文件,保存到成员self.pix_map中,便于显示
        pix_map = QPixmap(fname)
        self.pix_map = pix_map
        #默认居中显示在窗口中
        myLib.show_img_in_lable_center(self.label, pix_map)
- recog_start()
启动识别过程
def recog_start(self):
    #获取文件名
    fname = self.textEdit.toPlainText()
    #加载图像文件(np_rgb格式)
    image = face_recognition.load_image_file(fname)
    #识别+标记
    Qimg = face_recog.recog_in(image, update_features=True, frame_type='rgb', scale_rate=1.0)
    #将识别过程返回的QImage图转换成pix_map格式,居中显示在窗口中
    self.pix_map = QPixmap.fromImage(Qimg)
    myLib.show_img_in_lable_center(self.label, self.pix_map)
- change_pic_size()
图像在原始大小显示或适应窗口显示间切换
def change_pic_size(self):
    #检测若按钮被按下,则将执行按图像原始大小显示
    if not self.button_picBigSize.isChecked():
        #设置滑动条区域位置尺寸,通过窗口定位
        self.scrollArea.setGeometry(QtCore.QRect(20, 75, self.width() - 40, self.height() - 105))
        self.label.setText('请选择照片')
        #若有图像可显示
        if self.pix_map:
            #设置label大小与图像大小相同
            self.label.setGeometry(QtCore.QRect(0,0, self.pix_map.width(), self.pix_map.height()))
            #图像在label中显示出来
            self.label.setPixmap(self.pix_map)
        #更新按钮文本
        self.button_picBigSize.setText('适应窗口显示')
    else:
    #检测若按钮弹起,则将执行图像适应窗口大小显示
        #设置滑动条区域位置尺寸,通过窗口定位
        self.scrollArea.setGeometry(QtCore.QRect(20, 75, self.width() - 40, self.height() - 105))
        #更新按钮文本
        self.button_picBigSize.setText('原始大小显示')
        #此处必须清除label中图像后才能将label大小改小
        self.label.setText('请选择照片')
        #设置label大小为与scrollArea一致
        self.label.setGeometry(QtCore.QRect(0, 0, self.scrollArea.width(),self.scrollArea.height()))
        if self.pix_map:
            #若有图像可显示,则缩放后居中显示在串口中
            myLib.show_img_in_lable_center(self.label, self.pix_map)
win_recogFaceInVideo.py视频中人脸匹配
此界面有两种视频数据获取方式:加载用户选择的本地视频文件,打开摄像头抓取实时画面。
本模块定义了Win_RecogFaceInVideo类,继承于Ui_win_recogFaceInVideo类和QWidget类,Ui_win_recogFaceInVideo类是窗口界面的类,Win_RecogFaceInVideo类定义了此窗口的操作逻辑。
类初始化
Win_RecogFaceInVideo类的初始化函数包含了信号与槽的连接,和按钮的状态设置:
class Win_RecogFaceInVideo(QWidget, Ui_win_recogFaceInVideo):
    def __init__(self, parent=None ):
        super(Win_RecogFaceInVideo, self).__init__(parent)
        self.setupUi(self)
        #设置按钮button_openCamera状态保持,即单击一次按钮后不弹起,且状态可查询
        self.button_openCamera.setCheckable(True)
        self.button_openCamera.setAutoExclusive(True)
        #信号与槽函数连接
        self.button_openCamera.clicked.connect(self.recog_in_camera)
        self.button_openVideoFile.clicked.connect(self.open_video_file)
        self.commandLinkButton.clicked.connect(self.close)
成员函数
除初始化函数外,Win_RecogFaceInVideo还包括6个成员函数,作用如下:
- closeEvent()
重写关闭事件,在关闭本窗口时回到主界面。
 def closeEvent(self, event):
    #通过按钮状态判断摄像头是否开着,若开着则关闭
    if self.button_openCamera.isChecked():
        self.recog_close()
    #销毁所有cv2窗口
    cv2.destroyAllWindows()
    #实例化一个主界面
    from mainWin import MainWindow
    mainWin = MainWindow()
    将主界面加入本界面类的windowList成员中
    self.windowList.append(mainWin)  ##注:没有这句,是不打开另一个主界面的!
    #显示主界面
    mainWin.show()
    event.accept()
- open_video_file()
本方法是“打开视频文件”按钮单击操作的槽函数。
打开用户选择视频文件的对话框,用户选择视频文件后启动识别流程。
def open_video_file(self):
    #先将打开摄像头按钮设置失效
    self.button_openCamera.setEnabled(False)
    #用户选择视频文件
    fname, ret = myLib.loadFile(self,'video')
    #若用户选择成功
    if ret :
        #用户选择的文件名显示在编辑框内
        self.textEdit.setText(fname)
        #启动视频中识别人脸的流程
        self.recog_init( fname )
- recog_in_camera()
“打开摄像头”按钮单击操作的槽函数。
打开摄像头,启动识别摄像头抓取的画面中人脸;或关闭摄像头结束识别。
def recog_in_camera(self):
    #判断当前按钮状态
    if  self.button_openCamera.isChecked():
        #若摄像头未打开,则禁用“打开视频文件”按钮
        self.button_openVideoFile.setEnabled(False)
        self.button_openCamera.setText('关闭摄像头')
        #启动识别流程
        self.recog_init(0)
    else:
        #若摄像头已打开,则结束识别
        self.recog_close()
- recog_init(self, fname = 0)
启动识别流程。
def recog_init(self, fname = 0):
    #先要读出数据库中所有已存的面部特征数据列表
    face_recog.update_knownFace_list()
    #声明一个画面抓取器
    self.video_capture = cv2.VideoCapture(fname)
    #启动定时器
    self.timer_camera = QTimer()
    #每10毫秒触发一次超时
    self.timer_camera.start(10)
    #超时事件连接到play1pic方法,此后每10毫秒调用一次play1pic
    self.timer_camera.timeout.connect(self.play1pic)  # 连接槽函数
- recog_close()
停止识别流程。
def recog_close(self):
    #释放画面抓取器
    self.video_capture.release()
    #停止定时器
    self.timer_camera.stop()
    #改变按钮显示文本
    self.button_openCamera.setText('打开摄像头')
    #使能打开文件按钮
    self.button_openVideoFile.setEnabled(True)
    #设置显示区文本,避免播放结束后画面定在最后一帧
    self.label.setText('请选择视频文件或打开摄像头')
- play1pic()
播放一帧画面到显示区。
def play1pic(self):
    #用抓取器抓取一帧视频画面
    ret, frame = self.video_capture.read()
    #若抓取成功
    if ret:
        #识别这一帧画面中的人脸,并将结果标记出来,返回QImage到Qimg
        Qimg = face_recog.recog_in(frame, update_features=False, frame_type='bgr', scale_rate=4.0)
        #将处理后的画面居中显示在labe
        myLib.show_img_in_lable_center(self.label,QPixmap.fromImage(Qimg))
    #若抓取画面失败(视频文件已读完或摄像头故障)
    else:
        #释放画面抓取器
        self.video_capture.release()
        #停止定时器
        self.timer_camera.stop()
        #“打开摄像头”按钮解禁
        self.button_openCamera.setEnabled(True)
        #手动停止摄像头时不会走此else,而是在recog_in_camera的else中调用recog_close()
软件入口:main. py
软件入口模块main.py很简单,如下:
#程序入口
if __name__== "__main__":
    app= QtWidgets.QApplication(sys.argv)
    #实例化一个主窗口
    mainWindow = MainWindow()
    #禁止窗口最大化和改变窗口大小
    mainWindow.setWindowFlags(mainWindow.windowFlags() &~ QtCore.Qt.WindowMaximizeButtonHint)
    mainWindow.setFixedSize( mainWindow.width() , mainWindow.height() )
    #显示主窗口
    mainWindow.show()
    sys.exit(app.exec_())
打包发布
安装Pyinstaller模块
终端中输入:pip3 install pyinstaller
安装完成后,我们可以在跟pip在同一个目录路径找到Pyinstaller应用程序。
使用pyinstaller打包文件
step1:在终端中cd 到你的项目文件里
step2:输入打包的命令
命令格式是:
pyinstaller -[opts] xxx.py
这里只需要打包主文件就行,至于主文件中import了多少个其它其它文件没有关系。
可选的几个简单的opts有:
-F, –onefile 打包成一个exe文件,注意这里是大写。没有这个会是一个带各种dll和依赖文件的文件夹;
-D, –onedir 创建一个目录,包含exe文件,但会依赖很多文件(默认选项);
-c, –console, –nowindowed 使用控制台,无界面(默认);
-w, –windowed, –noconsole 使用窗口,无控制台;
-i ,image.ico -i表示图标,图标格式是.ico。
-p :这个指令后面可以增加pyinstaller搜索模块的路径,因为应用打包涉及的模块很多,这里可以自己添加路径。不过site-packages目录下都是可以被识别的,一般不需要再手动添加。
打包一下我自己的py文件:
$ pyinstaller -w -F main.py
打包完成后在工程文件夹下多出两个文件夹:dist和build,在dist里出现了Mac的可执行文件mian.app。
感谢:Python3.5+PyQt5下使用pyinstaller将 py打包成 exe所遇到的坑
最后
本工程为本人的个人练手项目,整个project从构思到设计再到着手实现和调试,遇到了不少问题,也从中学习了不少。感谢各博客网站的同仁们的知识分享,本文可能存在引用说明不全的情况望谅解,也可能存在细节理解不对的地方,请各位大牛指出来。
全部代码在我的github中,仅供参考。
后续如果有空,将会继续测试,修复测试中发现的Bug,可能还会加入一些异常处理机制,或者加入一些其他的功能。不定期更新~~

