layer的内容很多,包括卷积层、反卷积层、池化层、shortcut层、损失函数层、全链接层等等……本文分析卷积层、反卷积、YOLO层、BN层
typedef enum {
    CONVOLUTIONAL,
    DECONVOLUTIONAL,
    CONNECTED,
    MAXPOOL,
    SOFTMAX,
    DETECTION,
    DROPOUT,
    CROP,
    ROUTE,
    COST,
    NORMALIZATION,
    AVGPOOL,
    LOCAL,
    SHORTCUT,
    ACTIVE,
    RNN,
    GRU,
    LSTM,
    CRNN,
    BATCHNORM,
    NETWORK,
    XNOR,
    REGION,
    YOLO,
    ISEG,
    REORG,
    UPSAMPLE,
    LOGXENT,
    L2NORM,
    BLANK
} LAYER_TYPE;
layer结构体定义
struct layer;
typedef struct layer layer;

struct layer{
    LAYER_TYPE type; /*指定layer的类型*/
    ACTIVATION activation;/*指定激活层激活函数的类型*/
    COST_TYPE cost_type;/*指定损失函数的类型,这通常是最后一层才用*/
    void (*forward)   (struct layer, struct network);
    void (*backward)  (struct layer, struct network);
    void (*update)    (struct layer, update_args);
    void (*forward_gpu)   (struct layer, struct network);
    void (*backward_gpu)  (struct layer, struct network);
    void (*update_gpu)    (struct layer, update_args);
    int batch_normalize;
    int shortcut;
    int batch;
    int forced;
    int flipped;
    int inputs;
    int outputs;
    int nweights;
    int nbiases;
    int extra;
   /* 根据region_layer.c判断,这个变量表示一张图片含有的真实值的个数,对于检测模型来说,一个真实的标签含有5个值,
    ** 包括类型对应的编号以及定位矩形框用到的w,h,x,y四个参数,且在darknet中,固定每张图片最大处理30个矩形框(可查看max_boxes参数),
    ** 因此,在region_layer.c的make_region_layer()函数中,赋值为30*5*/
    int truths;
    int h,w,c;
    int out_h, out_w, out_c;
    int n;
    int max_boxes;
    /*这个参数目前仅发现用在softmax_layer中,含义是将一张图片的数据分成几组,具体的值由网络配置文件指定,如未指定默认为1(见parse_softmax())*/
    int groups;
    /*kernel size*/
    int size;
    int side;
    int stride;
    int reverse;
    int flatten;
    int spatial;
    int pad;
    int sqrt;
    int flip;
    int index;
    int binary;
    int xnor;
    int steps;
    int hidden;
    int truth;
    float smooth;
    float dot;
    float angle;
    float jitter;
    float saturation;
    float exposure;
    float shift;
    float ratio;
    float learning_rate_scale;
    float clip;
    int noloss;
    int softmax;
    int classes;/*基本适用于识别问题中,指物体类别种数*/
    int coords;/*用于检测任务,通常设为4指检测框要用的四个坐标*/
    int background;
    int rescore;
    int objectness;
    int joint;
    int noadjust;
    int reorg;
    int log;
    int tanh;
    int *mask;
    int total;

    float alpha;
    float beta;
    float kappa;

    float coord_scale;
    float object_scale;
    float noobject_scale;
    float mask_scale;
    float class_scale;
    int bias_match;
    int random;
    float ignore_thresh;
    float truth_thresh;
    float thresh;
    float focus;
    int classfix;
    int absolute;

    int onlyforward;
    int stopbackward;
    int dontload;
    int dontsave;
    int dontloadscales;
    int numload;

    float temperature;
    float probability;/*dropout的概率*/
    /*
     ** 比例因子,为保留概率的倒数
     ** 模型使用了dropout layer,训练的时候只有占比为 p 的隐藏层单元参与训练,那么在预测的时候,如果所有的隐藏层单元都需要参与进来,则得到的结果相比训练时平均要大 1/p ,
     ** 为了避免这种情况,就需要测试的时候将输出结果乘以 p 使下一层的输入规模保持不变。而利用inverted dropout,我们可以在训练的时候直接将dropout后留下的权重扩大1/p 倍
     ** 这样在预测的时候也不用做额外的操作了,更方便一些。
    */
    float scale;

    char  * cweights;
    int   * indexes;
    int   * input_layers;
    int   * input_sizes;
    int   * map;
    int   * counts;
    float ** sums;
    float * rand;
    float * cost;
    float * state;
    float * prev_state;
    float * forgot_state;
    float * forgot_delta;
    float * state_delta;
    float * combine_cpu;
    float * combine_delta_cpu;

    float * concat;
    float * concat_delta;

    float * binary_weights;

    float * biases;
    float * bias_updates;

    float * scales;
    float * scale_updates;


    float * weights;/*当前层所有权重系数(连接当前层和上一层的系数,但记在当前层上),对于卷积层,维度为l.n*l.c*l.size*l.size,即卷积核个数乘以卷积核尺寸再乘以输入通道数*/
    float * weight_updates;

    float * delta;
    float * output;
    float * loss;
    float * squared;
    float * norms;

    float * spatial_mean;
    float * mean;
    float * variance;

    float * mean_delta;
    float * variance_delta;

    float * rolling_mean;
    float * rolling_variance;

    float * x;
    float * x_norm;

    float * m;
    float * v;

    float * bias_m;
    float * bias_v;
    float * scale_m;
    float * scale_v;

    /*cpu参数*/
    float *z_cpu;
    float *r_cpu;
    float *h_cpu;
    float * prev_state_cpu;

    float *temp_cpu;
    float *temp2_cpu;
    float *temp3_cpu;

    float *dh_cpu;
    float *hh_cpu;
    float *prev_cell_cpu;
    float *cell_cpu;
    float *f_cpu;
    float *i_cpu;
    float *g_cpu;
    float *o_cpu;
    float *c_cpu;
    float *dc_cpu;

    float * binary_input;

    struct layer *input_layer;
    struct layer *self_layer;
    struct layer *output_layer;

    struct layer *reset_layer;
    struct layer *update_layer;
    struct layer *state_layer;

    struct layer *input_gate_layer;
    struct layer *state_gate_layer;
    struct layer *input_save_layer;
    struct layer *state_save_layer;
    struct layer *input_state_layer;
    struct layer *state_state_layer;

    struct layer *input_z_layer;
    struct layer *state_z_layer;

    struct layer *input_r_layer;
    struct layer *state_r_layer;

    struct layer *input_h_layer;
    struct layer *state_h_layer;

    struct layer *wz;
    struct layer *uz;
    struct layer *wr;
    struct layer *ur;
    struct layer *wh;
    struct layer *uh;
    struct layer *uo;
    struct layer *wo;
    struct layer *uf;
    struct layer *wf;
    struct layer *ui;
    struct layer *wi;
    struct layer *ug;
    struct layer *wg;

    tree *softmax_tree;

    size_t workspace_size;

#ifdef GPU
    int *indexes_gpu;

    float *z_gpu;
    float *r_gpu;
    float *h_gpu;

    float *temp_gpu;
    float *temp2_gpu;
    float *temp3_gpu;

    float *dh_gpu;
    float *hh_gpu;
    float *prev_cell_gpu;
    float *cell_gpu;
    float *f_gpu;
    float *i_gpu;
    float *g_gpu;
    float *o_gpu;
    float *c_gpu;
    float *dc_gpu;

    float *m_gpu;
    float *v_gpu;
    float *bias_m_gpu;
    float *scale_m_gpu;
    float *bias_v_gpu;
    float *scale_v_gpu;

    float * combine_gpu;
    float * combine_delta_gpu;

    float * prev_state_gpu;
    float * forgot_state_gpu;
    float * forgot_delta_gpu;
    float * state_gpu;
    float * state_delta_gpu;
    float * gate_gpu;
    float * gate_delta_gpu;
    float * save_gpu;
    float * save_delta_gpu;
    float * concat_gpu;
    float * concat_delta_gpu;

    float * binary_input_gpu;
    float * binary_weights_gpu;

    float * mean_gpu;
    float * variance_gpu;

    float * rolling_mean_gpu;
    float * rolling_variance_gpu;

    float * variance_delta_gpu;
    float * mean_delta_gpu;

    float * x_gpu;
    float * x_norm_gpu;
    float * weights_gpu;
    float * weight_updates_gpu;
    float * weight_change_gpu;

    float * biases_gpu;
    float * bias_updates_gpu;
    float * bias_change_gpu;

    float * scales_gpu;
    float * scale_updates_gpu;
    float * scale_change_gpu;

    float * output_gpu;
    float * loss_gpu;
    float * delta_gpu;
    float * rand_gpu;
    float * squared_gpu;
    float * norms_gpu;
#ifdef CUDNN
    cudnnTensorDescriptor_t srcTensorDesc, dstTensorDesc;
    cudnnTensorDescriptor_t dsrcTensorDesc, ddstTensorDesc;
    cudnnTensorDescriptor_t normTensorDesc;
    cudnnFilterDescriptor_t weightDesc;
    cudnnFilterDescriptor_t dweightDesc;
    cudnnConvolutionDescriptor_t convDesc;
    cudnnConvolutionFwdAlgo_t fw_algo;
    cudnnConvolutionBwdDataAlgo_t bd_algo;
    cudnnConvolutionBwdFilterAlgo_t bf_algo;
#endif
#endif
};
卷积层是怎样炼成的
首先,darknet的卷积与caffe的卷积相同,都是先使用im2col函数将输入的特征图转化为
(输入通道数*卷积核高*卷积核宽)* (输出单通道的特征图高*输出单通道的特征图宽)
而权重矩阵的大小为
(输出通道数)* (输入通道数*卷积核高*卷积核宽)
这样通过gemm函数进行矩阵乘法,权重矩阵*转化后的特征图矩阵就得到了最后的输出,其大小为 (输出通道数)* (输出单通道的特征图高*输出单通道的特征图宽)
为了了解这个过程可以看看卷积层的前向传播过程forward_convolutional_layer(convolutional_layer l, network net)
/*卷积层的前向传播*/
void forward_convolutional_layer(convolutional_layer l, network net)
{
    int i, j;
    /*
    ** l.outputs即batch中一个输入对应的输出特征总元素的个数
    ** 此函数就是将一个batch中所有输入对应的输出特征都初始化为0
    */

    fill_cpu(l.outputs*l.batch, 0, l.output, 1);
    /*是否对权重与输入进行二值化,二值化是一种模型量化的方法,能够加快模型在硬件上的速度*/
    if(l.xnor){
        binarize_weights(l.weights, l.n, l.c/l.groups*l.size*l.size, l.binary_weights);
        swap_binary(&l);
        binarize_cpu(net.input, l.c*l.h*l.w*l.batch, l.binary_input);
        net.input = l.binary_input;
    }

    int m = l.n/l.groups; /*该卷积层卷积核的个数*/
    int k = l.size*l.size*l.c/l.groups; /*卷积核元素的个数*/
    int n = l.out_w*l.out_h; /*该层输出单通道的特征图的尺寸*/
    /*循环batch中的每个输入*/
    for(i = 0; i < l.batch; ++i){
        for(j = 0; j < l.groups; ++j){
            float *a = l.weights + j*l.nweights/l.groups; /*a是指向当前层所有卷积核的,大小为(l.n)*(l.c*l.size*l.size)*/
            float *b = net.workspace; /*用于存储经im2col转换后的输入特征矩阵*/
            float *c = l.output + (i*l.groups + j)*n*m; /*输出特征图个数*/
            float *im =  net.input + (i*l.groups + j)*l.c/l.groups*l.h*l.w;

            if (l.size == 1) {
                /*如果是1*1的卷积,那么不用对输入特征进行转化*/
                b = im;
            } else {
                im2col_cpu(im, l.c/l.groups, l.h, l.w, l.size, l.stride, l.pad, b); /*对输入特征进行转化*/
            }
            /*进行矩阵乘法得到最终输出*/
            gemm(0,0,m,n,k,1,a,k,b,n,1,c,n);
        }
    }

    if(l.batch_normalize){
        forward_batchnorm_layer(l, net);
    } else {
        add_bias(l.output, l.biases, l.batch, l.n, l.out_h*l.out_w);/**/
    }

    activate_array(l.output, l.outputs*l.batch, l.activation);
    if(l.binary || l.xnor) swap_binary(&l);
}
那么其实重点就是理解im2col与gemm如何实现
im2col
之所以要先用im2col来解决卷积计算,是因为这样能将卷积问题转换为一个矩阵乘法问题,这样会让卷积的实现更加的高效。
先来看 imcol的实现代码
/*
** 获得输入的特征图im的特定行、列、通道的数据
** im: 输入特征图的指针
** height: 输入特征图的高
** width: 输入特征图的宽
** channels: 输入特征图的通道数
** row: 指定的要提取的行
** col: 指定的要提取的列
** channel: 指定的要提取的通道
** pad: pad的大小,这个有影响到最后的结果
*/
float im2col_get_pixel(float *im, int height, int width, int channels,
                        int row, int col, int channel, int pad)
{
    /*因为当前给定的row和col是加了pad即补0之后的行列号,因此为了得到真正的行列号,我们需要分别减去pad
    ** 注意,我们做pad时并非真的是在输入特征图上补全0的行与列,而是在im2col转化的过程中假装输入特征图里面有0的行与列,之后在转化后的结构中插入0
    */
    row -= pad;
    col -= pad;
    /*若出现判断中的这四种情况,说明我们要取的数据在pad行或列中,最后输出一定是0*/
    if (row < 0 || col < 0 ||
        row >= height || col >= width) return 0;
    /*若要取得数据不在pad行或者pad列中,说明位于输入特征图中,因此直接取出对应位置的数据就可以*/
    /*首先定位到对应的通道即width*height*channel,之后定位具体位置,即再加上col+width*row*/
    return im[col + width*(row + height*channel)];
}

//From Berkeley Vision's Caffe!
//https://github.com/BVLC/caffe/blob/master/LICENSE

/*注意上面的注释,说明darknet的卷积操作是从caffe源码中卷积的操作原理是相同的,但我看了一下,虽然结果是相同的,但caffe的im2col明显实现的要更加复杂一些
** 因此想研究caffe卷积的可以从darknet的卷积开始了解,我个人认为caffe的实现并没有比darknet好
** 这里data_col就是转换后输入特征图的指针,我们最后的结果都保存到这
** ksize是指卷积核的大小
** stride 是卷积核每次移动的跨度
*/
void im2col_cpu(float* data_im,
     int channels,  int height,  int width,
     int ksize,  int stride, int pad, float* data_col)
{
    int c,h,w;
    /*得到输出特征图的高和宽,其实这里是不用算的,因为在make_convolutional函数中已经算过,直接传到这里就好了*/
    int height_col = (height + 2*pad - ksize) / stride + 1;
    int width_col = (width + 2*pad - ksize) / stride + 1;
    /*我们知道卷积运算时,我们是要用卷积对特征图所有通道都作卷积运算,因此这里我们使用输入通道数乘卷积核的大小,从而代表针对特征图同一位置卷积运算要用到的卷积核元素个数
    * 同时该变量也是转换过后矩阵的行数
    */
    int channels_col = channels * ksize * ksize;
    /*以下三个循环决定了经过转换的特征图矩阵的最终形式*/
    /*第一个循环表示转换后矩阵的行数:输入通道数*卷积核高*卷积核宽*/
    for (c = 0; c < channels_col; ++c) {
        /*以下三个偏移的计算就是要算出当前行的第一个元素在卷积核上对应的位置*/
        int w_offset = c % ksize; /*计算列偏移:卷积核是一个二维矩阵,并按行存储在一维数组中,利用求余运算获取对应在卷积核中的列数*/
        int h_offset = (c / ksize) % ksize; /*计算行偏移*/
        int c_im = c / ksize / ksize;/*计算通道偏移*/
        /*接下来两个循环就是个表示转换后特征矩阵的列数,即输出特征图高*输出特征图宽*/
        for (h = 0; h < height_col; ++h) {
            for (w = 0; w < width_col; ++w) {
                int im_row = h_offset + h * stride; /*如果stride不为1,那么加上h*stride就是对对卷积核进行了移位操作*/
                int im_col = w_offset + w * stride;
                int col_index = (c * height_col + h) * width_col + w;/*转换后矩阵位置的索引*/
                data_col[col_index] = im2col_get_pixel(data_im, height, width, channels,
                        im_row, im_col, c_im, pad);
            }
        }
    }
}
通过画图直观的来看看im2col到底干了什么,假设我们的输入特征图是5*5单通道的,卷积核是3*3单通道的,这里使用单通道是为了方便讲解、画图,同时stride=2,那么我们经im2col转换后的特征图大小应该是(3*3*1)*(2*2)即9*4

这个转换过程的就是由代码中三个循环来完成的,第一个循环体的大小为channels*ksize*ksize即9,由此可见第一个循环决定的是转换后矩阵的行数,后两个循环体的大小就是算出来的输出特征图的高*输出特征图的宽,由此可见后两个循环完成的是列的填充。
注意到在后两个循环前,我们还计算了三个偏移,分别是列偏移(w_offset)、行偏移(h_offset)、通道偏移(c_im)这三个偏移可以这样理解,这三个偏移是为了得到转换后特征图第c行的所有数据所用到的卷积核的索引。让我们分析以下转换后特征矩阵的第一行数据是怎么得到的。
经过第一个循环,当前c=0,意味着我们后两个循环是为了填充第一行的所有列,此时w_offset = 0%3 = 0, h_offet = (0/3) % 3 = 0, c_im = 0, 也就是说第一行的数据是由卷积核的第一行第一列第一个通道得到的,事实上由于我们的卷积核只有一个通道因此c_im一直为0.之后进入下面两个循环,我们可以发现在第3个循环后,又计算了两个变量,这两个变量分别代表了原输入特征图的索引,这两个变量在原先的偏移上分别加上h*stride和w*stride相当于就是在做卷积核的移位操作。由此经过im2col转换后的特征图矩阵的第一行实际上是每次卷积核移位后覆盖的输入特征图部分的(w_offeset, h_offset)位置的数据,因此第一个循环体完成第一个循环之后,我们得到了第一行的数据,如下图。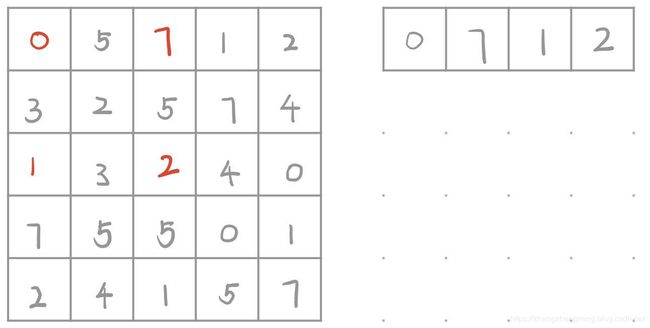
之后便进行第一个循环体的第二次循环,即要得到第二行的数据,此时我们可以计算出w_offset等于1,h_offset等于0,也就是说我们第二行的数据应该用的是每个卷积核第一行第二列在原特征矩阵上对应的数据,第二个循环体结束之后,我们便得到了第二行的数据

由此经过第一个循环体9次循环,我们便得到了最后的9*4的矩阵。我们注意到源码的注释里写道caffe的与源码地址,因此darknet的卷积实现过程实际上是借鉴了caffe的,但是如果看过caffe源码,会发现其实现和caffe还是有差别的,虽然都是先用ime2col转换输入特征矩阵,之后再用矩阵乘法解决,但是caffe的实现明显和这个不一样,darknet的实现过程更好理解一些,但是那个更加高效还不算很清楚,我想之后可以做个检测看看
这里需要注意一下就是我们最后转换出来的输入特征图是按行存储的且各通道的数据并成一行,是一维矩阵的形式,这个对于理解gemm的实现会有一定的帮助