高级UI系列:
setContentView源码分析_看AppCompatActivity是如何实现兼容的
源码分析_Activity是如何显示的?
源码分析_Android UI何时刷新:Choreographer
源码是基于API 26的
很多人分析这块的时候都是继承Activity的,今天我来继承下AppCompatActivity试试:
public class MainActivity extends AppCompatActivity {

    @Override
    protected void onCreate(Bundle savedInstanceState) {
        super.onCreate(savedInstanceState);
        setContentView(R.layout.activity_main);
    }
}
点击setContentView()
 @Override
    public void setContentView(@LayoutRes int layoutResID) {
        getDelegate().setContentView(layoutResID);
    }
  @NonNull
    public AppCompatDelegate getDelegate() {
        if (mDelegate == null) {
            mDelegate = AppCompatDelegate.create(this, this);
        }
        return mDelegate;
    }
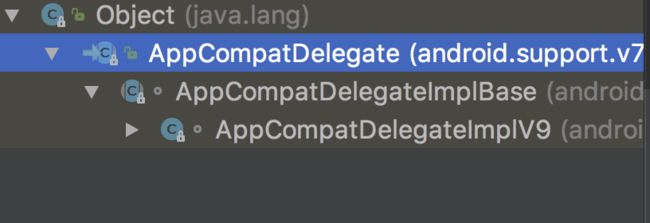
AppCompatDelegate是个抽象类
public abstract class AppCompatDelegate {
        ......
}
AppCompatDelegateImplBase继承了AppCompatDelegate但是他也是个抽象类
@RequiresApi(14)
abstract class AppCompatDelegateImplBase extends AppCompatDelegate {
}
所以说AppCompatDelegateImplV9才是真正的实现类:
@RequiresApi(14)
class AppCompatDelegateImplV9 extends AppCompatDelegateImplBase
        implements MenuBuilder.Callback, LayoutInflater.Factory2 {

    ......
   @Override
    public void setContentView(View v) {
        ensureSubDecor();
        ViewGroup contentParent = (ViewGroup) mSubDecor.findViewById(android.R.id.content);
        contentParent.removeAllViews();
        contentParent.addView(v);
        mOriginalWindowCallback.onContentChanged();
    }

    @Override
    public void setContentView(int resId) {
        ensureSubDecor();
        ViewGroup contentParent = (ViewGroup) mSubDecor.findViewById(android.R.id.content);
        contentParent.removeAllViews();
        LayoutInflater.from(mContext).inflate(resId, contentParent);
        mOriginalWindowCallback.onContentChanged();
    }

    @Override
    public void setContentView(View v, ViewGroup.LayoutParams lp) {
        ensureSubDecor();
        ViewGroup contentParent = (ViewGroup) mSubDecor.findViewById(android.R.id.content);
        contentParent.removeAllViews();
        contentParent.addView(v, lp);
        mOriginalWindowCallback.onContentChanged();
    }
......
}
我们看到里面有三个setContentView的重载方法,前两个使我们在创建Activity的时候常用的,第三个应该是创建dialog类型用的。
主要看前两个, 方法内部是现实一样的。先看下ensureDecor()是干啥子的,根据方法命名,大胆猜测下可能是用来确定DecorView的子View的。具体撸源码:
private void ensureSubDecor() {
        if (!mSubDecorInstalled) {
            mSubDecor = createSubDecor();

            // If a title was set before we installed the decor, propagate it now
            CharSequence title = getTitle();
            if (!TextUtils.isEmpty(title)) {
                onTitleChanged(title);
            }

            applyFixedSizeWindow();

            onSubDecorInstalled(mSubDecor);

            mSubDecorInstalled = true;

            // Invalidate if the panel menu hasn't been created before this.
            // Panel menu invalidation is deferred avoiding application onCreateOptionsMenu
            // being called in the middle of onCreate or similar.
            // A pending invalidation will typically be resolved before the posted message
            // would run normally in order to satisfy instance state restoration.
            PanelFeatureState st = getPanelState(FEATURE_OPTIONS_PANEL, false);
            if (!isDestroyed() && (st == null || st.menu == null)) {
                invalidatePanelMenu(FEATURE_SUPPORT_ACTION_BAR);
            }
        }
    }
mSubDecorInstalled:用来确认是否已经安装了sub_decor的布局,默认是false
// true if we have installed a window sub-decor layout.
    private boolean mSubDecorInstalled;
所以if (!mSubDecorInstalled)为true,向下看我们发现有些用的就createSubDecor()和 mSubDecorInstalled = true;
我们直接分析createSubDecor():
 private ViewGroup createSubDecor() {
        TypedArray a = mContext.obtainStyledAttributes(R.styleable.AppCompatTheme);

        if (!a.hasValue(R.styleable.AppCompatTheme_windowActionBar)) {
            a.recycle();
            throw new IllegalStateException(
                    "You need to use a Theme.AppCompat theme (or descendant) with this activity.");
        }

        if (a.getBoolean(R.styleable.AppCompatTheme_windowNoTitle, false)) {
            requestWindowFeature(Window.FEATURE_NO_TITLE);
        } else if (a.getBoolean(R.styleable.AppCompatTheme_windowActionBar, false)) {
            // Don't allow an action bar if there is no title.
            requestWindowFeature(FEATURE_SUPPORT_ACTION_BAR);
        }
        if (a.getBoolean(R.styleable.AppCompatTheme_windowActionBarOverlay, false)) {
            requestWindowFeature(FEATURE_SUPPORT_ACTION_BAR_OVERLAY);
        }
        if (a.getBoolean(R.styleable.AppCompatTheme_windowActionModeOverlay, false)) {
            requestWindowFeature(FEATURE_ACTION_MODE_OVERLAY);
        }
        mIsFloating = a.getBoolean(R.styleable.AppCompatTheme_android_windowIsFloating, false);
        a.recycle();

        // Now let's make sure that the Window has installed its decor by retrieving it
        mWindow.getDecorView();

        final LayoutInflater inflater = LayoutInflater.from(mContext);
        ViewGroup subDecor = null;


        if (!mWindowNoTitle) {
           .......
        } else {
            if (mOverlayActionMode) {
                subDecor = (ViewGroup) inflater.inflate(
                        R.layout.abc_screen_simple_overlay_action_mode, null);
            } else {
                subDecor = (ViewGroup) inflater.inflate(R.layout.abc_screen_simple, null);
            }

          .......
        }

        .......
        final ContentFrameLayout contentView = (ContentFrameLayout) subDecor.findViewById(
                R.id.action_bar_activity_content);

        final ViewGroup windowContentView = (ViewGroup) mWindow.findViewById(android.R.id.content);
        if (windowContentView != null) {
            // There might be Views already added to the Window's content view so we need to
            // migrate them to our content view
            while (windowContentView.getChildCount() > 0) {
                final View child = windowContentView.getChildAt(0);
                windowContentView.removeViewAt(0);
                contentView.addView(child);
            }

            // Change our content FrameLayout to use the android.R.id.content id.
            // Useful for fragments.
            windowContentView.setId(View.NO_ID);
            contentView.setId(android.R.id.content);

            // The decorContent may have a foreground drawable set (windowContentOverlay).
            // Remove this as we handle it ourselves
            if (windowContentView instanceof FrameLayout) {
                ((FrameLayout) windowContentView).setForeground(null);
            }
        }

        // Now set the Window's content view with the decor
        mWindow.setContentView(subDecor);

        contentView.setAttachListener(new ContentFrameLayout.OnAttachListener() {
            @Override
            public void onAttachedFromWindow() {}

            @Override
            public void onDetachedFromWindow() {
                dismissPopups();
            }
        });

        return subDecor;
    }
在最前面我们能看到我们设置的主题是在这里生效的,本人默认是使用FEATURE_NO_TITLE,
下面一行关键性代码:
    // Now let's make sure that the Window has installed its decor by retrieving it
        mWindow.getDecorView();
BUT我们还是先按住流程走下去,回头再看(其实注释已经告诉我们了:就是通过这行代码确定window已经装置decor了)。
由于我们设置的是FEATURE_NO_TITLE主题所以(!mWindowNoTitle)为false,又由于mOverlayActionMode默认为false,所以我们来到:
subDecor = (ViewGroup) inflater.inflate(R.layout.abc_screen_simple, null);
其实就是加载了R.layout.abc_screen_simple的布局,我们全局搜索下看看具体什么样的布局:
这个布局其实就是个垂直的线性布局,FitWindowsLinearLayout其实就是个LinearLayout,第一个ViewStubCompat我们看命名什么的大体就能猜出来,它是就是现实状态栏的布局。而下面的abc_screen_content_include应该就是用来承载我们的ContentView的布局,点进去看下
其实就是个FrameLayout ,我们跳出布局,接着看下面一段代码很有意思
 final ContentFrameLayout contentView = (ContentFrameLayout) subDecor.findViewById(
                R.id.action_bar_activity_content);

        final ViewGroup windowContentView = (ViewGroup) mWindow.findViewById(android.R.id.content);
        if (windowContentView != null) {
            // There might be Views already added to the Window's content view so we need to
            // migrate them to our content view
            while (windowContentView.getChildCount() > 0) {
                final View child = windowContentView.getChildAt(0);
                windowContentView.removeViewAt(0);
                contentView.addView(child);
            }

            // Change our content FrameLayout to use the android.R.id.content id.
            // Useful for fragments.
            windowContentView.setId(View.NO_ID);
            contentView.setId(android.R.id.content);

            // The decorContent may have a foreground drawable set (windowContentOverlay).
            // Remove this as we handle it ourselves
            if (windowContentView instanceof FrameLayout) {
                ((FrameLayout) windowContentView).setForeground(null);
            }
        }
上面做了什么呢?其实就是个兼容,总共三步:
- There might be Views already added to the Window's content view so we need to migrate them to our content view,就是将已存在的View从windowContent中移除放到我们的ContentView中。
- Change our content FrameLayout to use the android.R.id.content id. 就是将原来windowContentView对于的id移除,将我们的id设置成R.id.content;
- The decorContent may have a foreground drawable set (windowContentOverlay), Remove this as we handle it ourselves 如果windowContentView有foreground 将他设置为null。
做完上面三步,然后执行了这么行代码:
 // Now set the Window's content view with the decor
        mWindow.setContentView(subDecor);
这样就把subDecor作为窗口的ContentView了,具体怎么弄的等会再看
现在回看之前的代码:
@Override
    public void setContentView(View v) {
        ensureSubDecor();
        ViewGroup contentParent = (ViewGroup) mSubDecor.findViewById(android.R.id.content);
        contentParent.removeAllViews();
        contentParent.addView(v);
        mOriginalWindowCallback.onContentChanged();
    }
我们之前那么多都是看 ensureSubDecor()做了什么,其实就是根据你设置的主题给你配置了个subDecor的布局,并将里面一块布局id设置为androi.R.id.content。
下面就是找到这个FrameLayout并移除里面的所有布局,将我们自己的R.layout.activity_main的布局放进去。
这就是我们setContentView(R.layout.activity_main)实际上做的事。
之前有两地方直接跳过,没有进去看,现在我们撸撸:
    .....
  // Now let's make sure that the Window has installed its decor by retrieving it
        mWindow.getDecorView();
    .......
 // Now set the Window's content view with the decor
       mWindow.setContentView(subDecor);
    ......
点击getDecorView();返现我们进入了个Window的抽象类:
 /**
 * Abstract base class for a top-level window look and behavior policy.  An
 * instance of this class should be used as the top-level view added to the
 * window manager. It provides standard UI policies such as a background, title
 * area, default key processing, etc.
 *
 * The only existing implementation of this abstract class is
 * android.view.PhoneWindow, which you should instantiate when needing a
 * Window.
 */
public abstract class Window {
  /**
     * Retrieve the top-level window decor view (containing the standard
     * window frame/decorations and the client's content inside of that), which
     * can be added as a window to the window manager.
     *
     * Note that calling this function for the first time "locks in"
     * various window characteristics as described in
     * {@link #setContentView(View, android.view.ViewGroup.LayoutParams)}.
     *
     * @return Returns the top-level window decor view.
     */
     public abstract View getDecorView();
}
虽然是抽象类,我们还是看看这个方法的注释:校验一个能被添加到窗口管理器中的顶层窗口的decor view。
通过类的注释我们看到window的唯一实现类是phoneWindow。so,我们看看phoneWindow去:
/**
 * Android-specific Window.
 *
 * todo: need to pull the generic functionality out into a base class
 * in android.widget.
 *
 * @hide
 */
public class PhoneWindow extends Window implements MenuBuilder.Callback {
    ......

     /**
     * Constructor for main window of an activity.
     */
    public PhoneWindow(Context context, Window preservedWindow,
            ActivityConfigCallback activityConfigCallback) {
        this(context);
        .....
        if (preservedWindow != null) {
           .....
            mForceDecorInstall = true;
           .....
        }
       ....
    }
    ......
    @Override
    public final View getDecorView() {
        if (mDecor == null || mForceDecorInstall) {
            installDecor();
        }
        return mDecor;
    }
    ......
}
再看下注解:android指定的窗口,牛不牛,更牛的是使用了@hide注解,你会发现你再外面编译器中敲都不出这个类,跟别说创建了。
看上面代码有跑出个mDecor和mForceDecorInstall,是啥呢:
// This is the top-level view of the window, containing the window decor.
    private DecorView mDecor;
// When we reuse decor views, we need to recreate the content root. This happens when the decor view is requested, so we need to force the recreating without introducing an infinite loop.
    private boolean mForceDecorInstall = false;
DecorView看注释:是窗口的顶层View
mForceDecorInstall:没看懂到底干嘛的但是我们看到它在phoneWindow构造函数中被设置为true了。然后再创建decorView后被设置为false,看上去是为保证DecorView只被设置一次,但感觉又不仅仅这样。
所以当mDecorView为空的时候我们走installDecor();
private void installDecor() {
        mForceDecorInstall = false;
        if (mDecor == null) {
            mDecor = generateDecor(-1);
            .....
        } else {
            mDecor.setWindow(this);
        }
        if (mContentParent == null) {
            mContentParent = generateLayout(mDecor);

            // Set up decor part of UI to ignore fitsSystemWindows if appropriate.
            mDecor.makeOptionalFitsSystemWindows();

            final DecorContentParent decorContentParent = (DecorContentParent) mDecor.findViewById(
                    R.id.decor_content_parent);

            if (decorContentParent != null) {
                mDecorContentParent = decorContentParent;
                mDecorContentParent.setWindowCallback(getCallback());
                if (mDecorContentParent.getTitle() == null) {
                    mDecorContentParent.setWindowTitle(mTitle);
                }

                final int localFeatures = getLocalFeatures();
                for (int i = 0; i < FEATURE_MAX; i++) {
                    if ((localFeatures & (1 << i)) != 0) {
                        mDecorContentParent.initFeature(i);
                    }
                }

                mDecorContentParent.setUiOptions(mUiOptions);

                if ((mResourcesSetFlags & FLAG_RESOURCE_SET_ICON) != 0 ||
                        (mIconRes != 0 && !mDecorContentParent.hasIcon())) {
                    mDecorContentParent.setIcon(mIconRes);
                } else if ((mResourcesSetFlags & FLAG_RESOURCE_SET_ICON) == 0 &&
                        mIconRes == 0 && !mDecorContentParent.hasIcon()) {
                    mDecorContentParent.setIcon(
                            getContext().getPackageManager().getDefaultActivityIcon());
                    mResourcesSetFlags |= FLAG_RESOURCE_SET_ICON_FALLBACK;
                }
                if ((mResourcesSetFlags & FLAG_RESOURCE_SET_LOGO) != 0 ||
                        (mLogoRes != 0 && !mDecorContentParent.hasLogo())) {
                    mDecorContentParent.setLogo(mLogoRes);
                }

                // Invalidate if the panel menu hasn't been created before this.
                // Panel menu invalidation is deferred avoiding application onCreateOptionsMenu
                // being called in the middle of onCreate or similar.
                // A pending invalidation will typically be resolved before the posted message
                // would run normally in order to satisfy instance state restoration.
                PanelFeatureState st = getPanelState(FEATURE_OPTIONS_PANEL, false);
                if (!isDestroyed() && (st == null || st.menu == null) && !mIsStartingWindow) {
                    invalidatePanelMenu(FEATURE_ACTION_BAR);
                }
            } else {
                mTitleView = findViewById(R.id.title);
                if (mTitleView != null) {
                    if ((getLocalFeatures() & (1 << FEATURE_NO_TITLE)) != 0) {
                        final View titleContainer = findViewById(R.id.title_container);
                        if (titleContainer != null) {
                            titleContainer.setVisibility(View.GONE);
                        } else {
                            mTitleView.setVisibility(View.GONE);
                        }
                        mContentParent.setForeground(null);
                    } else {
                        mTitleView.setText(mTitle);
                    }
                }
            }

            if (mDecor.getBackground() == null && mBackgroundFallbackResource != 0) {
                mDecor.setBackgroundFallback(mBackgroundFallbackResource);
            }

            // Only inflate or create a new TransitionManager if the caller hasn't
            // already set a custom one.
            if (hasFeature(FEATURE_ACTIVITY_TRANSITIONS)) {
                if (mTransitionManager == null) {
                    final int transitionRes = getWindowStyle().getResourceId(
                            R.styleable.Window_windowContentTransitionManager,
                            0);
                    if (transitionRes != 0) {
                        final TransitionInflater inflater = TransitionInflater.from(getContext());
                        mTransitionManager = inflater.inflateTransitionManager(transitionRes,
                                mContentParent);
                    } else {
                        mTransitionManager = new TransitionManager();
                    }
                }

                mEnterTransition = getTransition(mEnterTransition, null,
                        R.styleable.Window_windowEnterTransition);
                mReturnTransition = getTransition(mReturnTransition, USE_DEFAULT_TRANSITION,
                        R.styleable.Window_windowReturnTransition);
                mExitTransition = getTransition(mExitTransition, null,
                        R.styleable.Window_windowExitTransition);
                mReenterTransition = getTransition(mReenterTransition, USE_DEFAULT_TRANSITION,
                        R.styleable.Window_windowReenterTransition);
                mSharedElementEnterTransition = getTransition(mSharedElementEnterTransition, null,
                        R.styleable.Window_windowSharedElementEnterTransition);
                mSharedElementReturnTransition = getTransition(mSharedElementReturnTransition,
                        USE_DEFAULT_TRANSITION,
                        R.styleable.Window_windowSharedElementReturnTransition);
                mSharedElementExitTransition = getTransition(mSharedElementExitTransition, null,
                        R.styleable.Window_windowSharedElementExitTransition);
                mSharedElementReenterTransition = getTransition(mSharedElementReenterTransition,
                        USE_DEFAULT_TRANSITION,
                        R.styleable.Window_windowSharedElementReenterTransition);
                if (mAllowEnterTransitionOverlap == null) {
                    mAllowEnterTransitionOverlap = getWindowStyle().getBoolean(
                            R.styleable.Window_windowAllowEnterTransitionOverlap, true);
                }
                if (mAllowReturnTransitionOverlap == null) {
                    mAllowReturnTransitionOverlap = getWindowStyle().getBoolean(
                            R.styleable.Window_windowAllowReturnTransitionOverlap, true);
                }
                if (mBackgroundFadeDurationMillis < 0) {
                    mBackgroundFadeDurationMillis = getWindowStyle().getInteger(
                            R.styleable.Window_windowTransitionBackgroundFadeDuration,
                            DEFAULT_BACKGROUND_FADE_DURATION_MS);
                }
                if (mSharedElementsUseOverlay == null) {
                    mSharedElementsUseOverlay = getWindowStyle().getBoolean(
                            R.styleable.Window_windowSharedElementsUseOverlay, true);
                }
            }
        }
    }
内容有点多,一段一段来:
 if (mDecor == null) {
            mDecor = generateDecor(-1);
           .......
        } else {
            mDecor.setWindow(this);
        }
如果mDecor不为空就将当前的phoneWindow设置给他,为空generateDecor(-1);
protected DecorView generateDecor(int featureId) {
        ......
        return new DecorView(context, featureId, this, getAttributes());
    }
创建了一个DecorView。
if (mContentParent == null) {
            mContentParent = generateLayout(mDecor);
看下generateLayout:
    protected ViewGroup generateLayout(DecorView decor) {
    ......
    layoutResource = R.layout.screen_simple;

    mDecor.startChanging();
    mDecor.onResourcesLoaded(mLayoutInflater, layoutResource);

    ViewGroup contentParent = (ViewGroup)findViewById(ID_ANDROID_CONTENT);
    ......
    return contentParent;
}
里面代码太多,大体就是将R.layout.screen_simple填充到DecorView中去。
看下xml文件:
所以mContentParent其实就是布局下半部的FrameLayout。而DecorView也可以理解为就是个LinearLayout。继续看installDecor();中代码:
final DecorContentParent decorContentParent = (DecorContentParent) mDecor.findViewById(
                    R.id.decor_content_parent);
由于这里我们没有选有actionBar的主题DecorView中没有加载R.layout.screen_action_bar布局故
if (decorContentParent != null) {
为空就不进去看了。贴下R.layout.screen_action_bar的xml文件
基本就ok了,所以
mWindow.getDecorView()
这行代码主要就是检测DecorView是否存在不存在就生成一个指定主题格式的最顶层布局,并将mContentParent指向R.id.content。
现在我们又得往很久很久之前回一下:
final ViewGroup windowContentView = (ViewGroup) mWindow.findViewById(android.R.id.content);
        if (windowContentView != null) {
            // There might be Views already added to the Window's content view so we need to
            // migrate them to our content view
            while (windowContentView.getChildCount() > 0) {
                final View child = windowContentView.getChildAt(0);
                windowContentView.removeViewAt(0);
                contentView.addView(child);
            }

            // Change our content FrameLayout to use the android.R.id.content id.
            // Useful for fragments.
            windowContentView.setId(View.NO_ID);
            contentView.setId(android.R.id.content);

            // The decorContent may have a foreground drawable set (windowContentOverlay).
            // Remove this as we handle it ourselves
            if (windowContentView instanceof FrameLayout) {
                ((FrameLayout) windowContentView).setForeground(null);
            }
        }
之前并没有讲解windowContentView是什么现在我们点进去一看:
@Nullable
    public  T findViewById(@IdRes int id) {
        return getDecorView().findViewById(id);
    }
恍然大悟,这个windowContentView 跟我们上面提到的mContentParent是一个内容,都是DecorView的FrameLayout那部分,应为看的源码是兼容包的代码,所以google工程师在这为了兼容,偷偷的将DecorView的FrameLayout换成了subDecor的FrameLayout并设置id为android.id.content。
下面再看mWindow.setContentView(mSubDecor);
 @Override
    public void setContentView(View view) {
        setContentView(view, new ViewGroup.LayoutParams(MATCH_PARENT, MATCH_PARENT));
    }

    @Override
    public void setContentView(View view, ViewGroup.LayoutParams params) {
      ....
        if (mContentParent == null) {
            installDecor();
        } else if (!hasFeature(FEATURE_CONTENT_TRANSITIONS)) {
            mContentParent.removeAllViews();
        }

        if (hasFeature(FEATURE_CONTENT_TRANSITIONS)) {
            view.setLayoutParams(params);
            final Scene newScene = new Scene(mContentParent, view);
            transitionTo(newScene);
        } else {
            mContentParent.addView(view, params);
        }
        mContentParent.requestApplyInsets();
        final Callback cb = getCallback();
        if (cb != null && !isDestroyed()) {
            cb.onContentChanged();
        }
        mContentParentExplicitlySet = true;
    }
其实我们核心是走下面这行代码:
mContentParent.addView(view, params);
这个mContentParent我们之间看过就是对应R.layout.screent_simple中的R.id.content的那个FrameLayout。
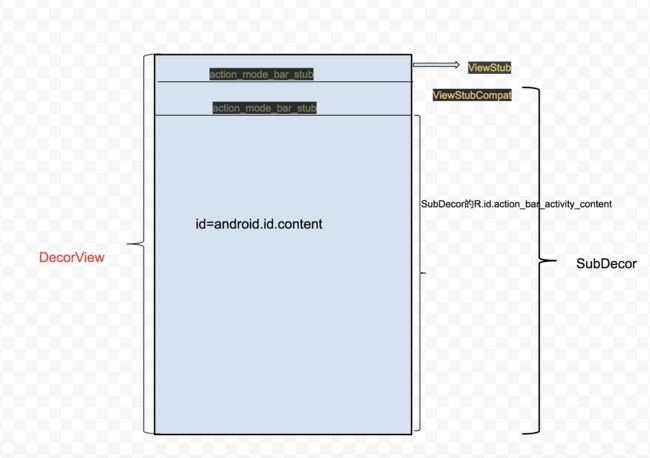
所以一张图解决:
以上总结为:AppCompatActivity通过AppCompatDelegateImplV9的DecorView的R.id.content部分替换为自己的SubDecor的contentView部分,已达到兼容效果。所以如果是看Activity里的setContentView上面这部分兼容的代码是没有的。
总结:setContentView()就是将Layout布局放置到DeCorView的R.id.content部分。
最后过一遍Activity实现setContentView的源码
  public void setContentView(View view) {
        getWindow().setContentView(view);
        initWindowDecorActionBar();
    }
phoneWindow里:
@Override
    public void setContentView(View view) {
        setContentView(view, new ViewGroup.LayoutParams(MATCH_PARENT, MATCH_PARENT));
    }

    @Override
    public void setContentView(View view, ViewGroup.LayoutParams params) {
        // Note: FEATURE_CONTENT_TRANSITIONS may be set in the process of installing the window
        // decor, when theme attributes and the like are crystalized. Do not check the feature
        // before this happens.
        if (mContentParent == null) {
            installDecor();
        } else if (!hasFeature(FEATURE_CONTENT_TRANSITIONS)) {
            mContentParent.removeAllViews();
        }

        if (hasFeature(FEATURE_CONTENT_TRANSITIONS)) {
            view.setLayoutParams(params);
            final Scene newScene = new Scene(mContentParent, view);
            transitionTo(newScene);
        } else {
            mContentParent.addView(view, params);
        }
        mContentParent.requestApplyInsets();
        final Callback cb = getCallback();
        if (cb != null && !isDestroyed()) {
            cb.onContentChanged();
        }
        mContentParentExplicitlySet = true;
    }
看下里面的 installDecor(), mContentParent.addView(view, params)。跟猜测的一样就是少了兼容部分。
下一篇:源码分析--Activity是如何显示的?


