Gradle + SpringBoot + Mybatis-plus + 代码生成器 + 多数据源配置
gradle整合(全)
- 1. 新建 gradle 项目(有网络情况下)
- 1.1 新建 SpringBoot 项目
- 1.2 运行项目
- 2. gradle 整合 mybatis-plus
- 2.1 前言
- 2.2 添加依赖
- 2.3 配置文件
- 2.4 基本配置完成
- 3. 代码生成器
- 3.1 添加依赖
- 3.2 配置文件
- 3.3 运行代码生成器
- 3.4 启动类添加注解
- 3.5 运行 Application
- 4. 简单CRUD 测试
- 4.1 简单查询测试
- 4.2 略
- 5. 多数据源配置
1. 新建 gradle 项目(有网络情况下)
1.1 新建 SpringBoot 项目
-
File --> New --> Module//新建一个模板Module

-
选择
Spring Initalizr

-
输入参数,选择
Type为Gradle Project
-
选择依赖

-
完成
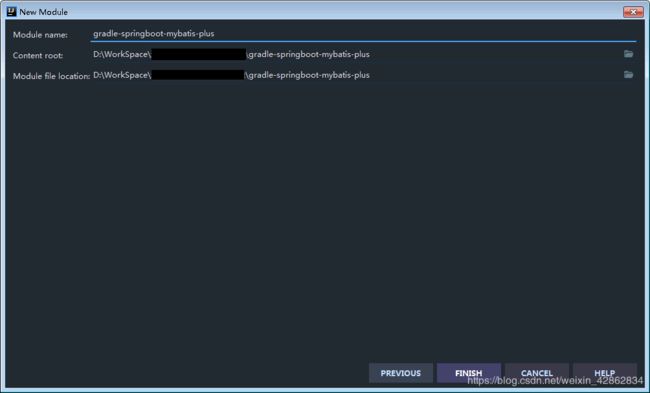
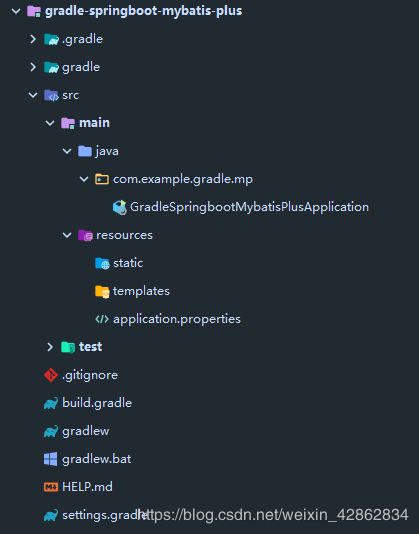
1.2 运行项目
-
目录展示如下(可删除不必要的文档)
-
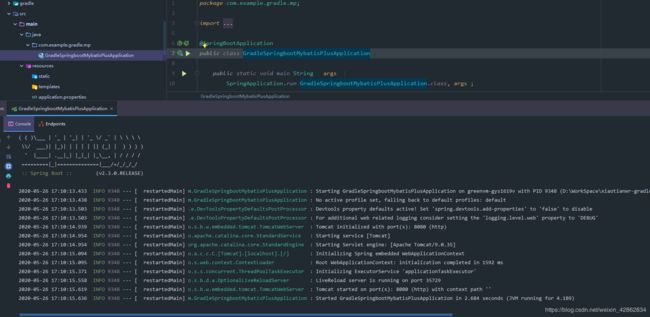
运行
Application文件如图: gradle 整合 SpringBoot项目 运行成功~~
2. gradle 整合 mybatis-plus
2.1 前言
-
上述方式创建完项目的
build.gradle文件内容如下plugins { id 'org.springframework.boot' version '2.3.0.RELEASE' id 'io.spring.dependency-management' version '1.0.9.RELEASE' id 'java' } group = 'com.example' version = '0.0.1-SNAPSHOT' sourceCompatibility = '1.8' configurations { compileOnly { extendsFrom annotationProcessor } } repositories { mavenCentral() } dependencies { implementation 'org.springframework.boot:spring-boot-starter-web' compileOnly 'org.projectlombok:lombok' developmentOnly 'org.springframework.boot:spring-boot-devtools' runtimeOnly 'mysql:mysql-connector-java' annotationProcessor 'org.projectlombok:lombok' testImplementation('org.springframework.boot:spring-boot-starter-test') { exclude group: 'org.junit.vintage', module: 'junit-vintage-engine' } } test { useJUnitPlatform() }
2.2 添加依赖
-
mybatis-plus启动依赖,添加至dependencies{...}中/* mybatis-plus 启动依赖 */ compile group: 'com.baomidou', name: 'mybatis-plus-boot-starter', version: '3.3.2'
2.3 配置文件
-
application.propertiesserver.port=8911 server.servlet.context-path=/gradle/mp # mysql 数据源配置 spring.datasource.url=jdbc:mysql://localhost:3306/mysql-plus?serverTimezone=Asia/Shanghai&useSSL=false&useUnicode=true&characterEncoding=utf8&characterSetResults=utf8 spring.datasource.username=root spring.datasource.password=password spring.datasource.driver-class-name=com.mysql.cj.jdbc.Driver
2.4 基本配置完成
- 启动有 mybatis-plus

3. 代码生成器
3.1 添加依赖
-
build.gradle文件在上述基础上添加代码生成器依赖/* 代码生成器依赖 */ compile group: 'com.baomidou', name: 'mybatis-plus-generator', version: '3.3.2' /* freemarker 引擎依赖 */ compile group: 'org.freemarker', name: 'freemarker', version: '2.3.30'
3.2 配置文件
MpGenerator.java
-
注意以下路径需要修改保持一致:
-
a. 全局配置中的输出路径
gc.setOutputDir("xxxxxx");如下图:

-
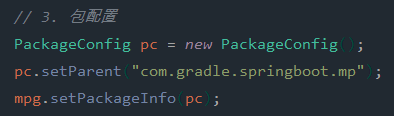
b. 包配置中的 包路径
c. 自定义配置中
Mapper.xml文件输出路径

-
-
MpGenerator.java代码配置package com.gradle.springboot.mp; import com.baomidou.mybatisplus.annotation.DbType; import com.baomidou.mybatisplus.annotation.IdType; import com.baomidou.mybatisplus.core.exceptions.MybatisPlusException; import com.baomidou.mybatisplus.core.toolkit.StringPool; import com.baomidou.mybatisplus.core.toolkit.StringUtils; import com.baomidou.mybatisplus.generator.AutoGenerator; import com.baomidou.mybatisplus.generator.InjectionConfig; import com.baomidou.mybatisplus.generator.config.*; import com.baomidou.mybatisplus.generator.config.po.TableInfo; import com.baomidou.mybatisplus.generator.config.rules.NamingStrategy; import com.baomidou.mybatisplus.generator.engine.FreemarkerTemplateEngine; import java.util.ArrayList; import java.util.List; import java.util.Scanner; /** * 代码生成器展示 */ public class MpGenerator { /** ** 读取控制台内容 *
*/ public static String scanner(String tip) { Scanner scanner = new Scanner(System.in); StringBuilder help = new StringBuilder(); help.append("请输入" + tip + ":"); System.out.println(help.toString()); if (scanner.hasNext()) { String ipt = scanner.next(); if (StringUtils.isNotEmpty(ipt)) { return ipt; } } throw new MybatisPlusException("请输入正确的" + tip + "!"); } public static void main(String[] args) { // 代码生成器 AutoGenerator mpg = new AutoGenerator(); // 1. 全局配置 GlobalConfig gc = new GlobalConfig(); gc.setAuthor("小天儿"); //作者 //String projectPath = System.getProperty("user.dir"); //项目Project地址 //gc.setOutputDir(projectPath + "/src/main/java"); //输出地址 gc.setOutputDir("D:\\WorkSpace\\xiaotianer-project\\gradle-springboot-mybatis-plus\\src\\main\\java"); //绝对路径 gc.setFileOverride(false); // 是否覆盖同名文件,默认是false gc.setIdType(IdType.AUTO); // 主键策略 gc.setActiveRecord(true); // ActiveRecord 模式,默认表名为类名的复数形式 gc.setEnableCache(false); // XML 二级缓存 gc.setBaseResultMap(true); // XML ResultMap 生成基本的 ResultMap gc.setBaseColumnList(false); // XML ColumnList 生成基本的sql片段 /* 自定义文件命名, %s 会自动填充表实体属性! */ gc.setMapperName("%sDao"); gc.setXmlName("%sMapper"); gc.setServiceName("%sService"); gc.setServiceImplName("%sServiceImpl"); gc.setControllerName("%sController"); mpg.setGlobalConfig(gc); // 2. 数据源配置 DataSourceConfig dsc = new DataSourceConfig(); dsc.setDbType(DbType.MYSQL); dsc.setUrl("jdbc:mysql://localhost:3306/school?serverTimezone=Asia/Shanghai&useSSL=false&useUnicode=true&characterEncoding=utf8&characterSetResults=utf8"); dsc.setDriverName("com.mysql.cj.jdbc.Driver"); dsc.setUsername("root"); dsc.setPassword("password"); mpg.setDataSource(dsc); // 3. 包配置 PackageConfig pc = new PackageConfig(); pc.setParent("com.gradle.springboot.mp"); mpg.setPackageInfo(pc); // 4. 策略配置 StrategyConfig strategy = new StrategyConfig(); strategy.setNaming(NamingStrategy.underline_to_camel); //表名生成策略 (驼峰) strategy.setColumnNaming(NamingStrategy.underline_to_camel); //strategy.setSuperEntityClass("你自己的父类实体,没有就不用设置!"); strategy.setEntityLombokModel(true); //以lombok注解生成实体类 strategy.setRestControllerStyle(true); //controller以RestFlue风格 // 公共父类 //strategy.setSuperControllerClass("你自己的父类控制器,没有就不用设置!"); // 写于父类中的公共字段 strategy.setSuperEntityColumns("id"); strategy.setInclude(scanner("表名,多个英文逗号分割").split(",")); strategy.setControllerMappingHyphenStyle(true); strategy.setTablePrefix("tbl_"); //表名前缀 mpg.setStrategy(strategy); // 5. 自定义配置 InjectionConfig cfg = new InjectionConfig() { @Override public void initMap() { // to do nothing } }; // 如果模板引擎是 freemarker String templatePath = "/templates/mapper.xml.ftl"; // 如果模板引擎是 velocity // String templatePath = "/templates/mapper.xml.vm"; // 自定义输出配置 List<FileOutConfig> focList = new ArrayList<>(); // 自定义配置会被优先输出 focList.add(new FileOutConfig(templatePath) { @Override public String outputFile(TableInfo tableInfo) { // 自定义输出文件名 , 如果你 Entity 设置了前后缀、此处注意 xml 的名称会跟着发生变化!! //return projectPath + "/src/main/resources/mapper/" + pc.getModuleName() + "/" + tableInfo.getEntityName() + "Mapper" + StringPool.DOT_XML; //由于projectPath 获取的是 项目地址,实际使用的为model,所以使用全地址替代 return "D:\\WorkSpace\\xiaotianer-project\\gradle-springboot-mybatis-plus\\src\\main\\resources\\mapper" + "/" + tableInfo.getEntityName() + "Mapper" + StringPool.DOT_XML; } }); /* cfg.setFileCreate(new IFileCreate() { @Override public boolean isCreate(ConfigBuilder configBuilder, FileType fileType, String filePath) { // 判断自定义文件夹是否需要创建 checkDir("调用默认方法创建的目录,自定义目录用"); if (fileType == FileType.MAPPER) { // 已经生成 mapper 文件判断存在,不想重新生成返回 false return !new File(filePath).exists(); } // 允许生成模板文件 return true; } }); */ cfg.setFileOutConfigList(focList); mpg.setCfg(cfg); // 配置模板 TemplateConfig templateConfig = new TemplateConfig(); // 配置自定义输出模板 //指定自定义模板路径,注意不要带上.ftl/.vm, 会根据使用的模板引擎自动识别 // templateConfig.setEntity("templates/entity2.java"); // templateConfig.setService(); // templateConfig.setController(); templateConfig.setXml(null); mpg.setTemplate(templateConfig); mpg.setTemplateEngine(new FreemarkerTemplateEngine()); mpg.execute(); } }
3.3 运行代码生成器
-
运行
MpConfig.java文件,输入表名user(中文乱码了,乱码问题稍后再解决 )

-
回车
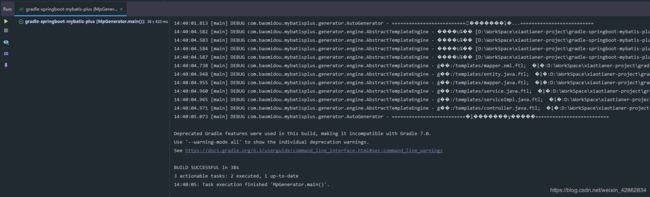
-
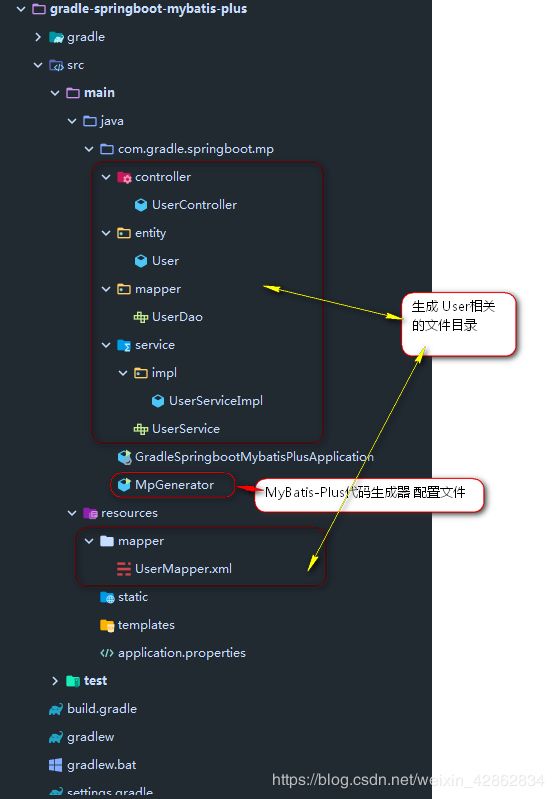
运行成功后目录结构展示如下:
3.4 启动类添加注解
-
添加
@MapperScan注解package com.gradle.springboot.mp; import org.mybatis.spring.annotation.MapperScan; import org.springframework.boot.SpringApplication; import org.springframework.boot.autoconfigure.SpringBootApplication; @SpringBootApplication @MapperScan(basePackages = "com.gradle.springboot.mp.mapper") //扫描Mapper接口(xxxDAO) public class GradleSpringbootMybatisPlusApplication { public static void main(String[] args) { SpringApplication.run(GradleSpringbootMybatisPlusApplication.class, args); } }
3.5 运行 Application
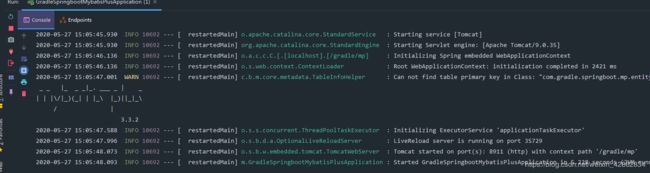
运行成功 ~ ~
4. 简单CRUD 测试
- 表数据如下:

4.1 简单查询测试
-
UserService.javapublic interface UserService extends IService<User> { List<User> selectAll(); } -
UserServiceImpl.java@Service public class UserServiceImpl extends ServiceImpl<UserDao, User> implements UserService { @Autowired UserDao userDao; @Override public List<User> selectAll() { return userDao.selectList(null); } } -
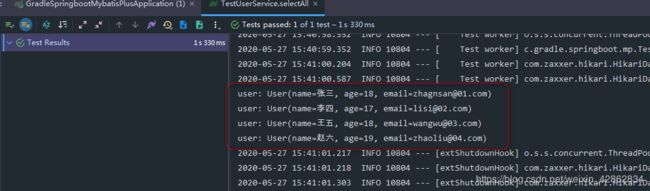
TestUserService.java测试类,位置:
src\test\java\com\gradle\springboot\mp\TestUserService.javapackage com.gradle.springboot.mp; import com.gradle.springboot.mp.service.UserService; import org.junit.jupiter.api.Test; import org.springframework.beans.factory.annotation.Autowired; import org.springframework.boot.test.context.SpringBootTest; @SpringBootTest public class TestUserService { @Autowired private UserService userService; @Test public void selectAll(){ userService.selectAll().forEach(user -> System.out.println("user: " + user)); } } -
运行结果:
4.2 略
同maven集成mybatis-plus,可参考下述博客
https://blog.csdn.net/weixin_42862834/article/details/106081618
5. 多数据源配置
方法 同 SpringBoot 整合 Mybatis-plus(三) 多数据源配置, 可参考下述博客
https://blog.csdn.net/weixin_42862834/article/details/106097540