SaltStack一键自动化部署高可用负载均衡集群
实验环境:
server1和server4组成高可用和负载均衡集群;
server2作为后端真实服务器提供httpd服务
server3作为后端真实服务器提供nginx服务
| 主机 | IP | 服务 | 角色 |
|---|---|---|---|
| server1 | 172.25.19.1 | haproxy,keepalived | master |
| server2 | 172.25.19.2 | httpd | minion |
| server3 | 172.25.19.3 | nginx | minion |
| server4 | 172.25.19.4 | haproxy,keepalived | minion |
server1/2/3/4都要指定master
[root@server1 ~]# cd /etc/salt/
[root@server1 salt]# vim minion
master: 172.25.19.1
开启服务
[root@server1 salt]# systemctl start salt-master
[root@server1 salt]# systemctl start salt-minion
[root@server2 salt]# systemctl start salt-minion
[root@server3 salt]# systemctl start salt-minion
[root@server4 salt]# systemctl start salt-minion
交换公钥
[root@server1 salt]# salt-key -L
[root@server1 salt]# salt-key -A     # 添加显示的所有主机
[root@server1 salt]# salt-key -L
一、saltstack搭建httpd服务
[root@server1 minions]# cd /etc/salt/
[root@server1 salt]# vim master
 674 file_roots:
 675   base:
 676     - /srv/salt      ##这个目录没有,需要自己创建
[root@server1 salt]# mkdir /srv/salt
[root@server1 salt]# mkdir httpd
[root@server1 salt]# cd httpd/
[root@server1 httpd]# mkdir files
[root@server1 httpd]# cd files/
[root@server1 files]# pwd
/etc/salt/httpd/files
[root@server1 files]# ls
httpd.conf         ##主机copy一个过来
[root@server1 files]# cd ..
[root@server1 httpd]# ls
files  install.sls  service.sls
[root@server1 httpd]# cat install.sls       ##安装httpd
apache-install:
  pkg.installed:
    - pkgs:
      - httpd
[root@server1 httpd]# cat  service.sls    ##启动httpd
include:
  - httpd.install

/etc/httpd/conf/httpd.conf:
  file.managed:
    - source: salt://httpd/files/httpd.conf

httpd-service:
  service.running:
    - name: httpd
    - enable: False
    - reload: True
      watch:
        - file: /etc/httpd/conf/httpd.conf

[root@server1 httpd]# salt server3 state.sls nginx.service
二、saltstack搭建nginx
1.编辑自动编译安装nginx文件
    [root@server1 salt]# mkdir nginx
    [root@server1 salt]# cd nginx/
    [root@server1 nginx]# mkdir files
    [root@server1 nginx]# cd files/
    [root@server1 files]# ls
    nginx-1.15.8.tar.gz
    [root@server1 nginx]# pwd
    /srv/salt/nginx
    [root@server1 nginx]# cat install.sls
    nginx-install:
      pkg.installed:
        - pkgs:
          - pcre-devel
          - zlib-devel
          - gcc
          - make

      file.managed:
        - name: /mnt/nginx-1.15.8.tar.gz
        - source: salt://nginx/files/nginx-1.15.8.tar.gz

      cmd.run:
        - name: cd /mnt && tar zxf nginx-1.15.8.tar.gz && cd nginx-1.15.8 && sed -i 's/CFLAGS="$CFLAGS -g"/#CFLAGS="$CFLAGS -g"/g' auto/cc/gcc && ./configure --prefix=/usr/local/nginx &> /dev/null && make &> /dev/null && make install &> /dev/null && cd .. && rm -fr nginx-1.15.8
        - creates: /usr/local/nginx

    [root@server1 nginx]# salt server3 state.sls nginx.install

2.
    开启nginx服务脚本

[root@server1 nginx]# cat service.sls
include:
  - nginx.install
  - users.nginx

/usr/local/nginx/conf/nginx.conf:
  file.managed:
    - source: salt://nginx/files/nginx.conf

nginx-service:
  file.managed:
    - name: /etc/systemd/system/nginx.service
    - source: salt://nginx/files/nginx.service

  service.running:
    - name: nginx
    - reload: True
    - watch:
      - file: /usr/local/nginx/conf/nginx.conf

 ##编写nginx的启动脚本
[root@server1 nginx]# cd files/
[root@server1 files]# vim nginx.service
[Unit]
Description=The NGINX HTTP and reverse proxy server
After=syslog.target network.target remote-fs.target nss-lookup.target

[Service]
Type=forking
PIDFile=/usr/local/nginx/logs/nginx.pid
ExecStartPre=/usr/local/nginx/sbin/nginx -t
ExecStart=/usr/local/nginx/sbin/nginx
ExecReload=/usr/local/nginx/sbin/nginx -s reload
ExecStop=/usr/bin/kill -s QUIT $MAINPID
PrivateTmp=true

[Install]
WantedBy=multi-user.target

[root@server3 salt]# scp /usr/local/nginx/conf/nginx.conf server1:/srv/salt/nginx/files
[root@server1 nginx]# cd files/
[root@server1 files]# ls
nginx-1.15.8.tar.gz  nginx.conf  nginx.service

[root@server1 files]# vim  nginx.conf
user  nginx;
worker_processes  auto;

#编辑自动建立nginx用户的sls文件
[root@server1 salt]# pwd
/srv/salt
[root@server1 salt]# mkdir users
[root@server1 salt]# cd users/
[root@server1 users]# vim nginx.sls
[root@server1 users]# cat nginx.sls
nginx:
  user.present:
    - uid: 1000
    - shell: /sbin/nologin

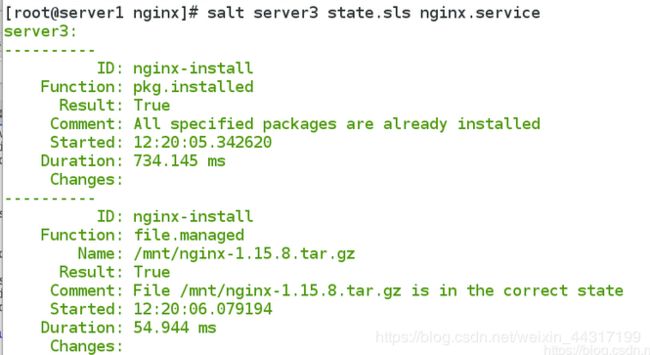
[root@server1 nginx]# salt server3 state.sls nginx.service
更高级的推送方式
[root@server1 salt]# pwd
/srv/salt
[root@server1 salt]# vim top.sls
[root@server1 salt]# cat top.sls
base:
  'server2':
    - httpd.service     ##server2安装httpd

  'server3':
    - nginx.service    ##server3安装nginx

[root@server1 salt]# salt '*' state.highstate
三、用haproxy实现负载均衡
1.编辑install.sls文件,添加重新加载服务等
[root@server1 salt]# mkdir haproxy
[root@server1 salt]# cd haproxy/
[root@server1 haproxy]# vim install.sls
[root@server1 haproxy]# cat install.sls
haproxy-install:
  pkg.installed:
    - pkgs:
      - haproxy

  file.managed:
    - name: /etc/haproxy/haproxy.cfg
    - source: salt://haproxy/files/haproxy.cfg

  service.running:
    - name: haproxy
    - reload: True
    - watch:
      - file: haproxy-install
2.将haproxy配置文件发送到server1salt目录下,编辑haproxy的配置文件
[root@server1 haproxy]# cd files/
[root@server1 files]# pwd
/srv/salt/haproxy/files
[root@server1 files]# ls
haproxy.cfg
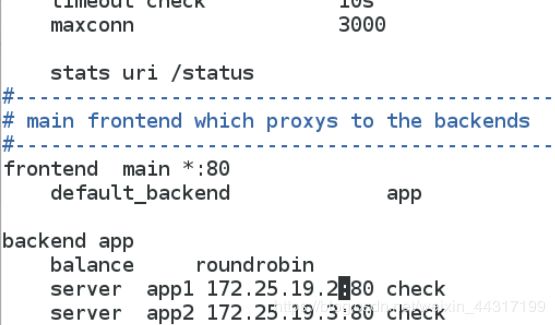
[root@server1 files]# vim haproxy.cfg
    stats uri /status
#---------------------------------------------------------------------
# main frontend which proxys to the backends
#---------------------------------------------------------------------
frontend  main *:80
    default_backend             app

backend app
    balance     roundrobin
    server  app1 172.25.19.2:80 check
    server  app2 172.25.19.3:80 check
3.编辑两个后端的默认发布文件内容
[root@server2 salt]# cat /var/www/html/index.html
server2
[root@server3 salt]# cat /usr/local/nginx/html/index.html
server3
4.在base(/etc/salt)目录下,编辑top.sls,并推送
[root@server1 salt]# pwd
/srv/salt
[root@server1 salt]# vim top.sls
base:
  'server1':
    - haproxy.install

  'server4':
    - haproxy.install

  'server2':
    - httpd.service

  'server3':
    - nginx.service

[root@server1 salt]# salt '*' state.highstate
四、配置高可用
1.在server1的/srv/salt目录下,建立keepalived目录,进到目录里边编辑安装keepalived的sls推送文件
[root@server1 salt]# ls
_grains  haproxy  httpd  nginx  top.sls  users
[root@server1 salt]# mkdir keepalived
[root@server1 salt]# cd keepalived/
[root@server1 keepalived]# mkdir files
[root@server1 keepalived]# vim install.sls
[root@server1 keepalived]# cat install.sls
kp-install:
  pkg.installed:
    - pkgs:
      - keepalived
  file.managed:
    - name: /etc/keepalived/keepalived.conf
    - source: salt://keepalived/files/keepalived.conf
    - template: jinja
      {% if grains['fqdn'] == 'server1' %}        # server1是master
      STATE: MASTER
      VRID: 51
      PRIORITY: 100
      {% elif grains['fqdn'] == 'server4' %}      # server2是backup
      STATE: BACKUP
      VRID: 51
      PRIORITY: 50
      {% endif %}

  service.running:
    - name: keepalived
    - reload: True
    - watch:
      - file: kp-install
2.编辑 keepalived的脚本,配置文件远程发送到到sevrer1中/srv/salt/keepalived/files
[root@server4 keepalived]# scp keepalived.conf server1:/srv/salt/keepalived/files

[root@server1 files]# cat keepalived.conf
! Configuration File for keepalived

global_defs {
   notification_email {
	root@localhost
   }
   notification_email_from keepalived@localhost
   smtp_server 127.0.0.1
   smtp_connect_timeout 30
   router_id LVS_DEVEL
}

vrrp_instance VI_1 {
    state {{ STATE }}
    interface eth0
    virtual_router_id {{ VRID }}
    priority {{ PRIORITY }}
    advert_int 1
    authentication {
        auth_type PASS
        auth_pass 1111
    }
    virtual_ipaddress {
        172.25.19.100
    }
}
3.安装mailx,用于接受推送消息
[root@server4 keepalived]# yum install -y mailx
[root@server1 keepalived]# yum install -y mailx
4.在/srv/salt下编辑全部节点的推送的top.sls文件
[root@server1 salt]# cat top.sls
base:
  'server1':
    - haproxy.install
    - keepalived.install

  'server4':
    - haproxy.install
    - keepalived.install

  'server2':
    - httpd.service

  'server3':
    - nginx.service

#执行top.sls文件,向所有节点安装以及部署服务
[root@server1 salt]# salt '*' state.highstate
5.查看vip已经在server1上了
[root@server1 files]# ip addr
测试通过vip可以实现后端的负载均衡
6.当server1关掉keepalived后,vip会自动飘逸到server4上
[root@server1 salt]# systemctl stop keepalived
[root@server4 keepalived]# ip addr


