CSR8675的DSP学习笔记——a2dp_sink工程的matlab仿真
为了让CSR867x的开发更容易,现与思度科技联合推出CSR867x学习板【淘宝链接:思度科技CSR开发板】。
技术交流QQ群号:743434463
开发板会员QQ群号:725398389(凭订单号入群,赠PPT、项目源码、视频教程)
——————————正文分割线———————————–
#1. 引言
本文简述了CSR8675的DSP工程a2dp_sink的matlab仿真方法。
#2. 基础的音频处理框架
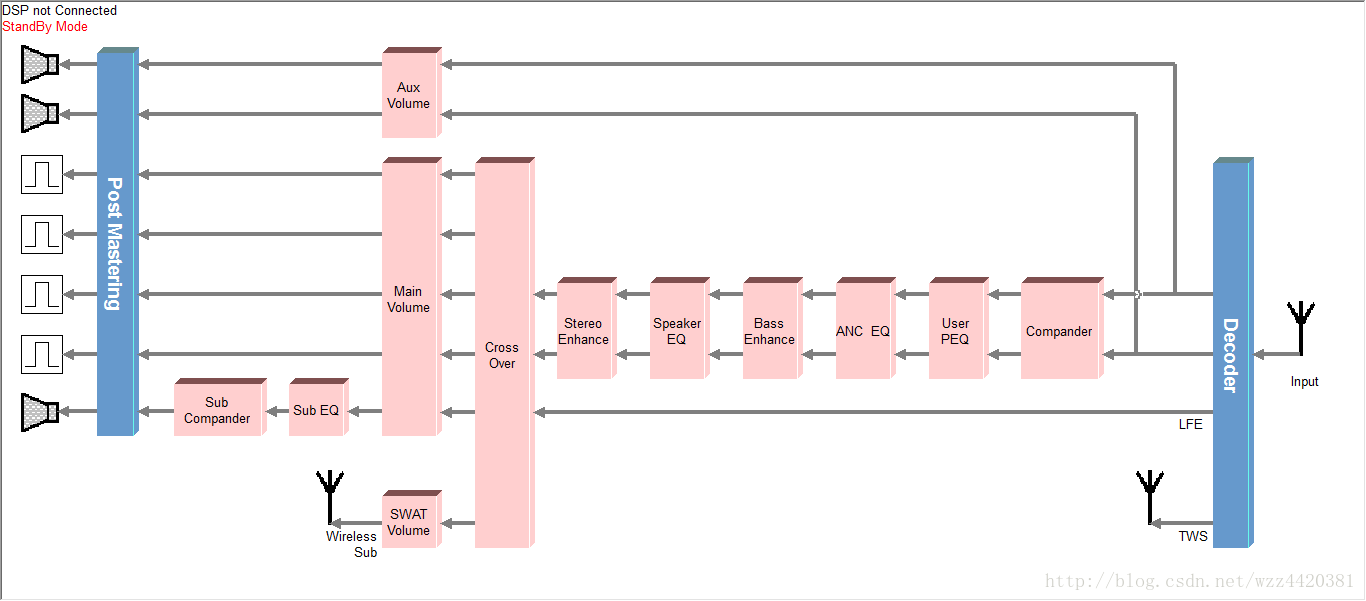
a2dp_sink工程对应的是CSR8675的A2DP音频播放功能。
大致的音频处理流程是:
- 接收音频数据并解码。在TWS enable时,音频数据不解码,直接relay给slave device。如果是I2S、analog等PCM数据源,也无需解码。
- 音效后处理。包括限幅、用户EQ、ANC EQ、低音增强、扬声器EQ、立体声增强、分频。隐含的处理包括输入端和输出端的采样率转换。
- 音量控制。包括模拟输出、数字输出、无线SUB输出。
- SUB音效处理。包括SUB EQ、SUB限幅。
#3. 修改音频处理框架
如果开发者需要在此音频流的基础上增删音频处理功能,通常的做法是修改DSP工程。在完成修改后,需要搭建一个基本的验证平台以验证改动。最基本的验证平台包括如下部分:
- PC机
- 音频信号输出端
- CSR8675硬件平台
- 音频信号输入端
- 信号分析软件
对于大多数的算法开发人员来说,除了CSR8675硬件平台以外,其他部分都或多或少存在于其现有的知识领域。而掌握某一特定的硬件平台需要阅读大量相关文档和代码,熟悉此平台的各种接口,熟练使用此平台的烧录编译、调试方法,才能摸清这个平台的优劣和能力,此工作一般由软件开发人员完成。
对于CSR8675平台来说,MCU和DSP运行在同一个芯片内,算法开发人员和软件开发人员在同一套软件和硬件平台上开发。实际项目中,算法和软硬件的开发是有依赖关系的,这就使得算法人员需要等到软硬件开发基本完成后才能开始算法的实现。此开发方式使得算法实现的风险在项目后期才会暴露出来。
实际开发过程中,算法开发人员和软件开发人员的工作有很多交集,因此往往会产生责任区分不明确,技术难点边界不清晰的问题。此类问题,如果解决得好,产品问题少,项目跑得顺,团队关系融洽;解决得不好,产品问题多,项目容易受阻,团队矛盾重重。因此,加强两者的工作的相互独立性,是解决此问题的有效方法。
matlab仿真工具能够使算法开发人员仅需一台笔记本即可开发和评估运行在CSR8675的DSP内的算法,使算法开发人员无需依赖真实的硬件平台。当算法开发人员的工作完成后,只需要向软件开发人员释放DSP工程,由软件开发人员二次集成即可。
#4. 修改源码
a2dp_sink工程源码不能直接用来仿真,原因是DSP在开始运行不能收到MCU发来的配置消息,使得DSP进入不正确的工作状态。
为了让工程源码能够直接仿真并输出结果,需要修改几处源码。
##4.1. codec_decoder.asm
选择analog作为输入源:
// Plugin type set from VM at run-time
.MODULE $app_config;
   .DATASEGMENT DM;

   .VAR io = $ANALOGUE_IO;
.ENDMODULE;
设置采样率:
   // Variables to receive dac and codec sampling rates from the vm
   .VAR $current_dac_sampling_rate = 4800;                              // Dac sample rate, set by message from VM
   .VAR $set_dac_rate_from_vm_message_struc[$message.STRUC_SIZE];    // Message structure for VM_SET_DAC_RATE_MESSAGE_ID message
   .VAR $current_codec_sampling_rate = 4800;                            // codec data sample rate, set by vm
   .VAR $set_codec_rate_from_vm_message_struc[$message.STRUC_SIZE];  // Message structure for VM_SET_CODEC_RATE_MESSAGE_ID message
设置codec类型:
   // This is the codec type being used
   .VAR $codec_type = $music_example.ANALOGUE_CODEC_TYPE;

   // This is the codec config being used
   .VAR $codec_config = $music_example.ANALOGUE_CODEC_CONFIG;
##4.2. music_example_config.asm
修改volume模块默认音量:
   .VAR aux_stereo_volume_and_limit_obj[$volume_and_limit.STRUC_SIZE] =
        0x000000,                                          //OFFSET_CONTROL_WORD_FIELD
        $M.MUSIC_MANAGER.CONFIG.VOLUME_LIMITER_BYPASS, //OFFSET_BYPASS_BIT_FIELD
        2,                                                 //NROF_CHANNELS_FIELD
        &$current_dac_sampling_rate,                       //SAMPLE_RATE_PTR_FIELD
        $music_example.DEFAULT_MASTER_VOLUME,                 //MASTER_VOLUME_FIELD
        $music_example.LIMIT_THRESHOLD,                    //LIMIT_THRESHOLD_FIELD
        $music_example.LIMIT_THRESHOLD_LINEAR,             //LIMIT_THRESHOLD_LINEAR_FIELD
        $music_example.LIMIT_RATIO,                        //LIMIT_RATIO_FIELD_FIELD
        $music_example.RAMP_FACTOR,                        //RAMP FACTOR FIELD
        0 ...;

   .VAR multichannel_volume_and_limit_obj[$volume_and_limit.STRUC_SIZE] =
        0x000000,                                         //OFFSET_CONTROL_WORD_FIELD
        $M.MUSIC_MANAGER.CONFIG.VOLUME_LIMITER_BYPASS,    //OFFSET_BYPASS_BIT_FIELD
        4,                                                //NROF_CHANNELS_FIELD
        &$current_dac_sampling_rate,                      //SAMPLE_RATE_PTR_FIELD
        $music_example.DEFAULT_MASTER_VOLUME,                //MASTER_VOLUME_FIELD
        $music_example.LIMIT_THRESHOLD,                   //LIMIT_THRESHOLD_FIELD
        $music_example.LIMIT_THRESHOLD_LINEAR,            //LIMIT_THRESHOLD_LINEAR_FIELD
        $music_example.LIMIT_RATIO,                       //LIMIT_RATIO_FIELD_FIELD
        $music_example.RAMP_FACTOR,                       //RAMP FACTOR FIELD
        0 ...;
##4.3. music_example_system.asm
修改系统模式:
   Null = r0 AND $M.MUSIC_MANAGER.CONTROL.MODE_OVERRIDE;
   if NZ r1 = r4;

   r2 = $M.MUSIC_MANAGER.SYSMODE.FULLPROC;
#5. 搭建matlab仿真环境
matlab是算法开发人员经常使用的工具。本章给出了一键输出仿真结果的.m文件源码,并分段讲解每段代码的作用。
##5.1. 清除所有临时运算结果
close;
clear all;
##5.2. 初始化系统参数
%% Parameters
   disp('***** Cnfigure parms *****');
   % cd C:\ADK_CSR867x.WIN4.2\kalimba\apps\a2dp_sink_lemon

   sim_mode_manual = 0; % 0:一键仿真;1:可选择仿真模式
   create_input_file = 1; % 0:使用外部的文件;1:使用生成的文件
   sound_input_en = 0; % 0:不播放输入文件;1:播放输入文件
   sound_output_en = 0; % 0:不播放输出文件;1:播放输出文件
   play_time_adj_en = 1; % 0:仿真时间由输入文件大小决定;1:仿真时间可调
   play_time_adj_val_sec = 1; % sec % 仿真时间,单位秒

   klo_file = 'sbc_decoder.elf';

   output_1 = 'output_left.wav';
   output_2 = 'output_right.wav';

   input_1_kps = 'lemon_input_left.kps';
   input_2_kps = 'lemon_input_right.kps';

   output_1_kps = 'lemon_output_left.kps';
   output_2_kps = 'lemon_output_left.kps';
##5.3. 准备仿真输入
% create input files
   if create_input_file == 1
       input_1 = 'input_left.wav';
       input_2 = 'input_right.wav';

       input_play_time = play_time_adj_val_sec;

       % 设置输入采样率
       fs1=48000;
       fs2=48000;

       t1=0:1/fs1:input_play_time;
       t2=0:1/fs2:input_play_time;

       % 生成输入波形
       in1=sin(2*pi*1000*t1);
       in2=sin(2*pi*5000*t2);

	   % 生成输入文件
       audiowrite(input_1,in1,fs1);
       audiowrite(input_2,in2,fs2);

       % calcualte input parms
       bitsize1=16;
       bitsize2=16;

       in1_size=length(in1);
       in2_size=length(in2);

       in1_time=in1_size/fs1;
       in2_time=in2_size/fs2;

   else
       % 导入已有输入文件
       input_1 = '244_Prompts_AptX_HD_48k.wav';
       input_2 = '244_Prompts_AptX_HD_48k.wav';

       % 读取数据和采样率
       [in1, fs1] = audioread(input_1);
       [in2, fs2] = audioread(input_2);

       % calcualte input parms
       in1_size=length(in1);
       in2_size=length(in2);

       in1_time=in1_size/fs1;
       in2_time=in2_size/fs2;

       bitsize1=16;
       bitsize2=16;

       if play_time_adj_en == 1
           input_play_time = play_time_adj_val_sec;
       else
           input_play_time = in1_time;
       end

       t1=0:1/fs1:input_play_time;
       t2=0:1/fs2:input_play_time;
   end
##5.4. 播放输入文件
   % play input files
   if sound_input_en == 1
       pause(3);
       disp(['play left input: ',input_1]);
       sound(in1,fs1);
       pause(3);
       disp(['play right input: ',input_2]);
       sound(in2,fs2);
       pause(3);
   end
##5.5. 创建输入和输出流控制脚本
% create input/output script
   input_kps_array={input_1_kps,...
       input_2_kps,...
       output_1_kps,...
       output_2_kps};

   input_kps_num=4; % 2输入,2输出
   wait_time = 100;

   for i=1:input_kps_num
       input_kps = input_kps_array(i);
       input_kps = input_kps{1}; % convert cell to string
       fp = fopen(input_kps,'w');
       str = '// echo First port script';
       fprintf(fp,'%s\r\n',str);

       %    echo About to wait xxx us:
       str = ['wait ',num2str(wait_time)];
       fprintf(fp,'%s\r\n',str);

       %    Syntax: stream   [block size] [extra buffer]
       kps_bps = bitsize1*fs1;
       kps_amount = kps_bps*input_play_time;
       kps_blocksize = 500*bitsize1;
       kps_extrablock = 0;
       str = ['strict_stream ',...
           ' ',num2str(kps_amount),...
           ' ',num2str(kps_bps),...
           ' ',num2str(kps_blocksize),...
           ' ',num2str(kps_extrablock)];

       fprintf(fp,'%s',str);
       fclose(fp);
   end
##5.6. 运行kalsim
分两种模式,一键仿真和可选择模式仿真。
可选择模式仿真支持两种模式,非调试模式和调试模式。非调试模式下,仿真结果可以直接输出;调试模式下,可以一边调试DSP一边仿真。
需要注意的是,在调试模式下,需要等待kalsim完成仿真,在matlab的command window中输入‘1’,否则仿真结果会有缺失。
%% run kalsim
   disp('***** Run kalsim... *****');
   if sim_mode_manual == 1
       disp('please select simulation mode:');
       disp(' -1 simulation without debugging');
       disp(' -2 simulation with debugging');
       sim_mode = input('press 1 or 2, then press enter\n');
   else
       sim_mode = 1;
   end

   if sim_mode==1
       disp('simulation without debugging');
       cmd = [...,
           'kalsim_csr8675 sbc_decoder.kap',...
           ' -i 0 ',input_1,' s=',input_1_kps,...
           ' -i 1 ',input_2,' s=',input_2_kps,...
           ' -o 4 ',output_1,' s=',output_1_kps,...
           ' -o 5 ',output_2,' s=',output_2_kps,...
           ' -s 32'];
       %dos(cmd);
       fp = fopen('a2dp_sink_lemon_without_debugging.bat','w');
       fprintf(fp,'%s',cmd);
       fclose(fp);
       !a2dp_sink_lemon_without_debugging.bat
       sim_done = 1;

   elseif sim_mode==2
       disp('simulate with debugging');
       cmd = [...,
           'kalsim_csr8675 sbc_decoder.kap -d',...
           ' -i 0 ',input_1,' s=',input_1_kps,...
           ' -i 1 ',input_2,' s=',input_2_kps,...
           ' -o 4 ',output_1,' s=',output_1_kps,...
           ' -o 5 ',output_2,' s=',output_2_kps,...
           ' -s 32'];
       %dos(cmd);
       fp = fopen('a2dp_sink_lemon_with_debugging.bat','w');
       fprintf(fp,'%s',cmd);
       fclose(fp);
       !a2dp_sink_lemon_with_debugging.bat &

        % connect kalsim
           %kalspi('listdevices');
           %pause(1);
           kalspi('open', 'SPITRANS=KALSIM SPIPORT=1');
           pause(1);

        % load elf file
           kalloadsym(klo_file);
           pause(1);
           kalrunning(1);

        % make sure simulation is done
           disp('please input simulation rsult:');
           disp(' -1 simulation success');
           disp(' -2 simulation fail');
           sim_done = input('press 1 or 2, then press enter\n');
           !taskkill /F /IM cmd.exe /T &
        % disconnect kalsim
            kalspi('close');
   end
##5.7. 仿真结果写入文件
kalsim仿真结束后,会生成DSP的输出文件。此时需要将这两个文件载入matlab分析。
%% read simulation result
   disp('***** Analysis simulation result... *****');
   if (sim_done == 1)
       output_left_sample_rate = 48000;
       output_right_sample_rate = 48000;

       fid=fopen(output_1,'r');output_left=fread(fid,'int16');
       fid=fopen(output_2,'r');output_right=fread(fid,'int16');

       output_left_size=length(output_left);
       output_right_size=length(output_right);

       output_left_x=0:1:(output_left_size-1);
       output_right_x=0:1:(output_right_size-1);

       output_left_time = output_left_size/output_left_sample_rate;
       output_right_time = output_right_size/output_right_sample_rate;

       output_left_float=output_left/(2.^15);
       output_right_float=output_right/(2.^15);

       if sound_output_en == 1
           pause(3);
           disp(['playing output left: ',output_1]);
           sound(output_left_float,output_left_sample_rate);
           pause(3);
           disp(['playing output right: ',output_2]);
           sound(output_right_float,output_right_sample_rate);
           pause(3);
       end

   else
        disp('Error, simulation not finish.');
   end
##5.8. 绘制仿真结果
绘制两个输入文件和输出文件的波形,全屏显示。
disp('***** Figure out simluation result *****');
  subplot(4,1,1);plot(in1);set(gca,'XTick',0:0.1*fs1:in1_size);set(gca,'XTickLabel',0:0.1:in1_time);xlabel('time (seconds)');title('adc input left');axis([0,in1_size,-1,1]);
  subplot(4,1,2);plot(in2);set(gca,'XTick',0:0.1*fs2:in2_size);set(gca,'XTickLabel',0:0.1:in2_time);xlabel('time (seconds)');title('adc input right');axis([0,in2_size,-1,1]);
  subplot(4,1,3);plot(output_left_float);set(gca,'XTick',0:0.1*output_left_sample_rate:output_left_size);set(gca,'XTickLabel',0:0.1:output_left_time);xlabel('time (seconds)');title('primary output left');axis([0,in1_size,-1,1]);
  subplot(4,1,4);plot(output_right_float);set(gca,'XTick',0:0.1*output_right_sample_rate:output_right_size);set(gca,'XTickLabel',0:0.1:output_right_time);xlabel('time (seconds)');title('primary output right');axis([0,in2_size,-1,1]);

set(gcf,'position',[1,83,1366,609]);
#6. 仿真结果
##6.1. matlab生成的正弦波
adc input left:48KHz 16Bit 正弦波,48KHz 16Bit,持续0.5s。
adc input right:48KHz 16Bit 正弦波,48KHz 16Bit,持续0.5s。

可见输出端有一小段延迟和变形。延迟的原因是,只有当输入缓冲区内的数据超过一定数量时才开始音频处理。变形的原因可能是fade-in/out功能生效了,防止输出陡然变大。
##6.2. 外部音频文件输入
adc input left:外部音频文件输入,48KHz 16Bit,持续1.3s。
adc input right:外部音频文件输入,48KHz 16Bit,持续1.3s。

输出端也有一小段延迟。
#7. 总结
有了这个工具,算法开发人员可以直接在PC平台上验证DSP工程的改动,方便了算法的开发和验证。
本文中的输入信号从analog通道直接进入,没有使用SCO通道的压缩信号,DSP工程内的解码器没有工作,因此不是蓝牙音箱的通常的MIPS消耗情况。后续会在此工程基础上补全各种主流解码器工作时的MIPS消耗情况。
在调试模式下,可以通过SPI端口与DSP通信。此功能的用处有很多,比如监控实时MIPS消耗、读写内部变量、调音等。后续会尝试写一个基于matlab GUI 的调试+调音界面。
