将NodeMCU接入物联网平台的踩坑之路(阿里云、百度天工)
最近在学习物联网,第一次买了一个Aaruino D1 WIFI开发板,过程遇到不少困难,甚至怀疑开发板是不是有问题;后来发现网上的大部分教程里用的是NodeMCU,于是我就把它买了下来,本教程里用的也是NodeMCU开发板。
下面是分别是接入阿里云物联网平台和百度天工物联网平台的注意事项:
- 阿里云物联网平台
- 百度天工物联网平台
阿里云物联网平台
阿里云物联网平台链接:https://www.aliyun.com/product/iot

直接进入管理控制台即可,新建设备什么的比较简单,查看技术文档即可

下面是阿里云开发者社区给出的教程:
NodeMCU(ESP8266)接入阿里云物联网平台
对于上面教程里的esp8266.ino 代码:
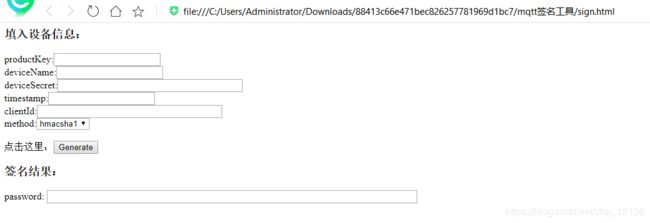
#include 这里主要讲一下CLIENT_ID和MQTT_PASSWD:
- CLIENT_ID的timestamp不用写,也就是:
"esp8266|securemode=3,signmethod=hmacsha1|"
阿里云的接入方法还是比较简单的,也有很多资源,下面来看看接入百度天工物联网平台的方法
百度天工物联网平台
百度天工物接入IoT Hub链接:
https://cloud.baidu.com/product/iot.html

创建设备的方法很简单,在帮助文档都能找到:

下面是百度开发者中心里的案例:
了解物接入-家庭温湿度交互式系统开发
教程里用的是Linux系统,但是问题不大,使用Windows系统的朋友也是可以的
首先是第三步的固件包下载:

这里划重点!
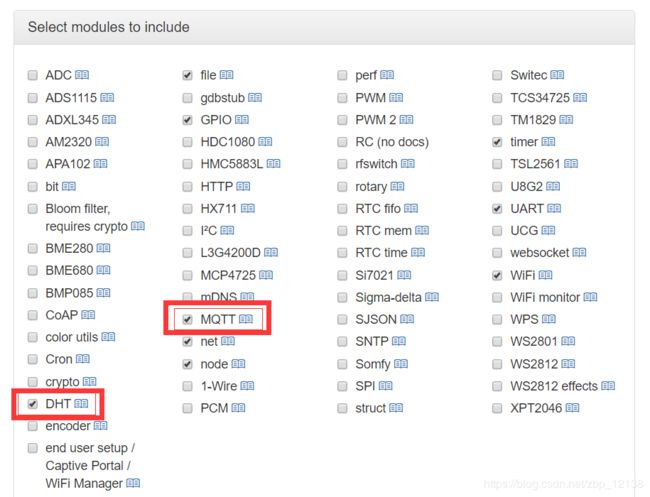
一定要把MQTT加上,如果要做温湿度检测,还要把DHT勾上,不然就会像这样:
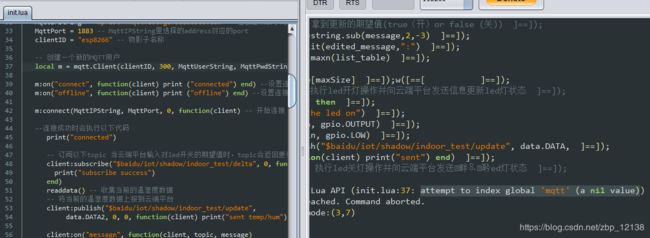
报错信息如下:
PANIC: unprotected error in call to Lua API (init.lua:37: attempt to index global ‘mqtt’ (a nil value))
这个报错就好像python里导入的库没有安装一样
接下来是第4步:
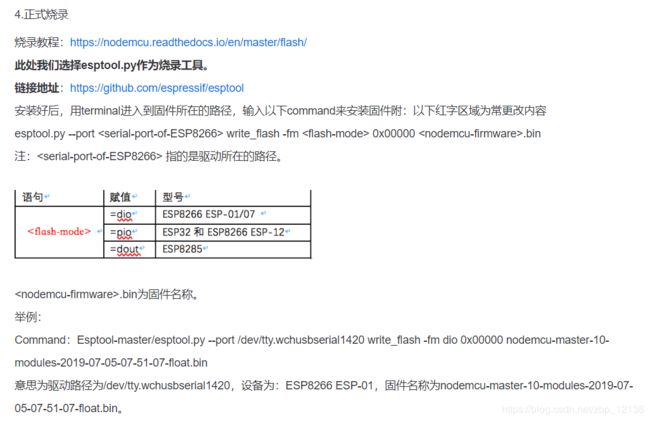
准确说,这里的烧录不是上传程序,而是为后续的程序上传做准备,具体原因请看 NodeMCU文档:
https://nodemcu.readthedocs.io/en/master/flash/#putting-device-into-flash-mode


那这一步怎么做呢?教程用到的是esptool.py
esptool.py的GitHub地址在教程上已经给了,但是下载速度很慢,这里我找了一个码云的,一样的,亲测能用:
https://gitee.com/reepu/esptool
使用方法在readme.md里,比较重要的是这一部分:

对应着教程里的这一部分:

在Windows系统下,驱动路径直接写COM口即可,下面是我用的命令:
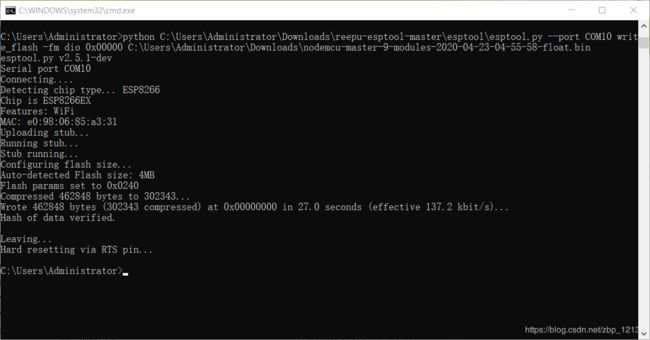
python C:\Users\Administrator\Downloads\reepu-esptool-master\esptool\esptool.py --port COM10 write_flash -fm dio 0x00000 C:\Users\Administrator\Downloads\nodemcu-master-9-modules-2020-04-23-04-55-58-float.bin
看似很长,主要是因为文件放的位置不太一样,如果文件在同一文件夹下,那么命令行可以写成:
python esptool.py --port COM10 write_flash -fm dio 0x00000 nodemcu-master-9-modules-2020-04-23-04-55-58-float.bin
这样就清晰多了
接下来是ESPlorer的使用:
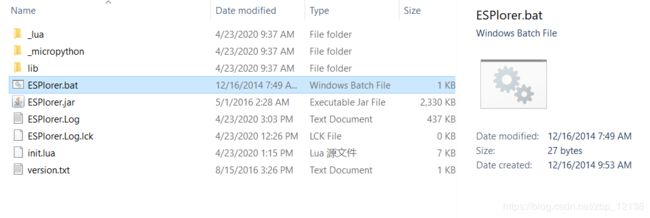
这个压缩包里没有.exe可执行文件,打开方式是双击这个.bat文件
然后是上传代码,教程里给了一个GitHub地址,里面有代码,但是没有讲代码里哪里需要修改,而且这代码有小瑕疵(代码地址:https://github.com/Tian-Gong/Baidu/blob/master/Temperature%20and%20humidity%20monitoring%20code)
这些问题一个个解决,先来看这个小瑕疵:

这注释少一个"-",虽然我不会lua语言,但是代码报错了,我根据报错提示找到的
下面来看一下完整代码,我把需要修改的地方给大家标出来:
local config = {
      WIFI_SSID = "zh213", --wifi名称
      WIFI_PASSWD = "zh213wei" --wifi密码

}

local data = {
      -- 按格式上报数据
      DATA= string.format("{\"%s\":{\"%s\":%s}}","reported","led","true"),
      DATA1= string.format("{\"%s\":{\"%s\":%s}}","reported","led","false"),
      DATA2="" -- 用来存储温湿度数据
}

local pin = 4 --控制LED灯的GPIO接口的IO index

function startup() -- wifi连接成功后开始运行的start function

      print("Running")
      tmr.create():alarm(30000, tmr.ALARM_AUTO, toCloud)
end

function toCloud() -- MQTT连接物联网平台并传输数据的function

   print("checking updates...")

   MqttUserString = "wp7z3eh/esp8266" --在创建物影子时保存的用户名name
   MqttPwdString = "" --在创建物影子时保存的密码key
   MqttIPString = "wp7z3eh.mqtt.iot.gz.baidubce.com" --在创建物影子时保存的address (TCP/SSL/WSS按需选择)
   MqttPort = 1883 -- MqttIPString里选择的address对应的port
   clientID = "esp8266" -- 物影子名称

   -- 创建一个新的MQTT用户
   local m = mqtt.Client(clientID, 1000, MqttUserString, MqttPwdString)

   m:on("connect", function(client) print ("connected") end) --设置连接成功时会弹出的信息
   m:on("offline", function(client) print ("offline") end) --设置连接失败时会弹出的信息

   m:connect(MqttIPString, MqttPort, 0, function(client) -- 开始连接

   --连接成功时会执行以下代码
      print("connected")

      -- 订阅以下topic 当云端平台输入对led开关的期望值时,topic会返回更新引导led灯做出反应
      client:subscribe("$baidu/iot/shadow/esp8266/delta", 0, function(client)
        print("subscribe success")
      end)
      readdata() -- 收集当前的温湿度数据
      -- 将当前的温湿度数据上报到云端平台
      client:publish("$baidu/iot/shadow/esp8266/update",
           data.DATA2, 0, 0, function(client) print("sent temp/hum") end)

      client:on("message", function(client, topic, message)
      -- 当云端平台的led开关期望值有更新时,执行以下操作

            --处理返回的数据,拿到更新的期望值(true(开)or false (关))
            edited_message =string.sub(message,2,-3)
            list_table = split(edited_message,":")
            maxSize = table.maxn(list_table)

            tag = list_table[maxSize]

            --当期望值=true,执行led开灯操作并向云端平台发送信息更新led灯状态
            if tag == "true" then
               print("turn the led on")
               gpio.mode(pin, gpio.OUTPUT)
               gpio.write(pin, gpio.LOW)
               client:publish("$baidu/iot/shadow/esp8266/update", data.DATA,
                0, 0, function(client) print("sent") end)
            --当期望值=false,执行led关灯操作并向云端平台发送信息更新led灯状态
            else
               print("turn the led off")
               gpio.mode(pin, gpio.OUTPUT)
               gpio.write(pin, gpio.HIGH)
               client:publish("$baidu/iot/shadow/esp8266/update", data.DATA1,
                0, 0, function(client) print("sent") end)
            end
      end)
   end,
   --连接失败时会执行以下代码
   function(client, reason)
      print("failed reason: " .. reason)
   end)
end

function split(fullstring, splitchar)  -- 用来处理topic返回数据的function
   start_with = 1
   split_index = 1
   res = {}

   flag = true
   repeat
     end_with = string.find(fullstring, splitchar, start_with)
     if end_with then
       len = end_with - 1
       res[split_index] = string.sub(fullstring, start_with, len)
       start_with = end_with + string.len(splitchar)
       split_index = split_index+1
     else
       len = string.len(fullstring)
       res[split_index] = string.sub(fullstring, start_with, len)
       flag = false
     end
   until (flag==false)

   return res
end

function readdata() --采集当前最新的温湿度数据

  tmr.create():alarm(1500,tmr.ALARM_SINGLE,function()

    dpin = 4 --接口index
    status, temp, humi, temp_dec, humi_dec = dht.read11(dpin)
    if status == dht.OK then

       --编写符合上报格式的数据
       format_data = string.format("{\"%s\":{\"%s\":%d,\"%s\":%d}}",
            "reported","temperature",math.floor(temp), "humidity", math.floor(humi))
       data.DATA2 = format_data

    elseif status == dht.ERROR_CHECKSUM then
       print( "DHT Checksum error." )
    elseif status == dht.ERROR_TIMEOUT then
       print( "DHT timed out." )
    end
 end)
end

-- Define WiFi station event callbacks
wifi_connect_event = function(T)
  print("Connection to "..T.SSID.." established!")
  disconnect_num = 0
end

wifi_got_ip_event = function(T)

  print("Wifi connection is ready! IP: "..T.IP)
  print("Waiting for updating data...")
  tmr.create():alarm(3000, tmr.ALARM_SINGLE, startup)
end

local disconnect_num = 0
wifi_disconnect_event = function(T)

  if T.reason == wifi.eventmon.reason.ASSOC_LEAVE then
    return
  end

  --如果没有connected,就不停re-connected wifi
  total_tries = 30
  print("\nWiFi connection to "..T.SSID.." has failed!")

  disconnect_num  = disconnect_num  + 1
  if disconnect_num  < total_tries then
    print("Retrying...(attempt "..(disconnect_ct+1).." of "..total_tries..")")
  else
    wifi.sta.disconnect()
    print("Failed for 30 times. Check your WiFi environment!")
    disconnect_num  = 0
  end
end

-- 将我们自定义的wifi callback functions分配给对应的wifi event
wifi.eventmon.register(wifi.eventmon.STA_CONNECTED, wifi_connect_event)
wifi.eventmon.register(wifi.eventmon.STA_GOT_IP, wifi_got_ip_event)
wifi.eventmon.register(wifi.eventmon.STA_DISCONNECTED, wifi_disconnect_event)

-- 第一步,连接wifi
print("Now connecting to WiFi...")
wifi.setmode(wifi.STATION)
wifi.sta.config({ssid=config.WIFI_SSID, pwd=config.WIFI_PASSWD, save=true})
连接WIFI用的名称和密码是必须的,还有MQTT的配置信息也需要修改
比较容易忽略的是这里:

这里要改成自己的物影子名称,改完后就能正常上传数据了,就像这样:

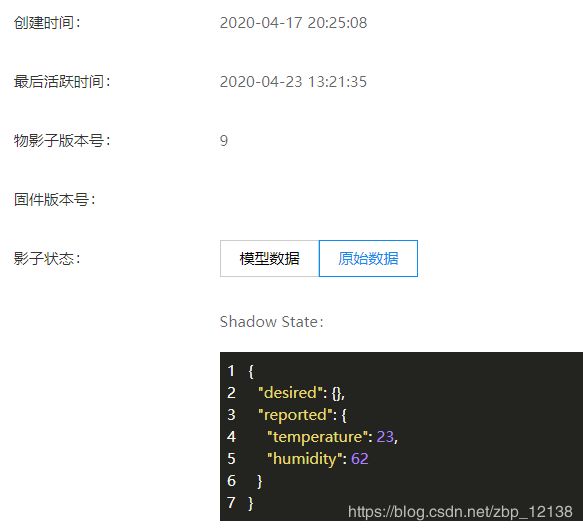
以上就是全部内容,如果大家在配置的过程中还遇到了其他问题,欢迎大家在评论区留言!

