桥梁监测信息关联分析可视化系统
文章目录
- 一、登陆界面
- 二、登陆功能界面
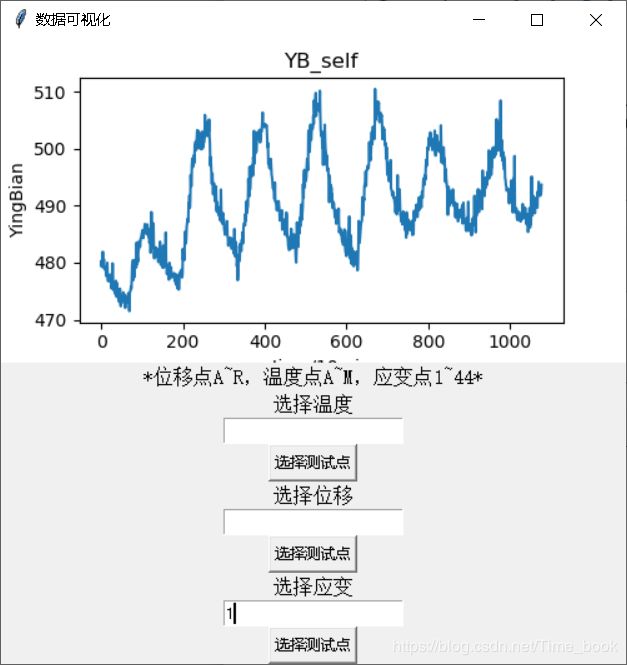
- 三、数据自相关功能
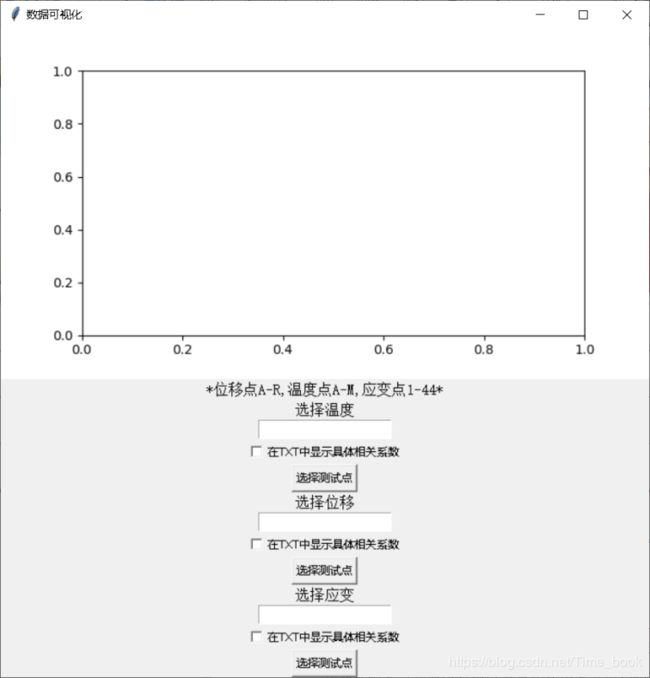
- 四、数据互相关功能
整个代码在jupyter notebook下运行
整个系统需要用到的库文件
#import pymysql
from tkinter import *
import tkinter as tk
import tkinter.messagebox as tkMessageBox
from PIL import Image, ImageFont,ImageTk
import matplotlib
import matplotlib.pyplot as plt
from matplotlib.backends.backend_tkagg import FigureCanvasTkAgg
from matplotlib.figure import Figure
import numpy as np
import xlrd
import pandas as pd
import subprocess
若要使用数据库进行注册功能的实现的话,推荐使用python自带的sqlite3,这个比MySQL方便;如果使用MySQL需要安装pymysql库
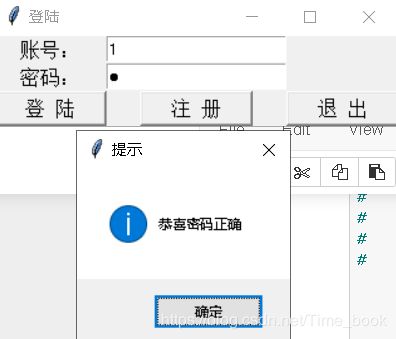
一、登陆界面
root = tk.Tk()
root.title('登陆')

f = Figure(figsize=(2.52, 2.56), dpi=100)
f_plot = f.add_subplot(111)#定义画布中的位置

e1 = tk.StringVar(root,value='')
e2 = tk.StringVar(root,value='')
tk.Label(root, text="账号:",font=20).grid(row=0, column=0)
tk.Label(root, text="密码:",font=20).grid(row=1, column=0)
entry_user =tk.Entry(root,textvariable=e1).grid(row=0, column=1)
entry_passwd=tk.Entry(root, show="●",textvariable=e2).grid(row=1, column=1)
tk.Button(root, text="登 陆", font=12,
          width=10, command=show).grid(row=2, column=0)
tk.Button(root, text="注 册", font=12,
          width=10, command=register
          ).grid(row=2, column=1)
tk.Button(root, text="退 出", font=12,
          width=10, command=root.destroy).grid(row=2, column=2)
root.mainloop()
效果图:
二、登陆功能界面
if e1.get() == '1'and e2.get() == '1':
        str1 = tk.messagebox.showinfo(title='提示',
                                  message = '恭喜密码正确')

    if  str1 == 'ok':
        root.destroy()
        root1 = tk.Tk()
        root1.title('桥梁监测信息关联分析可视化系统')
        canvas = tk.Canvas(root1,
                width = 800,
                height = 470,
                bg = 'black')
        image = Image.open("图片位置")
        im = ImageTk.PhotoImage(image)
        canvas.create_image(400,235,image = im)
        canvas.pack()
        buttonOk = tk.Button(root1,text = '****************▂▃▅▆▇▇▇▇数据可视化(周期估算)▇▇▇▇▆▅▃▂****************'
                            ,command=UI)
        buttonOk.place(x = 0,y = 370,width =800,height = 50)
        buttonOk = tk.Button(root1,text = '****************▂▃▅▆▇▇▇▇选择互相关(相关系数)▇▇▇▇▆▅▃▂****************'
                            ,command=UI2)
        buttonOk.place(x = 0,y = 420,width =800,height = 50)

        root1.mainloop()
    else :
        string_a = '密码或账号错误 ,请重新输入!'
        tkMessagebox.showinfo(title='提示', message = string_a)
三、数据自相关功能
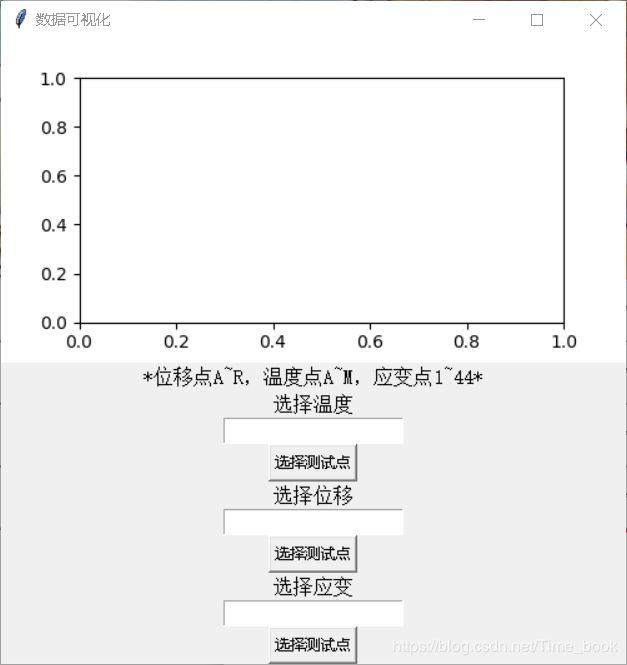
1.定义一个界面
def UI():

#     data = xlrd.open_workbook(r'F:/交通物联网/naodu625_strain_temp.xls')
#     sh1 = data.sheet_by_name('温度')
#     sh2 = data.sheet_by_name('挠度')
#     sh3 = data.sheet_by_name('应变')
    bk = xlrd.open_workbook('F:/交通物联网/naodu625_strain_temp.xls')
#通过索引顺序获取 sheet
    sh = bk.sheets()[0]
    root2=tk.Tk()
    root2.title('数据可视化')
#     var = tk.StringVar()
    root2.geometry("500x500")

    canvs = FigureCanvasTkAgg(f, root2)#f是定义的图像,root是tkinter中画布的定义位置
    canvs.get_tk_widget().pack(side=TOP, fill=BOTH, expand=1)
    Label(root2, text="*位移点A~R,温度点A~M,应变点1~44*",font=20).pack()
    Label(root2, text="选择温度",font=20).pack()
    test1=Entry(root2)
    test1.pack()
    Button(root2, text='选择测试点', command=draw_T).pack()
    Label(root2, text="选择位移",font=20).pack()
    test2=Entry(root2)
    test2.pack()
    Button(root2, text='选择测试点', command=draw_D).pack()
    Label(root2, text="选择应变",font=20).pack()
    test3=Entry(root2)
    test3.pack()
    Button(root2, text='选择测试点', command=draw_Y).pack()
    root2.mainloop()
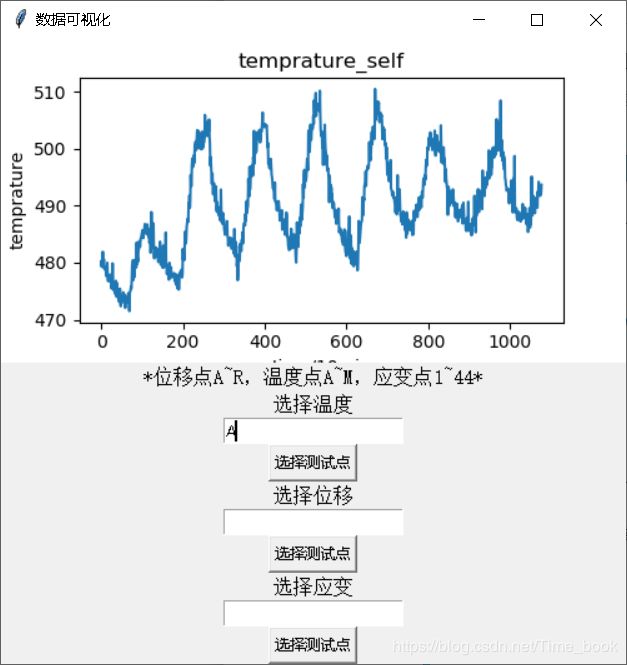
2.温度可视化界面
	def draw_T():
        f_plot.clear()
        t = ord(test1.get())  #用字母表示时
        if t in (65,82):
            test_TEM=t-65
            if test_TEM<13:
                col_test_TEM = sh.col_values(test_TEM+19,start_rowx=1)
                x=np.arange(0,1078,1)
                y=np.array(col_test_TEM)
                f_plot.set(title='temprature_self',
                                        xlabel='time/10min',ylabel='temprature')
                f_plot.plot(x,y)
                canvs.draw()
        else:
            tk.messagebox.showinfo(title='提示',message='*位移点A~R,温度点A~M,应变点1~44*')
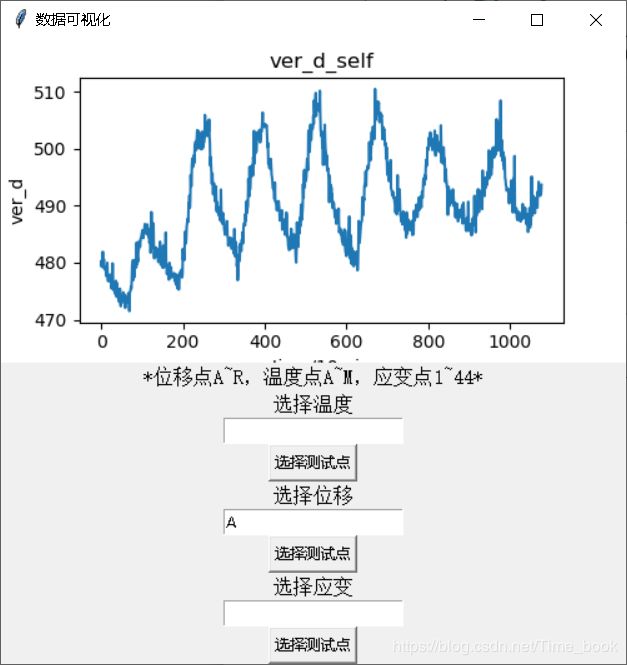
3.位移可视化界面
	def draw_D():
        f_plot.clear()
        d = ord(test2.get())  #用字母表示时
        if d in (65,77):
            test_VD = d-65
            if test_VD<18:
                col_test_VD = sh.col_values(test_VD+19,start_rowx=1)
                x=np.arange(0,1078,1)
                y=np.array(col_test_VD)
                f_plot.set(title='ver_d_self',
                                    xlabel='time/10min',ylabel='ver_d')
                f_plot.plot(x,y)
                canvs.draw()
        else:
            tk.messagebox.showinfo(title='提示', message = '*位移点A~R,温度点A~M,应变点1~44*')
4.应变可视化界面
	def draw_Y():
        f_plot.clear()
                #y = ord(var.get())  #用字母表示时
        if test3.get().isdigit():
            test_YB = int(test3.get())-1
        else:
            tk.messagebox.showinfo(title='提示', message = '*位移点A~R,温度点A~M,应变点1~44*')


        if test_YB<44 and test_YB>=0:
            col_test_YB = sh.col_values(test_YB+19,start_rowx=1)
            x=np.arange(0,1078,1)
            y=np.array(col_test_YB)
            f_plot.set(title='YB_self',xlabel='time/10min',ylabel='YingBian')
            f_plot.plot(x,y)
            canvs.draw()
        else:
            str1 = tkMessagebox.showinfo(title='提示',message = '输入范围错误,请重新输入')
            if str1 == 'ok':
                return
上述功能已经实验过,可以正常运行,不过需要自己进行整理
四、数据互相关功能
1.定义界面
def UI2():
    data = xlrd.open_workbook(r'F:/交通物联网/naodu625_strain_temp.xls')
    sh1 = data.sheet_by_name('温度')
    sh3 = data.sheet_by_name('挠度')
    sh2 = data.sheet_by_name('应变')
    root3=tk.Tk()
    root3.title('数据可视化')
#     var = tk.StringVar()
    root3.geometry("700x700")
    f = Figure(figsize=(2.52, 2.56), dpi=100)#figsize定义图像大小,dpi定义像素
    f_plot1 = f.add_subplot(111)#定义画布中的位置
    canvs = FigureCanvasTkAgg(f, root3)#f是定义的图像,root是tkinter中画布的定义位置
    canvs.get_tk_widget().pack(side=TOP, fill=BOTH, expand=1)

	Label(root3,text="*位移点A-R,温度点A-M,应变点1-44*",font=20).pack()
    Label(root3,text="选择温度",font=20).pack()
    test1=Entry(root3)
    test1.pack()
    #复选框
    chVarDis =IntVar(root3)   # 用来获取复选框是否被勾选,通过chVarDis.get()来获取其的状态,其状态值为int类型 勾选为1  未勾选为0
    check1 = Checkbutton(root3, text="在TXT中显示具体相关系数", variable=chVarDis)    # text为该复选框后面显示的名称, variable将该复选框的状态赋值给一个变量,当state='disabled'时,该复选框为灰色,不能点的状态
    check1.deselect()     # 该复选框是否勾选,select为勾选, deselect为不勾选
    check1.pack()

    Button(root3, text='选择测试点', command=draw_D_T).pack()
    Label(root3,text="选择位移",font=20).pack()
    test2=Entry(root3)
    test2.pack()
    chvarUn =IntVar(root3)
    check2 =Checkbutton(root3, text="在TXT中显示具体相关系数", variable=chvarUn)
    check2.deselect()
    check2.pack()

    Button(root3,text='选择测试点',command=draw_D_Y).pack()
    Label(root3,text="选择应变",font=20).pack()
    test3=Entry(root3)
    test3.pack()
    chvarEn =IntVar(root3)

    check3 =Checkbutton(root3, text="在TXT中显示具体相关系数", variable=chvarEn)
    check3.deselect()
    check3.pack()
    Button(root3, text='选择测试点',command=draw_Y_T).pack()
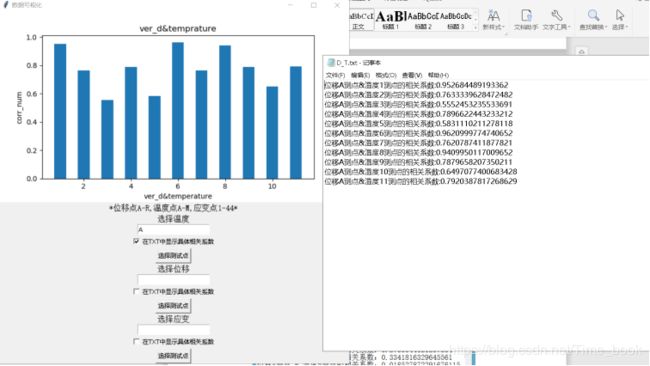
2.位移&温度互相关功能
	def draw_D_T():
        f_plot1.clear()
        d1 = ord(test1.get())
        if d1>82:
            str1 = tk.messagebox.showinfo(title='提示',message = '输入范围错误,请重新输入')
            if str1 == 'ok':
                return
        test_VD1 = d1-65
        if test_VD1<18:
            col_test_VD1 = sh3.col_values(test_VD1)
            s_test=pd.Series(col_test_VD1[1:])
            corr_nm1 = []
            X=[]
            open('D_T.txt','w').close()
            for j in range(1,12):
                X.insert(j,j)
                col3 = sh1.col_values(j)
                s3=pd.Series(col3[1:])
                corr_test=s_test.corr(s3)
                if corr_test<0:
                    corr_nm1.append(-corr_test)
                else:
                    corr_nm1.append(corr_test)
                if chVarDis.get()==1:
                    result2txt=str('位移'+str(test1.get())  +'测点&温度'+str(j) +'测点的相关系数:'+str(corr_nm1[j-1]))          # data是前面运行出的数据,先将其转为字符串才能写入
                    with open('D_T.txt','a',encoding='utf8') as file_handle:   # .txt可以不自己新建,代码会自动新建
                        file_handle.write(result2txt)     # 写入
                        file_handle.write('\n')         # 有时放在循环里面需要自动转行,不然会覆盖上一条数据
                    if j==11:
                        subprocess.Popen("notepad.exe D_T.txt")

            f_plot1.set(title='ver_d&temprature',
                                xlabel='ver_d&temperature',ylabel='corr_num')
            f_plot1.bar(x=X, height=corr_nm1,width=0.5,)
            canvs.draw()
	def draw_D_Y():
        f_plot1.clear()
        d2 = ord(test2.get())
        if d2>77:
            str1 = tk.messagebox.showinfo(title='提示',message = '输入范围错误,请重新输入')
            if str1 == 'ok':
                return
        test_VD2 = d2-65
        if test_VD2<18:
            col_test_VD2 = sh3.col_values(test_VD2)
            s_test1=pd.Series(col_test_VD2[1:])
            corr_nm2 = []
            X=[]
            open('D_Y.txt', 'w').close()
            for i in range(0,44):
                X.insert(i,i)
                col_y = sh2.col_values(i)
                s_y=pd.Series(col_y[1:])
                corr_test1=s_test1.corr(s_y)
                if corr_test1<0:
                    corr_nm2.append(-corr_test1)
                else :
                    corr_nm2.append(corr_test1)
                if chvarUn.get()==1:
                    result2txt=str('位移'+str(test2.get())  +'测点&应变'+str(i+1) +'测点的相关系数:'+str(corr_nm2[i]))          # data是前面运行出的数据,先将其转为字符串才能写入
                    with open('D_Y.txt','a',encoding='utf8') as file_handle:   # .txt可以不自己新建,代码会自动新建
                        file_handle.write(result2txt)     # 写入
                        file_handle.write('\n')         # 有时放在循环里面需要自动转行,不然会覆盖上一条数据
                    if i==43:
                        subprocess.Popen("notepad.exe D_Y.txt")

            f_plot1.set(title='ver_d&YB',
                        xlabel='ver_d&YB',ylabel='corr_num')
            f_plot1.bar(x=X,height=corr_nm2,width=0.5,)
            canvs.draw()
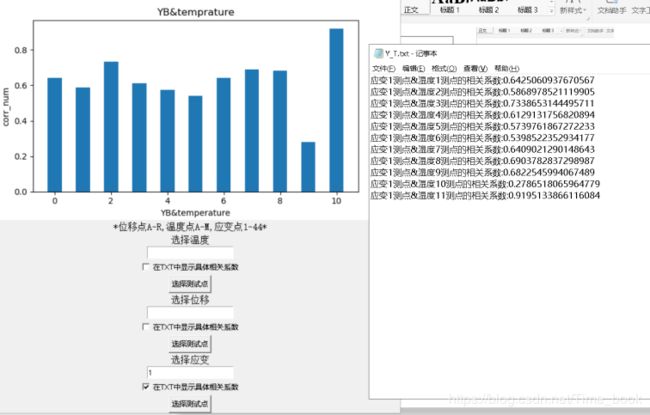
	def draw_Y_T():
        f_plot1.clear()
        if test3.get().isdigit():
            test_YB1 = int(test3.get())-1
        else :
            messagebox.showinfo(title='提示',message = '输入的测试点超出范围,请重新输入!')
        if test_YB1<44 and test_YB1>=0:
            col_test_YB1 = sh2.col_values(test_YB1)
            s_test2=pd.Series(col_test_YB1[1:])
            corr_nm3 = []
            X=[]
            open('Y_T.txt', 'w').close()
            for k in range(1,12):
                X.insert(k-1,k-1)
                col_yt = sh3.col_values(k)
                s_yt=pd.Series(col_yt[1:])
                corr_test2=s_test2.corr(s_yt)
                if corr_test2<0:
                    corr_nm3.append(-corr_test2)
                else :
                    corr_nm3.append(corr_test2)
                if chvarEn.get()==1:
                    result2txt=str('应变'+str(test3.get())  +'测点&温度'+str(k) +'测点的相关系数:'+str(corr_nm3[k-1]))          # data是前面运行出的数据,先将其转为字符串才能写入
                    with open('Y_T.txt','a',encoding='utf8') as file_handle:   # .txt可以不自己新建,代码会自动新建
                        file_handle.write(result2txt)     # 写入
                        file_handle.write('\n')         # 有时放在循环里面需要自动转行,不然会覆盖上一条数据
                    if k==11:
                        subprocess.Popen("notepad.exe Y_T.txt")
            f_plot1.set(title='YB&temprature',                                    xlabel='YB&temperature',ylabel='corr_num')
            f_plot1.bar(x=X,height=corr_nm3,width=0.5,)
            canvs.draw()
        else:
            str1 = tk.messagebox.showinfo(title='提示',message = '输入范围错误,请重新输入')
            if str1 == 'ok':
                return
同样这里的代码同样需要整理才能成功运行
若有小伙伴找到处理数据更加简便的方法也请告诉我,我会将源码和数据上传,源码比这个啰嗦,而且还有没有用到的,比如注册功能的代码,感谢各位看官的指教!

