实用FRIDA进阶:内存漫游、hook anywhere、抓包
本章中我们进一步介绍,大家在学习和工作中使用Frida的实际场景,比如动态查看安卓应用程序在当前内存中的状态,比如指哪儿就能hook哪儿,比如脱壳,还有使用Frida来自动化获取参数、返回值等数据,主动调用API获取签名结果sign等工作实际高频场景,最后介绍一些经常遇到的高频问题解决思路,希望可以切实地帮助到读者。
1 内存漫游
Frida只是提供了各种API供我们调用,在此基础之上可以实现具体的功能,比如禁用证书绑定之类的脚本,就是使用Frida的各种API来组合编写而成。于是有大佬将各种常见、常用的功能整合进一个工具,供我们直接在命令行中使用,这个工具便是objection。
objection功能强大,命令众多,而且不用写一行代码,便可实现诸如内存搜索、类和模块搜索、方法hook打印参数返回值调用栈等常用功能,是一个非常方便的,逆向必备、内存漫游神器。objection的界面及命令如下图图2-1所示。
图2-1 objection基本界面及命令
1.1 获取基本信息
首先介绍几个基本操作:
- 键入命令之后,回车执行;
- help:不知道当前命令的效果是什么,在当前命令前加
help比如,help env,回车之后会出现当前命令的解释信息; - 按空格:不知道输入什么就按空格,会有提示出来,上下选择之后再按空格选中,又会有新的提示出来;
- jobs:作业系统很好用,建议一定要掌握,可以同时运行多项(
hook)作业;
我们以安卓内置应用“设置”为例,来示范一下基本的用法。
在手机上启动frida-server,并且点击启动“设置”图标,手机进入设置的界面,首先查看一下“设置”应用的包名。
# frida-ps -U|grep -i setting
 7107  com.android.settings
13370  com.google.android.settings.intelligence
再使用objection注入“设置”应用。
# objection -g com.android.settings explore
启动objection之后,会出现提示它的logo,这时候不知道输入啥命令的话,可以按下空格,有提示的命令及其功能出来;再按空格选中,又会有新的提示命令出来,这时候按回车就可以执行该命令,见下图2-2执行的应用环境信息命令env和frida-server版本信息命令。
图2-2 应用环境信息和frida-server版本信息
1.2 提取内存信息
- 查看内存中加载的库
运行命令memory list modules,效果如下图2-3所示。
图2-3 内存中加载的库
- 查看库的导出函数
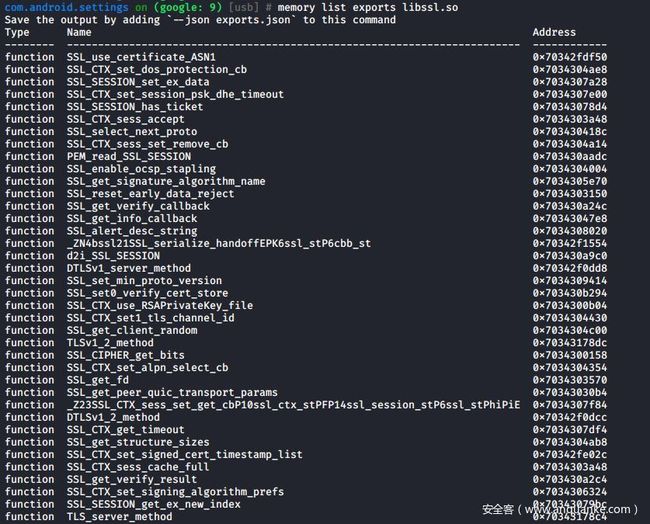
运行命令memory list exports libssl.so,效果如下图2-4所示。
图2-4 libssl.so库的导出函数
- 将结果保存到
json文件中
当结果太多,终端无法全部显示的时候,可以将结果导出到文件中,然后使用其他软件查看内容,见下图2-5。
# memory list exports libart.so --json /root/libart.json
Writing exports as json to /root/libart.json...
Wrote exports to: /root/libart.json
图2-5 使用json格式保存的libart.so的导出函数
- 提取整个(或部分)内存
命令是memory dump all from_base,这部分内容与下文脱壳部分有重叠,我们在脱壳部分介绍用法。
- 搜索整个内存
命令是memory search --string --offsets-only,这部分也与下文脱壳部分有重叠,我们在脱壳部分详细介绍用法。
1.3 内存堆搜索与执行
- 在堆上搜索实例
我们查看AOSP源码关于设置里显示系统设置的部分,发现存在着DisplaySettings类,可以在堆上搜索是否存在着该类的实例。首先在手机上点击进入“显示”设置,然后运行以下命令,并得到相应的实例地址:
# android heap search instances com.android.settings.DisplaySettings
Using exsiting matches for com.android.settings.DisplaySettings. Use --fresh flag for new instances.
Handle    Class                                 toString()
--------  ------------------------------------  -----------------------------------------
0x252a    com.android.settings.DisplaySettings  DisplaySettings{69d91ee #0 id=0x7f0a0231}
- 调用实例的方法
查看源码得知com.android.settings.DisplaySettings类有着getPreferenceScreenResId()方法(后文也会介绍在objection中直接打印类的所有方法的命令),这样就可以直接调用该实例的getPreferenceScreenResId()方法,用excute命令。
# android heap execute 0x2526 getPreferenceScreenResId
Handle 0x2526 is to class com.android.settings.DisplaySettings
Executing method: getPreferenceScreenResId()
2132082764
可见结果被直接打印了出来。
- 在实例上执行
js代码
也可以在找到的实例上直接编写js脚本,输入android heap evaluate 0x2526命令后,会进入一个迷你编辑器环境,输入console.log("evaluate result:"+clazz.getPreferenceScreenResId())这串脚本,按ESC退出编辑器,然后按回车,即会开始执行这串脚本,输出结果。
# android heap evaluate 0x2526
(The handle at `0x2526` will be available as the `clazz` variable.)

console.log("evaluate result:"+clazz.getPreferenceScreenResId())

JavaScript capture complete. Evaluating...
Handle 0x2526 is to class com.android.settings.DisplaySettings
evaluate result:2132082764
这个功能其实非常厉害,可以即时编写、出结果、即时调试自己的代码,不用再编写→注入→操作→看结果→再调整,而是直接出结果。
1.4 启动activity或service
- 直接启动
activity
直接上代码,想要进入显示设置,可以在任意界面直接运行以下代码进入显示设置:
# android intent launch_activity com.android.settings.DisplaySettings
(agent) Starting activity com.android.settings.DisplaySettings...
(agent) Activity successfully asked to start.
- 查看当前可用的
activity
可以使用android hooking list命令来查看当前可用的activities,然后使用上述命令进行调起。
# android hooking list activities

com.android.settings.ActivityPicker
com.android.settings.AirplaneModeVoiceActivity
com.android.settings.AllowBindAppWidgetActivity
com.android.settings.AppWidgetPickActivity
com.android.settings.BandMode
com.android.settings.ConfirmDeviceCredentialActivity
com.android.settings.CredentialStorage
com.android.settings.CryptKeeper$FadeToBlack
com.android.settings.CryptKeeperConfirm$Blank
com.android.settings.DeviceAdminAdd
com.android.settings.DeviceAdminSettings
com.android.settings.DisplaySettings
com.android.settings.EncryptionInterstitial
com.android.settings.FallbackHome
com.android.settings.HelpTrampoline
com.android.settings.LanguageSettings
com.android.settings.MonitoringCertInfoActivity
com.android.settings.RadioInfo
com.android.settings.RegulatoryInfoDisplayActivity
com.android.settings.RemoteBugreportActivity
com.android.settings.RunningServices
com.android.settings.SetFullBackupPassword
com.android.settings.SetProfileOwner
com.android.settings.Settings
com.android.settings.Settings
com.android.settings.Settings$AccessibilityDaltonizerSettingsActivity
com.android.settings.Settings$AccessibilitySettingsActivity
com.android.settings.Settings$AccountDashboardActivity
com.android.settings.Settings$AccountSyncSettingsActivity
com.android.settings.Settings$AdvancedAppsActivity
- 直接启动
service
也可以先使用android hooking list services查看可供开启的服务,然后使用android intent launch_service com.android.settings.bluetooth.BluetoothPairingService命令来开启服务。
2 Frida hook anywhere
很多新手在学习Frida的时候,遇到的第一个问题就是,无法找到正确的类及子类,无法定位到实现功能的准确的方法,无法正确的构造参数、继而进入正确的重载,这时候可以使用Frida进行动态调试,来确定以上具体的名称和写法,最后写出正确的hook代码。
2.1 objection(内存漫游)
- 列出内存中所有的类
# android hooking list classes

sun.util.logging.LoggingSupport
sun.util.logging.LoggingSupport$1
sun.util.logging.LoggingSupport$2
sun.util.logging.PlatformLogger
sun.util.logging.PlatformLogger$1
sun.util.logging.PlatformLogger$JavaLoggerProxy
sun.util.logging.PlatformLogger$Level
sun.util.logging.PlatformLogger$LoggerProxy
void

Found 11885 classes
- 内存中搜索所有的类
在内存中所有已加载的类中搜索包含特定关键词的类。
# android hooking search classes display
[Landroid.hardware.display.WifiDisplay;
[Landroid.icu.impl.ICUCurrencyDisplayInfoProvider$ICUCurrencyDisplayInfo$CurrencySink$EntrypointTable;
[Landroid.icu.impl.LocaleDisplayNamesImpl$CapitalizationContextUsage;
[Landroid.icu.impl.LocaleDisplayNamesImpl$DataTableType;
[Landroid.icu.number.NumberFormatter$DecimalSeparatorDisplay;
[Landroid.icu.number.NumberFormatter$SignDisplay;
[Landroid.icu.text.DisplayContext$Type;
[Landroid.icu.text.DisplayContext;
[Landroid.icu.text.LocaleDisplayNames$DialectHandling;
[Landroid.view.Display$Mode;
[Landroid.view.Display;
android.app.Vr2dDisplayProperties
android.hardware.display.AmbientBrightnessDayStats
android.hardware.display.AmbientBrightnessDayStats$1
android.hardware.display.BrightnessChangeEvent
com.android.settings.wfd.WifiDisplaySettings$SummaryProvider
com.android.settings.wfd.WifiDisplaySettings$SummaryProvider$1
com.android.settingslib.display.BrightnessUtils
com.android.settingslib.display.DisplayDensityUtils
com.google.android.gles_jni.EGLDisplayImpl
javax.microedition.khronos.egl.EGLDisplay

Found 144 classes
- 内存中搜索所有的方法
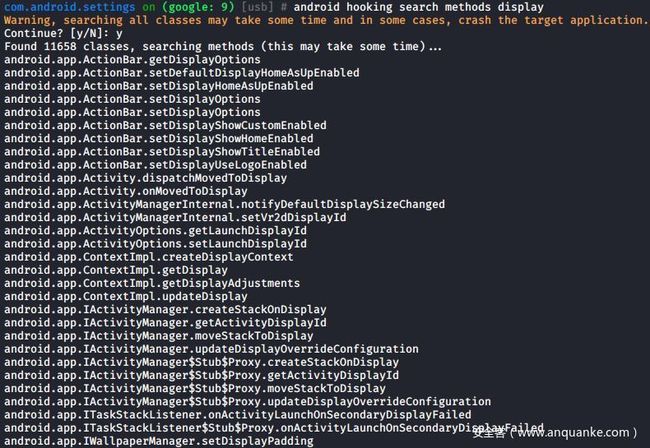
在内存中所有已加载的类的方法中搜索包含特定关键词的方法,上文中可以发现,内存中已加载的类就已经高达11885个了,那么他们的方法一定是类的个数的数倍,整个过程会相当庞大和耗时,见下图2-6。
# android hooking search methods display
图2-6 内存中搜索所有的方法
- 列出类的所有方法
当搜索到了比较关心的类之后,就可以直接查看它有哪些方法,比如我们想要查看com.android.settings.DisplaySettings类有哪些方法:
# android hooking list class_methods com.android.settings.DisplaySettings
private static java.util.List com.android.settings.DisplaySettings.buildPreferenceControllers(android.content.Context,com.android.settingslib.core.lifecycle.Lifecycle)
protected int com.android.settings.DisplaySettings.getPreferenceScreenResId()
protected java.lang.String com.android.settings.DisplaySettings.getLogTag()
protected java.util.List com.android.settings.DisplaySettings.createPreferenceControllers(android.content.Context)
public int com.android.settings.DisplaySettings.getHelpResource()
public int com.android.settings.DisplaySettings.getMetricsCategory()
static java.util.List com.android.settings.DisplaySettings.access$000(android.content.Context,com.android.settingslib.core.lifecycle.Lifecycle)

Found 7 method(s)
列出的方法与源码相比对之后,发现是一模一样的。
- 直接生成
hook代码
上文中在列出类的方法时,还直接把参数也提供了,也就是说我们可以直接动手写hook了,既然上述写hook的要素已经全部都有了,objection这个“自动化”工具,当然可以直接生成代码。
# android hooking generate  simple  com.android.settings.DisplaySettings

Java.perform(function() {
    var clazz = Java.use('com.android.settings.DisplaySettings');
    clazz.getHelpResource.implementation = function() {

        //

        return clazz.getHelpResource.apply(this, arguments);
    }
});


Java.perform(function() {
    var clazz = Java.use('com.android.settings.DisplaySettings');
    clazz.getLogTag.implementation = function() {

        //

        return clazz.getLogTag.apply(this, arguments);
    }
});


Java.perform(function() {
    var clazz = Java.use('com.android.settings.DisplaySettings');
    clazz.getPreferenceScreenResId.implementation = function() {

        //

        return clazz.getPreferenceScreenResId.apply(this, arguments);
    }
});
生成的代码大部分要素都有了,只是参数貌似没有填上,还是需要我们后续补充一些,看来还是无法做到完美。
2.2 objection(hook)
上述操作均是基于在内存中直接枚举搜索,已经可以获取到大量有用的静态信息,我们再来介绍几个方法,可以获取到执行时动态的信息,当然、同样地,不用写一行代码。
hook类的所有方法
我们以手机连接蓝牙耳机播放音乐为例为例,看看手机蓝牙接口的动态信息。首先我们将手机连接上我的蓝牙耳机——一加蓝牙耳机OnePlus Bullets Wireless 2,并可以正常播放音乐;然后我们按照上文的方法,搜索一下与蓝牙相关的类,搜到一个高度可疑的类:android.bluetooth.BluetoothDevice。运行以下命令,hook这个类:
# android hooking watch class android.bluetooth.BluetoothDevice
使用jobs list命令可以看到objection为我们创建的Hooks数为57,也就是将android.bluetooth.BluetoothDevice类下的所有方法都hook了。
这时候我们在设置→声音→媒体播放到上进行操作,在蓝牙耳机与“此设备”之间切换时,会命中这些hook之后,此时objection就会将方法打印出来,会将类似这样的信息“吐”出来:
com.android.settings on (google: 9) [usb] # (agent) [h0u5g7uclo] Called android.bluetooth.BluetoothDevice.getService()
(agent) [h0u5g7uclo] Called android.bluetooth.BluetoothDevice.isConnected()
(agent) [h0u5g7uclo] Called android.bluetooth.BluetoothDevice.getService()
(agent) [h0u5g7uclo] Called android.bluetooth.BluetoothDevice.getAliasName()
(agent) [h0u5g7uclo] Called android.bluetooth.BluetoothDevice.getAlias()
(agent) [h0u5g7uclo] Called android.bluetooth.BluetoothDevice.getName()
(agent) [h0u5g7uclo] Called android.bluetooth.BluetoothDevice.equals(java.lang.Object)
(agent) [h0u5g7uclo] Called android.bluetooth.BluetoothDevice.getService()
(agent) [h0u5g7uclo] Called android.bluetooth.BluetoothDevice.isConnected()
(agent) [h0u5g7uclo] Called android.bluetooth.BluetoothDevice.getService()
(agent) [h0u5g7uclo] Called android.bluetooth.BluetoothDevice.getAliasName()
(agent) [h0u5g7uclo] Called android.bluetooth.BluetoothDevice.getAlias()
(agent) [h0u5g7uclo] Called android.bluetooth.BluetoothDevice.getName()
(agent) [h0u5g7uclo] Called android.bluetooth.BluetoothDevice.equals(java.lang.Object)
(agent) [h0u5g7uclo] Called android.bluetooth.BluetoothDevice.equals(java.lang.Object)
(agent) [h0u5g7uclo] Called android.bluetooth.BluetoothDevice.getBatteryLevel()
(agent) [h0u5g7uclo] Called android.bluetooth.BluetoothDevice.equals(java.lang.Object)
(agent) [h0u5g7uclo] Called android.bluetooth.BluetoothDevice.getBatteryLevel()
(agent) [h0u5g7uclo] Called android.bluetooth.BluetoothDevice.equals(java.lang.Object)
(agent) [h0u5g7uclo] Called android.bluetooth.BluetoothDevice.getBondState()
(agent) [h0u5g7uclo] Called android.bluetooth.BluetoothDevice.getAliasName()
(agent) [h0u5g7uclo] Called android.bluetooth.BluetoothDevice.getAlias()
(agent) [h0u5g7uclo] Called android.bluetooth.BluetoothDevice.getName()
(agent) [h0u5g7uclo] Called android.bluetooth.BluetoothDevice.getBatteryLevel()
(agent) [h0u5g7uclo] Called android.bluetooth.BluetoothDevice.equals(java.lang.Object)
(agent) [h0u5g7uclo] Called android.bluetooth.BluetoothDevice.getBatteryLevel()
(agent) [h0u5g7uclo] Called android.bluetooth.BluetoothDevice.equals(java.lang.Object)
(agent) [h0u5g7uclo] Called android.bluetooth.BluetoothDevice.getBondState()
(agent) [h0u5g7uclo] Called android.bluetooth.BluetoothDevice.getAliasName()
(agent) [h0u5g7uclo] Called android.bluetooth.BluetoothDevice.getAlias()
(agent) [h0u5g7uclo] Called android.bluetooth.BluetoothDevice.getName()
(agent) [h0u5g7uclo] Called android.bluetooth.BluetoothDevice.getService()
可以看到我们的切换操作,调用到了android.bluetooth.BluetoothDevice类中的多个方法。
hook方法的参数、返回值和调用栈
在这些方法中,我们对哪些方法感兴趣,就可以查看哪些个方法的参数、返回值和调用栈,比如想看getName()方法,则运行以下命令:
# android hooking watch class_method android.bluetooth.BluetoothDevice.getName --dump-args --dump-return --dump-backtrace
注意最后加上的三个选项--dump-args --dump-return --dump-backtrace,为我们成功打印出来了我们想要看的信息,其实返回值Return Value就是getName()方法的返回值,我的蓝牙耳机的型号名字OnePlus Bullets Wireless 2;从调用栈可以反查如何一步一步调用到getName()这个方法的;虽然这个方法没有参数,大家可以再找个有参数的试一下。
hook方法的所有重载
objection的help中指出,在hook给出的单个方法的时候,会hook它的所有重载。
# help android hooking watch class_method
Command: android hooking watch class_method

Usage: android hooking watch class_method
       (optional: --dump-args) (optional: --dump-backtrace)
       (optional: --dump-return)

Hooks a specified class method and reports on invocations, together with
the number of arguments that method was called with. This command will
also hook all of the methods available overloads unless a specific
overload is specified.

If the --include-backtrace flag is provided, a full stack trace that
lead to the methods invocation will also be dumped. This would aid in
discovering who called the original method.

Examples:
   android hooking watch class_method com.example.test.login
   android hooking watch class_method com.example.test.helper.executeQuery
   android hooking watch class_method com.example.test.helper.executeQuery "java.lang.String,java.lang.String"
   android hooking watch class_method com.example.test.helper.executeQuery --dump-backtrace
   android hooking watch class_method com.example.test.login --dump-args --dump-return
那我们可以用File类的构造器来试一下效果。
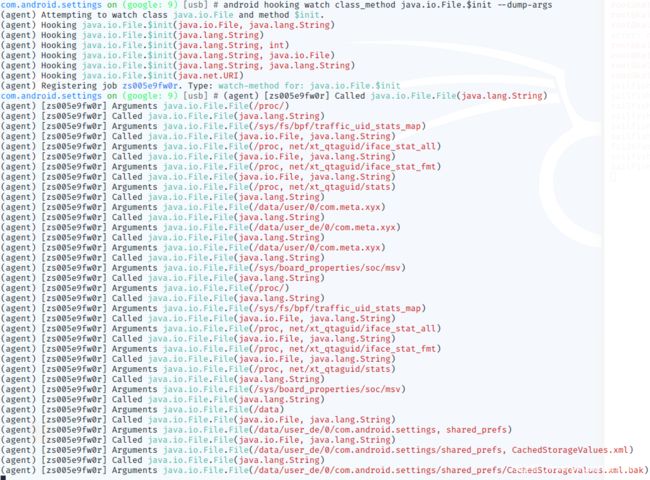
# android hooking watch class_method java.io.File.$init --dump-args
可以看到objection为我们hook了File构造器的所有重载,一共是6个。在设置界面随意进出几个子设置界面,可以看到命中很多次该方法的不同重载,每次参数的值也都不同,见下图2-9。
图2-9 方法重载的参数和值都不同
2.3 ZenTracer(hook)
前文中介绍的objection已经足够强大,优点是hook准确、粒度细。这里再推荐个好友自己写的批量hook查看调用轨迹的工具ZenTracer,可以更大范围地hook,帮助读者辅助分析。
# pyenv install 3.8.0
# git clone https://github.com/hluwa/ZenTracer
# cd ZenTracer
# pyenv local 3.8.0
# python -m pip install --upgrade pip
# pip install PyQt5
# pip install frida-tools
# python ZenTracer.py
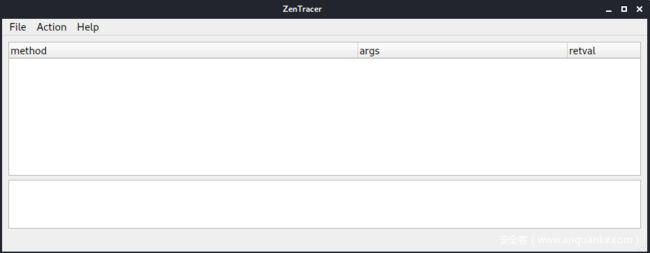
上述命令执行完毕之后,会出现一个PyQt画出来的界面,如图2-10所示。
图2-10 PyQt窗口
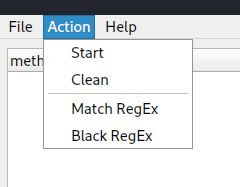
点击Action之后,会出现匹配模板(Match RegEx)和过滤模板(Black RegEx)。匹配就是包含的关键词,过滤就是不包含的关键词,见下图2-11。其代码实现就是
图2-11 匹配模板和过滤模板
通过如下的代码实现,hook出来的结果需要通过匹配模板进行匹配,并且筛选剔除掉过滤模板中的内容。
var matchRegEx = {MATCHREGEX};
var blackRegEx = {BLACKREGEX};
Java.enumerateLoadedClasses({
    onMatch: function (aClass) {
        for (var index in matchRegEx) {
            // console.log(matchRegEx[index]);
            // 通过匹配模板进行匹配
            if (match(matchRegEx[index], aClass)) {
                var is_black = false;
                for (var i in blackRegEx) {
                    //如果也包含在过滤模板中,则剔除
                    if (match(blackRegEx[i], aClass)) {
                        is_black = true;
                        log(aClass + "' black by '" + blackRegEx[i] + "'");
                        break;
                    }
                }
                if (is_black) {
                    break;
                }
                log(aClass + "' match by '" + matchRegEx[index] + "'");
                traceClass(aClass);
            }
        }

    },
    onComplete: function () {
        log("Complete.");
    }
});
通过下述代码实现的模糊匹配和精准匹配:
function match(ex, text) {
    if (ex[1] == ':') {
        var mode = ex[0];
        if (mode == 'E') {
            ex = ex.substr(2, ex.length - 2);
            return ex == text;
        } else if (mode == 'M') {
            ex = ex.substr(2, ex.length - 2);
        } else {
            log("Unknown match mode: " + mode + ", current support M(match) and E(equal)")
        }
    }
    return text.match(ex)
}
通过下述代码实现的导入导出调用栈及观察结果:
def export_onClick(self):
    jobfile = QFileDialog.getSaveFileName(self, 'export', '', 'json file(*.json)')
    if isinstance(jobfile, tuple):
        jobfile = jobfile[0]
    if not jobfile:
        return
    f = open(jobfile, 'w')
    export = {}
    export['match_regex'] = self.app.match_regex_list
    export['black_regex'] = self.app.black_regex_list
    tree = {}
    for tid in self.app.thread_map:
        tree[self.app.thread_map[tid]['list'][0].text()] = gen_tree(self.app.thread_map[tid]['list'][0])
    export['tree'] = tree
    f.write(json.dumps(export))
    f.close()

def import_onClick(self):
    jobfile = QFileDialog.getOpenFileName(self, 'import', '', 'json file(*.json)')
    if isinstance(jobfile, tuple):
        jobfile = jobfile[0]
    if not jobfile:
        return
    f = open(jobfile, 'r')
    export = json.loads(f.read())
    for regex in export['match_regex']: self.app.match_regex_list.append(
        regex), self.app.match_regex_dialog.setupList()
    for regex in export['black_regex']: self.app.black_regex_list.append(
        regex), self.app.black_regex_dialog.setupList()
    for t in export['tree']:
        tid = t[0: t.index(' - ')]
        tname = t[t.index(' - ') + 3:]
        for item in export['tree'][t]:
            put_tree(self.app, tid, tname, item)
我们来完整的演示一遍,比如现在看java.io.File类的所有方法,我们可以这样操作,首先是精准匹配:
- 点击打开“设置”应用;
- 选择
Action→Match RegEx - 输入
E:java.io.File,点击add,然后关闭窗口 - 点击
Action→Start
可以观察到java.io.File类的所有方法都被hook了,,并且像java.io.File.createTempFile方法的所有重载也被hook了,见下图2-12。
图2-12 ZenTracer正在进行类的方法hook
- 在“设置”应用上进行操作,打开几个子选项的界面之后,观察方法的参数和返回值;
图2-13 观察参数和返回值
- 导出
json来观察方法的调用树,选择File→Export json,导出为tmp.json,使用vscode来format Document之后,效果如下:
{
    "match_regex": [
        "E:java.io.File"
    ],
    "black_regex": [],
    "tree": {
        "2 - main": [
            {
                "clazz": "java.io.File",
                "method": "exists()",
                "args": [],
                "child": [],
                "retval": "false"
            },
            {
                "clazz": "java.io.File",
                "method": "toString()",
                "args": [],
                "child": [
                    {
                        "clazz": "java.io.File",
                        "method": "getPath()",
                        "args": [],
                        "child": [],
                        "retval": "/data/user/0/com.android.settings"
                    }
                ],
                "retval": "/data/user/0/com.android.settings"
            },
            {
                "clazz": "java.io.File",
                "method": "equals(java.lang.Object)",
                "args": [
                    "/data/user/0/com.android.settings"
                ],
                "child": [
                    {
                        "clazz": "java.io.File",
                        "method": "toString()",
                        "args": [],
                        "child": [
                            {
                                "clazz": "java.io.File",
                                "method": "getPath()",
                                "args": [],
                                "child": [],
                                "retval": "/data/user/0/com.android.settings"
                            }
                        ],
                        "retval": "/data/user/0/com.android.settings"
                    },
                    {
                        "clazz": "java.io.File",
                        "method": "compareTo(java.io.File)",
                        "args": [
                            "/data/user/0/com.android.settings"
                        ],
                        "child": [
                            {
                                "clazz": "java.io.File",
                                "method": "getPath()",
                                "args": [],
                                "child": [],
                                "retval": "/data/user_de/0/com.android.settings"
                            },
                            {
                                "clazz": "java.io.File",
                                "method": "getPath()",
                                "args": [],
                                "child": [],
                                "retval": "/data/user/0/com.android.settings"
                            }
                        ],
                        "retval": "48"
                    }
                ],
                "retval": "false"
            },
- 点击
Action→Stop,再点击Action→Clean,本次观察结束。 - 也可以使用模糊匹配模式,比如输入
M:java.io.File之后,会将诸如java.io.FileOutputStream类的诸多方法也都hook上,见下图2-14。
图2-14 模糊匹配模式
ZenTracer的目前已知的缺点,无法打印调用栈,无法hook构造函数,也就是$init。当然这些“缺点”无非也就是加几行代码的事情,整个工具非常不错,值得用于辅助分析。
3 Frida用于抓包
我们拿到一个app,做的第一件事情往往是先抓包来看,它发送和接收了哪些数据。收包发包是一个app的命门,企业为用户服务过程中最为关键的步骤——注册、流量商品、游戏数据、点赞评论、下单抢票等行为,均通过收包发包来完成。如果对收包发包的数据没有校验,黑灰产业可以直接制作相应的协议刷工具,脱离app本身进行实质性业务操作,为企业和用户带来巨大的损失。
3.1 推荐抓包环境
由上所述,抓包是每一位安全工程师必须掌握的技能。而抓包一般又分为以下两种情形:
- 应用层:
Http(s)协议抓包 - 会话层:
Socket端口通信抓包
在抓包工具的选择上,如果是抓应用层Http(s),推荐的专业工具是BurpSuite,如果只是想简单的抓包、用的舒服轻松,也可以使用花瓶(Charles)。推荐不要使用fiddle,因为它无法导入客户端证书(p12、Client SSL Certificates),对于服务器校验客户端证书的情况无法Bypass;如果是会话层抓包,则选择tcpdump和WireShark相组合的方式。
使用jnettop还可以实时查看流量走势和对方IP地址,更为直观和生动。
在手机上设置代理时,推荐使用VPN来将流量导出到抓包软件上,而不是通过给WIFI设置HTTP代理的方式。使用VPN可以同时抓到Http(s)和Socket的包,且不管其来自Java层还是so层。我们常用的代理软件是老牌的Postern,开VPN服务通过连接到开启Socks5服务端的抓包软件,将流量导出去。
当然有些应用会使用System.getProperty(“http.proxyHost”)、System.getProperty(“http.proxyPort”);这两个API来查看当前系统是否挂了VPN,这时候只能用Frida或Xposed来hook这个接口、修改其返回值,或者重打包来nop掉。当然还有一种最为终极、最为强悍的方法,那就是制作路由器,抓所有过网卡的包。
制作路由器的方法也很简单,给笔记本电脑装Kali Linux,eth0口插网线上网,wlan0口使用系统自带的热点功能,手机连上热点上网。史上最强,安卓应用是无法对抗的。
另外,曾经有人问我,像这样的一个场景如何抓包:
问:最近在分析手机搬家类软件的协议,不知道用什么去抓包,系统应用,不可卸载那种。搬家场景:两台手机打开搬家软件,一台会创建热点,另一台手机连接该热点后,通过搬家软件传输数据。求大佬指点抓包方法。
这个场景是有点和难度的,我们把开热点的手机假设为A,连接热点的手机假设为B。另外准备一台抓包电脑,连接上A开的热点。在B上安装VPN软件Postern,服务器设置为抓包电脑,这样B应该可以正常连接到A,B的所有流量也是从抓包电脑走的,可以抓到所有的包。
在抓包的对抗上体现的也是两个原则,一是理解的越成熟思路越多,二是对抗的战场越深上层越无法防御。
3.2 Http(s)多场景分析
从防护的强度来看,Https的强度是远远大于Http的;从大型分布式C/S架构的设计来看,如果服务器数量非常多、app版本众多,app在实现Https的策略上通常会采取客户端校验服务器证书的策略,如果服务器数量比较少,全国就那么几台、且app版本较少、对app版本管控较为严格,app在实现Https的策略时会加上服务器校验客户端证书的策略。
接下来我们具体分析每一种情况。
- Http
对于Http的抓包,只要在电脑的Charles上配置好Socks5服务器,手机上用Postern开启VPN连上电脑上的Charles的Socks5服务器,所有流量即可导出到Charles上。当然使用BurpSuite也是一样的道理。至于具体的操作步骤网上文档浩如烟海,读者可以自行取阅。
一般大型app、服务器数量非常多的,尤其还配置了多种CDN在全国范围、三网内进行内容分发和加速分发的,通常app里绝大多数内容都是走的Http。
当然他们会在最关键的业务上,比如用户登录时,配置Https协议,来保证最基本的安全。
- Https客户端校验服务器
这时候我们抓app的Http流量的时候一切正常,图片、视频、音乐都直接下载和转储。
但是作为用户要登录的时候,就会发现抓包失败,这时候开启Charles的SSL抓包功能,手机浏览器输入Charles的证书下载地址chls.pro/ssl,下载证书并安装到手机中。
注意在高版本的安卓上,用户安装的证书并不会安装到系统根证书目录中去,需要
root手机后将用户安装的证书移动到系统根证书目录中去,具体操作步骤网上非常多,这里不再赘述。
当Charles的证书安装到系统根目录中去之后,系统就会信任来自Charles的流量包了,我们的抓包过程就会回归正常。
当然,这里还是会有读者疑惑,为什么导入Charles的证书之后,app抓包就正常了呢?这里我们就需要理解一下应用层Https抓包的根本原理,见下图2-15(会话层Socket抓包并不是这个原理,后文会介绍Socket抓包的根本原理)。
图2-15 应用层Https抓包的根本原理
有了Charles置于中间之后,本来C/S架构的通信过程会“分裂”为两个独立的通信过程,app本来验证的是服务器的证书,服务器的证书手机的根证书是认可的,直接内置的;但是分裂成两个独立的通信过程之后,app验证的是Charles的证书,它的证书手机根证书并不认可,它并不是由手机内置的权威根证书签发机构签发的,所以手机不认,然后app也不认;所以我们要把Charles的证书导入到手机根证书目录中去,这样手机就会认可,如果app没有进行额外的校验(比如在代码中对该证书进行校验,也就是SSL pinning系列API,这种情况下一小节具体阐述)的话,app也会直接认可接受。
- Https服务器校验客户端
既然app客户端会校验服务器证书,那么服务器可不可能校验app客户端证书呢?答案是肯定的。
在许多业务非常聚焦并且当单一,比如行业应用、银行、公共交通、游戏等行业,C/S架构中服务器高度集中,对应用的版本控制非常严格,这时候就会在服务器上部署对app内置证书的校验代码。
上一小节中已经看到,单一通信已经分裂成两个互相独立的通信,这时候与服务器进行通信的已经不是app、而是Charles了,所以我们要将app中内置的证书导入到Charles中去。
这个操作通常需要完成两项内容:
- 找到证书文件
- 找到证书密码
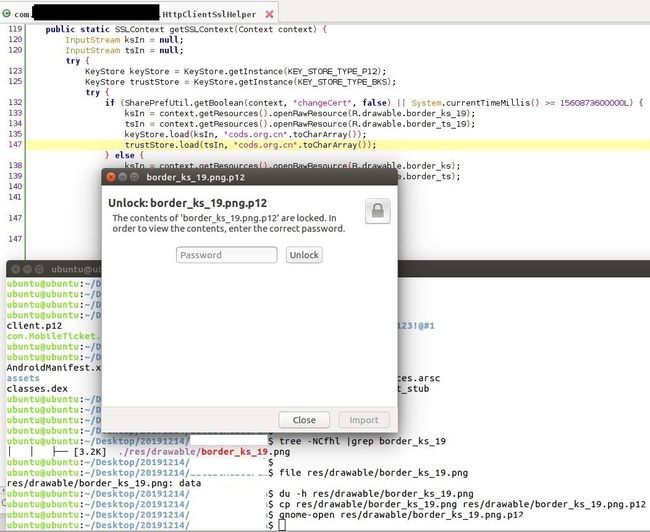
找到证书文件很简单,一般apk进行解包,直接过滤搜索后缀名为p12的文件即可,一般常用的命令为tree -NCfhl |grep -i p12,直接打印出p12文件的路径,当然也有一些app比较“狡猾”,比如我们通过搜索p12没有搜到证书,然后看jadx反编译的源码得出它将证书伪装成border_ks_19文件,我们找到这个文件用file命令查看果然不是后缀名所显示的png格式,将其改成p12的后缀名尝试打开时要求输入密码,可见其确实是一个证书,见下图2-17。
图2-17 伪装成png的证书文件
想要拿到密码也很简单,一般在jadx反编译的代码中或者so库拖进IDA后可以看到硬编码的明文;也可以使用下面这一段脚本,直接打印出来,终于到了Frida派上用场的时候。
function hook_KeyStore_load() {
    Java.perform(function () {
        var StringClass = Java.use("java.lang.String");
        var KeyStore = Java.use("java.security.KeyStore");
        KeyStore.load.overload('java.security.KeyStore$LoadStoreParameter').implementation = function (arg0) {
            printStack("KeyStore.load1");
            console.log("KeyStore.load1:", arg0);
            this.load(arg0);
        };
        KeyStore.load.overload('java.io.InputStream', '[C').implementation = function (arg0, arg1) {
            printStack("KeyStore.load2");
            console.log("KeyStore.load2:", arg0, arg1 ? StringClass.$new(arg1) : null);
            this.load(arg0, arg1);
        };

        console.log("hook_KeyStore_load...");
    });
}
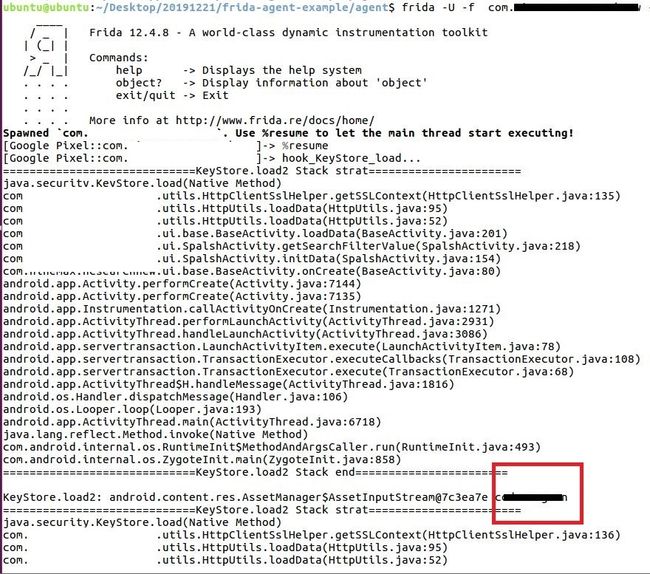
打印出来的效果如下图2-18,直接将密码打印了出来。
图2-18 直接打印出密码
当然其实也并不一定非要用
Frida,用Xposed也可以,只是Xposed很久不更新了,最近流行的大趋势是Frida。
有了证书和密码之后,就可以将其导入到抓包软件中,在Charles中是位于Proxy→SSL Proxy Settings→Client Certificates→Add添加新的证书,输入指定的域名或IP使用指定的证书即可,见下图2-19。
图2-19 Charles导入客户端证书的界面
3.3 SSL Pinning Bypass
上文中我们还有一种情况没有分析,就是客户端并不会默认信任系统根证书目录中的证书,而是在代码里再加一层校验,这就是证书绑定机制——SSL pinning,如果这段代码的校验过不了,那么客户端还是会报证书错误。
- Https客户端代码校验服务器证书
遇到这种情况的时候,我们一般有三种方式,当然目标是一样的,都是hook住这段校验的代码,使这段判断的机制失效即可。
hook住checkServerTrusted,将其所有重载都置空;
function hook_ssl() {
    Java.perform(function() {
        var ClassName = "com.android.org.conscrypt.Platform";
        var Platform = Java.use(ClassName);
        var targetMethod = "checkServerTrusted";
        var len = Platform[targetMethod].overloads.length;
        console.log(len);
        for(var i = 0; i < len; ++i) {
            Platform[targetMethod].overloads[i].implementation = function () {
                console.log("class:", ClassName, "target:", targetMethod, " i:", i, arguments);
                //printStack(ClassName + "." + targetMethod);
            }
        }
    });
}
- 使用
objection,直接将SSL pinning给disable掉
# android sslpinning disable
图2-20 使用objection的ssl pinning diable功能
- 如果还有一些情况没有覆盖的话,可以来看看大佬的代码
- 目录ObjectionUnpinningPlus增加了ObjectionUnpinning没覆盖到的锁定场景.(objection)
- 使用方法1 attach : frida -U com.example.mennomorsink.webviewtest2 —no-pause -l hooks.js
- 使用方法2 spawn : python application.py com.example.mennomorsink.webviewtest2
- 更为详细使用方法:参考我的文章 Frida.Android.Practice(ssl unpinning) 实战ssl pinning bypass 章节 .
- ObjectionUnpinningPlus hook list:
- SSLcontext(ART only)
- okhttp
- webview
- XUtils(ART only)
- httpclientandroidlib
- JSSE
- network_security_config (android 7.0+)
- Apache Http client (support partly)
- OpenSSLSocketImpl
- TrustKit
应该可以覆盖到目前已知的所有种类的证书绑定了。
3.4 Socket多场景分析
当我们在使用Charles进行抓包的时候,会发现针对某些IP的数据传输一直显示CONNECT,无法Complete,显示Sending request body,并且数据包大小持续增长,这时候说明我们遇到了Socket端口通信。
Socket端口通信运行在会话层,并不是应用层,Socket抓包的原理与应用层Http(s)有着显著的区别。准确的说,Http(s)抓包是真正的“中间人”抓包,而Socket抓包是在接口上进行转储;Http(s)抓包是明显的将一套C/S架构通信分裂成两套完整的通信过程,而Socket抓包是在接口上将发送与接收的内容存储下来,并不干扰其原本的通信过程。
对于安卓应用来说,Socket通信天生又分为两种Java层Socket通信和Native层Socket通信。
Java层:使用的是java.net.InetAddress、java.net.Socket、java.net.ServerSocket等类,与证书绑定的情形类似,也可能存在着自定义框架的Socket通信,这时候就需要具体情况具体分析,比如谷歌的protobuf框架等;Native层:一般使用的是C Socket API,一般hook住send()和recv()函数可以得到其发送和接受的内容
抓包方法分为三种,接口转储、驱动转储和路由转储:
- 接口转储:比如给
outputStream.write下hook,把内容存下来看看,可能是经过压缩、或加密后的包,毕竟是二进制,一切皆有可能; - 驱动转储:使用
tcpdump将经过网口驱动时的数据包转储下来,再使用Wireshark进行分析; - 路由转储:自己做个路由器,运行
jnettop,观察实时进过的流量和IP,可以使用WireShark实时抓包,也可以使用tcpdump抓包后用WireShark分析。
转自:https://www.anquanke.com/post/id/197657
---------------------------------------------------------------------------
给大家推荐一个渗透工具下载地址:
http://pan.ximcx.cn/home/%E6%B8%97%E9%80%8F%E6%B5%8B%E8%AF%95%E5%B7%A5%E5%85%B7
