上一篇博文介绍了如何使用Freemaker引擎搭建web项目,这一篇我们则看一下另外一个常见的页面渲染引擎Thymeleaf如何搭建一个web项目
推荐结合Freemaker博文一起查看,效果更佳 190816-SpringBoot系列教程web篇之Freemaker环境搭建
I. 准备
Thymeleaf 是现代化服务器端的Java模板引擎,不同与JSP和FreeMarker,Thymeleaf的语法更加接近HTML,关于它的使用说明,可以参考官方文档 https://www.thymeleaf.org/documentation.html
1. 依赖
首先我们是需要一个springboot项目,基本的pom结构大都相似
    org.springframework.boot
    spring-boot-starter-parent
    2.0.4.RELEASE


    UTF-8
    UTF-8
    Finchley.RELEASE
    1.8


                org.springframework.boot
                spring-boot-maven-plugin


        spring-milestones
        Spring Milestones
        https://repo.spring.io/milestone

            false
在这个项目中,我们主要需要引入两个依赖包,一个web,一个thymeleaf
        org.springframework.boot
        spring-boot-starter-web


        org.springframework.boot
        spring-boot-starter-thymeleaf
2. 配置参数
通常我们直接使用默认的thymeleaf参数配置即可,下面给出几个常用的配置
spring:
  thymeleaf:
    mode: HTML
    encoding: UTF-8
    servlet:
      content-type: text/html
    cache: false
thymeleaf的参数,主要对应的是org.springframework.boot.autoconfigure.thymeleaf.ThymeleafProperties
II. 项目搭建演示
1. 项目结构
搭建一个web项目和我们之前的纯后端项目有点不一样,前端资源放在什么地方,依赖文件怎么处理都是有讲究的,下面是一个常规的项目结构
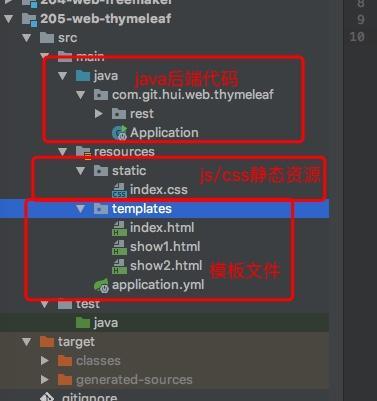
如上图,前端资源文件默认放在resources目录下,下面有两个目录
templates:存放模板文件,可以理解为我们编写的html,注意这个文件名不能有问题static: 存放静态资源文件,如js,css,image等
2. Rest服务
我们这里提供了三个接口,主要是为了演示三种不同的数据绑定方式(和Freemaker这篇博文基本一样)
@Controller
public class IndexController {

    @GetMapping(path = {"", "/", "/index"})
    public ModelAndView index() {
        Map data = new HashMap<>(2);
        data.put("name", "YiHui Thymeleaf");
        data.put("now", LocalDateTime.now().toString());
        return new ModelAndView("index", data);
    }

    /**
     * 一般不建议直接使用jdk的String.split来分割字符串,内部实现是根据正则来处理的,虽然更强大,但在简单的场景下,性能开销更大
     */
    private static String[] contents =
            ("绿蚁浮觞香泛泛,黄花共荐芳辰。\n清霜天宇净无尘。\n登高宜有赋,拈笔戏成文。\n可奈园林摇落尽,悲秋意与谁论。\n眼中相识几番新。\n龙山高会处,落帽定何人。").split("\n");
    private static Random random = new Random();

    @GetMapping(path = "show1")
    public String showOne(Model model) {
        model.addAttribute("title", "临江仙");
        model.addAttribute("content", contents[random.nextInt(6)]);
        return "show1";
    }

    @GetMapping(path = "show2")
    public String showTow(Map data) {
        data.put("name", "Show2---->");
        data.put("now", LocalDateTime.now().toString());
        return "show2";
    }
}
上面的三种case中
- 第一个是最好理解的,在创建
ModelAndView时,传入viewName和数据 - 第二个是通过接口参数Model,设置传递给view的数据
- 第三种则直接使用Map来传递数据
三个接口,对应的三个html文件,如下
index.html
YiHui's SpringBoot Demo
show1.html
    YiHui's SpringBoot Demo


    标题!
    内容
show2.html
    YiHui's SpringBoot Demo


    标题!
    内容
在上面的模板文件中,需要注意引用css样式文件,路径前面并没有static,我们对应的css文件
index.css
.title {
    color: #c00;
    font-weight: normal;
    font-size: 2em;
}

.content {
    color: darkblue;
    font-size: 1.2em;
}

.sign {
    color: lightgray;
    font-size: 0.8em;
    font-style: italic;
}
3. 演示
启动项目后,可以看到三个页面的切换,模板中的数据根据后端的返回替换,特别是主页的时间,每次刷新都会随之改变
II. 其他
0. 项目&系列文章
-
190822-SpringBoot系列教程web篇之Beetl环境搭建
-
190820-SpringBoot系列教程web篇之Thymeleaf环境搭建
-
190816-SpringBoot系列教程web篇之Freemaker环境搭建
-
工程:https://github.com/liuyueyi/spring-boot-demo
-
项目地址: https://github.com/liuyueyi/spring-boot-demo/blob/master/spring-boot/205-web-thymeleaf
1. 一灰灰Blog
尽信书则不如,以上内容,纯属一家之言,因个人能力有限,难免有疏漏和错误之处,如发现bug或者有更好的建议,欢迎批评指正,不吝感激
下面一灰灰的个人博客,记录所有学习和工作中的博文,欢迎大家前去逛逛
- 一灰灰Blog个人博客 https://blog.hhui.top
- 一灰灰Blog-Spring专题博客 http://spring.hhui.top